1. 下载离线安装包
在线安装 99% 会失败, 建议还是使用离线安装包
下载地址
https://github.com/vmware/harbor/releases
20180719 时最新版本的get地址为:
https://storage.googleapis.com/harbor-releases/harbor-offline-installer-v1.5.2-rc1.tgz
需要FQ 建议使用百度云盘下载
安装包较大

2. 安装docker 以及安装 docker-composet
docker 不再重复
docker-compose 直接下载 二进制文件 放到 /usr/bin (随便一个path路径包含的即可)
然后增加执行权限

chmod +x /usr/bin/docker-compose
验证执行命令无问题

修改 docker的配置文件
vim /etc/docker/daemon.json

{
"registry-mirrors": ["http://a7d80d83.m.daocloud.io"],
"insecure-registries":["CentOS75:8081", "127.0.0.1:8081","10.24.101.99:81","10.24.101.99:8081"]
}

增加:
"insecure-registries":["CentOS75:8081", "127.0.0.1:8081","10.24.101.99:81","10.24.101.99:8081"]
3. copy离线安装文件到 linux机器 并且解压缩包
cd 到harbor目录。 将下面最大的gz 包使用 gzip -d 的命令解压缩出来
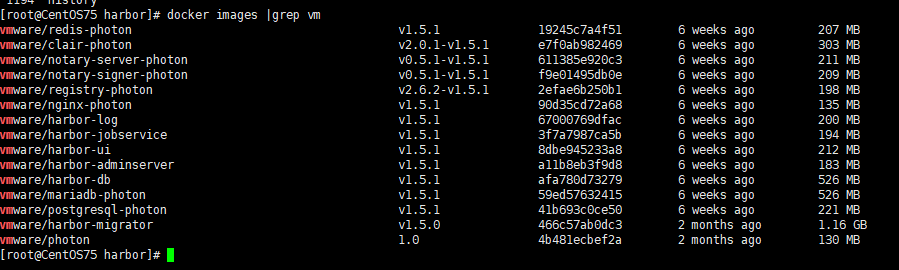
然后docker load -i 的方式将 vm harbor相关的镜像导入
导入的镜像主要有:
4. 还是在当前harbor目录 修改harbor的配置文件
vim harbor.cnf

修改点:
hostname=10.24.101.99:81

##如果修改了默认端口 这个地方需要同步也修改一下 避免 docker login 失败 我昨天就登录失败了很久.

## Configuration file of Harbor

#This attribute is for migrator to detect the version of the .cfg file, DO NOT MODIFY!
_version = 1.5.0
#The IP address or hostname to access admin UI and registry service.
#DO NOT use localhost or 127.0.0.1, because Harbor needs to be accessed by external clients.
hostname = 10.24.101.99:81

默认密码
##The initial password of Harbor admin, only works for the first time when Harbor starts.
#It has no effect after the first launch of Harbor.
#Change the admin password from UI after launching Harbor.
harbor_admin_password = Harbor12345

其他密码

#The address of the Harbor database. Only need to change when using external db.
db_host = mysql

#The password for the root user of Harbor DB. Change this before any production use.
db_password = root123

#The port of Harbor database host
db_port = 3306

#The user name of Harbor database
db_user = root

##### End of Harbor DB configuration#######

#The redis server address. Only needed in HA installation.
#address:port[,weight,password,db_index]
redis_url = redis:6379
5. 修改docker-compose.yml 文件 将端口号与 上一步的配置文件中的端口号一致起来

6. 还是在当前目录执行命令
./install.sh
我这边已经有了 nginx 和registry 命令的container 了 所以报错
需要需改 docker-compose文件 或者是 修改 容器的名字 简单点就是rename 容器的名字即可
docker rename registry registry2
docker rename nginx    nginx2
继续执行 会提示 正常 然后这是 重复安装时的界面

安装完成时的提示
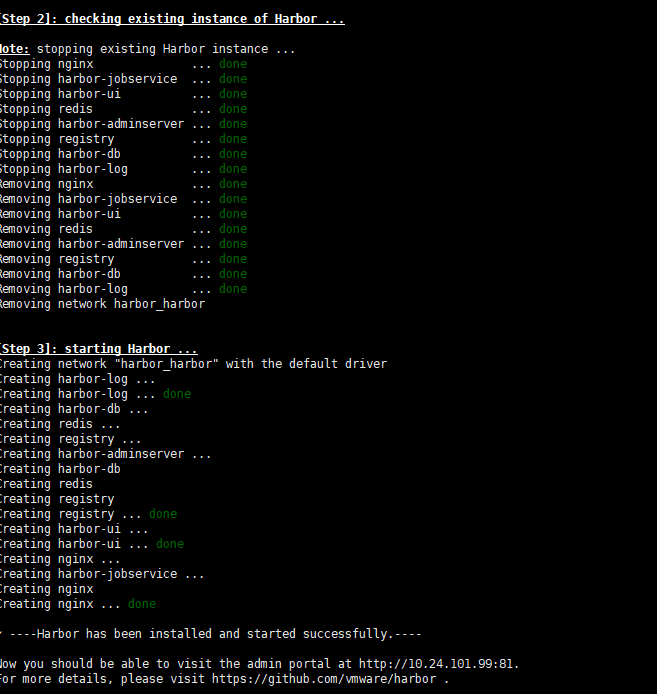
注意提示信息
? ----Harbor has been installed and started successfully.----

Now you should be able to visit the admin portal at http://10.24.101.99:81.
For more details, please visit https://github.com/vmware/harbor .
安装完成形成很多container
如图示 我这个版本有8个容器在运行

7. 进行docker login
docker login 10.24.101.99:81
用户密码 就是 上文中配置文件里面的
admin:Harbor12345

8. docker tag和docker push
简单命令
docker tag hello-world 10.24.101.99:81/library/hello-world:20180719

docker push 10.24.101.99:81/library/hello-world:20180719

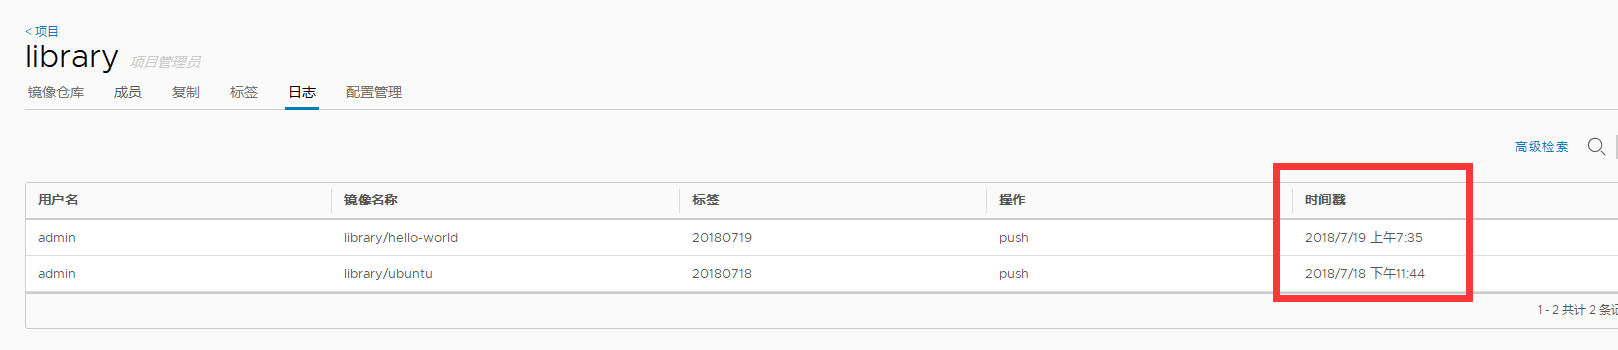
9. 网页端进行查看
登录地址与docker login的地址完全一致.

输入 admin和more密码登录
查看镜像标签日志等
10 https 还有 高可用等以后有时间在研究. 验证重复 install.sh 也不会降之前 push的镜像删除掉 非常好用 比直接用regsitry 还简单. mark一下 继续学习.