Sanic是一个支持 async/await 语法的异步无阻塞框架,Flask的升级版,效率更高,性能会提升不少,我将同一服务分别用Flask和Sanic编写,再将压测的结果进行对比,发现Sanic编写的服务大概是Falsk的1.5倍。
不过Sanic对环境的要求比较苛刻:linux /Mac + python3.5+
window不支持uvloop
先上一个简单案例:
#!/usr/bin/env python
from sanic import Sanic
from sanic.response import text

app = Sanic()


@app.route("/")
async def test(request):
    return text('Hello World!')


if __name__ == "__main__":
    app.run(host="0.0.0.0", port=8000)
来对比一下flask的code:
from flask import Flask
from flask.ext import restful

app = Flask(__name__)
api = restful.Api(app)

class HelloWorld(restful.Resource):
    def get(self):
        return {'hello': 'world'}

api.add_resource(HelloWorld, '/')

if __name__ == '__main__':
    app.run(debug=True)
从两者对比,可以看到相似性非常高,可以作为flask是完全没有问题的。
一、Snaic基本功能
这里笔者只解读了Snaic的三个方面:Request 、Routing、Response。
1.Routing路由
一个简单的例子:
@app.route('/post7/<param>', methods=['POST','GET'], host='example.com')‘/post7’代表接下来post时候,需要在url后面加上这个后缀:’http://127.0.0.1:8000/post7’
methods是指request的方式接受那些方式,常见的有post/ get(大写)
1.1 传入参数且参数格式规定
from sanic.response import text

@app.route('/tag/<tag>')
async def tag_handler(request, tag):
return text('Tag - {}'.format(tag))这边在URL中会写入一个参数,’http://127.0.0.1:8000/tag/tag01‘,async def tag_handler之中需要写入tag参数
然后该参数即可在函数中任意使用。
相似写法:
@app.route('/number/<integer_arg:int>')
async def integer_handler(request, integer_arg):
    return text('Integer - {}'.format(integer_arg))

@app.route('/number/<number_arg:number>')
async def number_handler(request, number_arg):
    return text('Number - {}'.format(number_arg))

@app.route('/person/<name:[A-z]+>')
async def person_handler(request, name):
    return text('Person - {}'.format(name))

@app.route('/folder/<folder_id:[A-z0-9]{0,4}>')
async def folder_handler(request, folder_id):
    return text('Folder - {}'.format(folder_id))
1.2 路由的第二种写法
之前看到的路由的写法都是以装饰器的形式出现:
@app.route()
async def function():
其实也可以不用装饰器,简单的写法:
from sanic.response import text

# Define the handler functions
async def person_handler2(request, name):
    return text('Person - {}'.format(name))

# Add each handler function as a route
app.add_route(person_handler2, '/person/<name:[A-z]>', methods=['GET'])
通过app.add_route的方式去加路由。
.
2.Request 请求
来看一个比较完整的例子。
# 加载
import aiohttp
import random
from sanic import Sanic
from sanic.exceptions import NotFound
from sanic.response import html, json, redirect
app = Sanic()

#定义
@app.route('/matt01')
async def index_json(request):
    # 用户定义一些传入参数
    content = request.args.get('titles')
    content _list = request.args.getlist('titles')
    # 获取数据
    return json({'titles':content ,'title_list':content _list,'args1':request.args['titles'],
                 "args2": request.args, "url": request.url, "query_string": request.query_string })
# 启动
if __name__ == "__main__":
    app.run(host="0.0.0.0", port=8000)
request.args.get—->得到{‘titles’: [‘yes! hello’,’no!’]}中的第一个’yes! hello’,
request.args.getlist—->得到list所有内容[‘yes! hello’, ‘no!’],
request.args[‘titles’],—->得到[‘yes! hello’,’no!’],
request.args—->得到{‘titles’: [‘yes! hello’, ‘no!’]},
request.url—->传入URL的所有内容,
request.query_string—->IP+端口+Routing之后的所有内容,
有两种获取结果的写法:
‘http://127.0.0.1:8000/matt01‘后面可以直接接dict,也可以用?后面接上。
get('http://127.0.0.1:8000/matt01',{'titles': ['yes! hello','no!']}).json()
    >>> {'args1': ['yes! hello', 'no!'],
    >>>  'args2': {'titles': ['yes! hello', 'no!']},
    >>>  'query_string': 'titles=yes%21+hello&titles=no%21',
    >>>  'title_list': ['yes! hello', 'no!'],
    >>>  'titles': 'yes! hello',
    >>>  'url': 'http://127.0.0.1:8000/matt01?titles=yes%21+hello&titles=no%21'}

get('http://127.0.0.1:8000/matt01?titles=value1&titles=value2').json()
    >>> {'args1': ['value1', 'value2'],
    >>>  'args2': {'titles': ['value1', 'value2']},
    >>>  'query_string': 'titles=value1&titles=value2',
    >>>  'title_list': ['value1', 'value2'],
    >>>  'titles': 'value1',
    >>>  'url': 'http://127.0.0.1:8000/matt01?titles=value1&titles=value2'}
.
3.Response
在Request 之中,较多的都是以json格式,也可以是很多其他的格式:text、HTML、file、Streaming等。
3.1 文本格式
from sanic import response


@app.route('/text')
def handle_request(request):
    return response.text('Hello world!')
3.2 HTML
from sanic import response


@app.route('/html')
def handle_request(request):
    return response.html('<p>Hello world!</p>')
3.3 JSON
from sanic import response


@app.route('/json')
def handle_request(request):
    return response.json({'message': 'Hello world!'})
3.4 File
from sanic import response


@app.route('/file')
async def handle_request(request):
    return await response.file('/srv/www/whatever.png')
案例一:回传图片案例
回传图片用的是response.file
# 实验8:传回一张图

from sanic import response
@app.route('/file8')
async def handle_request(request):
    return await response.file('/mnt/flask/out3.jpg')
# 实验8 返回图片
get('http://127.0.0.1:8000/file8')
>>> <Response [200]>返回的是bytes格式的图片。
.
二、Snaic其他信息
1.app.run参数
来源于:Sanic框架
try:
    serve(
        host=host,
        port=port,
        debug=debug,
        # 服务开始后启动的函数
        after_start=after_start,
        # 在服务关闭前启动的函数
        before_stop=before_stop,
        # Sanic(__name__).handle_request()
        request_handler=self.handle_request,
        # 默认读取Config
        request_timeout=self.config.REQUEST_TIMEOUT,
        request_max_size=self.config.REQUEST_MAX_SIZE,
    )
except:
pass- host(默认“127.0.0.1”): 服务器主机的地址。
- port(默认8000): 服务器的端口。
- debug(默认False): 启用调试(减慢服务器速度)。
- ssl(默认None): 用于工作者SSL加密的SSLContext。
- sock(默认None):服务器接受连接的Socket。
- worker(默认值1):生成的工作进程数。
- loop(默认None): asyncio兼容的事件循环。如果没有指定,Sanic会创建自己的事件循环。
- protocol(默认HttpProtocol):asyncio.protocol的子类。
默认情况下,Sanic在主进程中只侦听一个CPU内核。要启动其它核心,只需指定run参数中进程的数量。
app.run(host='0.0.0.0', port=1337, workers=4)Sanic将自动启动多个进程并在它们之间建立路由路径。建议进程数和CPU核心数一样。
命令行格式运行:
如果你将Sanic应用程序在名为server.py的文件中初始化,那么可以像这样运行服务:
python -m sanic server.app --host=0.0.0.0 --port=1337 --workers=42.报错信息的返回
from sanic.response import text
from sanic.exceptions import NotFound

@app.exception(NotFound)
def ignore_404s(request, exception):
    return text("Yep, I totally found the page: {}".format(request.url))
如果出现错误就会显示出以下的内容:
b'Yep, I totally found the page: http://127.0.0.1:8000/users/matt'3.蓝本 Blueprint
把一些小功能包装在一个小集合Blueprint里面。参考
from sanic import Blueprint
from sanic.response import html, json, redirect

app = Sanic()
blueprint = Blueprint('name', url_prefix='/my_blueprint')
blueprint2 = Blueprint('name2', url_prefix='/my_blueprint2')


@blueprint.route('/foo')
async def foo(request):
    return json({'msg': 'hi from blueprint'})


@blueprint2.route('/foo')
async def foo2(request):
    return json({'msg': 'hi from blueprint2'})


app.register_blueprint(blueprint)
app.register_blueprint(blueprint2)

app.run(host="0.0.0.0", port=8000, debug=True)
Blueprint(‘name’, url_prefix=’/my_blueprint’)中为,该小蓝本的名字为‘name’,前缀为:’/my_blueprint’;
定义蓝本之后,就要定义蓝本内容,@blueprint.route('/foo')还有@blueprint2.route('/foo'),即为相关内容;
app.register_blueprint(blueprint)和app.register_blueprint(blueprint2)把蓝本合并到app这个大服务中,然后一起打包给出。
因为每个蓝本有不同的前缀,所以需要在URL之后加入自己的前缀内容以示区分:
get('http://0.0.0.0:8000/my_blueprint2/foo').content
>>> b'{"msg":"hi from blueprint2"}'
get('http://0.0.0.0:8000/my_blueprint/foo').content
>>> b'{"msg":"hi from blueprint"}'
延伸一:路由为post,如何写请求?
对于小白来说,post的方式太难懂了。
@app.route('/post12', methods=['POST'])
async def get_handler(request):
    return json('POST request - {}'.format(request.body))

# 启动
if __name__ == "__main__":
app.run(host="0.0.0.0", port=8000)这边用request.get 或者request.args好像在post都不太好用,只能在get请求上可以使用。这边只有request.body比较使用。
那么Post以及Post之后的结果可见:
post('http://127.0.0.1:8000/post12',{'titles': ['value1', 'value2']}).json()
>>> "POST request - b'titles=value1&titles=value2'"
post('http://127.0.0.1:8000/post12','value1').json()
>>> "POST request - b'value1'"
# 实践不出来的几种方式
post('http://127.0.0.1:8000/post12?titles=value1&titles=value2').json()
>>> 'POST request - None'
延伸二:设置sanic 的HTTPS服务
网上教程很多,利用 stunnel 建立一个 SSL 加密通道绑定到 Django/Flask 内建服务器,好像不好用。
HTTPS相当于需要设置SSL证书,sanic官方文档写的是:
ssl = {'cert': "/path/to/cert", 'key': "/path/to/keyfile"}
app.run(host="0.0.0.0", port=8443, ssl=ssl)
那么这里可以使用openssl,就需要设置一步:
openssl req -x509 -newkey rsa:4096 -nodes -out cert.pem -keyout key.pem -days 365然后依次输入:
> openssl req -new -out ca/ca-req.csr -key ca/ca-key.pem

Country Name (2 letter code) [AU]:cn
State or Province Name (full name) [Some-State]:guangdong
Locality Name (eg, city) []:guangzhou
Organization Name (eg, company) [Internet Widgits Pty Ltd]:test
Organizational Unit Name (eg, section) []:test
Common Name (eg, YOUR name) []:root
Email Address []:test
一些个人信息都可以随意填时该目就会生成: key.pem,key.pem
ssl = {'cert': "./cert.pem", 'key': "./key.pem"}
app.run(host="0.0.0.0", port=xxxx,ssl = ssl)
延伸三:压力测试
测试环节有两个部分:单元测试与压力测试。单元测试这边其实可简单可复杂,sanic有自己的测试环节,插件:pytest,这边提一下压力测试。使用的是:locust,压力测试最好在内外网都进行测试下,当然服务器配置是你定。(主要参考:9. 测试与部署)
from requests import post,get
from locust import TaskSet, task
from locust import HttpLocust
import sys
# 端口调用环节
def action_rss(client):
    data = '心心念念的要来吃花和,好不容易找到个周日的中午有时间,气温刚好不热,组个小团来吃顿棒棒的海鲜,味道超级好。'.encode("utf-8")       # matt
    route = '/seg'         # matt
    headers = {'content-type': 'application/json'}
    return client.post(route, data =data,headers=headers).json()

# 压力测试
class RssBehavior(TaskSet):
    @task(1)
    def interface_rss(self):
        action_rss(self.client)

# locust
class Rss(HttpLocust):
    host = 'http://0.0.0.0:7777'     # matt
    task_set = RssBehavior
    min_wait = 20
max_wait = 3000执行的时候,在终端输入:locust -f locustfile.py --no-web -c 1,这个结果直接在终端显示,也可以使用:locust -f locustfile.py,可以通过访问IP:http://0.0.0.0:8089/,在web端口看到压力测试的结果。
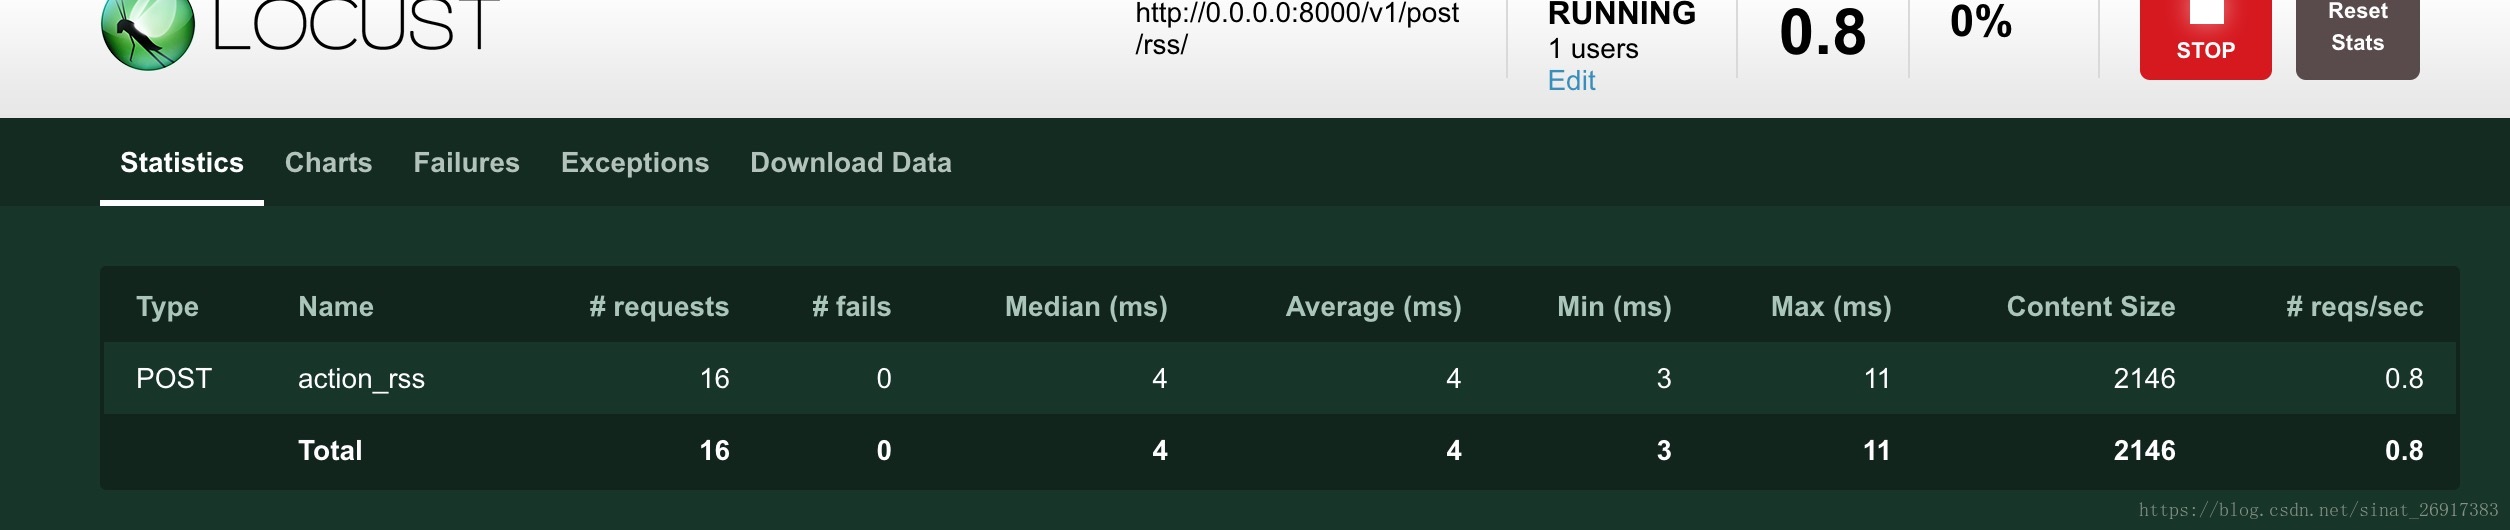
再来说一下,里面的逻辑,
class Rss(HttpLocust):为主函数
min_wait/max_wait为最小、最大重复测试次数,host为主要请求的端口,此时不能加路由route classRssBehavior(TaskSet)执行函数
笔者之前没有接触这样的模块,这段代码这段很诡异的是,一开始笔者很难理解,self.client在哪定义了??
不过,原来在这段函数中,只要执行了Rss,那么隐藏了这么一条信息:self.client =
'http://0.0.0.0:7777'action_rss(client)比较奇怪的就是:client.pos环节,那么这边隐藏的条件为:还有路由'/seg'和数据data其实都可以及时变更。
client.post(route, data =data,headers=headers).json() = 'http://0.0.0.0:7777'.post('/seg',data = data).
参考:
Running Your Flask Application Over HTTPS
【Flask】在Flask中使用HTTPS
【网络安全】在局域网里创建个人CA证书
python Flask 使用https 安全协议
.
参考:
1、Sanic教程:快速开始其howie6879/Sanic-For-Pythoneer
2、官网地址
3、howie6879/Sanic-For-Pythoneer技术文档地址
4、Sanic框架