(一)Hbase Shell
1、hbase提供了一个shell的终端给用户交互
#$HBASE_HOME/bin/hbase shell

2、如果退出执行quit命令
>quit
3、查看数据库状态(status)

– 表示有3台机器活着,0台机器down掉,当前负载0.67(数字越大,负载越大)
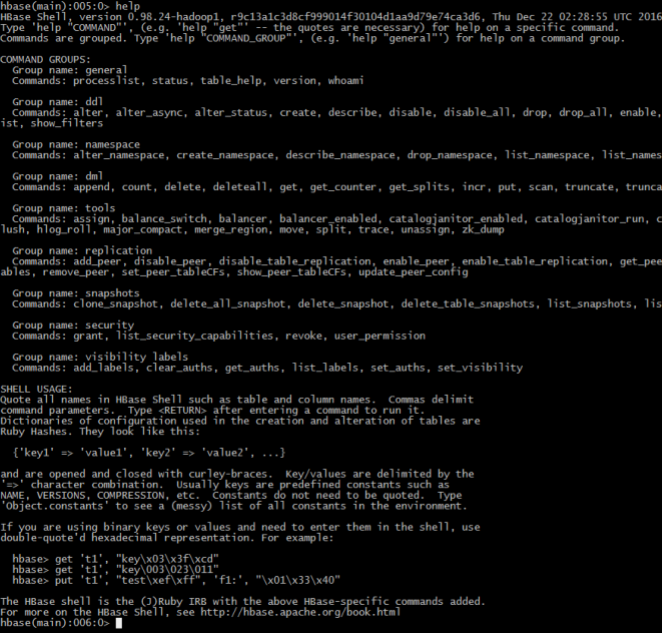
4、执行help查询帮助
– General:普通命令组– Ddl:数据定义语言命令组
– Dml:数据操作语言命令组
– Tools:工具组
– Replication:复制命令组
– SHELL USAGE:shell语法
5、 命令create / list / describe
– hbase(main):006:0> create 'music_table','meta_data','action'– 表名:music_table
– 列簇1:meta_data
– 列簇2: 'action

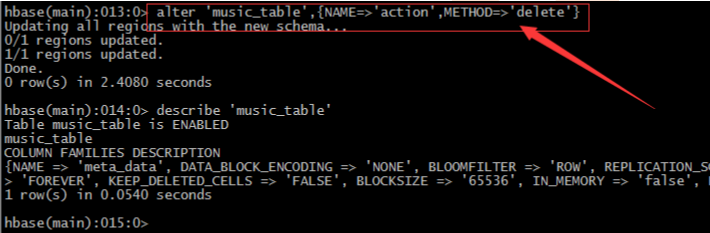
6、命令alter / disable / enable
– 凡是要修改表的结构hbase规定,必须先禁用表->修改表->启用表 直接修改会报错– 删除表中的列簇:alter 'music_table',{NAME=>'action',METHOD=>'delete'}
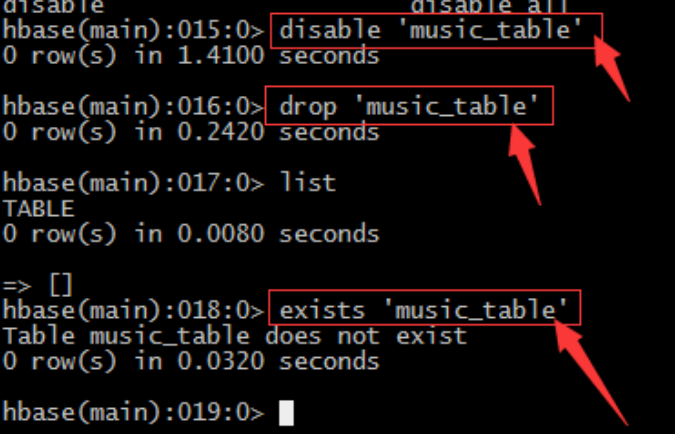
7、命令drop / exists
– 同样对表进行任何的操作都需要先禁用表->修改->启用表,删除同样– 禁用表: disable 'music_table‘
– 删除表:drop 'music_table‘
– 利用list或exists命令判断表是否存在
8、命令is_enabled
– 判断表是否enable或者disable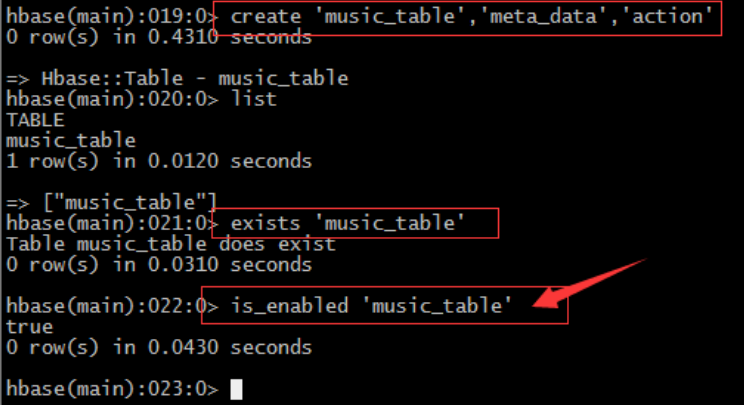
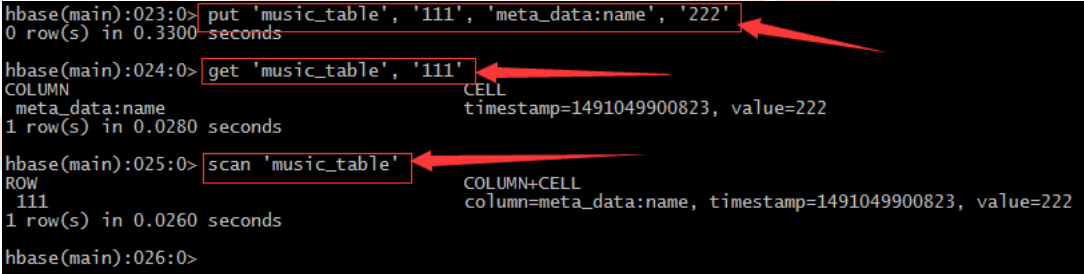
9、 插入命令put
– 对于hbase来说insert update其实没有什么区别,都是插入原理– 在hbase中没有数据类型概念,都是“字符类型”,至于含义在程序中体现
– 每插入一条记录都会自动建立一个时间戳,由系统自动生成。也可手动“强行指定”

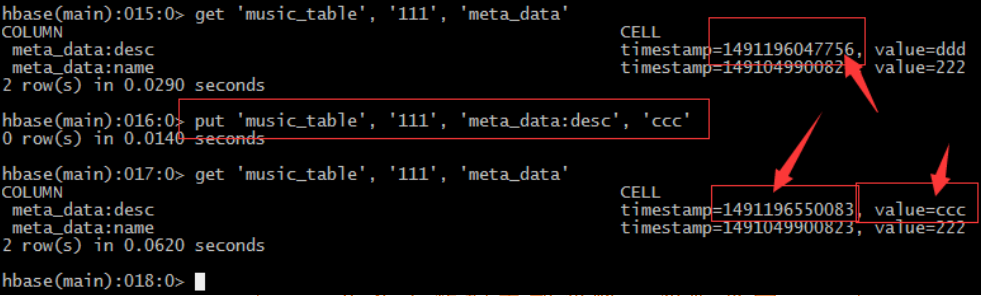
• 指定版本
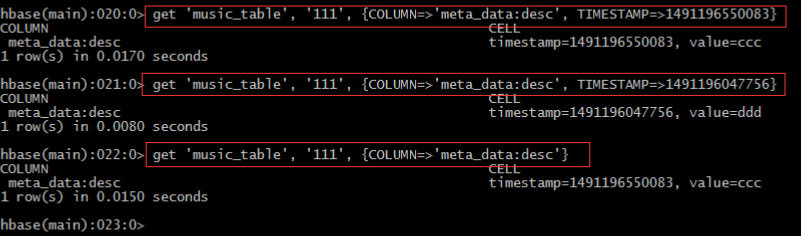
• 修改版本存储个数:
– alter 'music_table',{NAME=>'meta_data', VERSIONS=>3}

• 查看有多少条记录count
– count 'music_table'

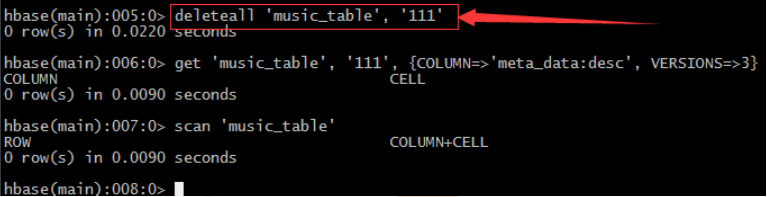
• 删除delete
– 删除指定列簇
– 删除整行

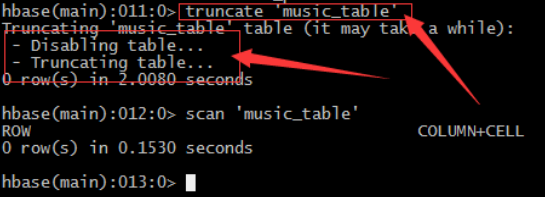
• 截断表truncate
– 注意:truncate表的处理过程:由于Hadoop的HDFS文件系统不允许直接修改,所以只能先删除表在重新创建已达到清空表的目的
• Split
– 手动
• split 'music_table', 'bc31bc83af45aab95d5d8a62962b23f5'
– 建表时预设
• create 'test_table', 'f1', SPLITS=> ['a', 'b', 'c']
• Compact
– merge_region '759a217c34ad5203801866dab4b6b209','939affd918502d5e46792367a0a4a59a', true
– major_compact 'music_table'
名称 |
命令表达式 |
创建表 |
create '表名', '列族名1','列族名2','列族名N' |
查看所有表 |
list |
描述表 |
describe ‘表名’ |
判断表存在 |
exists '表名' |
判断是否禁用启用表 |
is_enabled '表名' is_disabled ‘表名’ |
添加记录 |
put ‘表名’, ‘rowKey’, ‘列族 : 列‘ , '值' |
查看记录rowkey下的所有数据 |
get '表名' , 'rowKey' |
查看表中的记录总数 |
count '表名' |
获取某个列族 |
get '表名','rowkey','列族' |
获取某个列族的某个列 |
get '表名','rowkey','列族:列’ |
删除记录 |
delete ‘表名’ ,‘行名’ , ‘列族:列' |
删除整行 |
deleteall '表名','rowkey' |
删除一张表 |
先要屏蔽该表,才能对该表进行删除 第一步 disable ‘表名’ ,第二步 drop '表名' |
清空表 |
truncate '表名' |
查看所有记录 |
scan "表名" |
查看某个表某个列中所有数据 |
scan "表名" , {COLUMNS=>'列族名:列名'} |
更新记录 |
就是重写一遍,进行覆盖,hbase没有修改,都是追加 |
依赖zookeeper
1、 保存Hmaster的地址和backup-master地址hmaster:
a) 管理HregionServer
b) 做增删改查表的节点
c) 管理HregionServer中的表分配
2、 保存表-ROOT-的地址
hbase默认的根表,检索表。
3、 HRegionServer列表
表的增删改查数据。
和hdfs交互,存取数据。
(二)Hbase的Python操
• 安装Thrift:
– ]# wget http://archive.apache.org/dist/thrift/0.8.0/thrift-0.8.0.tar.gz
– ]# tar xzf thrift-0.8.0.tar.gz
– ]# yum install automake libtool flex bison pkgconfig gcc-c++ boost-devel libevent-devel zlib-devel python-devel ruby-devel openssl-devel
– ]# yum install boost-devel.x86_64
– ]# yum install libevent-devel.x86_64
– [root@master thrift-0.8.0]# pwd
– /home/badou/hbase_test/thrift-0.8.0
– ]# ./configure --with-cpp=no --with-ruby=no
– ]# make
– ]# make install– 下载hbase源码:
– ]# wget http://mirrors.hust.edu.cn/apache/hbase/0.98.24/hbase-0.98.24-src.tar.gz
– [root@master hbase-0.98.24]# find . -name Hbase.thrift
– ./hbase-thrift/src/main/resources/org/apache/hadoop/hbase/thrift/Hbase.thrift
– [root@master hbase-0.98.24]# cd ./hbase-
thrift/src/main/resources/org/apache/hadoop/hbase/thrift
– ]# thrift -gen py Hbase.thrift
– ]# cp -raf gen-py/hbase/ /home/badou/hbase_test– ]# hbase-daemon.sh start thrift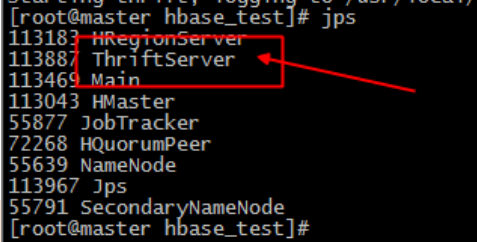
• 实例1:创建表
• 实例2:插入数据
• 实例3:读取指定row key记录
• 实例4:读取多条记录
• Hive读取HBase表,通过MR,最终使用HiveHBaseTableInputFormat来读取数 据,在getSplit()方法中对 HBase表进行切分,切分原则是根据该表对应的 HRegion,将每一个Region作为一个InputSplit,即,该表有多少个Region,就 有多少个Map Task;
• 每个Region的大小由参数hbase.hregion.max.filesize控制,默认10G,这样会 使得每个map task处理的数据文件太大,map task性能自然很差;
• 为HBase表预分配Region,使得每个Region的大小在合理的范围;

• 创建Hbase表:
– create 'classes','user'
• 加入数据:
– put 'classes','001','user:name','jack'
– put 'classes','001','user:age','20'
– put 'classes','002','user:name','liza'
– put 'classes','002','user:age','18'
• 创建Hive表并验证:
– create external table classes(id int, name string, age int)
– STORED BY 'org.apache.hadoop.hive.hbase.HBaseStorageHandler'
– WITH SERDEPROPERTIES ("hbase.columns.mapping" = ":key,user:name,user:age")
– TBLPROPERTIES("hbase.table.name" = "classes");
• 再添加数据到Hbase:
– put 'classes','003','user:age','1820183291839132'
(三)MapReduce操作Hbase
1、实现方法
Hbase对MapReduce提供支持,它实现了TableMapper类和TableReducer类,我们只需要继承这两个类即可。1、写个mapper继承TableMapper<Text,IntWritable>
参数:Text:mapper的输出key类型;IntWritable:mapper的输出value类型。
其中的map方法如下:
map(ImmutableBytesWritablekey, Result value,Context context)
参数:key:rowKey;value: Result ,一行数据; context上下文
2、写个reduce继承TableReducer<Text,IntWritable, ImmutableBytesWritable>
参数:Text:reducer的输入key; IntWritable:reduce的输入value;
ImmutableBytesWritable:reduce输出到hbase中的rowKey类型。
其中的reduce方法如下:
reduce(Textkey, Iterable<IntWritable> values,Context context)
参数: key:reduce的输入key;values:reduce的输入value;
2、准备表
1、建立数据来源表‘word’,包含一个列族‘content’向表中添加数据,在列族中放入列‘info’,并将短文数据放入该列中,如此插入多行,行键为不同的数据即可
2、建立输出表‘stat’,包含一个列族‘content’
3、通过Mr操作Hbase的‘word’表,对‘content:info’中的短文做词频统计,并将统计结果写入‘stat’表的‘content:info中’,行键为单词
3、实现
package com.itcast.hbase;

import java.io.IOException;
import java.util.ArrayList;
import java.util.List;

import org.apache.hadoop.conf.Configuration;
import org.apache.hadoop.hbase.HBaseConfiguration;
import org.apache.hadoop.hbase.HColumnDescriptor;
import org.apache.hadoop.hbase.HTableDescriptor;
import org.apache.hadoop.hbase.client.HBaseAdmin;
import org.apache.hadoop.hbase.client.HTable;
import org.apache.hadoop.hbase.client.Put;
import org.apache.hadoop.hbase.client.Result;
import org.apache.hadoop.hbase.client.Scan;
import org.apache.hadoop.hbase.io.ImmutableBytesWritable;
import org.apache.hadoop.hbase.mapreduce.TableMapReduceUtil;
import org.apache.hadoop.hbase.mapreduce.TableMapper;
import org.apache.hadoop.hbase.mapreduce.TableReducer;
import org.apache.hadoop.hbase.util.Bytes;
import org.apache.hadoop.io.IntWritable;
import org.apache.hadoop.io.Text;
import org.apache.hadoop.mapreduce.Job;
/**
 * mapreduce操作hbase
 * @author wilson
 *
 */
public class HBaseMr {
	/**
	 * 创建hbase配置
	 */
	static Configuration config = null;
	static {
		config = HBaseConfiguration.create();
		config.set("hbase.zookeeper.quorum", "slave1,slave2,slave3");
		config.set("hbase.zookeeper.property.clientPort", "2181");
	}
	/**
	 * 表信息
	 */
	public static final String tableName = "word";//表名1
	public static final String colf = "content";//列族
	public static final String col = "info";//列
	public static final String tableName2 = "stat";//表名2
	/**
	 * 初始化表结构,及其数据
	 */
	public static void initTB() {
		HTable table=null;
		HBaseAdmin admin=null;
		try {
			admin = new HBaseAdmin(config);//创建表管理
			/*删除表*/
			if (admin.tableExists(tableName)||admin.tableExists(tableName2)) {
				System.out.println("table is already exists!");
				admin.disableTable(tableName);
				admin.deleteTable(tableName);
				admin.disableTable(tableName2);
				admin.deleteTable(tableName2);
			}
			/*创建表*/
				HTableDescriptor desc = new HTableDescriptor(tableName);
				HColumnDescriptor family = new HColumnDescriptor(colf);
				desc.addFamily(family);
				admin.createTable(desc);
				HTableDescriptor desc2 = new HTableDescriptor(tableName2);
				HColumnDescriptor family2 = new HColumnDescriptor(colf);
				desc2.addFamily(family2);
				admin.createTable(desc2);
			/*插入数据*/
				table = new HTable(config,tableName);
				table.setAutoFlush(false);
				table.setWriteBufferSize(5);
				List<Put> lp = new ArrayList<Put>();
				Put p1 = new Put(Bytes.toBytes("1"));
				p1.add(colf.getBytes(), col.getBytes(),	("The Apache Hadoop software library is a framework").getBytes());
				lp.add(p1);
				Put p2 = new Put(Bytes.toBytes("2"));p2.add(colf.getBytes(),col.getBytes(),("The common utilities that support the other Hadoop modules").getBytes());
				lp.add(p2);
				Put p3 = new Put(Bytes.toBytes("3"));
				p3.add(colf.getBytes(), col.getBytes(),("Hadoop by reading the documentation").getBytes());
				lp.add(p3);
				Put p4 = new Put(Bytes.toBytes("4"));
				p4.add(colf.getBytes(), col.getBytes(),("Hadoop from the release page").getBytes());
				lp.add(p4);
				Put p5 = new Put(Bytes.toBytes("5"));
				p5.add(colf.getBytes(), col.getBytes(),("Hadoop on the mailing list").getBytes());
				lp.add(p5);
				table.put(lp);
				table.flushCommits();
				lp.clear();
		} catch (Exception e) {
			e.printStackTrace();
		} finally {
			try {
				if(table!=null){
					table.close();
				}
			} catch (IOException e) {
				e.printStackTrace();
			}
		}
	}
	/**
	 * MyMapper 继承 TableMapper
	 * TableMapper<Text,IntWritable>
	 * Text:输出的key类型,
	 * IntWritable:输出的value类型
	 */
	public static class MyMapper extends TableMapper<Text, IntWritable> {
		private static IntWritable one = new IntWritable(1);
		private static Text word = new Text();
		@Override
		//输入的类型为:key:rowKey; value:一行数据的结果集Result
		protected void map(ImmutableBytesWritable key, Result value,
				Context context) throws IOException, InterruptedException {
			//获取一行数据中的colf:col
			String words = Bytes.toString(value.getValue(Bytes.toBytes(colf), Bytes.toBytes(col)));// 表里面只有一个列族,所以我就直接获取每一行的值
			//按空格分割
			String itr[] = words.toString().split(" ");
			//循环输出word和1
			for (int i = 0; i < itr.length; i++) {
				word.set(itr[i]);
				context.write(word, one);
			}
		}
	}
	/**
	 * MyReducer 继承 TableReducer
	 * TableReducer<Text,IntWritable>
	 * Text:输入的key类型,
	 * IntWritable:输入的value类型,
	 * ImmutableBytesWritable:输出类型,表示rowkey的类型
	 */
	public static class MyReducer extends
			TableReducer<Text, IntWritable, ImmutableBytesWritable> {
		@Override
		protected void reduce(Text key, Iterable<IntWritable> values,
				Context context) throws IOException, InterruptedException {
			//对mapper的数据求和
			int sum = 0;
			for (IntWritable val : values) {//叠加
				sum += val.get();
			}
			// 创建put,设置rowkey为单词
			Put put = new Put(Bytes.toBytes(key.toString()));
			// 封装数据
			put.add(Bytes.toBytes(colf), Bytes.toBytes(col),Bytes.toBytes(String.valueOf(sum)));
			//写到hbase,需要指定rowkey、put
			context.write(new ImmutableBytesWritable(Bytes.toBytes(key.toString())),put);
		}
	}

	public static void main(String[] args) throws IOException,
			ClassNotFoundException, InterruptedException {
		config.set("df.default.name", "hdfs://master:9000/");//设置hdfs的默认路径
		config.set("hadoop.job.ugi", "hadoop,hadoop");//用户名,组
		config.set("mapred.job.tracker", "master:9001");//设置jobtracker在哪
		//初始化表
		initTB();//初始化表
		//创建job
		Job job = new Job(config, "HBaseMr");//job
		job.setJarByClass(HBaseMr.class);//主类
		//创建scan
		Scan scan = new Scan();
		//可以指定查询某一列
		scan.addColumn(Bytes.toBytes(colf), Bytes.toBytes(col));
		//创建查询hbase的mapper,设置表名、scan、mapper类、mapper的输出key、mapper的输出value
		TableMapReduceUtil.initTableMapperJob(tableName, scan, MyMapper.class,Text.class, IntWritable.class, job);
		//创建写入hbase的reducer,指定表名、reducer类、job
		TableMapReduceUtil.initTableReducerJob(tableName2, MyReducer.class, job);
		System.exit(job.waitForCompletion(true) ? 0 : 1);
	}
}
(四)Hbase基础API与过滤器
1、配置
HBaseConfiguration包:org.apache.hadoop.hbase.HBaseConfiguration
作用:通过此类可以对HBase进行配置
用法实例:
Configuration config = HBaseConfiguration.create();
说明: HBaseConfiguration.create() 默认会从classpath 中查找 hbase-site.xml 中的配置信息,初始化 Configuration。

使用方法:
static Configuration config = null;
static {
     config = HBaseConfiguration.create();
     config.set("hbase.zookeeper.quorum", "slave1,slave2,slave3");
     config.set("hbase.zookeeper.property.clientPort", "2181");
}
2、表管理类
HBaseAdmin包:org.apache.hadoop.hbase.client.HBaseAdmin
作用:提供接口关系HBase 数据库中的表信息
用法:
HBaseAdmin admin = new HBaseAdmin(config);
3、表描述类
HTableDescriptor包:org.apache.hadoop.hbase.HTableDescriptor
作用:HTableDescriptor 类包含了表的名字以及表的列族信息、表的schema(设计)
用法:
HTableDescriptor htd =newHTableDescriptor(tablename);
htd.addFamily(newHColumnDescriptor(“myFamily”));
4、列族的描述类
HColumnDescriptor包:org.apache.hadoop.hbase.HColumnDescriptor
作用:HColumnDescriptor 维护列族的信息
用法:
htd.addFamily(newHColumnDescriptor(“myFamily”));
5、创建表的操作
CreateTable(一般我们用shell创建表)
static Configuration config = null;
static {
     config = HBaseConfiguration.create();
     config.set("hbase.zookeeper.quorum", "slave1,slave2,slave3");
     config.set("hbase.zookeeper.property.clientPort", "2181");
}

HBaseAdmin admin = new HBaseAdmin(config);
HTableDescriptor desc = new HTableDescriptor(tableName);
HColumnDescriptor family1 = new HColumnDescriptor(“f1”);
HColumnDescriptor family2 = new HColumnDescriptor(“f2”);
desc.addFamily(family1);
desc.addFamily(family2);
admin.createTable(desc);
6、删除表
HBaseAdmin admin = new HBaseAdmin(config);
admin.disableTable(tableName);
admin.deleteTable(tableName);
7、创建一个表的类
HTable包:org.apache.hadoop.hbase.client.HTable
作用:HTable 和 HBase 的表通信
用法:
// 普通获取表
 HTable table = newHTable(config,Bytes.toBytes(tablename);
// 通过连接池获取表
Connection connection =ConnectionFactory.createConnection(config);
HTableInterface table = connection.getTable(TableName.valueOf("user"));
8、插入单条数据
Put包:org.apache.hadoop.hbase.client.Put
作用:插入数据
用法:
Put put = new Put(row);
p.add(family,qualifier,value);
说明:向表 tablename 添加“family,qualifier,value”指定的值。
示例代码:
Connection connection =ConnectionFactory.createConnection(config);
HTableInterface table = connection.getTable(TableName.valueOf("user"));
Put put = new Put(Bytes.toBytes(rowKey));
put.add(Bytes.toBytes(family),Bytes.toBytes(qualifier),Bytes.toBytes(value));
table.put(put);
9、批量插入
List<Put> list = new ArrayList<Put>();
Put put = new Put(Bytes.toBytes(rowKey));//获取put,用于插入
put.add(Bytes.toBytes(family), Bytes.toBytes(qualifier),Bytes.toBytes(value));//封装信息
list.add(put);
table.put(list);//添加记录
10、删除数据
Delete包:org.apache.hadoop.hbase.client.Delete
作用:删除给定rowkey的数据
用法:
Delete del= newDelete(Bytes.toBytes(rowKey));
table.delete(del);
代码实例
Connection connection =ConnectionFactory.createConnection(config);
HTableInterface table = connection.getTable(TableName.valueOf("user"));
Delete del= newDelete(Bytes.toBytes(rowKey));
table.delete(del);
11、单条查询
Get包:org.apache.hadoop.hbase.client.Get
作用:获取单个行的数据
用法:
HTable table = new HTable(config,Bytes.toBytes(tablename));
Get get = new Get(Bytes.toBytes(row));
Result result = table.get(get);
说明:获取 tablename 表中 row 行的对应数据
代码示例:
Connection connection =ConnectionFactory.createConnection(config);
HTableInterface table = connection.getTable(TableName.valueOf("user"));
Get get = new Get(rowKey.getBytes());
Result row = table.get(get);
for (KeyValue kv : row.raw()) {
         System.out.print(newString(kv.getRow()) + " ");
         System.out.print(newString(kv.getFamily()) + ":");
         System.out.print(newString(kv.getQualifier()) + " = ");
         System.out.print(newString(kv.getValue()));
         System.out.print("timestamp = " + kv.getTimestamp() + "\n");
}
12、批量查询
ResultScanner包:org.apache.hadoop.hbase.client.ResultScanner
作用:获取值的接口
用法:
ResultScanner scanner = table.getScanner(scan);
For(Result rowResult : scanner){
Bytes[] str = rowResult.getValue(family,column);
}
说明:循环获取行中列值。
代码示例:
Connection connection =ConnectionFactory.createConnection(config);
HTableInterface table = connection.getTable(TableName.valueOf("user"));
Scan scan = new Scan();
scan.setStartRow("a1".getBytes());
scan.setStopRow("a20".getBytes());
ResultScanner scanner =table.getScanner(scan);
for (Result row : scanner) {
         System.out.println("\nRowkey:" + new String(row.getRow()));
         for(KeyValue kv : row.raw()) {
              System.out.print(new String(kv.getRow()) +" ");
              System.out.print(newString(kv.getFamily()) + ":");
              System.out.print(newString(kv.getQualifier()) + " = ");
              System.out.print(newString(kv.getValue()));
              System.out.print(" timestamp = "+ kv.getTimestamp() + "\n");
         }
}
13、Hbase过滤器
13.1、FilterList
FilterList 代表一个过滤器列表,可以添加多个过滤器进行查询,多个过滤器之间的关系有:与关系(符合所有):FilterList.Operator.MUST_PASS_ALL
或关系(符合任一):FilterList.Operator.MUST_PASS_ONE
使用方法:
FilterList filterList = new FilterList(FilterList.Operator.MUST_PASS_ONE);
Scan s1 = new Scan();
 filterList.addFilter(new SingleColumnValueFilter(Bytes.toBytes(“f1”),  Bytes.toBytes(“c1”),  CompareOp.EQUAL,Bytes.toBytes(“v1”) )  );
filterList.addFilter(new SingleColumnValueFilter(Bytes.toBytes(“f1”),  Bytes.toBytes(“c2”),  CompareOp.EQUAL,Bytes.toBytes(“v2”) )  );
 // 添加下面这一行后,则只返回指定的cell,同一行中的其他cell不返回
 s1.addColumn(Bytes.toBytes(“f1”), Bytes.toBytes(“c1”));
 s1.setFilter(filterList);  //设置filter
 ResultScanner ResultScannerFilterList = table.getScanner(s1);  //返回结果列表
13.2 过滤器的种类
过滤器的种类:列植过滤器—SingleColumnValueFilter
过滤列植的相等、不等、范围等
列名前缀过滤器— ColumnPrefixFilter
过滤指定前缀的列名
多个列名前缀过滤器—MultipleColumnPrefixFilter
过滤多个指定前缀的列名
rowKey过滤器—RowFilter
通过正则,过滤rowKey值。
13.3 列植过滤器—SingleColumnValueFilter
SingleColumnValueFilter 列值判断相等 (CompareOp.EQUAL ),
不等(CompareOp.NOT_EQUAL),
范围 (e.g., CompareOp.GREATER)…………
下面示例检查列值和字符串'values' 相等...
SingleColumnValueFilter f = new SingleColumnValueFilter(Bytes.toBytes("cFamily"),Bytes.toBytes("column"),CompareFilter.CompareOp.EQUAL,Bytes.toBytes("values"));
s1.setFilter(f);
注意:如果过滤器过滤的列在数据表中有的行中不存在,那么这个过滤器对此行无法过滤。
13.4 列名前缀过滤器—ColumnPrefixFilter
过滤器—ColumnPrefixFilterColumnPrefixFilter 用于指定列名前缀值相等
ColumnPrefixFilter f = newColumnPrefixFilter(Bytes.toBytes("values"));
s1.setFilter(f);
13.5 多个列名前缀过滤器—MultipleColumnPrefixFilter
MultipleColumnPrefixFilter 和ColumnPrefixFilter 行为差不多,但可以指定多个前缀
byte[][] prefixes = new byte[][]{Bytes.toBytes("value1"),Bytes.toBytes("value2")};
Filter f = new MultipleColumnPrefixFilter(prefixes);
s1.setFilter(f);
13.6 rowKey过滤器——RowFilter
RowFilter 是rowkey过滤器通常根据rowkey来指定范围时,使用scan扫描器的StartRow和StopRow方法比较好。
Filter f = new RowFilter(CompareFilter.CompareOp.EQUAL, newRegexStringComparator("^1234")); //匹配以1234开头的rowkey
s1.setFilter(f);