转:https://segmentfault.com/a/1190000013532009
在上篇文章《springboot应用启动原理(一) 将启动脚本嵌入jar》中介绍了springboot如何将启动脚本与Runnable Jar整合为Executable Jar的原理,使得生成的jar/war文件可以直接启动
本篇将介绍springboot如何扩展URLClassLoader实现嵌套jar的类(资源)加载,以启动我们的应用。
本篇示例使用 java8 + grdle4.2 + springboot2.0.0.release 环境
首先,从一个简单的示例开始
build.gradle
group 'com.manerfan.spring'
version '1.0.0'

apply plugin: 'java'
apply plugin: 'java-library' sourceCompatibility = 1.8 buildscript { ext { springBootVersion = '2.0.0.RELEASE' } repositories { mavenLocal() maven { name 'aliyun maven central' url 'http://maven.aliyun.com/nexus/content/groups/public' } } dependencies { classpath("org.springframework.boot:spring-boot-gradle-plugin:${springBootVersion}") } } apply plugin: 'org.springframework.boot' apply plugin: 'io.spring.dependency-management' bootJar { launchScript() } repositories { mavenLocal() maven { name 'aliyun maven central' url 'http://maven.aliyun.com/nexus/content/groups/public' } } dependencies { api 'org.springframework.boot:spring-boot-starter-web' }
WebApp.java
@SpringBootApplication
@RestController
public class WebApp { public static void main(String[] args) { SpringApplication.run(WebApp.class, args); } @RequestMapping("/") @GetMapping public String hello() { return "Hello You!"; } }执行gradle build构建jar包,里面包含应用程序、第三方依赖以及springboot启动程序,其目录结构如下
spring-boot-theory-1.0.0.jar
├── META-INF
│   └── MANIFEST.MF
├── BOOT-INF
│   ├── classes
│   │   └── 应用程序
│   └── lib
│       └── 第三方依赖jar
└── org
    └── springframework
        └── boot
            └── loader
                └── springboot启动程序
查看MANIFEST.MF的内容(MANIFEST.MF文件的作用请自行GOOGLE)
Manifest-Version: 1.0
Start-Class: com.manerfan.springboot.theory.WebApp Main-Class: org.springframework.boot.loader.JarLauncher可以看到,jar的启动类为org.springframework.boot.loader.JarLauncher,而并不是我们的com.manerfan.springboot.theory.WebApp,应用程序入口类被标记为了Start-Class
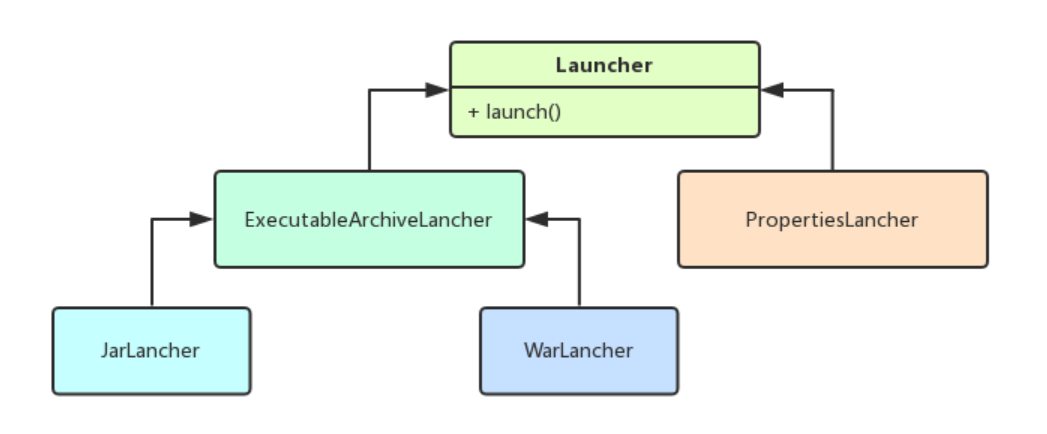
jar启动并不是通过应用程序入口类,而是通过JarLauncher代理启动。其实SpringBoot拥有3中不同的Launcher:JarLauncher 、WarLauncher 、PropertiesLauncher
springboot使用Launcher代理启动,其最重要的一点便是可以自定义ClassLoader,以实现对jar文件内(jar in jar)或其他路径下jar、class或资源文件的加载
关于ClassLoader的更多介绍可参考《深入理解JVM之ClassLoader》
Archive
- 归档文件
- 通常为tar/zip等格式压缩包
- jar为zip格式归档文件
SpringBoot抽象了Archive的概念,一个Archive可以是jar(JarFileArchive),可以是一个文件目录(ExplodedArchive),可以抽象为统一访问资源的逻辑层。
上例中,spring-boot-theory-1.0.0.jar既为一个JarFileArchive,spring-boot-theory-1.0.0.jar!/BOOT-INF/lib下的每一个jar包也是一个JarFileArchive
将spring-boot-theory-1.0.0.jar解压到目录spring-boot-theory-1.0.0,则目录spring-boot-theory-1.0.0为一个ExplodedArchive
public interface Archive extends Iterable<Archive.Entry> { // 获取该归档的url URL getUrl() throws MalformedURLException; // 获取jar!/META-INF/MANIFEST.MF或[ArchiveDir]/META-INF/MANIFEST.MF Manifest getManifest() throws IOException; // 获取jar!/BOOT-INF/lib/*.jar或[ArchiveDir]/BOOT-INF/lib/*.jar List<Archive> getNestedArchives(EntryFilter filter) throws IOException; }JarLancher
Launcherfor JAR based archives. This launcher assumes that dependency jars are included inside a/BOOT-INF/libdirectory and that application classes are included inside a/BOOT-INF/classesdirectory.
按照定义,JarLauncher可以加载内部/BOOT-INF/lib下的jar及/BOOT-INF/classes下的应用class
其实JarLauncher实现很简单
public class JarLauncher extends ExecutableArchiveLauncher { public JarLauncher() {} public static void main(String[] args) throws Exception { new JarLauncher().launch(args); } }其主入口新建了JarLauncher并调用父类Launcher中的launch方法启动程序
再创建JarLauncher时,父类ExecutableArchiveLauncher找到自己所在的jar,并创建archive
public abstract class ExecutableArchiveLauncher extends Launcher { private final Archive archive; public ExecutableArchiveLauncher() { try { // 找到自己所在的jar,并创建Archive this.archive = createArchive(); } catch (Exception ex) { throw new IllegalStateException(ex); } } } public abstract class Launcher { protected final Archive createArchive() throws Exception { ProtectionDomain protectionDomain = getClass().getProtectionDomain(); CodeSource codeSource = protectionDomain.getCodeSource(); URI location = (codeSource == null ? null : codeSource.getLocation().toURI()); String path = (location == null ? null : location.getSchemeSpecificPart()); if (path == null) { throw new IllegalStateException("Unable to determine code source archive"); } File root = new File(path); if (!root.exists()) { throw new IllegalStateException( "Unable to determine code source archive from " + root); } return (root.isDirectory() ? new ExplodedArchive(root) : new JarFileArchive(root)); } }在Launcher的launch方法中,通过以上archive的getNestedArchives方法找到/BOOT-INF/lib下所有jar及/BOOT-INF/classes目录所对应的archive,通过这些archives的url生成LaunchedURLClassLoader,并将其设置为线程上下文类加载器,启动应用
public abstract class Launcher { protected void launch(String[] args) throws Exception { JarFile.registerUrlProtocolHandler(); // 生成自定义ClassLoader ClassLoader classLoader = createClassLoader(getClassPathArchives()); // 启动应用 launch(args, getMainClass(), classLoader); } protected void launch(String[] args, String mainClass, ClassLoader classLoader) throws Exception { // 将自定义ClassLoader设置为当前线程上下文类加载器 Thread.currentThread().setContextClassLoader(classLoader); // 启动应用 createMainMethodRunner(mainClass, args, classLoader).run(); } } public abstract class ExecutableArchiveLauncher extends Launcher { protected List<Archive> getClassPathArchives() throws Exception { // 获取/BOOT-INF/lib下所有jar及/BOOT-INF/classes目录对应的archive List<Archive> archives = new ArrayList<>( this.archive.getNestedArchives(this::isNestedArchive)); postProcessClassPathArchives(archives); return archives; } } public class MainMethodRunner { // Start-Class in MANIFEST.MF private final String mainClassName; private final String[] args; public MainMethodRunner(String mainClass, String[] args) { this.mainClassName = mainClass; this.args = (args == null ? null : args.clone()); } public void run() throws Exception { // 加载应用程序主入口类 Class<?> mainClass = Thread.currentThread().getContextClassLoader() .loadClass(this.mainClassName); // 找到main方法 Method mainMethod = mainClass.getDeclaredMethod("main", String[].class); // 调用main方法,并启动 mainMethod.invoke(null, new Object[] { this.args }); } }至此,才执行我们应用程序主入口类的main方法,所有应用程序类文件均可通过/BOOT-INF/classes加载,所有依赖的第三方jar均可通过/BOOT-INF/lib加载
LaunchedURLClassLoader
在分析LaunchedURLClassLoader前,首先了解一下URLStreamHandler
URLStreamHandler
java中定义了URL的概念,并实现多种URL协议(见URL) http file ftp jar 等,结合对应的URLConnection可以灵活地获取各种协议下的资源
public URL(String protocol,
           String host,
int port, String file, URLStreamHandler handler) throws MalformedURLException对于jar,每个jar都会对应一个url,如jar:file:/data/spring-boot-theory/BOOT-INF/lib/spring-aop-5.0.4.RELEASE.jar!/
jar中的资源,也会对应一个url,并以'!/'分割,如jar:file:/data/spring-boot-theory/BOOT-INF/lib/spring-aop-5.0.4.RELEASE.jar!/org/springframework/aop/SpringProxy.class
对于原始的JarFile URL,只支持一个'!/',SpringBoot扩展了此协议,使其支持多个'!/',以实现jar in jar的资源,如jar:file:/data/spring-boot-theory.jar!/BOOT-INF/lib/spring-aop-5.0.4.RELEASE.jar!/org/springframework/aop/SpringProxy.class
自定义URL的类格式为[pkgs].[protocol].Handler,在运行Launcher的launch方法时调用了JarFile.registerUrlProtocolHandler()以注册自定义的 Handler
private static final String PROTOCOL_HANDLER = "java.protocol.handler.pkgs";
private static final String HANDLERS_PACKAGE = "org.springframework.boot.loader"; public static void registerUrlProtocolHandler() { String handlers = System.getProperty(PROTOCOL_HANDLER, ""); System.setProperty(PROTOCOL_HANDLER, ("".equals(handlers) ? HANDLERS_PACKAGE : handlers + "|" + HANDLERS_PACKAGE)); resetCachedUrlHandlers(); }
在处理如下URL时,会循环处理'!/'分隔符,从最上层出发,先构造spring-boot-theory.jar的JarFile,再构造spring-aop-5.0.4.RELEASE.jar的JarFile,最后构造指向SpringProxy.class的
JarURLConnection ,通过JarURLConnection的getInputStream方法获取SpringProxy.class内容
jar:file:/data/spring-boot-theory.jar!/BOOT-INF/lib/spring-aop-5.0.4.RELEASE.jar!/org/springframework/aop/SpringProxy.class
从一个URL,到读取其中的内容,整个过程为
- 注册一个Handler处理‘jar:’这种协议
- 扩展JarFile、JarURLConnection,处理jar in jar的情况
- 循环处理,找到内层资源
- 通过getInputStream获取资源内容
URLClassLoader可以通过原始的jar协议,加载jar中从class文件
LaunchedURLClassLoader 通过扩展的jar协议,以实现jar in jar这种情况下的class文件加载
WarLauncher
构建war包很简单
- build.gradle中引入插件
apply plugin: 'war' - build.gradle中将内嵌容器相关依赖设为provided
providedRuntime 'org.springframework.boot:spring-boot-starter-tomcat' - 修改WebApp内容,重写SpringBootServletInitializer的configure方法
@SpringBootApplication
@RestController
public class WebApp extends SpringBootServletInitializer { public static void main(String[] args) { SpringApplication.run(WebApp.class, args); } @Override protected SpringApplicationBuilder configure(SpringApplicationBuilder builder) { return builder.sources(WebApp.class); } @RequestMapping("/") @GetMapping public String hello() { return "Hello You!"; } }
构建出的war包,其目录机构为
spring-boot-theory-1.0.0.war
├── META-INF
│   └── MANIFEST.MF
├── WEB-INF
│   ├── classes
│   │   └── 应用程序
│   └── lib
│       └── 第三方依赖jar
│   └── lib-provided │ └── 与内嵌容器相关的第三方依赖jar └── org └── springframework └── boot └── loader └── springboot启动程序
MANIFEST.MF内容为
Manifest-Version: 1.0
Start-Class: com.manerfan.springboot.theory.WebApp Main-Class: org.springframework.boot.loader.WarLauncher此时,启动类变为了org.springframework.boot.loader.WarLauncher,查看WarLauncher实现,其实与JarLauncher并无太大差别
public class WarLauncher extends ExecutableArchiveLauncher { private static final String WEB_INF = "WEB-INF/"; private static final String WEB_INF_CLASSES = WEB_INF + "classes/"; private static final String WEB_INF_LIB = WEB_INF + "lib/"; private static final String WEB_INF_LIB_PROVIDED = WEB_INF + "lib-provided/"; public WarLauncher() { } @Override public boolean isNestedArchive(Archive.Entry entry) { if (entry.isDirectory()) { return entry.getName().equals(WEB_INF_CLASSES); } else { return entry.getName().startsWith(WEB_INF_LIB) || entry.getName().startsWith(WEB_INF_LIB_PROVIDED); } } public static void main(String[] args) throws Exception { new WarLauncher().launch(args); } }差别仅在于,JarLauncher在构建LauncherURLClassLoader时,会搜索BOOT-INF/classes目录及BOOT-INF/lib目录下jar,WarLauncher在构建LauncherURLClassLoader时,则会搜索WEB-INFO/classes目录及WEB-INFO/lib和WEB-INFO/lib-provided两个目录下的jar
如此依赖,构建出的war便支持两种启动方式
- 直接运行
./spring-boot-theory-1.0.0.war start - 部署到Tomcat容器下
PropertiesLauncher
PropretiesLauncher 的实现与 JarLauncher WarLauncher 的实现极为相似,通过PropretiesLauncher可以实现更为轻量的thin jar,其实现方式可自行查阅源码
总结
- SpringBoot通过扩展JarFile、JarURLConnection及URLStreamHandler,实现了jar in jar中资源的加载
- SpringBoot通过扩展URLClassLoader--LauncherURLClassLoader,实现了jar in jar中class文件的加载
- JarLauncher通过加载BOOT-INF/classes目录及BOOT-INF/lib目录下jar文件,实现了fat jar的启动
- WarLauncher通过加载WEB-INF/classes目录及WEB-INF/lib和WEB-INF/lib-provided目录下的jar文件,实现了war文件的直接启动及web容器中的启动