Docker 安装时会自动在host上创建三个网络,我们可用 docker network ls命令查看:
[root@localhost ~]# docker network ls
NETWORK ID          NAME                DRIVER              SCOPE
0164da7ee66a        bridge              bridge              local
a4a5d0b84564        host                host                local
df2c5c066a6a        none                null                local
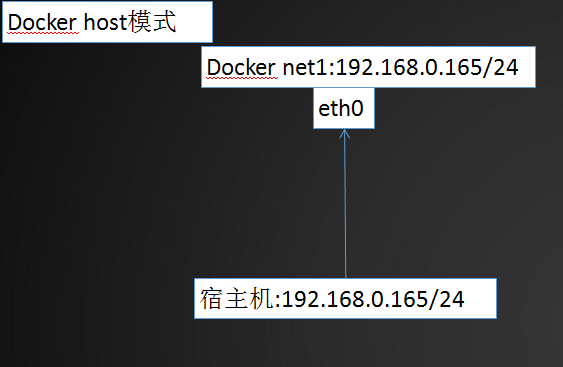
1、host模式
host模式,使用docker run 时,使用--net=host指定docker使用的网络实际上和宿主机一样,启动容器的时候使用host模式,那么这个容器将不会获得一个独立的Network Namespace,而是和宿主机共用一个Network Namespace。容器将不会虚拟出自己的网卡,配置自己的IP等,而是使用宿主机的IP和端口。但是,容器的其他方面,如文件系统、进程列表等还是和宿主机隔离的。
演示:
[root@localhost ~]# docker run -it --rm --net=host --name net1 centos_1 bash
[root@localhost /]# ifconfig
docker0: flags=4099<UP,BROADCAST,MULTICAST>  mtu 1500
        inet 172.17.0.1  netmask 255.255.0.0  broadcast 0.0.0.0
        inet6 fe80::42:5aff:fe52:25a9  prefixlen 64  scopeid 0x20<link>
        ether 02:42:5a:52:25:a9  txqueuelen 0  (Ethernet)
        RX packets 32541  bytes 45836190 (43.7 MiB)
        RX errors 0  dropped 0  overruns 0  frame 0
        TX packets 45025  bytes 305790826 (291.6 MiB)
        TX errors 0  dropped 0 overruns 0  carrier 0  collisions 0

enp0s3: flags=4163<UP,BROADCAST,RUNNING,MULTICAST>  mtu 1500
        inet 192.168.0.165  netmask 255.255.255.0  broadcast 192.168.0.255
        inet6 fe80::71bd:4770:36ed:a5df  prefixlen 64  scopeid 0x20<link>
        ether 08:00:27:06:15:d8  txqueuelen 1000  (Ethernet)
        RX packets 690783  bytes 269935255 (257.4 MiB)
        RX errors 0  dropped 0  overruns 0  frame 0
        TX packets 164584  bytes 86989110 (82.9 MiB)
        TX errors 0  dropped 0 overruns 0  carrier 0  collisions 0

lo: flags=73<UP,LOOPBACK,RUNNING>  mtu 65536
        inet 127.0.0.1  netmask 255.0.0.0
        inet6 ::1  prefixlen 128  scopeid 0x10<host>
        loop  txqueuelen 1  (Local Loopback)
        RX packets 5206  bytes 265735 (259.5 KiB)
        RX errors 0  dropped 0  overruns 0  frame 0
        TX packets 5206  bytes 265735 (259.5 KiB)
        TX errors 0  dropped 0 overruns 0  carrier 0  collisions 0
2、container模式
container模式,使用--net=container:container_id/container_name多个容器使用共同的网络,这个模式指定新创建的容器和已经存在的一个容器共享一个 Network Namespace,而不是和宿主机共享。新创建的容器不会创建自己的网卡,配置自己的IP,而是和一个指定的容器共享 IP、端口范围等。同样,两个容器除了网络方面,其他的如文件系统、进程列表等还是隔离的。两个容器的进程可以通过lo网卡设备通信。
演示:
①创建一个net2的容器,并查看ip为172.17.0.2
[root@localhost ~]# docker run -itd --name net2 centos_1 bash
b8a14e5e8a670d5680aae830f79267257143397c124d011fbf09b71c59b37e5d
[root@localhost ~]# docker exec -it net2 bash
[root@b8a14e5e8a67 /]# ifconfig
eth0: flags=4163<UP,BROADCAST,RUNNING,MULTICAST>  mtu 1500
        inet 172.17.0.2  netmask 255.255.0.0  broadcast 0.0.0.0
        inet6 fe80::42:acff:fe11:2  prefixlen 64  scopeid 0x20<link>
        ether 02:42:ac:11:00:02  txqueuelen 0  (Ethernet)
        RX packets 8  bytes 648 (648.0 B)
        RX errors 0  dropped 0  overruns 0  frame 0
        TX packets 8  bytes 648 (648.0 B)
        TX errors 0  dropped 0 overruns 0  carrier 0  collisions 0

lo: flags=73<UP,LOOPBACK,RUNNING>  mtu 65536
        inet 127.0.0.1  netmask 255.0.0.0
        inet6 ::1  prefixlen 128  scopeid 0x10<host>
        loop  txqueuelen 1  (Local Loopback)
        RX packets 0  bytes 0 (0.0 B)
        RX errors 0  dropped 0  overruns 0  frame 0
        TX packets 0  bytes 0 (0.0 B)
        TX errors 0  dropped 0 overruns 0  carrier 0  collisions 0

②创建容器net3,并指定使用container网络模式,查看net3容器的ip为:172.17.0.2
[root@localhost ~]# docker run -it --net=container:net2 --name net3 centos_1 bash
[root@b8a14e5e8a67 /]# ifconfig
eth0: flags=4163<UP,BROADCAST,RUNNING,MULTICAST>  mtu 1500
        inet 172.17.0.2  netmask 255.255.0.0  broadcast 0.0.0.0
        inet6 fe80::42:acff:fe11:2  prefixlen 64  scopeid 0x20<link>
        ether 02:42:ac:11:00:02  txqueuelen 0  (Ethernet)
        RX packets 8  bytes 648 (648.0 B)
        RX errors 0  dropped 0  overruns 0  frame 0
        TX packets 8  bytes 648 (648.0 B)
        TX errors 0  dropped 0 overruns 0  carrier 0  collisions 0

lo: flags=73<UP,LOOPBACK,RUNNING>  mtu 65536
        inet 127.0.0.1  netmask 255.0.0.0
        inet6 ::1  prefixlen 128  scopeid 0x10<host>
        loop  txqueuelen 1  (Local Loopback)
        RX packets 0  bytes 0 (0.0 B)
        RX errors 0  dropped 0  overruns 0  frame 0
        TX packets 0  bytes 0 (0.0 B)
        TX errors 0  dropped 0 overruns 0  carrier 0  collisions 0

③查看运行的net2,net3容器,两者id并不相同,但使用container网络模式,进入到net3时,net3容器id会和net2相同
[root@localhost ~]# docker ps
CONTAINER ID        IMAGE               COMMAND             CREATED             STATUS              PORTS               NAMES
a795f6825e1e        centos_1            "bash"              6 minutes ago       Up 3 seconds                            net3
b8a14e5e8a67        centos_1            "bash"              8 minutes ago       Up 8 minutes                            net2
[root@localhost ~]# docker exec -it net3 bash
[root@b8a14e5e8a67 /]# ifconfig
eth0: flags=4163<UP,BROADCAST,RUNNING,MULTICAST>  mtu 1500
        inet 172.17.0.2  netmask 255.255.0.0  broadcast 0.0.0.0
        inet6 fe80::42:acff:fe11:2  prefixlen 64  scopeid 0x20<link>
        ether 02:42:ac:11:00:02  txqueuelen 0  (Ethernet)
        RX packets 8  bytes 648 (648.0 B)
        RX errors 0  dropped 0  overruns 0  frame 0
        TX packets 8  bytes 648 (648.0 B)
        TX errors 0  dropped 0 overruns 0  carrier 0  collisions 0

lo: flags=73<UP,LOOPBACK,RUNNING>  mtu 65536
        inet 127.0.0.1  netmask 255.0.0.0
        inet6 ::1  prefixlen 128  scopeid 0x10<host>
        loop  txqueuelen 1  (Local Loopback)
        RX packets 0  bytes 0 (0.0 B)
        RX errors 0  dropped 0  overruns 0  frame 0
        TX packets 0  bytes 0 (0.0 B)
        TX errors 0  dropped 0 overruns 0  carrier 0  collisions 0

3、none模式
none模式,使用--net=none指定这种模式下,不会配置任何网络。使用none模式,Docker容器拥有自己的Network Namespace,但是,并不为Docker容器进行任何网络配置。也就是说,这个Docker容器没有网卡、IP、路由等信息。需要我们自己为Docker容器添加网卡、配置IP等。
演示:
[root@localhost ~]# docker run -it --net=none --name net4 centos_1 bash
[root@b12e7ad03af2 /]# ifconfig
lo: flags=73<UP,LOOPBACK,RUNNING>  mtu 65536
        inet 127.0.0.1  netmask 255.0.0.0
        inet6 ::1  prefixlen 128  scopeid 0x10<host>
        loop  txqueuelen 1  (Local Loopback)
        RX packets 0  bytes 0 (0.0 B)
        RX errors 0  dropped 0  overruns 0  frame 0
        TX packets 0  bytes 0 (0.0 B)
        TX errors 0  dropped 0 overruns 0  carrier 0  collisions 0
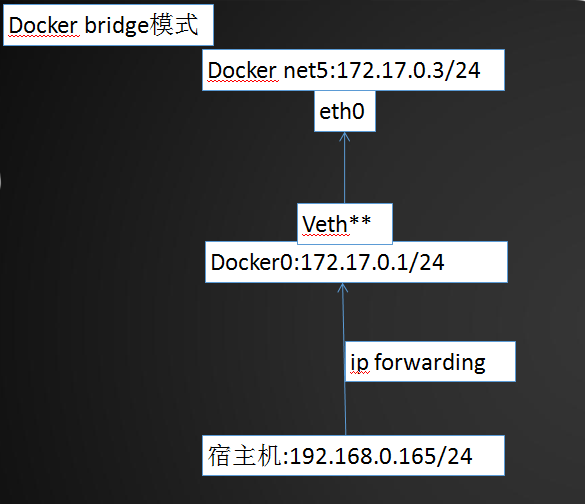
4、bridge模式
bridge模式,使用--net=bridge指定默认模式,当Docker进程启动时,会在主机上创建一个名为docker0的虚拟网桥,此主机上启动的Docker容器会连接到这个虚拟网桥上。虚拟网桥的工作方式和物理交换机类似,这样主机上的所有容器就通过交换机连在了一个二层网络中。
从docker0子网中分配一个IP给容器使用,并设置docker0的IP地址为容器的默认网关。在主机上创建一对虚拟网卡veth pair设备,Docker将veth pair设备的一端放在新创建的容器中,并命名为eth0(容器的网卡),另一端放在主机中,以vethxxx这样类似的名字命名,并将这个网络设备加入到docker0网桥中。可以通过brctl show命令查看。
bridge模式是docker的默认网络模式,不写--net参数,就是bridge模式。使用docker run -p时,docker实际是在iptables做了DNAT规则,实现端口转发功能。可以使用iptables -t nat -vnL查看。
演示:
①查看宿主机docker0的虚拟网桥ip为:172.17.0.1
[root@localhost ~]# ifconfig
docker0: flags=4163<UP,BROADCAST,RUNNING,MULTICAST>  mtu 1500
        inet 172.17.0.1  netmask 255.255.0.0  broadcast 0.0.0.0
        inet6 fe80::42:5aff:fe52:25a9  prefixlen 64  scopeid 0x20<link>
        ether 02:42:5a:52:25:a9  txqueuelen 0  (Ethernet)
        RX packets 32557  bytes 45837262 (43.7 MiB)
        RX errors 0  dropped 0  overruns 0  frame 0
        TX packets 45025  bytes 305790826 (291.6 MiB)
        TX errors 0  dropped 0 overruns 0  carrier 0  collisions 0

enp0s3: flags=4163<UP,BROADCAST,RUNNING,MULTICAST>  mtu 1500
        inet 192.168.0.165  netmask 255.255.255.0  broadcast 192.168.0.255
        inet6 fe80::71bd:4770:36ed:a5df  prefixlen 64  scopeid 0x20<link>
        ether 08:00:27:06:15:d8  txqueuelen 1000  (Ethernet)
        RX packets 702882  bytes 271309720 (258.7 MiB)
        RX errors 0  dropped 0  overruns 0  frame 0
        TX packets 166364  bytes 87203641 (83.1 MiB)
        TX errors 0  dropped 0 overruns 0  carrier 0  collisions 0

②创建net5容器,并使用bridge网络模式。查看ip和网关
[root@localhost ~]# docker run -it --name net5 --net=bridge centos_1 bash
[root@a3a6416d08c0 /]# ifconfig
eth0: flags=4163<UP,BROADCAST,RUNNING,MULTICAST>  mtu 1500
        inet 172.17.0.3  netmask 255.255.0.0  broadcast 0.0.0.0
        inet6 fe80::42:acff:fe11:3  prefixlen 64  scopeid 0x20<link>
        ether 02:42:ac:11:00:03  txqueuelen 0  (Ethernet)
        RX packets 6  bytes 508 (508.0 B)
        RX errors 0  dropped 0  overruns 0  frame 0
        TX packets 6  bytes 508 (508.0 B)
        TX errors 0  dropped 0 overruns 0  carrier 0  collisions 0

lo: flags=73<UP,LOOPBACK,RUNNING>  mtu 65536
        inet 127.0.0.1  netmask 255.0.0.0
        inet6 ::1  prefixlen 128  scopeid 0x10<host>
        loop  txqueuelen 1  (Local Loopback)
        RX packets 0  bytes 0 (0.0 B)
        RX errors 0  dropped 0  overruns 0  frame 0
        TX packets 0  bytes 0 (0.0 B)
        TX errors 0  dropped 0 overruns 0  carrier 0  collisions 0
[root@a3a6416d08c0 /]# route -n
Kernel IP routing table
Destination     Gateway         Genmask         Flags Metric Ref    Use Iface
0.0.0.0         172.17.0.1      0.0.0.0         UG    0      0        0 eth0
172.17.0.0      0.0.0.0         255.255.0.0     U     0      0        0 eth0
5、如何自定义docker网络?
我们可通过bridge驱动创建类似前面默认的bridge网络,例如:
[root@localhost ~]# docker network create --driver bridge my_net  #创建桥接网络my_net
afb854fd239b26f95265002190f9df88f8b7f66c204085bfd16c6a2b4932f5d9
[root@localhost ~]# brctl show   查看一下当前 host 的网络结构变化
bridge name bridge          id      STP enabled interfaces
br-afb854fd239b     8000.02422702f1bc   no
docker0             8000.0242646f882f   no      veth211fb49
                                                veth709c331
                                                veth8069764
                                                vethfa120d8
[root@localhost ~]# docker network inspect my_net
[
    {
        "Name": "my_net",
        "Id": "afb854fd239b26f95265002190f9df88f8b7f66c204085bfd16c6a2b4932f5d9",
        "Created": "2018-04-21T14:14:15.479906429+08:00",
        "Scope": "local",
        "Driver": "bridge",
        "EnableIPv6": false,
        "IPAM": {
            "Driver": "default",
            "Options": {},
            "Config": [
                {
                    "Subnet": "172.18.0.0/16",  #这里 172.18.0.0/16 是 Docker 自动分配的 IP 网段。
                    "Gateway": "172.18.0.1"
                }
            ]
        },
        "Internal": false,
        "Attachable": false,
        "Containers": {},
        "Options": {},
        "Labels": {}
    }
]
指定 --subnet 和--gateway参数自定义ip网段:
[root@localhost ~]# docker network create --driver bridge --subnet 192.168.100.0/24 --gateway 192.168.100.1 my_net2
889ba4ceb97290e440db559e104db2bf9273854fd789322aaea30b3c76937af6
[root@localhost ~]# docker network inspect my_net2
[
    {
        "Name": "my_net2",
        "Id": "889ba4ceb97290e440db559e104db2bf9273854fd789322aaea30b3c76937af6",
        "Created": "2018-04-21T14:19:15.730480499+08:00",
        "Scope": "local",
        "Driver": "bridge",
        "EnableIPv6": false,
        "IPAM": {
            "Driver": "default",
            "Options": {},
            "Config": [
                {
                    "Subnet": "192.168.100.0/24",
                    "Gateway": "192.168.100.1"
                }
            ]
        },
        "Internal": false,
        "Attachable": false,
        "Containers": {},
        "Options": {},
        "Labels": {}
    }
]
创建了新的 bridge 网络 my_net2,网段为 192.168
[root@localhost ~]# brctl show
bridge name bridge          id          STP enabled         interfaces
br-889ba4ceb972     8000.02424b2256df       no
br-afb854fd239b     8000.02422702f1bc       no
docker0             8000.0242646f882f       no              veth211fb49
                                                            veth709c331
                                                            veth8069764
                                                            vethfa120d8
[root@localhost ~]# ifconfig br-889ba4ceb972
br-889ba4ceb972: flags=4099<UP,BROADCAST,MULTICAST>  mtu 1500
        inet 192.168.100.1  netmask 255.255.255.0  broadcast 0.0.0.0
        ether 02:42:4b:22:56:df  txqueuelen 0  (Ethernet)
        RX packets 0  bytes 0 (0.0 B)
        RX errors 0  dropped 0  overruns 0  frame 0
        TX packets 0  bytes 0 (0.0 B)
        TX errors 0  dropped 0 overruns 0  carrier 0  collisions 0
容器要使用新的网络,需要在启动时通过 --network指定,并且还可以使用--ip参数直接指定一个静态ip:
[root@localhost ~]# docker run -it --network=my_net2 busybox
/ # ip a
1: lo: <LOOPBACK,UP,LOWER_UP> mtu 65536 qdisc noqueue qlen 1
    link/loopback 00:00:00:00:00:00 brd 00:00:00:00:00:00
    inet 127.0.0.1/8 scope host lo
       valid_lft forever preferred_lft forever
    inet6 ::1/128 scope host
       valid_lft forever preferred_lft forever
116: eth0@if117: <BROADCAST,MULTICAST,UP,LOWER_UP,M-DOWN> mtu 1500 qdisc noqueue
    link/ether 02:42:c0:a8:64:02 brd ff:ff:ff:ff:ff:ff
    inet 192.168.100.2/24 scope global eth0   ##容器被分配的ip为192.168.100.2
       valid_lft forever preferred_lft forever
    inet6 fe80::42:c0ff:fea8:6402/64 scope link
       valid_lft forever preferred_lft forever

[root@localhost ~]# docker run -it --network=my_net2 --ip 192.168.100.100 busybox
/ # ip a
1: lo: <LOOPBACK,UP,LOWER_UP> mtu 65536 qdisc noqueue qlen 1
    link/loopback 00:00:00:00:00:00 brd 00:00:00:00:00:00
    inet 127.0.0.1/8 scope host lo
       valid_lft forever preferred_lft forever
    inet6 ::1/128 scope host
       valid_lft forever preferred_lft forever
118: eth0@if119: <BROADCAST,MULTICAST,UP,LOWER_UP,M-DOWN> mtu 1500 qdisc noqueue
    link/ether 02:42:c0:a8:64:64 brd ff:ff:ff:ff:ff:ff
    inet 192.168.100.100/24 scope global eth0    ##容器被分配的ip为192.168.100.100
       valid_lft forever preferred_lft forever
    inet6 fe80::42:c0ff:fea8:6464/64 scope link
       valid_lft forever preferred_lft forever

注:只有使用 --subnet 创建的网络才能指定静态 IP。
my_net 创建时没有指定 --subnet,如果指定静态 IP 报错如下:

[root@localhost ~]# docker run -it --rm --network=my_net --ip 172.18.0.100 busybox
/usr/bin/docker-current: Error response from daemon: User specified IP address is supported only when connecting to networks with user configured subnets.
6、Docker使用pipework配置容器与宿主机在同一网段
为了使本地网络中的机器和Docker容器更方便的通信,我们经常会有将Docker容器配置到和主机同一网段的需求。这个需求其实很容易实现,我们只要将Docker容器和宿主机的网卡桥接起来,再给Docker容器配上IP就可以了。
(1)新建桥接网卡br0,并进行修改宿主机网卡enp0s3以及br0
[root@localhost network-scripts]# cp ifcfg-enp0s3 ifcfg-br0
[root@localhost network-scripts]# vim ifcfg-br0
注:修改TYPE=Bridge,DEVICE=br0,NAME=br0
TYPE=Bridge
BOOTPROTO=static
DEFROUTE=yes

PEERDNS=yes
PEERROUTES=yes
IPV4_FAILURE_FATAL=no
IPV6INIT=yes
IPV6_AUTOCONF=yes
IPV6_DEFROUTE=yes
IPV6_PEERDNS=yes
IPV6_PEERROUTES=yes
IPV6_FAILURE_FATAL=no
IPV6_ADDR_GEN_MODE=stable-privacy
NAME=br0
#UUID=faa61166-b507-4992-b055-2c6284de3981
DEVICE=br0
ONBOOT=yes
IPADDR=192.168.0.165
GATEWAY=192.168.0.1
NATMASK=255.255.255.0
DNS1=8.8.8.8
#NM_CONTROLLED=no

[root@localhost network-scripts]# vim ifcfg-enp0s3
注:增加BRIDGE=br0,删除IPADDR,GATEWAY,NETMASK,DNS
TYPE=Ethernet
BOOTPROTO=static
DEFROUTE=yes
PEERDNS=yes
PEERROUTES=yes
IPV4_FAILURE_FATAL=no
IPV6INIT=yes
IPV6_AUTOCONF=yes
IPV6_DEFROUTE=yes
IPV6_PEERDNS=yes
IPV6_PEERROUTES=yes
IPV6_FAILURE_FATAL=no
IPV6_ADDR_GEN_MODE=stable-privacy
NAME=enp0s3
#UUID=faa61166-b507-4992-b055-2c6284de3981
DEVICE=enp0s3
ONBOOT=yes
#IPADDR=192.168.0.165
#GATEWAY=192.168.0.1
#NATMASK=255.255.255.0
#DNS1=8.8.8.8
#NM_CONTROLLED=no
BRIDGE=br0
(2)重启网络,查看br0的ip地址,以及enp0s3是否未分配ip地址,表示成功
[root@localhost network-scripts]# systemctl restart network
[root@localhost network-scripts]# ifconfig
br0: flags=4163<UP,BROADCAST,RUNNING,MULTICAST>  mtu 1500
        inet 192.168.0.165  netmask 255.255.255.0  broadcast 192.168.0.255
        inet6 fe80::ca01:a411:fb77:c348  prefixlen 64  scopeid 0x20<link>
        ether 08:00:27:06:15:d8  txqueuelen 1000  (Ethernet)
        RX packets 36  bytes 3485 (3.4 KiB)
        RX errors 0  dropped 0  overruns 0  frame 0
        TX packets 25  bytes 2318 (2.2 KiB)
        TX errors 0  dropped 0 overruns 0  carrier 0  collisions 0

docker0: flags=4099<UP,BROADCAST,MULTICAST>  mtu 1500
        inet 172.17.0.1  netmask 255.255.0.0  broadcast 0.0.0.0
        ether 02:42:7e:ec:e1:e6  txqueuelen 0  (Ethernet)
        RX packets 0  bytes 0 (0.0 B)
        RX errors 0  dropped 0  overruns 0  frame 0
        TX packets 0  bytes 0 (0.0 B)
        TX errors 0  dropped 0 overruns 0  carrier 0  collisions 0

enp0s3: flags=4163<UP,BROADCAST,RUNNING,MULTICAST>  mtu 1500
        ether 08:00:27:06:15:d8  txqueuelen 1000  (Ethernet)
        RX packets 2831  bytes 321711 (314.1 KiB)
        RX errors 0  dropped 0  overruns 0  frame 0
        TX packets 1070  bytes 182494 (178.2 KiB)
        TX errors 0  dropped 0 overruns 0  carrier 0  collisions 0

lo: flags=73<UP,LOOPBACK,RUNNING>  mtu 65536
        inet 127.0.0.1  netmask 255.0.0.0
        inet6 ::1  prefixlen 128  scopeid 0x10<host>
        loop  txqueuelen 1  (Local Loopback)
        RX packets 96  bytes 7888 (7.7 KiB)
        RX errors 0  dropped 0  overruns 0  frame 0
        TX packets 96  bytes 7888 (7.7 KiB)
        TX errors 0  dropped 0 overruns 0  carrier 0  collisions 0
(3)下载pipework
[root@localhost ~]# git clone https://github.com/jpetazzo/pipework
Cloning into 'pipework'...
remote: Counting objects: 501, done.
remote: Total 501 (delta 0), reused 0 (delta 0), pack-reused 501
Receiving objects: 100% (501/501), 172.97 KiB | 4.00 KiB/s, done.
Resolving deltas: 100% (264/264), done.
(4)拷贝pipework二进制文件到/usr/local/bin下,运行一个容器并使用none网络模式
[root@localhost ~]# cp pipework/pipework /usr/local/bin/
[root@localhost ~]# docker run -itd --net=none --name pipework centos_nginx bash
ab88e2159ce32408154a776c1c62cf1af170fa8ce4d01908da6175f01b6c787d
[root@localhost ~]# docker ps
CONTAINER ID        IMAGE               COMMAND             CREATED             STATUS              PORTS               NAMES
ab88e2159ce3        centos_nginx        "bash"              4 seconds ago       Up 4 seconds                            pipework
[root@localhost ~]# docker exec -it pipework bash
[root@ab88e2159ce3 /]# ifconfig
lo: flags=73<UP,LOOPBACK,RUNNING>  mtu 65536
        inet 127.0.0.1  netmask 255.0.0.0
        inet6 ::1  prefixlen 128  scopeid 0x10<host>
        loop  txqueuelen 1  (Local Loopback)
        RX packets 0  bytes 0 (0.0 B)
        RX errors 0  dropped 0  overruns 0  frame 0
        TX packets 0  bytes 0 (0.0 B)
        TX errors 0  dropped 0 overruns 0  carrier 0  collisions 0
[root@ab88e2159ce3 /]# exit
exit
(5)使用pipework进行配置容器pipework的ip地址,166为容器的ip地址,@后面的ip为容器网关,配置完毕进入容器进行查看
[root@localhost ~]# pipework br0 pipework 192.168.0.166/24@192.168.0.1
[root@localhost ~]# docker exec -it pipework bash
[root@ab88e2159ce3 /]# ifconfig
eth1: flags=4163<UP,BROADCAST,RUNNING,MULTICAST>  mtu 1500
        inet 192.168.0.166  netmask 255.255.255.0  broadcast 192.168.0.255
        inet6 fe80::340c:ebff:fe50:1ba3  prefixlen 64  scopeid 0x20<link>
        ether 36:0c:eb:50:1b:a3  txqueuelen 1000  (Ethernet)
        RX packets 62  bytes 10518 (10.2 KiB)
        RX errors 0  dropped 0  overruns 0  frame 0
        TX packets 10  bytes 732 (732.0 B)
        TX errors 0  dropped 0 overruns 0  carrier 0  collisions 0

lo: flags=73<UP,LOOPBACK,RUNNING>  mtu 65536
        inet 127.0.0.1  netmask 255.0.0.0
        inet6 ::1  prefixlen 128  scopeid 0x10<host>
        loop  txqueuelen 1  (Local Loopback)
        RX packets 0  bytes 0 (0.0 B)
        RX errors 0  dropped 0  overruns 0  frame 0
        TX packets 0  bytes 0 (0.0 B)
        TX errors 0  dropped 0 overruns 0  carrier 0  collisions 0
(6)windows和linux下验证容器pipework的网络连通性
[root@ab88e2159ce3 /]# ping www.baidu.com
PING www.a.shifen.com (14.215.177.39) 56(84) bytes of data.
64 bytes from 14.215.177.39 (14.215.177.39): icmp_seq=1 ttl=54 time=8.29 ms
64 bytes from 14.215.177.39 (14.215.177.39): icmp_seq=2 ttl=54 time=8.09 ms
64 bytes from 14.215.177.39 (14.215.177.39): icmp_seq=3 ttl=54 time=8.43 ms
64 bytes from 14.215.177.39 (14.215.177.39): icmp_seq=4 ttl=54 time=8.12 ms
64 bytes from 14.215.177.39 (14.215.177.39): icmp_seq=5 ttl=54 time=8.80 ms
64 bytes from 14.215.177.39 (14.215.177.39): icmp_seq=6 ttl=54 time=8.51 ms
^C
--- www.a.shifen.com ping statistics ---
6 packets transmitted, 6 received, 0% packet loss, time 5007ms
rtt min/avg/max/mdev = 8.094/8.378/8.805/0.249 ms
(7)通过pipework配置网络,配置web服务
[root@localhost ~]# docker run -itd --privileged -e "container=docker" --name pipework --net=none centos_nginx /usr/sbin/init
aa85a59dc347633fcd9a2b5206eaed619451c52f299d2505c32df2b6d1ce7521
[root@localhost ~]# pipework br0 pipework 192.168.0.166/24@192.168.0.1
[root@localhost ~]# docker exec -it pipework bash
[root@aa85a59dc347 /]# ifconfig
eth1: flags=4163<UP,BROADCAST,RUNNING,MULTICAST>  mtu 1500
        inet 192.168.0.166  netmask 255.255.255.0  broadcast 192.168.0.255
        inet6 fe80::a00d:aff:fec2:a59d  prefixlen 64  scopeid 0x20<link>
        ether a2:0d:0a:c2:a5:9d  txqueuelen 1000  (Ethernet)
        RX packets 192  bytes 21152 (20.6 KiB)
        RX errors 0  dropped 0  overruns 0  frame 0
        TX packets 11  bytes 774 (774.0 B)
        TX errors 0  dropped 0 overruns 0  carrier 0  collisions 0

lo: flags=73<UP,LOOPBACK,RUNNING>  mtu 65536
        inet 127.0.0.1  netmask 255.0.0.0
        inet6 ::1  prefixlen 128  scopeid 0x10<host>
        loop  txqueuelen 1  (Local Loopback)
        RX packets 0  bytes 0 (0.0 B)
        RX errors 0  dropped 0  overruns 0  frame 0
        TX packets 0  bytes 0 (0.0 B)
        TX errors 0  dropped 0 overruns 0  carrier 0  collisions 0

[root@aa85a59dc347 /]# systemctl start nginx
[root@aa85a59dc347 /]# netstat -tulnp |grep nginx
tcp        0      0 0.0.0.0:80              0.0.0.0:*               LISTEN      86/nginx: master pr
tcp6       0      0 :::80                   :::*                    LISTEN      86/nginx: master pr
[root@aa85a59dc347 /]# ps -ef |grep nginx
root        86     1  0 07:54 ?        00:00:00 nginx: master process /usr/sbin/nginx
nginx       87    86  0 07:54 ?        00:00:00 nginx: worker process
root        98    68  0 07:54 ?        00:00:00 grep --color=auto nginx