CSS简单介绍
day02(参照流程图)
")
1、css的简介
css:层叠样式表 样式表(更多的属性和属性值)
- css将网页内容和显示样式进行了分离,提高了显示功能
2、css和html的结合方式(四种结合方式)
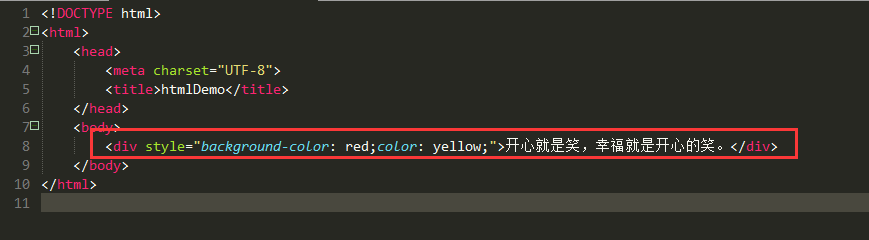
(1)在每一个html标签上面都有一个属性style,把css和html结合在一起
- <div style="background-color: red;color: yellow;">开心就是笑,幸福就是开心的笑。</div>
e-image
(2)使用html一个标签实现<style>,写在head里
<style type="text/css">
css代码;
</style>
e-image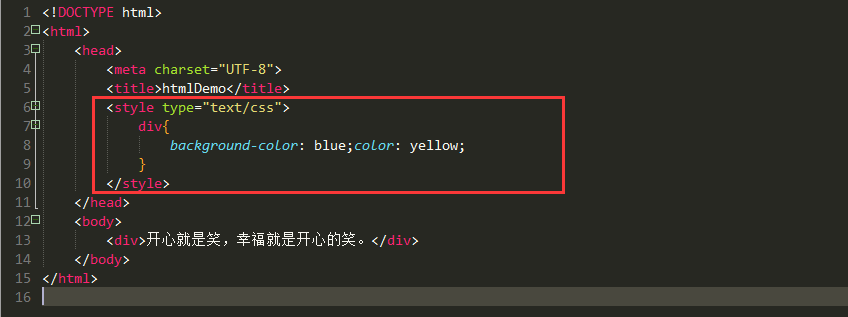
(3)在style标签里面 使用语句
- @import url(css文件的路径)
创建css文件
<style type="text/css">
@import url(div.css);
</style>
(4)头标签link,引入外部css文件
- <link rel="stylesheet" type="text/css" href="css(day2)/03.css"/>
e-image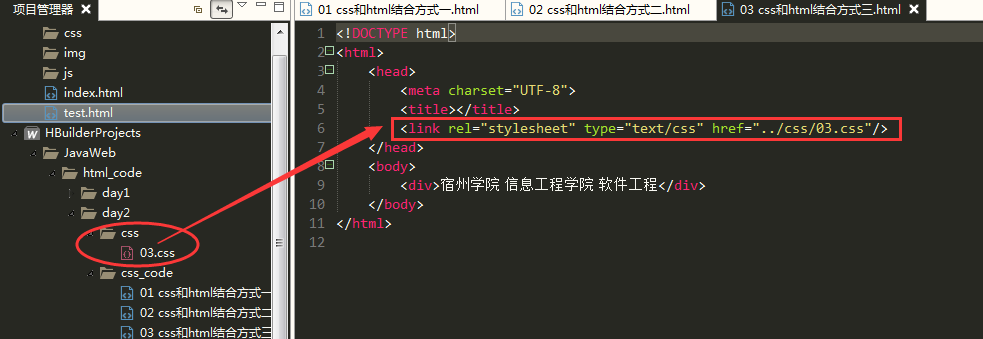
css优先级:由上到下,由外到内。优先级由低到高
**** 后加载的优先级高
3、css的选择器(三种)
** 要对哪个标签里面的数据进行操作
(1)标签选择器(使用标签名作为选择器的名称)
div{background-color: yellow}
pfont{background-color: yellow;}
e-code


 1 <!DOCTYPE html>
 2 <html>
 3     <head>
 4         <meta charset="UTF-8">
 5         <title></title>
 6         <style type="text/css">
 7             div{
 8                 background-color: gray;
 9             }
10             p{
11                 background-color: #0000FF;
12             }
13         </style>
14     </head>
15     <body>
16         <div>宿州学院 信息工程学院 软件工程</div>
17         <p>安徽省</p>
18     </body>
19 </html>
(2)class选择器(属性值为 class) .
/*div.font{background-color: yellow}
p.font{background-color: yellow;}*/
// class属性值相同代码简化方式(.font)
.font{background-color: yellow;}
e-code
 1 <!DOCTYPE html>
 2 <html>
 3     <head>
 4         <meta charset="UTF-8">
 5         <title></title>
 6         <style type="text/css">
 7             /*div.font{
 8                 background-color: yellow
 9             }
10             p.font{
11                 background-color: yellow;
12             }*/
13             .font{
14                 background-color: yellow;
15             }
16         </style>
17     </head>
18     <body>
19         <div class="font">天道勤酬</div>
20         <p class="font">哈哈哈哈哈</p>
21     </body>
22 </html>
(3)id选择器(属性值为 id) #
/*div#font{background-color: yellow}
p#font{background-color: yellow;}*/
// class属性值相同代码简化方式(#font)
#font{background-color: yellow;}
e-code
 1 <!DOCTYPE html>
 2 <html>
 3     <head>
 4         <meta charset="UTF-8">
 5         <title></title>
 6         <style type="text/css">
 7             /*
 8             div#font{
 9                 background-color: yellow;
10             }
11             p#font{
12                 background-color: yellow;
13             }
14             */
15             #font{
16                 background-color: gray;
17             }
18         </style>
19     </head>
20     <body>
21         <div id="font">天道勤酬</div>
22         <p id="font">哈哈哈哈哈</p>
23     </body>
24 </html>
**** 优先级
style > id选择器 > class选择器 > 标签选择器
4、css扩展选择器
(1)关联选择器 div p 中间是空格
* <div><p>www.baidu.com</p></div>
* 设置div标签里面p标签的样式,嵌套标签里面的样式
* div p{background-color: yellow;}
e-image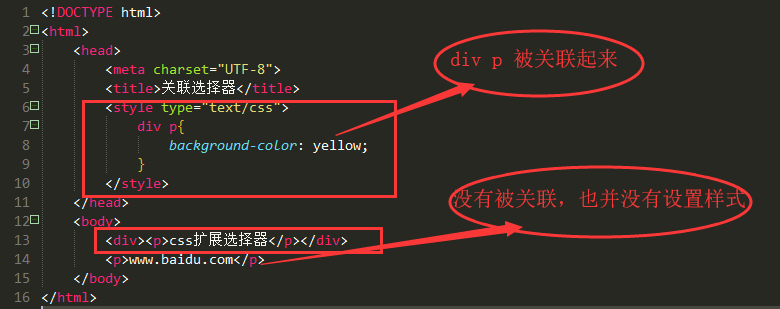
(2)组合选择器 div,p p中间是逗号
* <div>www.baidu.com</div>
* <p>www.google.com</p>
* 把不同的标签设置成相同的样式
* div,p{background-color: yellow;}
e-image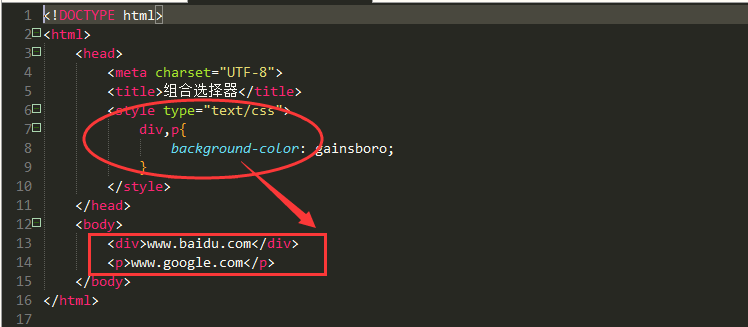
(3)伪元素选择器
* css里面听了一些定义好的样式,可以直接使用
* 如:超链接
** 超链接的状态
- 原始状态 鼠标悬停状态 点击 点击之后
:link :hover :active :visited
e-image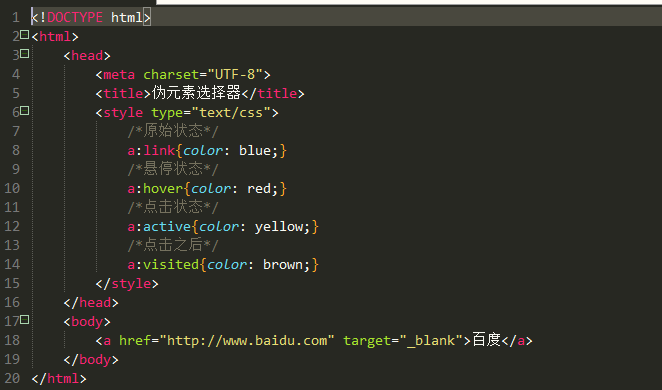
5、css盒子模型
** 进行布局前需要把数据封装到一块一块的区域内(div)
(1)边框 border
border:2px solid blue;
border:统一设置
上:border-top
下:border-bottom
左:border-left
右:border-right
e-code
 1 <!DOCTYPE html>
 2 <html>
 3     <head>
 4         <meta charset="UTF-8">
 5         <title>css盒子模型[边框border]</title>
 6         <style type="text/css">
 7             div{
 8                 width: 200px;
 9                 height: 100px;
10                 border: 2px solid blue;
11             }
12             #div12{
13                 /* div id="div12边框右侧更改了样式:虚线__红色*/
14                 border-right: 2px dashed red;
15             }
16         </style>
17     </head>
18     <body>
19         <div id="div11">AAAAAAAA</div>
20         <div id="div12">BBBBBBBB</div>
21         <div id="div13">CCCCCCCC</div>
22     </body>
23 </html>
e-image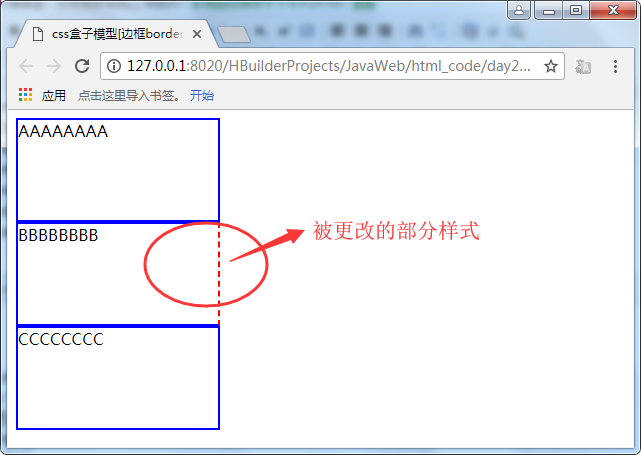
(2)内边距 padding
padding:10px;
统一设置:上下左右四个内边距
e-code
 1 <!DOCTYPE html>
 2 <html>
 3     <head>
 4         <meta charset="UTF-8">
 5         <title>css盒子模型[内边距padding]</title>
 6         <style type="text/css">
 7             div{
 8                 width: 200px;
 9                 height: 100px;
10                 border: 2px solid blue;
11             }
12             #div22{
13                 padding: 20px;
14             }
15             #div23{
16                 padding-bottom: 30px;
17             }
18         </style>
19     </head>
20     <body>
21         <div id="div21">AAAAAAAA</div>
22         <div id="div22">BBBBBBBBBBBBBB</div>
23         <div id="div23">CCCCCCCC</div>
24
25     </body>
26 </html>
e-image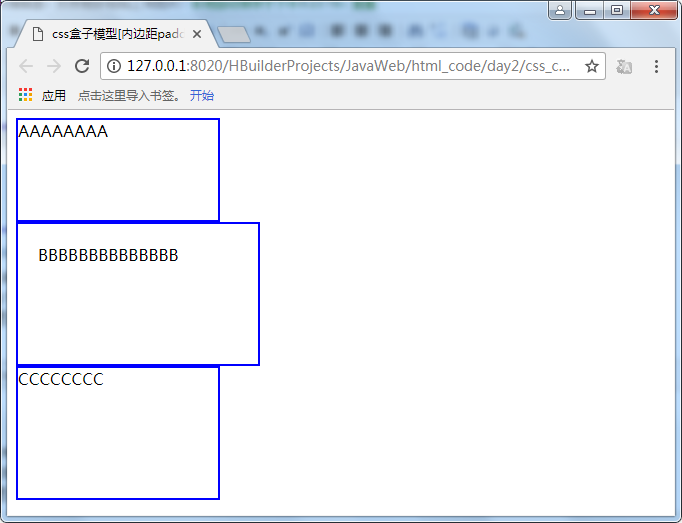
(3)外边距 margin
margin:20px;
统一设置:上下左右四个外边距
e-code
 1 <!DOCTYPE html>
 2 <html>
 3     <head>
 4         <meta charset="UTF-8">
 5         <title>css盒子模型[外边距margin]</title>
 6         <style type="text/css">
 7             div{
 8
 9                 border: 2px solid blue;
10             }
11             #div32{
12                 margin: 20px;
13             }
14             #div33{
15                 margin-left: 50px;
16             }
17         </style>
18     </head>
19     <body>
20         <div id="div31">AAAAAAAA</div>
21         <div id="div32">BBBBBBBBBBBBBB</div>
22         <div id="div33">CCCCCCCC</div>
23
24     </body>
25 </html>
e-image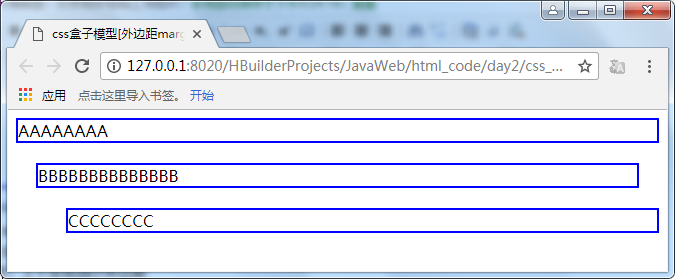
6、css布局的飘浮 float
** 属性值
left: 文本流向对象的右边
right:文本流向对象的左边
e-code
 1 <!DOCTYPE html>
 2 <html>
 3     <head>
 4         <meta charset="UTF-8">
 5         <title>css布局浮动[float]</title>
 6         <style type="text/css">
 7             div{
 8                 width: 200px;
 9                 height: 150px;
10                 border: 2px solid red;
11             }
12             #div41{
13                 float: right;
14             }
15         </style>
16     </head>
17     <body>
18         <div id="div41">AAAAAA</div>
19         <div id="div42">BBBBBB</div>
20         <div id="div43">CCCCCC</div>
21     </body>
22 </html>
e-image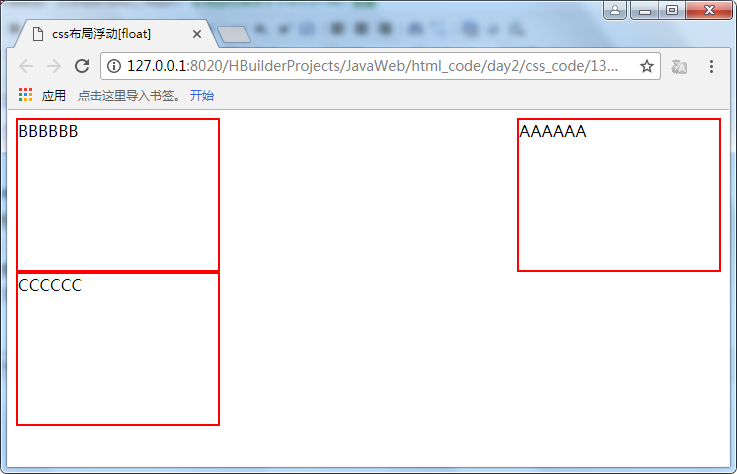
7、css布局的定位 position
** 属性值
- absolute:
** 将对象从文档流中拖出
** 可用top、bottom等属性进行定位
- relative:
** 不会将对象从文档流中拖出
** 可用top、bottom等属性进行定位
e-code
 1 <!DOCTYPE html>
 2 <html>
 3     <head>
 4         <meta charset="UTF-8">
 5         <title>css布局定位[position]</title>
 6         <style type="text/css">
 7             div{
 8                 width: 200px;
 9                 height: 150px;
10                 border: 2px solid black;
11             }
12             #div51{
13                 background-color: red;
14                 position: absolute;
15                 top: 80px;
16                 left: 120px;
17             }
18             #div52{
19                 background-color: yellow;
20                 width: 250px;
21                 height: 150px;
22             }
23             #div53{
24                 background-color: forestgreen;
25             }
26         </style>
27     </head>
28     <body>
29         <div id="div51">AAAAAA</div>
30         <div id="div52">BBBBBB</div>
31         <div id="div53">CCCCCC</div>
32     </body>
33 </html>
e-image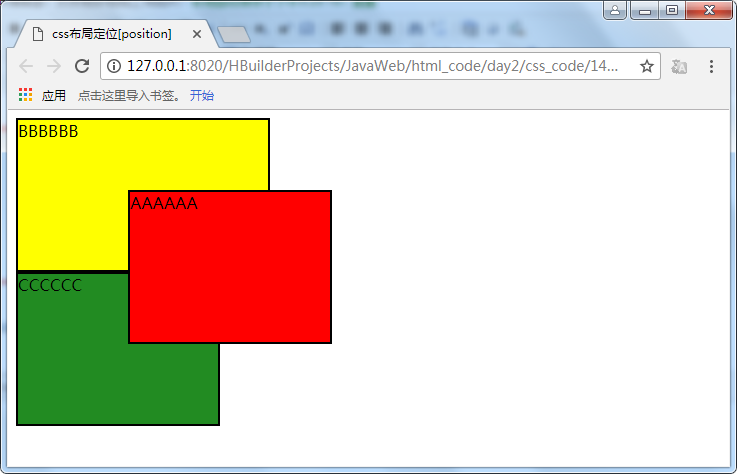
e-code
 1 <!DOCTYPE html>
 2 <html>
 3     <head>
 4         <meta charset="UTF-8">
 5         <title>css布局定位[position]</title>
 6         <style type="text/css">
 7             div{
 8                 width: 200px;
 9                 height: 150px;
10                 border: 2px solid black;
11             }
12             #div51{
13                 background-color: red;
14                 position: relative;
15                 top: 80px;
16                 left: 120px;
17             }
18             #div52{
19                 background-color: yellow;
20             }
21             #div53{
22                 background-color: forestgreen;
23             }
24         </style>
25     </head>
26     <body>
27         <div id="div51">AAAAAA</div>
28         <div id="div52">BBBBBB</div>
29         <div id="div53">CCCCCC</div>
30     </body>
31 </html>
e-image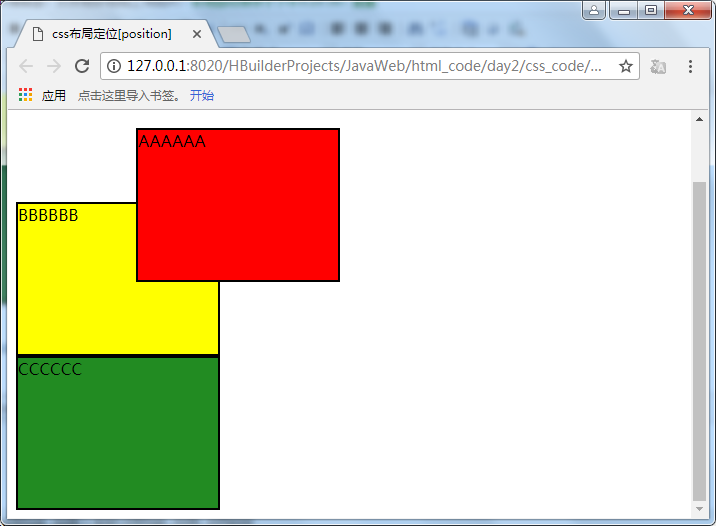
案例 图文混排
e-code
 1 <!DOCTYPE html>
 2 <html>
 3     <head>
 4         <meta charset="UTF-8">
 5         <title>案例 图文混排</title>
 6         <style type="text/css">
 7             #imgtext11{
 8                 width: 400px;
 9                 height: 420px;
10                 border: 2px dashed orange;
11             }
12             #img11{
13                 /*float: left*/;
14                 float: right;
15             }
16             #text11{
17                 color: firebrick;
18             }
19         </style>
20     </head>
21     <body>
22         <div id="imgtext11">
23         <div id="img11"><img src="../imges/a.jpg" width="250" height="300"/></div>
24         <div id="text11">
25             JDBC(Java Data Base Connecttivity ,java数据库连接),有一些接口和类构成的PAI
26             连接数据的步骤
27             1,注册驱动(一次即可,一劳永逸)//实现jdbc驱动
28             // 推荐:不会读具体的驱动类产生依赖// 会造成DriverManager中产生两个一样的驱动,并会对具体的驱动类产生依赖
29             DriverManager.registerDriver(new com.mysql.jdbc.Driver());
30             // 虽然不会对具体的驱动类产生依赖,但注册不太方便,很少使用。
31             System.setProperty("jdbc.driver", "com.mysql.jdbc.Driver");//键值对方式
32             </div>
33         </div>
34     </body>
35 </html>
e-image
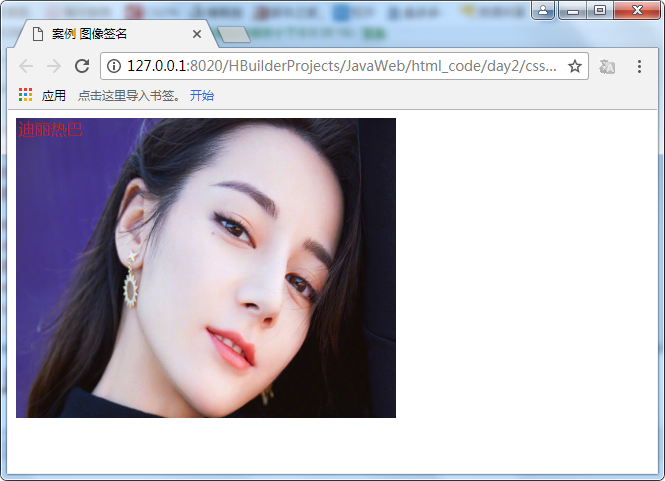
案例 图像签名 文字漂浮在图像上面
e-code
 1 <!DOCTYPE html>
 2 <html>
 3     <head>
 4         <meta charset="UTF-8">
 5         <title>案例 图像签名</title>
 6         <style type="text/css">
 7             #text21{
 8                 position: absolute;
 9                 top: 8px;
10                 left: 10px;
11                 color: firebrick;
12             }
13         </style>
14     </head>
15     <body>
16         <div id="img21"><img src="../imges/b.jpg" width="380" height="300"/></div>
17         <div id="text21">迪丽热巴</div>
18     </body>
19 </html>
e-image