ImageDataLayer 继承关系
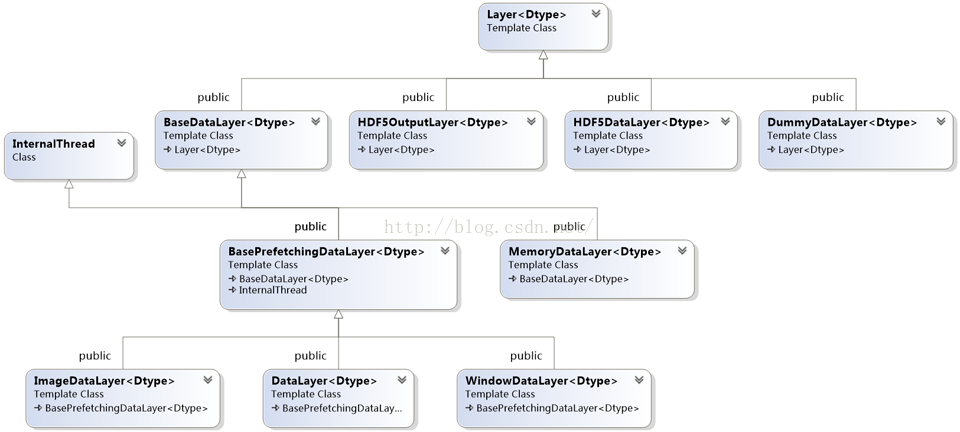
可以发现ImageDataLayer层继承于BasePrefetchingDataLayer层,而BasePrefetchingDataLayer继承于BaseDataLayer层InternalThread层,BaseDataLayer则继承于最原始的Layer层。下面具体讲讲实现方式。
1、BaseDataLayer
查看data_layers.hpp,发现类BaseDataLayer声明了三个变量:
Protected:
    TransformationParameter transform_param_;
    shared_ptr<DataTransformer<Dtype> > data_transformer_;
    bool output_labels_;
声明了TransformationParameter对象参数,data_transformer_数据处理器,top是否具有label。接着看类声明函数:
template <typename Dtype>
class BaseDataLayer : public Layer<Dtype> {
public:
    explicit BaseDataLayer(const LayerParameter& param);
    // LayerSetUp: implements common data layer setup functionality, and calls
    // DataLayerSetUp to do special data layer setup for individual layer types.
    // This method may not be overridden except by the BasePrefetchingDataLayer.

    virtual void LayerSetUp(const vector<Blob<Dtype>*>& bottom,
            const vector<Blob<Dtype>*>& top) {}
    virtual void DataLayerSetUp(const vector<Blob<Dtype>*>& bottom,
            const vector<Blob<Dtype>*>& top) {}

    // Data layers have no bottoms, so reshaping is trivial.
    virtual void Reshape(const vector<Blob<Dtype>*>& bottom,
            const vector<Blob<Dtype>*>& top) {}

    virtual void Backward_cpu(const vector<Blob<Dtype>*>& top,
            const vector<bool>& propagate_down, const vector<Blob<Dtype>*>& bottom) {}


    virtual void Backward_gpu(const vector<Blob<Dtype>*>& top,
            const vector<bool>& propagate_down, const vector<Blob<Dtype>*>& bottom) {}
可以看到做了三件事情:
1、将LayerParameter参数对象传递给BaseDataLayer层的构造函数。
2、层配置,调用LayerSetUp实现通用层配置,调用DataLayerSetUp实现数据读取层的特殊设置。
3、Reshape()由于数据读取层没有底部bottom,所以变形操作很简单,后向传播不做任何操作仅声明而已。
让我们看看BaseDataLayer.cpp做了些什么:
template <typename Dtype>
BaseDataLayer<Dtype>::BaseDataLayer(const LayerParameter& param)
    : Layer<Dtype>(param),
      transform_param_(param.transform_param()) {
}

template <typename Dtype>
void BaseDataLayer<Dtype>::LayerSetUp(const vector<Blob<Dtype>*>& bottom,
      const vector<Blob<Dtype>*>& top) {
  if (top.size() == 1) {
    output_labels_ = false;
  } else {
    output_labels_ = true;
  }
  data_transformer_.reset(
      new DataTransformer<Dtype>(transform_param_, this->phase_));
  data_transformer_->InitRand();
  // The subclasses should setup the size of bottom and top
  DataLayerSetUp(bottom, top);
}
首先LayerSetUp确定是否输出label,确定out_label_到底是true还是false,接着具体特殊层的建立,DataLayerSetUp并没有做任何功能实现,这是因为具体特殊层在各个派生类中具体实现就好了。这里只是调用。
2、BasePretchingDataLayer层的解析,同理,看.hpp文件,声明了三个变量。
    Blob<Dtype> prefetch_data_;
    Blob<Dtype> prefetch_label_;
    Blob<Dtype> transformed_data_;
三个Blob块,一个prefetch_data_,一个prefetch_label_,一个transformed_data_。可以想一下,perfetch_data_ 和data_不同的地方是data_是Blob里声明的变量,用于存储一张图片,而perfetch_data_里也是Blob里声明的变量,但不同是perfetch_data_里是以Batch为单位存储的,当然不代表perfetch_data_ 就是Batch个Blob,事实是data_和prefetch_data_都是一个Blob,只不过 shape(0) 维度不同而已。下面看声明函数:
template <typename Dtype>
class BasePrefetchingDataLayer :
        public BaseDataLayer<Dtype>, public InternalThread {
        public:
    explicit BasePrefetchingDataLayer(const LayerParameter& param)
    : BaseDataLayer<Dtype>(param) {}
    // LayerSetUp: implements common data layer setup functionality, and calls
    // DataLayerSetUp to do special data layer setup for individual layer types.
    // This method may not be overridden.
    void LayerSetUp(const vector<Blob<Dtype>*>& bottom,
            const vector<Blob<Dtype>*>& top);

    virtual void Forward_cpu(const vector<Blob<Dtype>*>& bottom,
            const vector<Blob<Dtype>*>& top);

    virtual void Forward_gpu(const vector<Blob<Dtype>*>& bottom,
            const vector<Blob<Dtype>*>& top);

    virtual void CreatePrefetchThread();

    virtual void JoinPrefetchThread();
    // The thread's function
    virtual void InternalThreadEntry() {}
BasePretchingDataLayer继承自BaseDataLayer 层和 InternalThread封装线程,创建了预取线层,加入预取线层,定义了内部线程入口。
template <typename Dtype>
void BasePrefetchingDataLayer<Dtype>::LayerSetUp(
    const vector<Blob<Dtype>*>& bottom, const vector<Blob<Dtype>*>& top) {
  BaseDataLayer<Dtype>::LayerSetUp(bottom, top);
  // Now, start the prefetch thread. Before calling prefetch, we make two
  // cpu_data calls so that the prefetch thread does not accidentally make
  // simultaneous cudaMalloc calls when the main thread is running. In some
  // GPUs this seems to cause failures if we do not so.
  this->prefetch_data_.mutable_cpu_data();
  if (this->output_labels_) {
    this->prefetch_label_.mutable_cpu_data();
  }
哇塞,惊呆的一看原来BasePretchingDataLayer里面声明的LayerSetUp实现方式是BaseDataLayer的SetUp函数,那么在后面的ImageDataLayer中,我们明确了我们的目的便是实现DataLayerSetUp,建立起来之后,分别对data和label进行了cudaMalloc,避免在多线程情况下同时进行cudaMalloc,导致CUDA API调用失败。
template <typename Dtype>
void BasePrefetchingDataLayer<Dtype>::Forward_cpu(
    const vector<Blob<Dtype>*>& bottom, const vector<Blob<Dtype>*>& top) {
  // First, join the thread
  JoinPrefetchThread();
  DLOG(INFO) << "Thread joined";
  // Reshape to loaded data.
  top[0]->ReshapeLike(prefetch_data_);
  // Copy the data
  caffe_copy(prefetch_data_.count(), prefetch_data_.cpu_data(),
             top[0]->mutable_cpu_data());
  DLOG(INFO) << "Prefetch copied";
  if (this->output_labels_) {
    // Reshape to loaded labels.
    top[1]->ReshapeLike(prefetch_label_);
    // Copy the labels.
    caffe_copy(prefetch_label_.count(), prefetch_label_.cpu_data(),
               top[1]->mutable_cpu_data());
这部分不多说,仔细看应该可以看得懂,实际上是把pretch_data_和pretch_label_分别存储(通过复制的方式)到top[0]和top[1] 中。
3、ImageDataLayer
刚入门caffe的肯定是用demo里面的leveldb格式的数据库,说实话这数据库用起来太麻烦了,所以有必要从image_data_layer进行数据读取,最原始但最统一的入门方式,作者也是很久了才想是不是要看看image_data_layer的代码,但看代码太痛苦了!话不多说,直接打开data_layer.hpp:
template <typename Dtype>
class ImageDataLayer : public BasePrefetchingDataLayer<Dtype> {
public:
    explicit ImageDataLayer(const LayerParameter& param)
    : BasePrefetchingDataLayer<Dtype>(param) {}
    virtual ~ImageDataLayer();
    virtual void DataLayerSetUp(const vector<Blob<Dtype>*>& bottom,
            const vector<Blob<Dtype>*>& top);

    virtual inline const char* type() const { return "ImageData"; }
    virtual inline int ExactNumBottomBlobs() const { return 0; }
    virtual inline int ExactNumTopBlobs() const { return 2; }

protected:
    shared_ptr<Caffe::RNG> prefetch_rng_;
    virtual void ShuffleImages();
    virtual void InternalThreadEntry();
ImageDataLayer继承自BasePrefetchingDataLayer,参数从LayerParameter对象param传到BasePretchingDataLayer对象 然后传到 ImageDataLayer,然后还是最本质的DataLayerSetUp(),其他的其实都是一些很容易看得懂的东西。注意在新的派生类中有新的变量,prefetch_rng_这是一个RNG类指针,shuffleImages也是这层特有的,具体后面看实现解析,InternalThreadEntry是内部封装函数入口,实现中解析。
接着看声明的变量:
vector<std::pair<std::string, int> > lines_;

int lines_id_;
嗯,就是这样lines_是一个vector,lines_id_是行数,在.txt文件里,我们发现每一行都是映射对(data label),所以,lines是一个vector用来存储所有行的数据。
接下来可以看一下具体实现,ImageDataLayer.cpp:
template <typename Dtype>
ImageDataLayer<Dtype>::~ImageDataLayer<Dtype>() {
  this->JoinPrefetchThread();
}
加入线程,这一块不怎么懂,所以也不关注了,接着往下看。
template <typename Dtype>
void ImageDataLayer<Dtype>::DataLayerSetUp(const vector<Blob<Dtype>*>& bottom,
      const vector<Blob<Dtype>*>& top) {
  const int new_height = this->layer_param_.image_data_param().new_height();
  const int new_width  = this->layer_param_.image_data_param().new_width();
  const bool is_color  = this->layer_param_.image_data_param().is_color();
  string root_folder = this->layer_param_.image_data_param().root_folder();

  CHECK((new_height == 0 && new_width == 0) ||
      (new_height > 0 && new_width > 0)) << "Current implementation requires "
      "new_height and new_width to be set at the same time.";
  // Read the file with filenames and labels
  const string& source = this->layer_param_.image_data_param().source();
  LOG(INFO) << "Opening file " << source;
  std::ifstream infile(source.c_str());
  string filename;
  int label;
  while (infile >> filename >> label) {
    lines_.push_back(std::make_pair(filename, label));
  }
首先加入内部封装进程,其次,实现DataSetUp,注意,这里的参数new_height,new_width,is_color,root_folder,source,都是在caffe.proto中实现的,所以,这个过程是在获取ImageDataLayer参数,这里的参数是在prototxt里面定义的。
 if (this->layer_param_.image_data_param().shuffle()) {
    // randomly shuffle data
    LOG(INFO) << "Shuffling data";
    const unsigned int prefetch_rng_seed = caffe_rng_rand();
    prefetch_rng_.reset(new Caffe::RNG(prefetch_rng_seed));
    ShuffleImages();
  }
打乱数据,防止结果偏向某一类,这也只是大概看了下,不是重点,不深究,所以暂时先放一下。
 lines_id_ = 0;
  // Check if we would need to randomly skip a few data points
  if (this->layer_param_.image_data_param().rand_skip()) {
    unsigned int skip = caffe_rng_rand() %
        this->layer_param_.image_data_param().rand_skip();
    LOG(INFO) << "Skipping first " << skip << " data points.";
    CHECK_GT(lines_.size(), skip) << "Not enough points to skip";
    lines_id_ = skip;
  }
  // Read an image, and use it to initialize the top blob.
  cv::Mat cv_img = ReadImageToCVMat(root_folder + lines_[lines_id_].first,
                                    new_height, new_width, is_color);
  // Use data_transformer to infer the expected blob shape from a cv_image.
  vector<int> top_shape = this->data_transformer_->InferBlobShape(cv_img);
  this->transformed_data_.Reshape(top_shape);
  // Reshape prefetch_data and top[0] according to the batch_size.
  const int batch_size = this->layer_param_.image_data_param().batch_size();
  top_shape[0] = batch_size;
  this->prefetch_data_.Reshape(top_shape);
  top[0]->ReshapeLike(this->prefetch_data_);

  LOG(INFO) << "output data size: " << top[0]->num() << ","
      << top[0]->channels() << "," << top[0]->height() << ","
      << top[0]->width();
  // label
  vector<int> label_shape(1, batch_size);
  top[1]->Reshape(label_shape);
  this->prefetch_label_.Reshape(label_shape);
}

template <typename Dtype>
void ImageDataLayer<Dtype>::ShuffleImages() {
  caffe::rng_t* prefetch_rng =
      static_cast<caffe::rng_t*>(prefetch_rng_->generator());
  shuffle(lines_.begin(), lines_.end(), prefetch_rng);
}
这个的英文注释其实很清楚了,主要做了以下几件事情:
1、随机跳过前几个数据,随机选择起始数据。
2、先读一幅图片到cv_img(这个是opencv里的操作,也没什么了解,具体可以看),注意看root_folder + lines_[lines_id_].first可以访问到目标图片,那么我们要知道了,训练的时候,如果数据存在train的文件夹里,那么root_folder则是/path/to/train ,而lines_[lines_id].first 便是.txt文件里的文件名,这是需要注意的一点。
3、根据读取数据的形状,将在BasePretchingDataLayer中预取的数据pretch_data_和pretch_label_ 的形状分别reshape,注意到 top_shape[0] = batch_size; 实际上每次pretch_data_ 每次读入一个batch。
4、shuffle了。。。。
template <typename Dtype>
void ImageDataLayer<Dtype>::InternalThreadEntry() {
  CPUTimer batch_timer;
  batch_timer.Start();
  double read_time = 0;
  double trans_time = 0;
  CPUTimer timer;
  CHECK(this->prefetch_data_.count());
  CHECK(this->transformed_data_.count());
  ImageDataParameter image_data_param = this->layer_param_.image_data_param();
  const int batch_size = image_data_param.batch_size();
  const int new_height = image_data_param.new_height();
  const int new_width = image_data_param.new_width();
  const bool is_color = image_data_param.is_color();
  string root_folder = image_data_param.root_folder();
// Reshape according to the first image of each batch
  // on single input batches allows for inputs of varying dimension.
  cv::Mat cv_img = ReadImageToCVMat(root_folder + lines_[lines_id_].first,
      new_height, new_width, is_color);
  // Use data_transformer to infer the expected blob shape from a cv_img.
  vector<int> top_shape = this->data_transformer_->InferBlobShape(cv_img);
  this->transformed_data_.Reshape(top_shape);
  // Reshape prefetch_data according to the batch_size.
  top_shape[0] = batch_size;
  this->prefetch_data_.Reshape(top_shape);

  Dtype* prefetch_data = this->prefetch_data_.mutable_cpu_data();
  Dtype* prefetch_label = this->prefetch_label_.mutable_cpu_data();
接下来定义内部线程用来预取数据,先预取一个blob,来reshape prefetch_data_ 和pretetch_label_ ,然后Net读入的是prefetch_data_ 和prefetch_label_。
/ datum scales
  const int lines_size = lines_.size();
  for (int item_id = 0; item_id < batch_size; ++item_id) {
    // get a blob
    timer.Start();
    CHECK_GT(lines_size, lines_id_);
    cv::Mat cv_img = ReadImageToCVMat(root_folder + lines_[lines_id_].first,
        new_height, new_width, is_color);
    CHECK(cv_img.data) << "Could not load " << lines_[lines_id_].first;
    read_time += timer.MicroSeconds();
    timer.Start();
    // Apply transformations (mirror, crop...) to the image
    int offset = this->prefetch_data_.offset(item_id);
    this->transformed_data_.set_cpu_data(prefetch_data + offset);
    this->data_transformer_->Transform(cv_img, &(this->transformed_data_));
    trans_time += timer.MicroSeconds();

    prefetch_label[item_id] = lines_[lines_id_].second;
    // go to the next iter
    lines_id_++;
    if (lines_id_ >= lines_size) {
      // We have reached the end. Restart from the first.
      DLOG(INFO) << "Restarting data prefetching from start.";
      lines_id_ = 0;
      if (this->layer_param_.image_data_param().shuffle()) {
        ShuffleImages();
      }
    }
  }
  batch_timer.Stop();
  DLOG(INFO) << "Prefetch batch: " << batch_timer.MilliSeconds() << " ms.";
  DLOG(INFO) << "     Read time: " << read_time / 1000 << " ms.";
  DLOG(INFO) << "Transform time: " << trans_time / 1000 << " ms.";
}