Notification 历史和现状
| iOSVersion | 新增推送特性描述 |
|---|---|
| iOS 3 | 引入推送通知 UIApplication 的 registerForRemoteNotificationTypes 与 UIApplicationDelegate 的 application(:didRegisterForRemoteNotificationsWithDeviceToken:),application(:didReceiveRemoteNotification:) |
| iOS 4 | 引入本地通知 scheduleLocalNotification,presentLocalNotificationNow:, application(_:didReceive:) |
| iOS 5 | 加入通知中心页面 |
| iOS 6 | 通知中心页面与 iCloud 同步 |
| iOS 7 | 后台静默推送application(_:didReceiveRemoteNotification:fetchCompletionHandle:) |
| iOS 8 | 重新设计 notification 权限请求,Actionable 通知 registerUserNotificationSettings(:),UIUserNotificationAction 与 UIUserNotificationCategory,application(:handleActionWithIdentifier:forRemoteNotification:completionHandler:) 等 |
| iOS 9 | Text Input action,基于 HTTP/2 的推送请求 UIUserNotificationActionBehavior,全新的 Provider API 等 |
| iOS 10 | 添加新框架:UserNotifications.framework ,使用 UserNotifications 类轻松操作通知内容 |
注册过一次后,再调用这个接口就不会询问了
- (BOOL)application:(UIApplication*)application didFinishLaunchingWithOptions:(NSDictionary*)launchOptions{ // todo ... [self RegistNotificationSettings]; return YES;}
在多数移动应用中任何时候都只能有一个应用程序处于活跃状态,如果其他应用此刻发生了一些用户感兴趣的那么通过通知机制就可以告诉用户此时发生的事情。iOS中通知机制又叫消息机制,其包括两类:一类是本地通知;另一类是推送通知,也叫远程通知。两种通知在iOS中的表现一致,可以通过横幅或者弹出提醒两种形式告诉用户,并且点击通知可以会打开应用程序,但是实现原理却完全不同。今天就和大家一块去看一下如何在iOS中实现这两种机制,并且在文章后面会补充通知中心的内容避免初学者对两种概念的混淆。
本地通知是由本地应用触发的,它是基于时间行为的一种通知形式,例如闹钟定时、待办事项提醒,又或者一个应用在一段时候后不使用通常会提示用户使用此应用等都是本地通知。创建一个本地通知通常分为以下几个步骤:
- 创建UILocalNotification。
- 设置处理通知的时间fireDate。
- 配置通知的内容:通知主体、通知声音、图标数字等。
- 配置通知传递的自定义数据参数userInfo(这一步可选)。
- 调用通知,可以使用scheduleLocalNotification:按计划调度一个通知,也可以使用presentLocalNotificationNow立即调用通知。
注意:
- 在使用通知之前必须注册通知类型,如果用户不允许应用程序发送通知,则以后就无法发送通知,除非用户手动到iOS设置中打开通知。
- 本地通知是有操作系统统一调度的,只有在应用退出到后台或者关闭才能收到通知。(注意:这一点对于后面的推送通知也是完全适用的。 )
- 通知的声音是由iOS系统播放的,格式必须是Linear PCM、MA4(IMA/ADPCM)、µLaw、aLaw中的一种,并且播放时间必须在30s内,否则将被系统声音替换,同时自定义声音文件必须放到main boundle中。
- 本地通知的数量是有限制的,最近的本地通知最多只能有64个,超过这个数量将被系统忽略。
- 如果想要移除本地通知可以调用UIApplication的cancelLocalNotification:或cancelAllLocalNotifications移除指定通知或所有通知。
和本地通知不同,推送通知是由应用服务提供商发起的,通过苹果的APNs(Apple Push Notification Server)发送到应用客户端。下面是苹果官方关于推送通知的过程示意图:

推送通知的过程可以分为以下几步:
- 应用服务提供商从服务器端把要发送的消息和设备令牌(device token)发送给苹果的消息推送服务器APNs。
- APNs根据设备令牌在已注册的设备(iPhone、iPad、iTouch、mac等)查找对应的设备,将消息发送给相应的设备。
- 客户端设备接将接收到的消息传递给相应的应用程序,应用程序根据用户设置弹出通知消息。
当然,这只是一个简单的流程,有了这个流程我们还无从下手编写程序,将上面的流程细化可以得到如下流程图(图片来自互联网),在这个过程中会也会提到如何在程序中完成这些步骤:
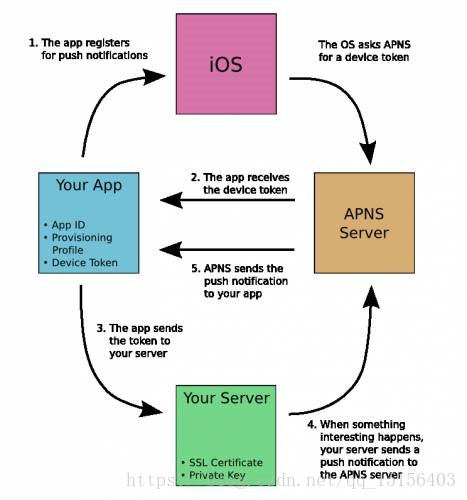
1.应用程序注册APNs推送消息。
说明:
a.只有注册过的应用才有可能接收到消息,程序中通常通过UIApplication的registerUserNotificationSettings:方法注册,iOS8中通知注册的方法发生了改变,如果是iOS7及之前版本的iOS请参考其他代码。
b.注册之前有两个前提条件必须准备好:开发配置文件(provisioning profile,也就是.mobileprovision后缀的文件)的App ID不能使用通配ID必须使用指定APP ID并且生成配置文件中选择Push Notifications服务,一般的开发配置文件无法完成注册;应用程序的Bundle Identifier必须和生成配置文件使用的APP ID完全一致。
2.iOS从APNs接收device token,在应用程序获取device token。
说明:
a.在UIApplication的-(void)application:(UIApplication *)application didRegisterForRemoteNotificationsWithDeviceToken:(NSData *)deviceToken代理方法中获取令牌,此方法发生在注册之后。
b.如果无法正确获得device token可以在UIApplication的-(void)application:(UIApplication *)application didFailToRegisterForRemoteNotificationsWithError:(NSError *)error代理方法中查看详细错误信息,此方法发生在获取device token失败之后。
c.必须真机调试,模拟器无法获取device token。
3.iOS应用将device token发送给应用程序提供商,告诉服务器端当前设备允许接收消息。
说明:
a.device token的生成算法只有Apple掌握,为了确保算法发生变化后仍然能够正常接收服务器端发送的通知,每次应用程序启动都重新获得device token(注意:device token的获取不会造成性能问题,苹果官方已经做过优化)。
b.通常可以创建一个网络连接发送给应用程序提供商的服务器端, 在这个过程中最好将上一次获得的device token存储起来,避免重复发送,一旦发现device token发生了变化最好将原有的device token一块发送给服务器端,服务器端删除原有令牌存储新令牌避免服务器端发送无效消息。
4.应用程序提供商在服务器端根据前面发送过来的device token组织信息发送给APNs。
说明:
a.发送时指定device token和消息内容,并且完全按照苹果官方的消息格式组织消息内容,通常情况下可以借助其他第三方消息推送框架来完成。
5.APNs根据消息中的device token查找已注册的设备推送消息。
说明:
a.正常情况下可以根据device token将消息成功推送到客户端设备中,但是也不排除用户卸载程序的情况,此时推送消息失败,APNs会将这个错误消息通知服务器端以避免资源浪费(服务器端此时可以根据错误删除已经存储的device token,下次不再发送)。
下面将简单演示一下推送通知的简单流程:
ios10 ios8 ios7以前注册远程通知的方法
- if #available(iOS 10.0, *) {
- let center = UNUserNotificationCenter.current()
- center.requestAuthorization(options: UNAuthorizationOptions(rawValue : UNAuthorizationOptions.alert.rawValue | UNAuthorizationOptions.badge.rawValue | UNAuthorizationOptions.sound.rawValue)){ (granted: Bool, error:Error?) in
- if granted {
- print("success")
- }
- }
- UIApplication.shared.registerForRemoteNotifications()
- // center.delegate = self
- }else if #available(iOS 8.0, *) {
- // 请求授权
- let type = UIUserNotificationType.alert.rawValue | UIUserNotificationType.badge.rawValue | UIUserNotificationType.sound.rawValue
- let set = UIUserNotificationSettings(types: UIUserNotificationType(rawValue: type), categories: nil)
- UIApplication.shared.registerUserNotificationSettings(set)
- // 需要通过设备UDID, 和app bundle id, 发送请求, 获取deviceToken
- UIApplication.shared.registerForRemoteNotifications()
- }else {
- let type = UIRemoteNotificationType(rawValue: UIRemoteNotificationType.alert.rawValue | UIRemoteNotificationType.sound.rawValue | UIRemoteNotificationType.badge.rawValue)
- UIApplication.shared.registerForRemoteNotifications(matching: type)
- }
上代码
导入库
Import the UserNotifications framework and add the UNUserNotificationCenterDelegate in AppDelegate.swift
Request user permission
func application(_ application: UIApplication, didFinishLaunchingWithOptions launchOptions: [NSObject: AnyObject]?) -> Bool {


        let center = UNUserNotificationCenter.current()
        center.requestAuthorization(options:[.badge, .alert, .sound]) { (granted, error) in
            // Enable or disable features based on authorization.
        }
        application.registerForRemoteNotifications()
        return true
}
Getting device token
func application(_ application: UIApplication, didRegisterForRemoteNotificationsWithDeviceToken deviceToken: Data) {

    let deviceTokenString = deviceToken.reduce("", {$0 + String(format: "%02X", $1)})
    print(deviceTokenString)
}
In case of error
func application(_ application: UIApplication, didFailToRegisterForRemoteNotificationsWithError error: Error) {

        print("i am not available in simulator \(error)")
In case if you need to know the permissions granted
UNUserNotificationCenter.current().getNotificationSettings(){ (settings) in

            switch settings.soundSetting{
            case .enabled:

                print("enabled sound setting")

            case .disabled:

                print("setting has been disabled")

            case .notSupported:
                print("something vital went wrong here")
            }
        }