声明:本人是个小白,博文中的知识都是我从网上归类总结而来,主要是记录一下我的学习历程;如果各位网友有什么更好的参考资料欢迎推荐。
最近在学习【腾飞(Jesse)】 大神的 【ASP.NET Core 快速入门】 教程,在看第一章将 .NET Core 应用程序部署到 Linux 系统时,大神的做法是在vmware上安装 CentOS 系统,然后配置 Nginx 和 .NET Core 运行环境。由于我的电脑配置比较低,所以我并不想安装虚拟机,于是就想到了能不能在 win10 的子系统上进行类似的操作呢?虽然以前子系统刚出来的时候我有玩过,但是后面学校学习紧张,后面就慢慢的淡忘了。
下面我就从
1、安装子系统开始 2、配置 Nginx 环境 3、配置 .NET Core 运行环境 4、发布项目到 Linux 这几个开始我的记录。
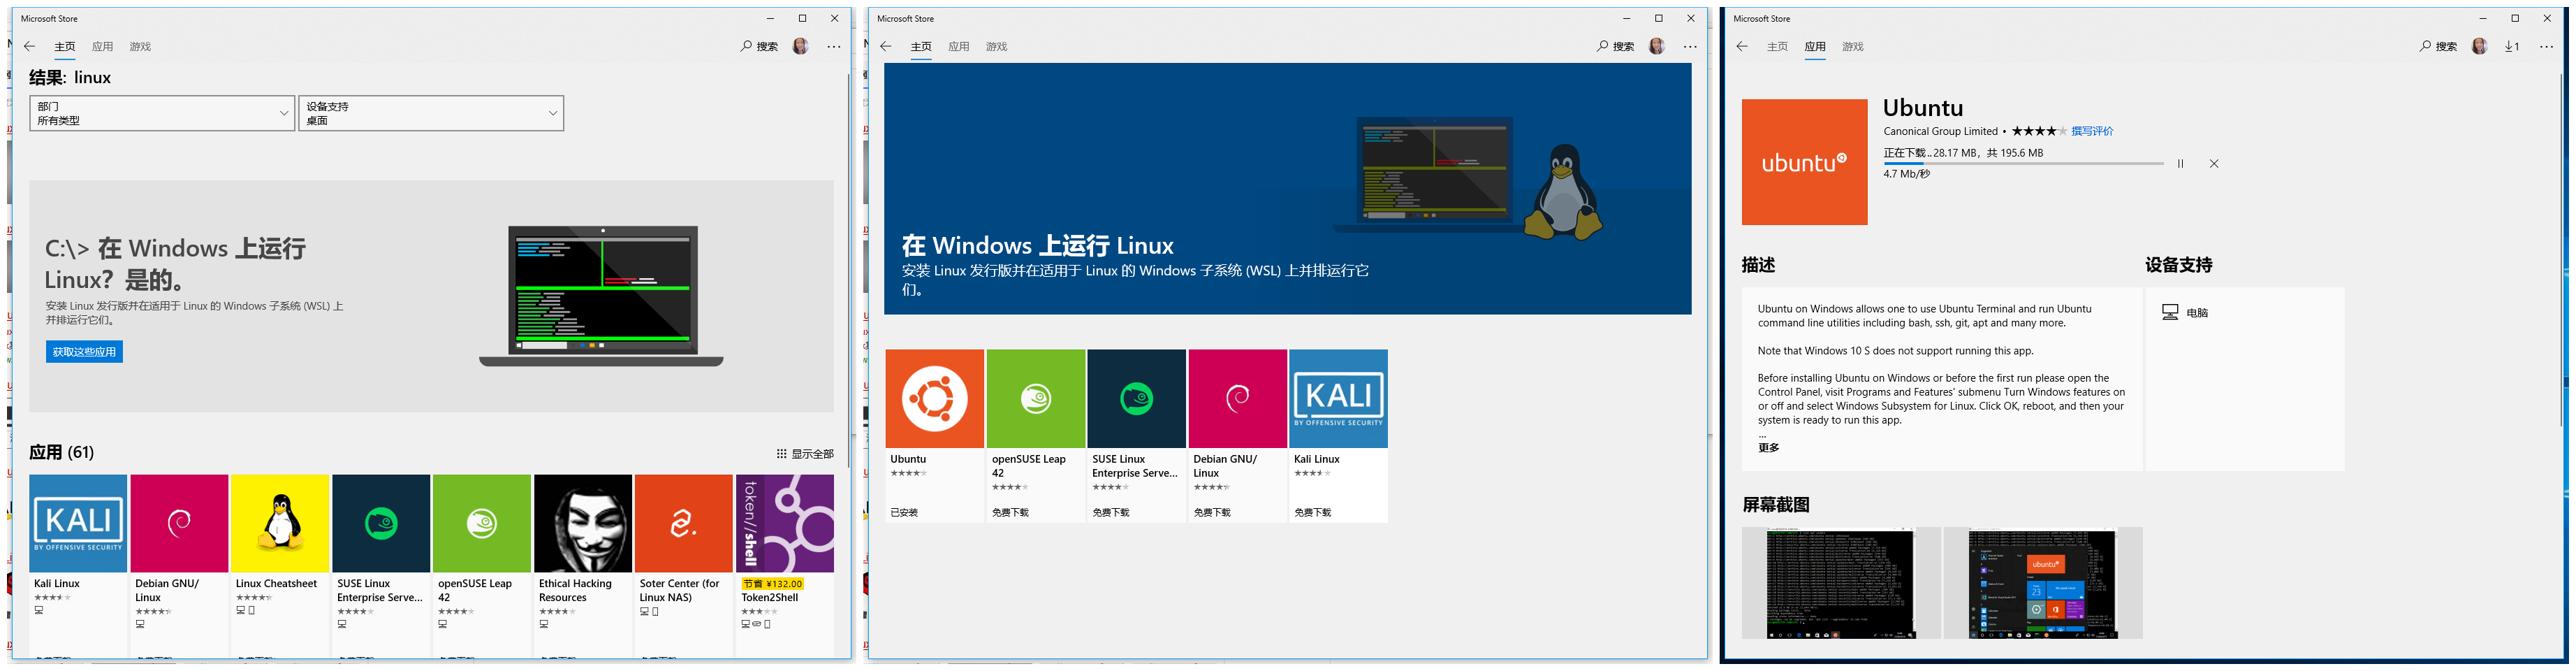
1、Ubuntu 子系统安装;打开控制面板搜索启用和关闭 windows 功能,勾选 适用于 Linux 的 Window 子系统功能,然后就是重启电脑;重启电脑后进入 Microsoft Store 搜索 Linux 就可以找到相关的系统;这里我以下载 Unbuntu 系统为例(主要是商店里没有 CentOS 系统)。
安装好之后就可以启动了。启动后就可以进入 Unbuntu 系统了,第一次进入需要设置用户名和密码( lwi/123 ),设置好后就可以使用了;不过我比较喜欢使用权限最高的 root 账户,于是我们开启它;输入命令


sudo passwd root
然后需要输入密码:123
su root
切换时也需要输入密码:123(我们刚才设置的 root 用户密码)。接着我们来查看一下系统的版本,输入 lsb_release -a ;这个系统版本在后面我们安装 .NET Core 运行环境时需要安装对应的版本。
root@YJ:/var/www/html# lsb_release -a
No LSB modules are available.
Distributor ID: Ubuntu
Description:    Ubuntu 16.04.4 LTS
Release:        16.04
Codename:       xenial
root@YJ:/var/www/html#
2、安装并配置 Nginx 环境
sudo apt-get install nginx
然后我们需要配置一下 Nginx ;将等下需要发布的网站目录,映射的端口号等修改一下,由于本机 IIS 已经占用了 80 端口,所以 Nginx 的监听端口我改为了 8080 ,以下就是要用到的一些命令【Nginx 配置文件在 /etc/nginx/sites-available/ 下的 default 文件(其实还有其它地方,这里我就不详解了,因为我也不是很清楚,先按着我找到的来配置好了)】:
root@YJ:/# cd /etc/nginx/sites-available/
root@YJ:/etc/nginx/sites-available# sudo vim default
用来发布的项目没有使用新建的 .NET Core Web 项目,而是使用了我最近在学习的【在7楼】大神的 【从零开始搭建自己的.NET Core Api框架】项目(非原项目,是我自己跟着大神的脚步慢慢搭建的)。
##
# You should look at the following URL's in order to grasp a solid understanding
# of Nginx configuration files in order to fully unleash the power of Nginx.
# http://wiki.nginx.org/Pitfalls
# http://wiki.nginx.org/QuickStart
# http://wiki.nginx.org/Configuration
#
# Generally, you will want to move this file somewhere, and start with a clean
# file but keep this around for reference. Or just disable in sites-enabled.
#
# Please see /usr/share/doc/nginx-doc/examples/ for more detailed examples.
##

# Default server configuration
#
server {
    listen 8080 default_server;
    listen [::]:8080 default_server;

    # SSL configuration
    #
    # listen 443 ssl default_server;
    # listen [::]:443 ssl default_server;
    #
    # Note: You should disable gzip for SSL traffic.
    # See: https://bugs.debian.org/773332
    #
    # Read up on ssl_ciphers to ensure a secure configuration.
    # See: https://bugs.debian.org/765782
    #
    # Self signed certs generated by the ssl-cert package
    # Don't use them in a production server!
    #
    # include snippets/snakeoil.conf;

    #root /var/www/html;
        #在这里配置网站路径
        root /var/www/IIS/RayPI;

    # Add index.php to the list if you are using PHP
    #index index.html index.htm index.nginx-debian.html;

    server_name _;

    location / {
        # First attempt to serve request as file, then
        # as directory, then fall back to displaying a 404.
        # try_files $uri $uri/ =404;
                #设置反向代理
                proxy_pass http://localhost:5000;
                proxy_http_version 1.1;
                proxy_set_header Upgrade $http_upgrade;
                proxy_set_header Connection keep-alive;
                proxy_set_header Host $http_host;
                proxy_cache_bypass $http_upgrade;
    }

    # pass the PHP scripts to FastCGI server listening on 127.0.0.1:9000
    #
    #location ~ \.php$ {
    #    include snippets/fastcgi-php.conf;
    #
    #    # With php7.0-cgi alone:
    #    fastcgi_pass 127.0.0.1:9000;
    #    # With php7.0-fpm:
    #    fastcgi_pass unix:/run/php/php7.0-fpm.sock;
    #}

    # deny access to .htaccess files, if Apache's document root
    # concurs with nginx's one
    #
    #location ~ /\.ht {
    #    deny all;
    #}
}


# Virtual Host configuration for example.com
#
# You can move that to a different file under sites-available/ and symlink that
# to sites-enabled/ to enable it.
#
#server {
#    listen 80;
#    listen [::]:80;
#
#    server_name example.com;
#
#    root /var/www/example.com;
#    index index.html;
#
#    location / {
#        try_files $uri $uri/ =404;
#    }
#}
3、配置 .NET Core 运行环境
这一步很简单,我们只用到 .NET Core 的官网找到刚才我们查到对应的 Ubuntu 版本的 .NET Core 运行环境进行安装岂可。
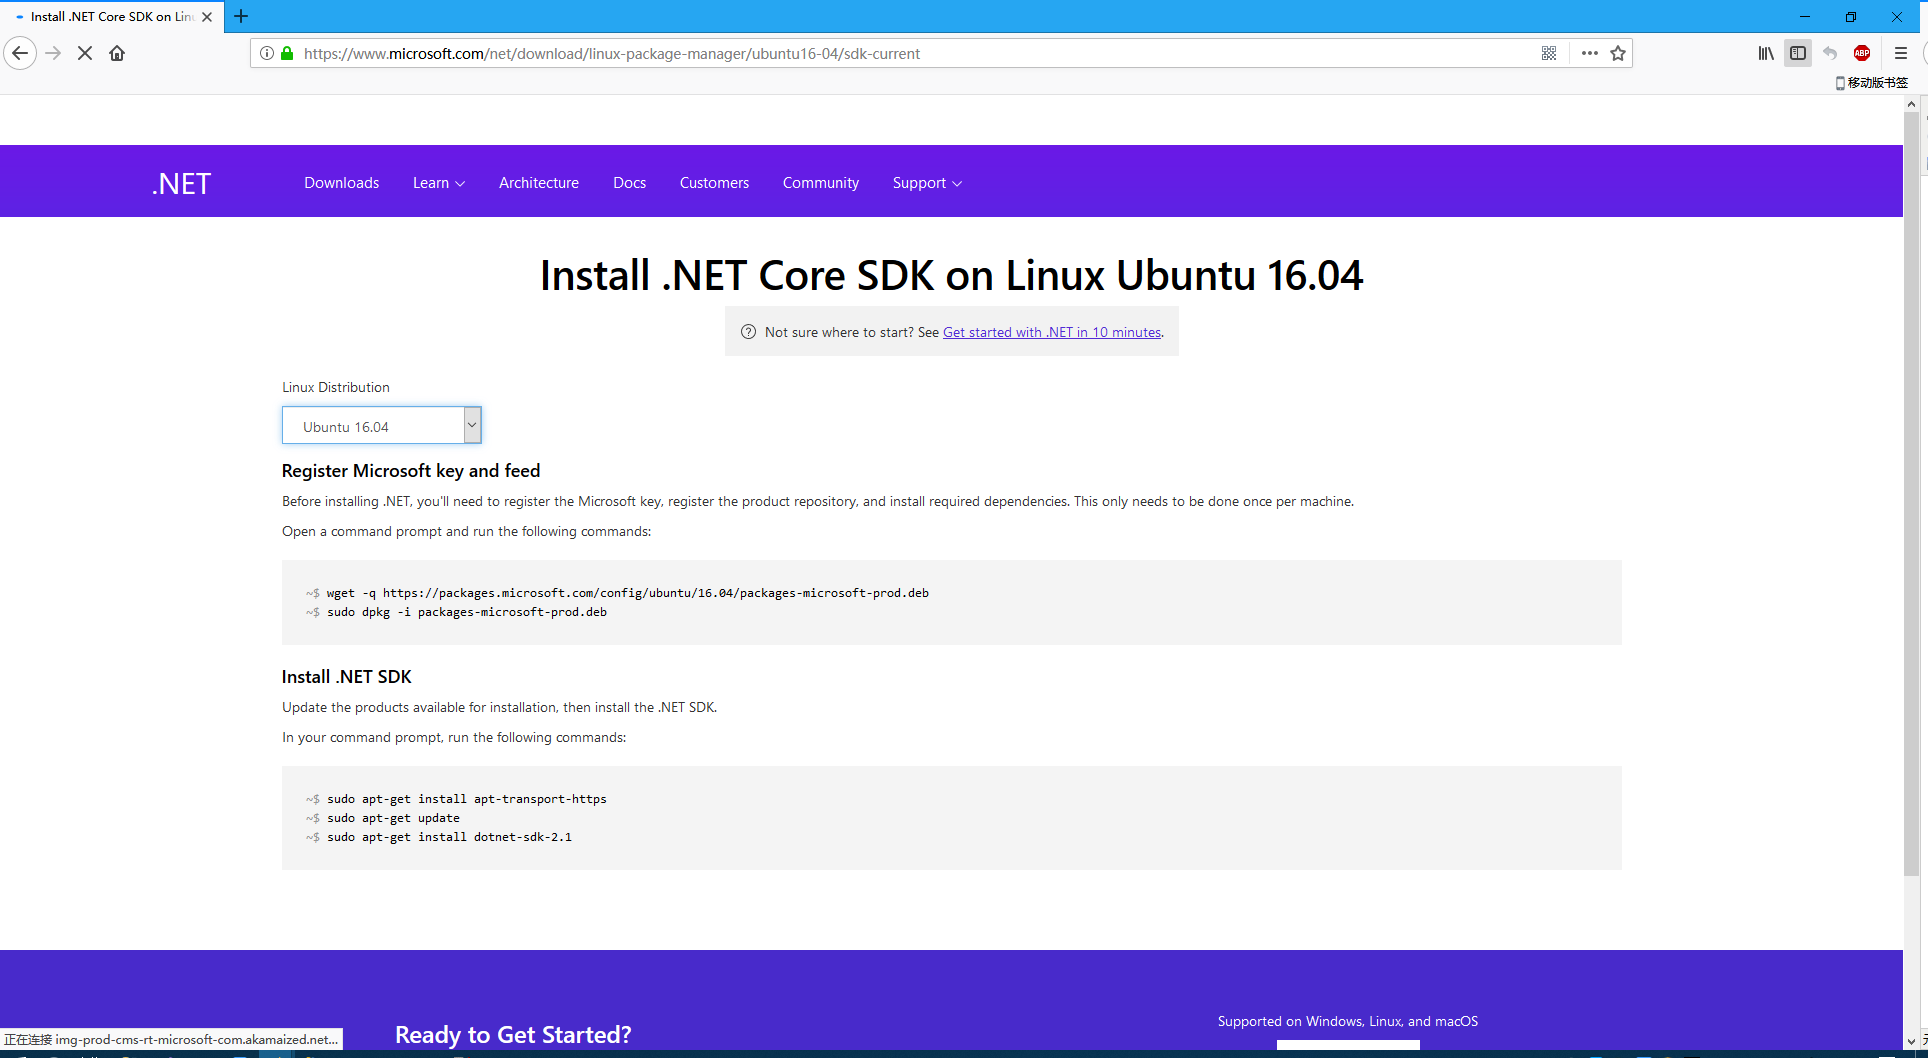
安装完成后 输入命令:dotnet --info 就可以查看安装的 .NET Core 版本信息等.
接着我们用 VS2017 发布我们的项目,并将发布的文件复制到刚才建好的文件夹下。先进入 Ubuntu 系统,按 win+R 输入 bash 就可以进入系统了,然后我们切换到 root 用户(命令:su root ),这里补充一下,在 Ubuntu 子系统中是可以直接访问 win10 的系统文件的,它在 /mnt/ 这个目录下,所以我们不用安装什么类似 winscap 的软件来上传我们的代码,我们可以直接从 win10 系统盘中直接复制过来 ;当然 Linux 中有配置软链接的应该也可以实现 (由于我不会,所以我这里就不进行深究了)。下面就是复制的代码
lwi@YJ:/mnt/c/Users/wl$ su root
Password:
root@YJ:/mnt/c/Users/wl# cp -r /mnt/d/IIS/RayPI/ /var/www/
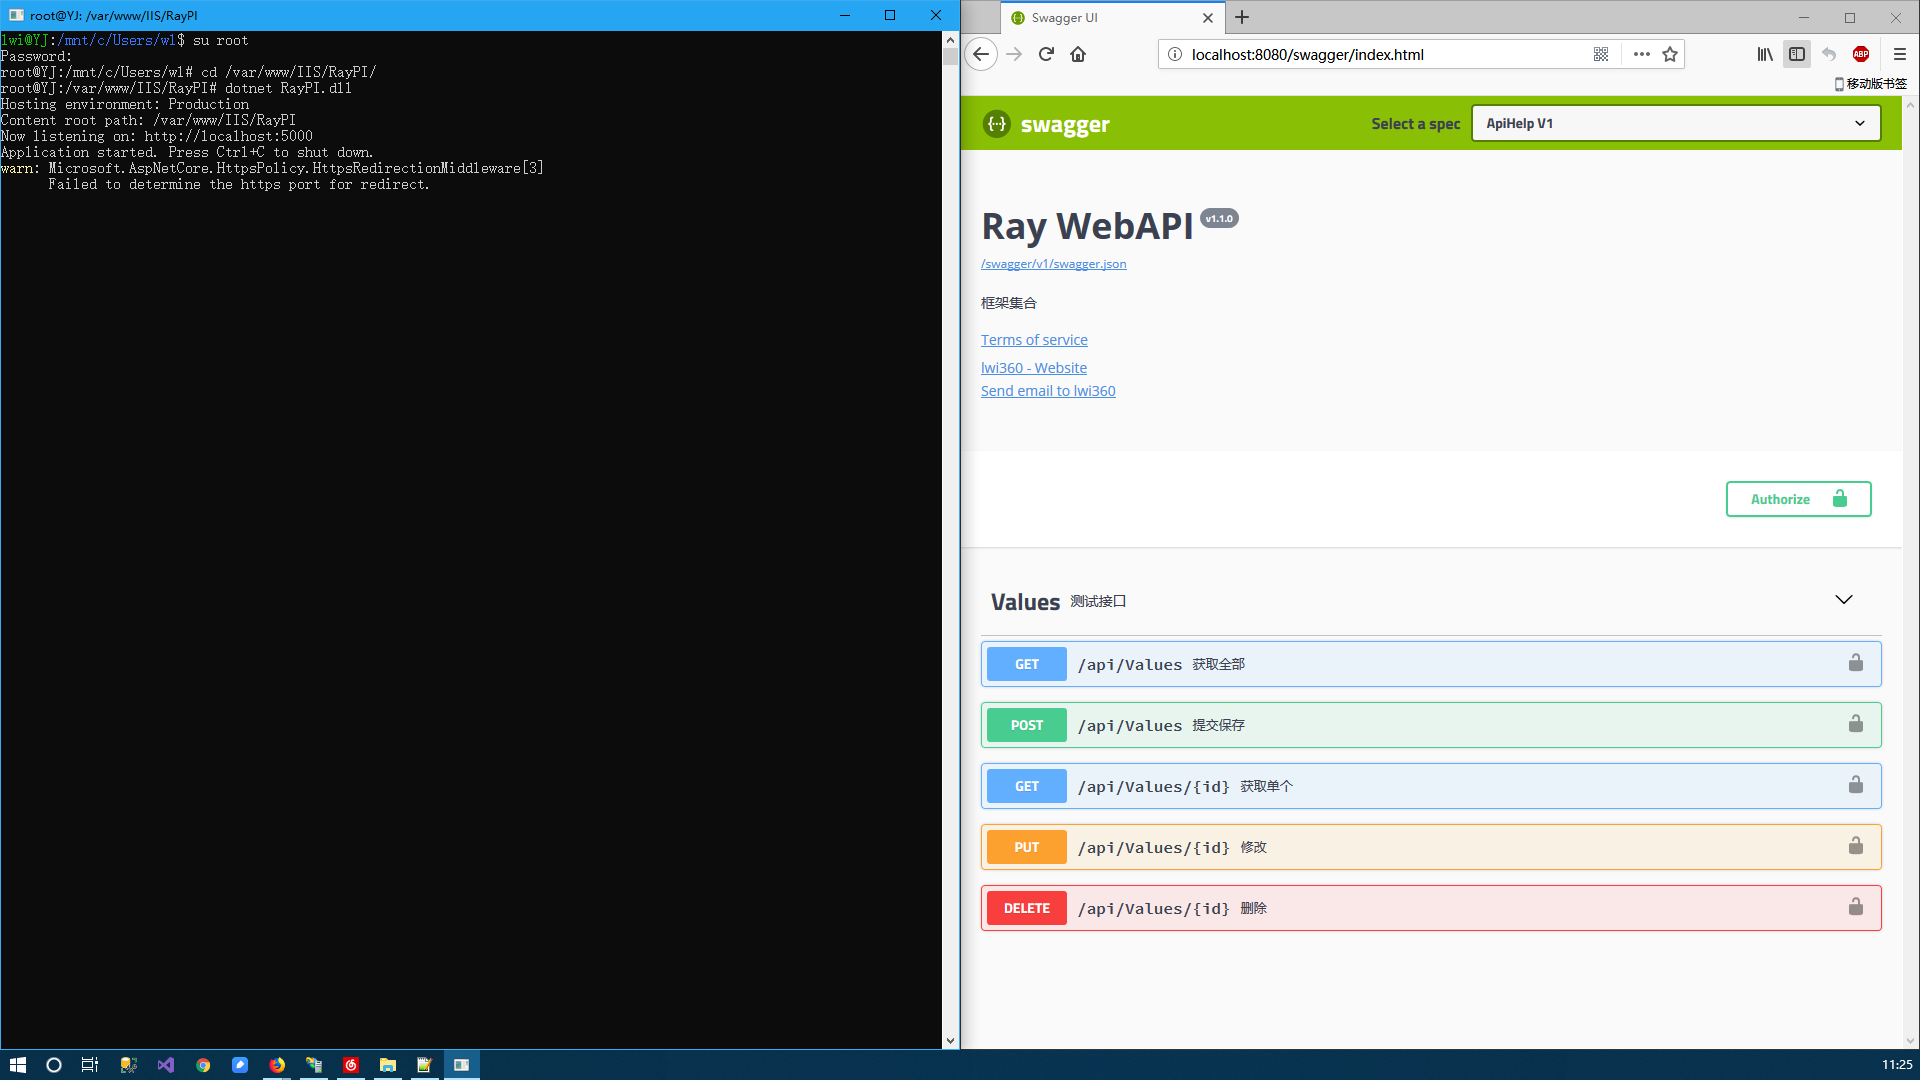
走到这一步教程也接近了尾声。我们只用把网站运行起来就可以访问到了
lwi@YJ:/mnt/c/Users/wl$ su root
Password:
root@YJ:/mnt/c/Users/wl# cd /var/www/IIS/RayPI/
root@YJ:/var/www/IIS/RayPI# dotnet RayPI.dll
Hosting environment: Production
Content root path: /var/www/IIS/RayPI
Now listening on: http://localhost:5000
Application started. Press Ctrl+C to shut down.
warn: Microsoft.AspNetCore.HttpsPolicy.HttpsRedirectionMiddleware[3]
      Failed to determine the https port for redirect.
网站运行成功图:
参考资料:
4、ASP.NET Core快速入门 (视频收费)