小程序注意事项:wxml的引号内的花括号旁边不要加多余的空格,有可能会影响js代码
1、轮播功能
<swiper indicator-dots="{{indicatorDots}}" autoplay="{{autoplay}}" interval="{{interval}}" duration="{{duration}}" circular="{{duration}}" current="{{swiperCurrent}}" bindchange="swiperChange" class="swiper">

      <block wx:for="{{imgUrls}}" wx:key="unique">

        <swiper-item>

          <image src="{{item}}" class="img" bindtap="swipclick" />

        </swiper-item>

      </block>

    </swiper>
/* swiper {
height: 421.5rpx;
} */
swiper-item image {
width: 100%;
height: 100%;
}
.swiper-container{
width: 100%;
position: relative;
}
.swiper-container .swiper{
height: 300rpx;
}
.swiper-container .swiper .img{
width: 100%;
height: 100%;
}const app = getApp()
Page({
data: {
swiperCurrent: 0,
indicatorDots: true,
autoplay: true,
interval: 3000,//自动切换时间间隔
duration: 800,//滑动动画时长
circular: true,//是否采用衔接滑动
imgUrls: [
'../../img/index/1.jpeg',
'../../img/index/2.jpeg',
'../../img/index/3.jpeg'
]
},
//轮播图的切换事件
swiperChange: function (e) {
this.setData({
swiperCurrent: e.detail.current
})
//console.log(e.detail.current);
},
//点击指示点切换
chuangEvent: function (e) {
this.setData({
swiperCurrent: e.currentTarget.id
})
},
//点击图片触发事件
swipclick: function (e) {
console.log(this.data.swiperCurrent);
wx.switchTab({
url: this.data.links[this.data.swiperCurrent]
})
},
})
2、小程序客服会话功能
<button class="kf_button" open-type="contact" session-from="weapp">
    客服按钮
</button>
微信平台 - 小程序绑定客服页面
微信平台 - 小程序客服会话窗口
3、转发/分享功能 小卡片设置
<button data-name="shareBtn" open-type="share" plain="true">转发</button>PS: 添加plain=”true”后button的边框样式可自定义 ↓ ↓
button[plain]{
  border:0
}
//转发
onShareAppMessage: function (options) {
var that = this;
// 设置菜单中的转发按钮触发转发事件时的转发内容
var shareObj = {
title: "这是一个标题!", // 默认是小程序的名称(可以写slogan等)
//path: '/page/index/index/user?id=123', // 默认是当前页面,必须是以‘/’开头的完整路径
imageUrl: '../../img/xiaochengxu-share.jpg', //自定义图片路径,可以是本地文件路径、代码包文件路径或者网络图片路径,支持PNG及JPG,不传入 imageUrl 则使用默认截图。显示图片长宽比是 5:4
success: function (res) {
// 转发成功之后的回调
if (res.errMsg == 'shareAppMessage:ok') {
}
},
fail: function (res) {
// 转发失败之后的回调
if (res.errMsg == 'shareAppMessage:fail cancel') {
// 用户取消转发
console.log("用户取消转发");
} else if (res.errMsg == 'shareAppMessage:fail') {
// 转发失败,其中 detail message 为详细失败信息
}
},
complete: function(){
// 转发结束之后的回调(转发成不成功都会执行)
},
};
// 来自页面内的按钮的转发
if(options.from == 'button') {
var eData = options.target.dataset;
console.log(eData.name); // shareBtn
// 此处可以修改 shareObj 中的内容
//shareObj.path = '/pages/btnname/btnname?btn_name=' + eData.name;
}
// 返回shareObj
return shareObj;
},4、获取微信用户的头像和名称
<view class='top'>
    <open-data type="userAvatarUrl" class='tx'></open-data>
    <open-data type="userNickName" class='name'></open-data>
</view>
5、新页面跳转(子页面返回)
父页面直接写下边代码,子页面自动添加返回上一页功能
<navigator class='gotoreport' url="/pages/report/report?title=navigate" >生成报告</navigator>6、更改单个页面顶部导航栏的名字
在要更改的页面的*.json写如下配置
{
  "navigationBarTitleText": "这是标题"
}
7、Canvas导出图片
微信官方有提供相应API
https://developers.weixin.qq.com/miniprogram/dev/component/canvas.html
saveToPhoto: function () {
    wx.canvasToTempFilePath({
        x: 0,
        y: 0,
        width: 240,
        height: 240,
        destWidth: 240,
        destHeight: 240,
        canvasId: 'ctx',
        success: function (res) {
            //canvas转图片成功回调
        }
    })
}
最后保存到相册
wx.saveImageToPhotosAlbum({
    filePath: res.tempFilePath,
})
wx.showToast({title: '保存成功'})
8、小程序弹窗提示 wx.showToast()
var pageObject = {
  onLoad: function () {
    wx.showToast({
      title: '成功',  //标题
      icon: 'loading',  //图标,支持"success"、"loading"
      image: '../image/img.png',  //自定义图标的本地路径,image 的优先级高于 icon
      duration: 2000000, //提示的延迟时间,单位毫秒,默认:1500
      mask: false,  //是否显示透明蒙层,防止触摸穿透,默认:false
      success: function () { }, //接口调用成功的回调函数
      fail: function () { },  //接口调用失败的回调函数
      complete: function () { } //接口调用结束的回调函数
    })
  }
}

Page(pageObject)
9、九宫格方式上传图片(预览并删除)
wxml:
<view class="gallery">
    <view class="item" wx:for="{{images}}" wx:key="">
        <image src="{{item}}" data-src="{{item}}" bindtap="previewImage" mode="aspectFill" />

        <!-- 删除按钮 -->
        <view class="delete" bindtap="delete" data-index="{{index}}">X</view>
    </view>
    <view class="item" bindtap="chooseImage">
        <view class='addIcon'>+</view>
    </view>
</view>
<button type="primary" bindtap="submit">提交</button>
wxss:
/* pages/index/index.wxss */
/*画廊*/
.gallery {
  width:630rpx;
  margin: 0 auto;
  display: flex;
  justify-content: flex-start;
  flex-wrap: wrap;
}
/*每张图片所占容器*/
.item {
  position: relative;
  margin:10rpx 5rpx;
  width: 200rpx;
  height: 200rpx;
}
.item image{
  width: 100%;
  height: 100%;
}
/*add按钮*/
.item .addIcon{
  position:relative;
  width:200rpx;
  height:200rpx;
  text-align:center;
  line-height:200rpx;
  font-size:80rpx;
  background: #f2f2f2;
  color: #555;
}
/*删除按钮*/
.delete {
  position:absolute;
  right:0;
  top:0;
  /* background:#ccc; */
  opacity:1;
  height: 36rpx;
  font-size:22rpx;
  font-weight:700;
  padding:0 8rpx 0 10rpx;
}
js:
var that;
Page({
data: {
images: [],
uploadedImages: [],
//imageWidth: getApp().screenWidth / 4 - 10
},
onLoad: function (options) {
that = this; var objectId = options.objectId; console.log(objectId);
},
chooseImage: function () {
// 选择图片
wx.chooseImage({
count: 3, // 默认9
sizeType: ['compressed'],
sourceType: ['album', 'camera'],
// 可以指定来源是相册还是相机,默认二者都有
success: function (res) {
// 返回选定照片的本地文件路径列表,tempFilePath可以作为img标签的src属性显示图片
var tempFilePaths = res.tempFilePaths;
console.log(tempFilePaths);
that.setData({
images: that.data.images.concat(tempFilePaths)
});
}
})
},
// 图片预览
previewImage: function (e) {
//console.log(this.data.images);
var current = e.target.dataset.src
wx.previewImage({
current: current,
urls: this.data.images
})
},
// submit: function () {
// // 提交图片,事先遍历图集数组
// that.data.images.forEach(function (tempFilePath) {
// new AV.File('file-name', {
// blob: {
// uri: tempFilePath,
// },
// }).save().then(
// // file => console.log(file.url())
// function (file) {
// // 先读取
// var uploadedImages = that.data.uploadedImages;
// uploadedImages.push(file.url());
// // 再写入
// that.setData({
// uploadedImages: uploadedImages
// }); console.log(uploadedImages);
// }
// ).catch(console.error);
// });
// wx.showToast({
// title: '评价成功', success: function () {
// wx.navigateBack();
// }
// });
// },
delete: function (e) {
var index = e.currentTarget.dataset.index; var images = that.data.images;
images.splice(index, 1);
that.setData({
images: images
});
}
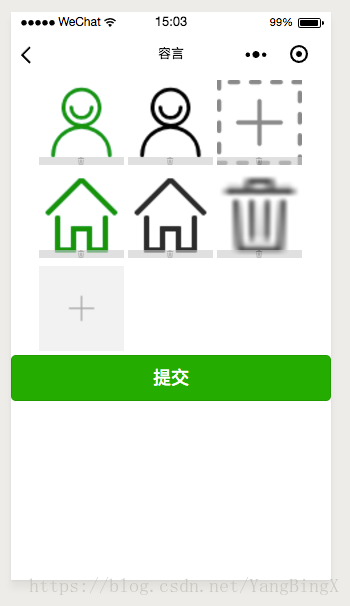
})预览图:
10、底部导航
TIP:注释仅供参考,如果报错请删掉注释
"tabBar": {
    "color": "#cdcdcd", //为本未选中时候的颜色
    "selectedColor": "#ec6376", //为本选中时的颜色
    "backgroundColor": "#eee", //背景
    "borderStyle": "#f3c4cb", //边框颜色
    "list": [
      {
        "selectedIconPath": "img/icon12.png", //选中时的图标路径
        "iconPath": "img/icon11.png", //未选中的路径
        "pagePath": "pages/index/index", //要加载的页面路径
        "text": "首页" //显示的文本
      },
      {
        "selectedIconPath": "img/icon22.png",
        "iconPath": "img/icon21.png",
        "pagePath": "pages/myHome/myHome",
        "text": "我的"
      }
    ]
  },
效果图:

11、小程序MD5加密写法(支持加密中文)
md5.js文件下载地址:https://github.com/ybx13579/xiaochengxu-module/blob/master/md5.js
EG:
var MD5s = require('../../utils/md5.js')

Page({

  /**
   * 页面的初始数据
   */
  data: {
  },

  /**
   * 生命周期函数--监听页面加载
   */
  onLoad: function (options) {
    var md = MD5s.md5("这是一段要被加密的话");
    console.log(md);  //802909e380455122f72d652ffaa1a4dc
  }
})
12、锚点效果
转
.wxml
<view class="list">
    <view bindtap='jumpTo' data-opt="list0">list0</view>
    <view bindtap='jumpTo' data-opt="list11">list11</view>
    <view bindtap='jumpTo' data-opt="list29">list29</view>
</view>


<scroll-view  scroll-into-view="{{toView}}"  scroll-y="true"   scroll-with-animation="true"   class="scr">
    <view wx:for="{{list}}"  id="{{item}}"  class="test">
      {{item}}
    </view>
</scroll-view>
.wxss代码
.scr{
    position: relative;
    height: 500rpx
}
.test{
    height: 80rpx;
}
.list{ position: fixed; z-index: 9; top:30rpx; right: 10rpx; }
.js代码
  data: {

    list: ["list0", "list1", "list2", "list3", "list4", "list5", "list11", "list12", "list13", "list14", "list15", "list25", "list26", "list27", "list28", "list29","list30"],
    toView: ''
  },

  jumpTo: function (e) {

    // 获取标签元素上自定义的 data-opt 属性的值
    let target = e.currentTarget.dataset.opt;

    this.setData({
      toView: target
    })

  },
13、导航栏吸顶效果
转
1. 在需要监听的外部添加
<scroll-view style="height:100vh" class="scroll-view" scroll-y="true" bindscroll="scroll">

  <view class="{{scroll_height<'150'?'barrage':'barraging'}}">
      <view class="swipwer">吸顶效果</view>
   </view>

</scroll-view>- 判断不同的class名改变样式
/*样式  */
.barrage{
  width:100%;
  height:50rpx;
  margin-top:20rpx;
  position: relative;
}
.barraging{
  width:100%;
  height:50rpx;
  position: fixed;
  left:0;
  top:0;
  z-index:100;
  margin-top:20rpx;
}
.barrage .swipwer{
  margin-left:24rpx;
  height:50rpx;
  line-height:50rpx;
  background: rgba(0, 0, 0, 0.6);
  font-size:26rpx;
  text-align: center;
  color:#fff;
  width:60%;
  border-radius:30rpx;
  position:absolute;
  left:-500rpx;

}
.barraging .swipwer{
  margin-left:24rpx;
  height:50rpx;
  line-height:50rpx;
  background: rgba(0, 0, 0, 0.6);
  font-size:26rpx;
  text-align: center;
  color:#fff;
  width:60%;
  border-radius:30rpx;
   position:absolute;
  left:-500rpx;
}
3、js
 //存储高度
  data: {
    scroll_height:''
  },
 //滚动监听
  scroll: function (e) {
    var that=this;
    // console.log(e.detail.scrollTop)
    that.setData({
      scroll_height: e.detail.scrollTop
    })
  },
这里我只用到了scroll滚动事件,根据自己业务需求即可,注意在最外层添加< scroll-view>< /scroll-view>就好
14、获取屏幕当前高度并赋值给某个view
<view style="height:{{bodyHeight}}px"></view>data: {
bodyHeight:"",
},
onLoad: function (options) {
var that = this;
wx.getSystemInfo({
success: function (res) {
that.setData({
bodyHeight: res.windowHeight//获取屏幕高度
})
},
})
},15、图片裁剪功能
https://we-plugin.github.io/we-cropper/#/
