Android-Multidex安装流程解析
关于为什么需要引入Multidex支持以及如何配置Multidex可参考官网,本篇不做阐述,本篇着重分析Multidex1.0.2源码进行分析
大家都知道配置Multidex都需要在Application中的添加这样代码
public class MyApplication extends SomeOtherApplication {
  @Override
  protected void attachBaseContext(Context base) {
     super.attachBaseContext(context);
     Multidex.install(this);
  }
}其关键代码是Multidex类的install方法,我们来看看内部如何实现
public final class MultiDex {
    static final String TAG = "MultiDex";
    private static final Set<File> installedApk = new HashSet();
    private static final boolean IS_VM_MULTIDEX_CAPABLE = isVMMultidexCapable(System.getProperty("java.vm.version"));
    ...
    private MultiDex() {
    }

    public static void install(Context context) {
        Log.i("MultiDex", "Installing application");
        //1、判断虚拟机是否支持MultiDex
        if(IS_VM_MULTIDEX_CAPABLE) {
            Log.i("MultiDex", "VM has multidex support, MultiDex support library is disabled.");
        } else if(VERSION.SDK_INT < 4) {
            //2、Android SDK小于4不支持Multidex
            throw new RuntimeException("MultiDex installation failed. SDK " + VERSION.SDK_INT + " is unsupported. Min SDK version is " + 4 + ".");
        } else {
            try {
                ApplicationInfo applicationInfo = getApplicationInfo(context);
                if(applicationInfo == null) {
                    Log.i("MultiDex", "No ApplicationInfo available, i.e. running on a test Context: MultiDex support library is disabled.");
                    return;
                }
                //3、关键代码
                doInstallation(context, new File(applicationInfo.sourceDir), new File(applicationInfo.dataDir), "secondary-dexes", "");
            } catch (Exception var2) {
                Log.e("MultiDex", "MultiDex installation failure", var2);
                throw new RuntimeException("MultiDex installation failed (" + var2.getMessage() + ").");
            }

            Log.i("MultiDex", "install done");
        }
    }
    static boolean isVMMultidexCapable(String versionString) {
        boolean isMultidexCapable = false;
        if(versionString != null) {
            Matcher matcher = Pattern.compile("(\\d+)\\.(\\d+)(\\.\\d+)?").matcher(versionString);
            if(matcher.matches()) {
                try {
                    int major = Integer.parseInt(matcher.group(1));
                    int minor = Integer.parseInt(matcher.group(2));
                    isMultidexCapable = major > 2 || major == 2 && minor >= 1;
                } catch (NumberFormatException var5) {
                    ;
                }
            }
        }

        Log.i("MultiDex", "VM with version " + versionString + (isMultidexCapable?" has multidex support":" does not have multidex support"));
        return isMultidexCapable;
    }
}
小结:Multidex.install方法可分为如下3步
1、判断VM是否原生支持Multidex,如果支持就不进行Multidex.install方法
2、如果Android SDK小于4,直接抛出异常提示不支持Multidex
3、也是最关键的代码即doInstallation方法
继续看doInstallation方法
private static void doInstallation(Context mainContext, File sourceApk, File dataDir, String secondaryFolderName, String prefsKeyPrefix) throws IOException, IllegalArgumentException, IllegalAccessException, NoSuchFieldException, InvocationTargetException, NoSuchMethodException {
        //installedApk是个全局静态变量Set集合
        Set var5 = installedApk;
        synchronized(installedApk) {
            if(!installedApk.contains(sourceApk)) {

                //1、如果集合中不存在将souceApk文件加入其中
                installedApk.add(sourceApk);

                //Android5.0以及以上版本使用ART机制运行,后者原生支持从 APK 文件加载多个 DEX 文件
                if(VERSION.SDK_INT > 20) {
                    Log.w("MultiDex", "MultiDex is not guaranteed to work in SDK version " + VERSION.SDK_INT + ": SDK version higher than " + 20 + " should be backed by " + "runtime with built-in multidex capabilty but it's not the " + "case here: java.vm.version=\"" + System.getProperty("java.vm.version") + "\"");
                }

                ClassLoader loader;
                try {
                    //此处获取的类型为PathClassLoader,后面安装非主dex会使用到
                    loader = mainContext.getClassLoader();
                } catch (RuntimeException var11) {
                    Log.w("MultiDex", "Failure while trying to obtain Context class loader. Must be running in test mode. Skip patching.", var11);
                    return;
                }

                if(loader == null) {
                    Log.e("MultiDex", "Context class loader is null. Must be running in test mode. Skip patching.");
                } else {
                    try {
                        //2、删除secondar-dexs目录(/data/data/app_package_name/files/secondary-dexes)
                        clearOldDexDir(mainContext);
                    } catch (Throwable var10) {
                        Log.w("MultiDex", "Something went wrong when trying to clear old MultiDex extraction, continuing without cleaning.", var10);
                    }

                    //3、创建"secondar-dexs"目录,用于存储提取的zip
                    File dexDir = getDexDir(mainContext, dataDir, secondaryFolderName);

                    //4、从副dex中提取zip并返回zip列表
                    List<? extends File> files = MultiDexExtractor.load(mainContext, sourceApk, dexDir, prefsKeyPrefix, false);

                    //5、将提取出所有zip添加到BaseDexClassLoader中pathList属性
                    installSecondaryDexes(loader, dexDir, files);
                }
            }
        }
    }

//删除旧dex目录
private static void clearOldDexDir(Context context) throws Exception {
        File dexDir = new File(context.getFilesDir(), "secondary-dexes");
        if(dexDir.isDirectory()) {
            Log.i("MultiDex", "Clearing old secondary dex dir (" + dexDir.getPath() + ").");
            File[] files = dexDir.listFiles();
            if(files == null) {
                Log.w("MultiDex", "Failed to list secondary dex dir content (" + dexDir.getPath() + ").");
                return;
            }

            File[] var3 = files;
            int var4 = files.length;

            for(int var5 = 0; var5 < var4; ++var5) {
                File oldFile = var3[var5];
                Log.i("MultiDex", "Trying to delete old file " + oldFile.getPath() + " of size " + oldFile.length());
                if(!oldFile.delete()) {
                    Log.w("MultiDex", "Failed to delete old file " + oldFile.getPath());
                } else {
                    Log.i("MultiDex", "Deleted old file " + oldFile.getPath());
                }
            }

            if(!dexDir.delete()) {
                Log.w("MultiDex", "Failed to delete secondary dex dir " + dexDir.getPath());
            } else {
                Log.i("MultiDex", "Deleted old secondary dex dir " + dexDir.getPath());
            }
        }

    }

private static File getDexDir(Context context, File dataDir, String secondaryFolderName) throws IOException {
        //默认使用/data/data/app_package_name/code_cache/作为存放提取文件(zip)的父目录
        File cache = new File(dataDir, "code_cache");

        try {
            mkdirChecked(cache);
        } catch (IOException var5) {
            cache = new File(context.getFilesDir(), "code_cache");
            mkdirChecked(cache);
        }

        //在code_cache目录下新建secondary-dexes子目录,以存放zip文件
        File dexDir = new File(cache, secondaryFolderName);
        mkdirChecked(dexDir);
        return dexDir;
    }

private static void mkdirChecked(File dir) throws IOException {
        dir.mkdir();
        if(!dir.isDirectory()) {
            File parent = dir.getParentFile();
            if(parent == null) {
                Log.e("MultiDex", "Failed to create dir " + dir.getPath() + ". Parent file is null.");
            } else {
                Log.e("MultiDex", "Failed to create dir " + dir.getPath() + ". parent file is a dir " + parent.isDirectory() + ", a file " + parent.isFile() + ", exists " + parent.exists() + ", readable " + parent.canRead() + ", writable " + parent.canWrite());
            }

            throw new IOException("Failed to create directory " + dir.getPath());
        }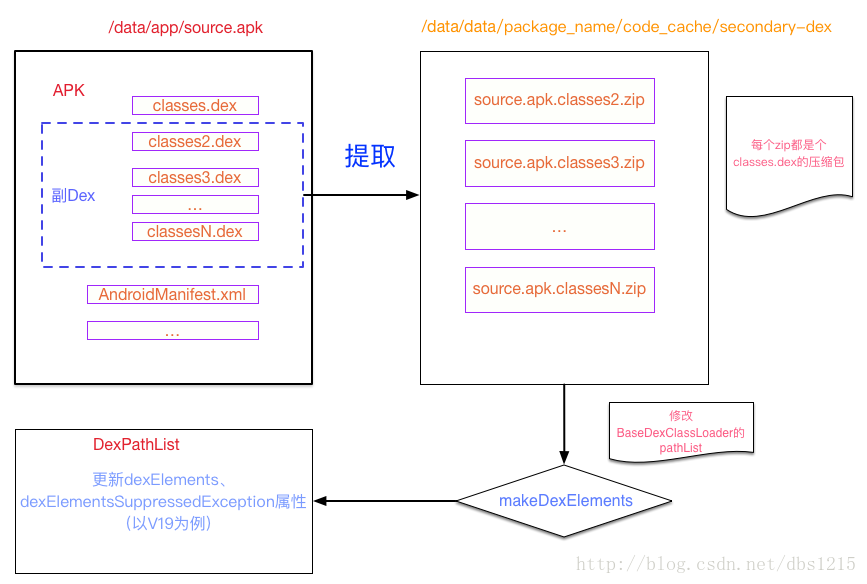
}我们小结下Multidex.doInstallation方法基本的四大步骤
1. 判断sourceApk文件是否存在installedApk集合中,不存在则将其添加到集合中,否则不做处理
2. 删除旧副dex目录(/data/data/app_package_name/files/secondary-dexes)
3. 提取zip并返回zip的列表
4. 修改pathList
前二步好理解直接看源码即可,我们重点来看第三步,第四步
提取zip并返回zip的列表
代码如下
//提取的zip文件存放的目录,正常情况下目录为/data/data/you_package_name/code_cache/secondary-dexes
File dexDir = getDexDir(mainContext, dataDir, secondaryFolderName);

List<? extends File> files = MultiDexExtractor.load(mainContext, sourceApk, dexDir, prefsKeyPrefix, false);我们继续看MultiDexExtractor.load方法
static List<? extends File> load(Context context, File sourceApk, File dexDir, String prefsKeyPrefix, boolean forceReload) throws IOException {
        Log.i("MultiDex", "MultiDexExtractor.load(" + sourceApk.getPath() + ", " + forceReload + ", " + prefsKeyPrefix + ")");
        //获取sourceApk循环冗余校验码
        long currentCrc = getZipCrc(sourceApk);

        // 使用文件锁来保证进程间安装multidex正常
        File lockFile = new File(dexDir, "MultiDex.lock");
        RandomAccessFile lockRaf = new RandomAccessFile(lockFile, "rw");
        FileChannel lockChannel = null;
        FileLock cacheLock = null;
        IOException releaseLockException = null;

        List files;
        try {
            lockChannel = lockRaf.getChannel();
            Log.i("MultiDex", "Blocking on lock " + lockFile.getPath());

            //1、使用文件锁,阻塞当前线程直到获取锁为止
            cacheLock = lockChannel.lock();
            Log.i("MultiDex", lockFile.getPath() + " locked");

            //2、如果不是强制重新加载且sourceApk没有修改则直接加载已存在的文件
            if(!forceReload && !isModified(context, sourceApk, currentCrc, prefsKeyPrefix)) {
                try {
                    //加载之前提取过的zip文件
                    files = loadExistingExtractions(context, sourceApk, dexDir, prefsKeyPrefix);
                } catch (IOException var21) {
                    Log.w("MultiDex", "Failed to reload existing extracted secondary dex files, falling back to fresh extraction", var21);
                    //异常则执行步骤3
                    files = performExtractions(sourceApk, dexDir);
                    putStoredApkInfo(context, prefsKeyPrefix, getTimeStamp(sourceApk), currentCrc, files);
                }
            } else {
                //3、执行提取操作
                Log.i("MultiDex", "Detected that extraction must be performed.");
                files = performExtractions(sourceApk, dexDir);

                //保存提取出的文件相关属性(apk的crc、timeStamp(**lastModified**())以及所有副dex的crc、timeStamp)
                putStoredApkInfo(context, prefsKeyPrefix, getTimeStamp(sourceApk), currentCrc, files);
            }
        } finally {
            //4、执行收尾操作,譬如文件锁的释放等...
            if(cacheLock != null) {
                try {
                    cacheLock.release();
                } catch (IOException var20) {
                    Log.e("MultiDex", "Failed to release lock on " + lockFile.getPath());
                    releaseLockException = var20;
                }
            }


            if(lockChannel != null) {
                closeQuietly(lockChannel);
            }

            closeQuietly(lockRaf);
        }

         //5、判断释放锁是否出现异常,如果有直接抛出标志提取或加载文件失败,否则返回提取文件列表
        if(releaseLockException != null) {
            throw releaseLockException;
        } else {
            Log.i("MultiDex", "load found " + files.size() + " secondary dex files");
            return files;
        }
    }
小结下其实分为5个小步骤
1. 使用文件锁来保证加载提取文件操作/提取文件操作的安全性
2. 加载之前提取的zip文件
3. 提取文件操作
4. 文件资源释放(执行收尾操作,譬如文件锁的释放等)
5. 根据释放文件锁是否有异常决定是抛出异常还是正常返回文件列表
上述步骤关键步骤为2、3步;我们按app首次安装流程来分析,先看第三步提取文件操作

提取文件操作
废话不多说,直接上代码
private static List<MultiDexExtractor.ExtractedDex> performExtractions(File sourceApk, File dexDir) throws IOException {
        //定义提取zip文件的名称前缀(fileName.apk.classes)
        String extractedFilePrefix = sourceApk.getName() + ".classes";

        //在dexDir目录清理旧文件
        prepareDexDir(dexDir, extractedFilePrefix);

        //创建数组用于存放提取的zip文件和方法返回
        List<MultiDexExtractor.ExtractedDex> files = new ArrayList();

        /**
         *解析apk压缩包
         */
        ZipFile apk = new ZipFile(sourceApk);
        try {
            int secondaryNumber = 2;

            //从apk文件中尝试寻找"classes2.dex","chasses3.dex"..."classesN.dex"直到找到所有为止
            for(ZipEntry dexFile = apk.getEntry("classes" + secondaryNumber + ".dex"); dexFile != null; dexFile = apk.getEntry("classes" + secondaryNumber + ".dex")) {

                //每找到一个副dex,立马创建一个相对应名为"fileName.apk.classesN.zip"的提取文件
                String fileName = extractedFilePrefix + secondaryNumber + ".zip";
                MultiDexExtractor.ExtractedDex extractedFile = new MultiDexExtractor.ExtractedDex(dexDir, fileName);
                files.add(extractedFile);
                Log.i("MultiDex", "Extraction is needed for file " + extractedFile);

                //每次提取时有三次重试机会
                int numAttempts = 0;
                boolean isExtractionSuccessful = false;

                while(numAttempts < 3 && !isExtractionSuccessful) {
                    ++numAttempts;

                    //执行提取操作
                    extract(apk, dexFile, extractedFile, extractedFilePrefix);

                    try {
                        //从提取文件中读取crc校验码,如果读取失败视为提取失败
                        extractedFile.crc = getZipCrc(extractedFile);
                        isExtractionSuccessful = true;
                    } catch (IOException var19) {
                        isExtractionSuccessful = false;
                        Log.w("MultiDex", "Failed to read crc from " + extractedFile.getAbsolutePath(), var19);
                    }

                    Log.i("MultiDex", "Extraction " + (isExtractionSuccessful?"succeeded":"failed") + " - length " + extractedFile.getAbsolutePath() + ": " + extractedFile.length() + " - crc: " + extractedFile.crc);
                    if(!isExtractionSuccessful) {
                        //提取失败执行清理操作
                        extractedFile.delete();
                        if(extractedFile.exists()) {
                            Log.w("MultiDex", "Failed to delete corrupted secondary dex '" + extractedFile.getPath() + "'");
                        }
                    }
                }

                //若果重试了三次还是失败则直接抛出异常
                if(!isExtractionSuccessful) {
                    throw new IOException("Could not create zip file " + extractedFile.getAbsolutePath() + " for secondary dex (" + secondaryNumber + ")");
                }

                ++secondaryNumber;
            }
        } finally {

            //释放资源
            try {
                apk.close();
            } catch (IOException var18) {
                Log.w("MultiDex", "Failed to close resource", var18);
            }

        }

        return files;
    }
小结下上面方法做了哪些事
1. 清理dexDir旧文件
2. 创建数组用于保存提取文件
3. 从apk源包中寻找到所有副dex,每找到一个副dex尝试提取(有三次重试机会)并将提取到文件存放到数组中
4. 释放资源并返回数组
其实真正到提取还是第三步中的extract方法
extract其实内部非常简单
大体就是将副dex数据拷贝一份生成一个classes.dex文件,并将该文件压缩成zip
这个zip就是我们需要的提取文件
extract就不在细说了,大家有兴趣自己看
extract(apk, dexFile, extractedFile, extractedFilePrefix);apk: zipFile
dexFile:apk中副dex(classesN.dex)
extractTo:提取文件(fileName.apk.classesN.zip)
extractedFilePrefix:提取文件前缀(fileName.apk.classes)
private static void extract(ZipFile apk, ZipEntry dexFile, File extractTo, String extractedFilePrefix) throws IOException, FileNotFoundException {

        InputStream in = apk.getInputStream(dexFile);
        ZipOutputStream out = null;

        //创建临时文件(tmp-fileName.apk.classes.zip)
        File tmp = File.createTempFile("tmp-" + extractedFilePrefix, ".zip", extractTo.getParentFile());
        Log.i("MultiDex", "Extracting " + tmp.getPath());

        try {
            out = new ZipOutputStream(new BufferedOutputStream(new FileOutputStream(tmp)));

            try {
                //构建一个名为"classes.dex"的子文件
                ZipEntry classesDex = new ZipEntry("classes.dex");
                classesDex.setTime(dexFile.getTime());
                out.putNextEntry(classesDex);
                byte[] buffer = new byte[16384];

                for(int length = in.read(buffer); length != -1; length = in.read(buffer)) {
                    out.write(buffer, 0, length);
                }

                out.closeEntry();
            } finally {
                out.close();
            }

            if(!tmp.setReadOnly()) {
                throw new IOException("Failed to mark readonly \"" + tmp.getAbsolutePath() + "\" (tmp of \"" + extractTo.getAbsolutePath() + "\")");
            }

            Log.i("MultiDex", "Renaming to " + extractTo.getPath());
            if(!tmp.renameTo(extractTo)) {
                throw new IOException("Failed to rename \"" + tmp.getAbsolutePath() + "\" to \"" + extractTo.getAbsolutePath() + "\"");
            }
        } finally {
            closeQuietly(in);
            tmp.delete();
        }
    }
至此提取文件的流程已分析完毕
我们再回过头来看看MultiDexExtractor.load方法的第二步加载之前提取的zip文件
加载之前提取的zip文件
因为提取文件操作后还有一个保存文件信息的操作(见下面代码)
该操作就是为了加载zip文件服务,因为加载zip需要知道有几个zip需要加载,加载的zip的路径等
源码如下很简单不解释了
//保存提取文件相关信息
private static void putStoredApkInfo(Context context, String keyPrefix, long timeStamp, long crc, List<MultiDexExtractor.ExtractedDex> extractedDexes) {
        SharedPreferences prefs = getMultiDexPreferences(context);
        Editor edit = prefs.edit();
        edit.putLong(keyPrefix + "timestamp", timeStamp);
        edit.putLong(keyPrefix + "crc", crc);
        edit.putInt(keyPrefix + "dex.number", extractedDexes.size() + 1);
        int extractedDexId = 2;

        for(Iterator var10 = extractedDexes.iterator(); var10.hasNext(); ++extractedDexId) {
            MultiDexExtractor.ExtractedDex dex = (MultiDexExtractor.ExtractedDex)var10.next();
            edit.putLong(keyPrefix + "dex.crc." + extractedDexId, dex.crc);
            edit.putLong(keyPrefix + "dex.time." + extractedDexId, dex.lastModified());
        }

        edit.commit();
    }

//加载提取文件
private static List<MultiDexExtractor.ExtractedDex> loadExistingExtractions(Context context, File sourceApk, File dexDir, String prefsKeyPrefix) throws IOException {
        Log.i("MultiDex", "loading existing secondary dex files");
        String extractedFilePrefix = sourceApk.getName() + ".classes";
        SharedPreferences multiDexPreferences = getMultiDexPreferences(context);
        int totalDexNumber = multiDexPreferences.getInt(prefsKeyPrefix + "dex.number", 1);
        List<MultiDexExtractor.ExtractedDex> files = new ArrayList(totalDexNumber - 1);

        for(int secondaryNumber = 2; secondaryNumber <= totalDexNumber; ++secondaryNumber) {
            String fileName = extractedFilePrefix + secondaryNumber + ".zip";
            MultiDexExtractor.ExtractedDex extractedFile = new MultiDexExtractor.ExtractedDex(dexDir, fileName);
            if(!extractedFile.isFile()) {
                throw new IOException("Missing extracted secondary dex file '" + extractedFile.getPath() + "'");
            }

            extractedFile.crc = getZipCrc(extractedFile);
            long expectedCrc = multiDexPreferences.getLong(prefsKeyPrefix + "dex.crc." + secondaryNumber, -1L);
            long expectedModTime = multiDexPreferences.getLong(prefsKeyPrefix + "dex.time." + secondaryNumber, -1L);
            long lastModified = extractedFile.lastModified();
            if(expectedModTime != lastModified || expectedCrc != extractedFile.crc) {
                throw new IOException("Invalid extracted dex: " + extractedFile + " (key \"" + prefsKeyPrefix + "\"), expected modification time: " + expectedModTime + ", modification time: " + lastModified + ", expected crc: " + expectedCrc + ", file crc: " + extractedFile.crc);
            }

            files.add(extractedFile);
        }

        return files;
    }
我们在回过头来看看Multidex.doInstallation的最后一大步
修改pathList
修改pathList其实就是修改BaseDexClassLoader中pathList属性,我们以V19版本源码为例进行分析(V14、V4代码基本差不多)
private static void installSecondaryDexes(ClassLoader loader, File dexDir, List<? extends File> files) throws IllegalArgumentException, IllegalAccessException, NoSuchFieldException, InvocationTargetException, NoSuchMethodException, IOException {
        if(!files.isEmpty()) {
            if(VERSION.SDK_INT >= 19) {
                MultiDex.V19.install(loader, files, dexDir);
            } else if(VERSION.SDK_INT >= 14) {
                MultiDex.V14.install(loader, files, dexDir);
            } else {
                MultiDex.V4.install(loader, files);
            }
        }
    }
private static final class V19 {
private V19() {
}
//修改BaseDexClassLoader中pathList的dexElements、dexElementsSuppressedExceptions数组
private static void install(ClassLoader loader, List<? extends File> additionalClassPathEntries, File optimizedDirectory) throws IllegalArgumentException, IllegalAccessException, NoSuchFieldException, InvocationTargetException, NoSuchMethodException {
Field pathListField = MultiDex.findField(loader, "pathList");
//1、通过反射获取pathList变量
Object dexPathList = pathListField.get(loader);
ArrayList<IOException> suppressedExceptions = new ArrayList();
//2、修改dexElements数组
//构造一个新数组将原数组添加其中,在将所有提取zip追加到新数组中;
//suppressedExceptions则是用来存在在加载副dex过程中出现到异常
MultiDex.expandFieldArray(dexPathList, "dexElements", makeDexElements(dexPathList, new ArrayList(additionalClassPathEntries), optimizedDirectory, suppressedExceptions));
if(suppressedExceptions.size() > 0) {
Iterator var6 = suppressedExceptions.iterator();
while(var6.hasNext()) {
IOException e = (IOException)var6.next();
Log.w("MultiDex", "Exception in makeDexElement", e);
}
Field suppressedExceptionsField = MultiDex.findField(dexPathList, "dexElementsSuppressedExceptions");
//反射来后去DexPathList中dexElementsSuppressedExceptions数组
IOException[] dexElementsSuppressedExceptions = (IOException[])((IOException[])suppressedExceptionsField.get(dexPathList));
//判断dexElementsSuppressedExceptions为空直接将其修改为suppressedExceptions
if(dexElementsSuppressedExceptions == null) {
dexElementsSuppressedExceptions = (IOException[])suppressedExceptions.toArray(new IOException[suppressedExceptions.size()]);
} else {
//如果dexElementsSuppressedExceptions不空则将创建数组,并先将加载提取文件到异常放到新建数组前面
//在将原有dexElementsSuppressedExceptions数据追加其后,并通过反射将dexElementsSuppressedExceptions设置为新建数组
IOException[] combined = new IOException[suppressedExceptions.size() + dexElementsSuppressedExceptions.length];
suppressedExceptions.toArray(combined);
System.arraycopy(dexElementsSuppressedExceptions, 0, combined, suppressedExceptions.size(), dexElementsSuppressedExceptions.length);
dexElementsSuppressedExceptions = combined;
}
suppressedExceptionsField.set(dexPathList, dexElementsSuppressedExceptions);
}
}
//调用DexPathList类中的makeDexElements方法
private static Object[] makeDexElements(Object dexPathList, ArrayList<File> files, File optimizedDirectory, ArrayList<IOException> suppressedExceptions) throws IllegalAccessException, InvocationTargetException, NoSuchMethodException {
Method makeDexElements = MultiDex.findMethod(dexPathList, "makeDexElements", new Class[]{ArrayList.class, File.class, ArrayList.class});
return (Object[])((Object[])makeDexElements.invoke(dexPathList, new Object[]{files, optimizedDirectory, suppressedExceptions}));
}
}至此Multidex安装流程已全部完毕,说了这么多,其实最关键的就二步(提取、修改pathList)大家可以参照下面图理解