ARouter源码探究
1. 疑问
- 如何做到支持直接解析标准URL进行跳转,并自动注入参数到目标页面中?
- 如何做到支持Multidex、InstantRun?
- 如何做到映射关系按组分类、多级管理,按需初始化?
- 依赖注入是如何实现的?
- 如何做到支持添加多个拦截器,自定义拦截顺序?
- 页面、拦截器、服务等组件如何自动注册到框架?
- 如何做到支持多模块工程使用?
- 如何做到支持获取Fragment?
源码是最好的老师,我们带着这些疑问去源码中寻找答案;
其实ARouter有上述功能我总结有二个关键点:APT、反射
下面我们从编译期,ARouter初始化,route三个方面进行分析
2. 编译期间做了什么?
https://github.com/alibaba/ARouter.git我们以官方源码为例进行剖析,下载源码后终端输入如下命令
cd ARouter && ./gradlew clean assembleDebug构建成功后你看到的目录结构如下

App:主工程
arouter-annotation:存放ARouter注解的Module
arouter-compiler:编译期间动态生成代码的逻辑
arouter-api: ARouter大部分的内部实现设计
arouter-register:支持第三方加固
module-java:跨模块调用演示
module-kotlin:支持Kotlin
我们先熟悉下几个类
Route注解
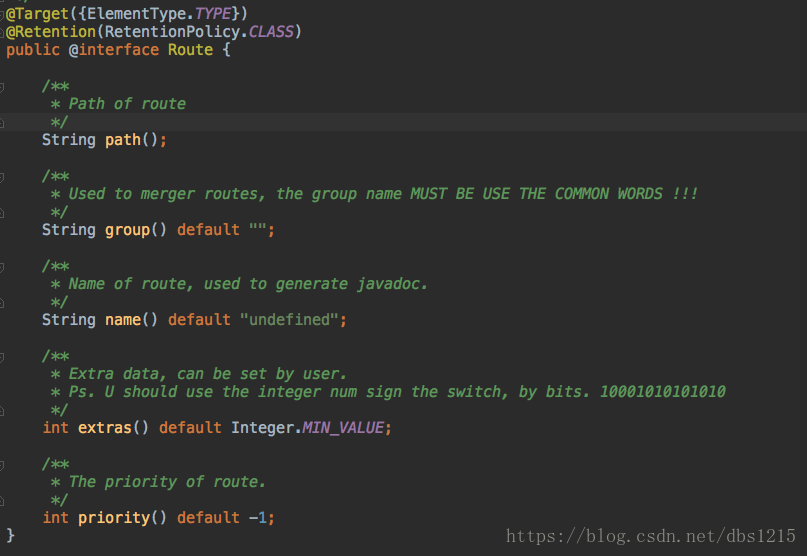
可以看到Route注解中的path就是跳转的路由,group是其对应的分组(按需加载用到);需要说明的是ARouter除了支持跳转Activity外还支持其他类型
Arouter的跳转类型
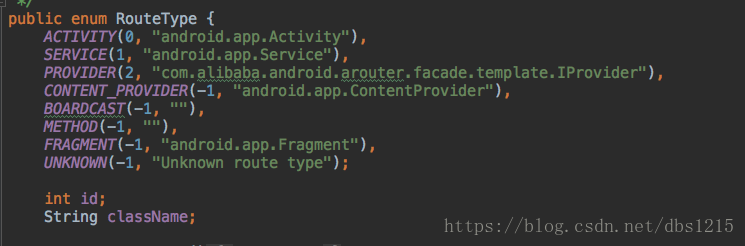
从上面可推测目前应该支持挑转Activity,Service,ContentProvider以及Java接口
APT(注解处理器)
APT(Annotation Processing Tool)即注解处理器,是一种处理注解的工具,确切的说它是javac的一个工具,它用来在编译时扫描和处理注解。注解处理器以Java代码(或者编译过的字节码)作为输入,生成.java文件作为输出。简单来说就是在编译期,通过注解生成.java文件。用过Dagger、EventBus等注解框架同学都能感受到,使用这些框架只要写一些注解就可以了,使用起来非常方便;其实它们都是通过读取注解,生成了一些代码而已;
Arouter的参数的自动注入,支持拦截,path和类如何建立映射,都是和注解处理器分不开的;
我们来看app工程中自动生成的代码有哪些
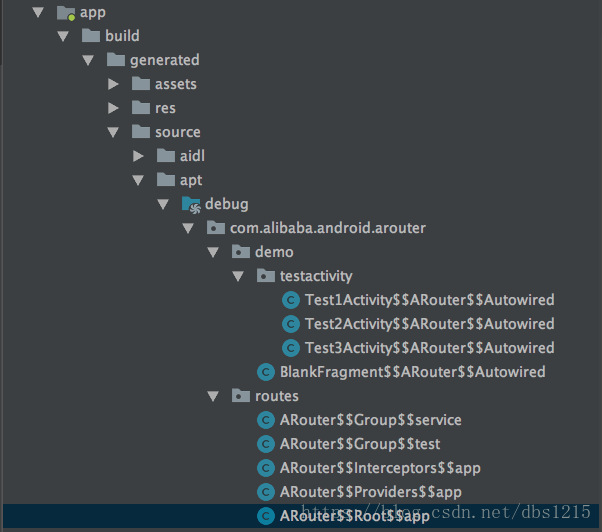
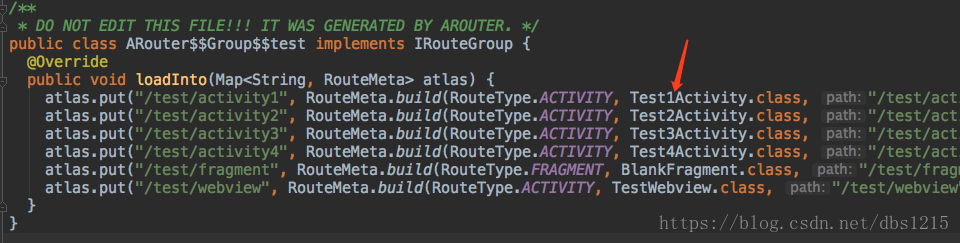
我挑选分组为test、service代码来看看,可以看到下面二个类名的末尾都是使用自身的组名来拼接而成的;因为ARouter是运行期间按组加载路由而不是一次性载入,而下面的二个类也正是基于这一考虑而生成的;每个类只负责加载自己组内路由,一个类只做一件事情
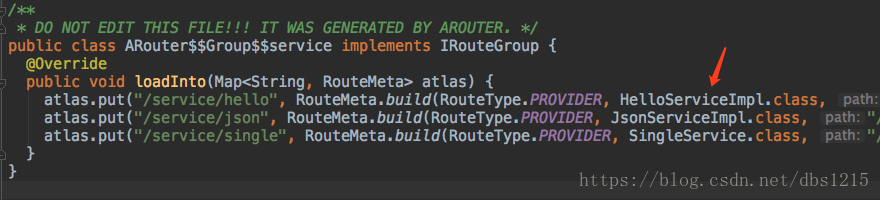
既然ARouter要做到按组加载路由,那肯定有一个存放所有分组映射的类,以便于快速定位分组类,我们发现有个Arouter$$Root$app类,它就是我们猜想的那个类,key存放组名,value存放其对应的映射类

拦截器生成类:

可以看到该类中包含了声明的所有拦截器类,key对应就是其优先级
我们用一张图概括编译期间做了啥
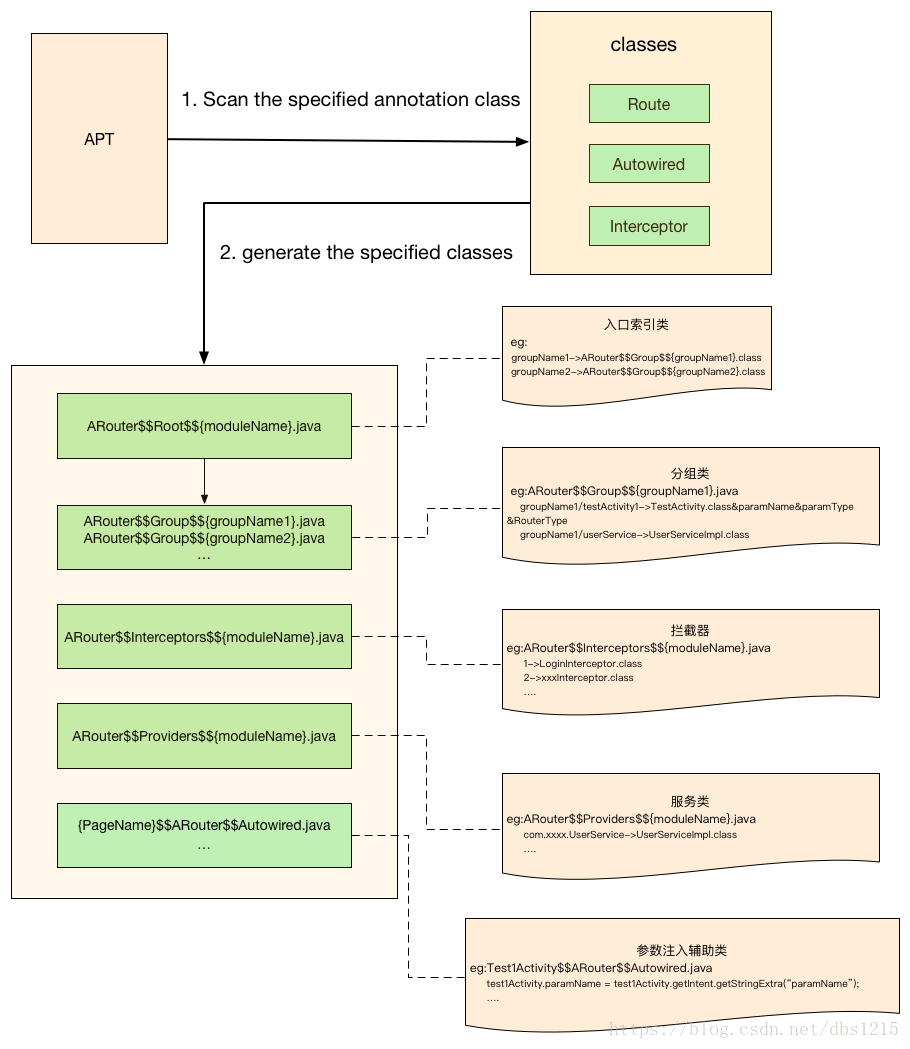
从上图看出编译器做了二件事情
- APT扫描指定注解的java类文件
- 通过扫描分析生成对应的java类
3. 初始化做了什么?
一张图总结如下:
下面我们具体分析下
//ARouter.java
/**
 * Init, it must be call before used router.
 */
public static void init(Application application) {
    if (!hasInit) {
        logger = _ARouter.logger;
        _ARouter.logger.info(Consts.TAG, "ARouter init start.");
        hasInit = _ARouter.init(application);

        if (hasInit) {
            _ARouter.afterInit();
        }

        _ARouter.logger.info(Consts.TAG, "ARouter init over.");
    }
}

//_ARouter.java
protected static synchronized boolean init(Application application) {
        mContext = application;
        LogisticsCenter.init(mContext, executor);
        logger.info(Consts.TAG, "ARouter init success!");
        hasInit = true;

        // It's not a good idea.
        // if (Build.VERSION.SDK_INT > Build.VERSION_CODES.ICE_CREAM_SANDWICH) {
        //     application.registerActivityLifecycleCallbacks(new AutowiredLifecycleCallback());
        // }
        return true;
    }
我们看到Arouter的初始化其实最后还是由LogisticsCenter这个类来做的
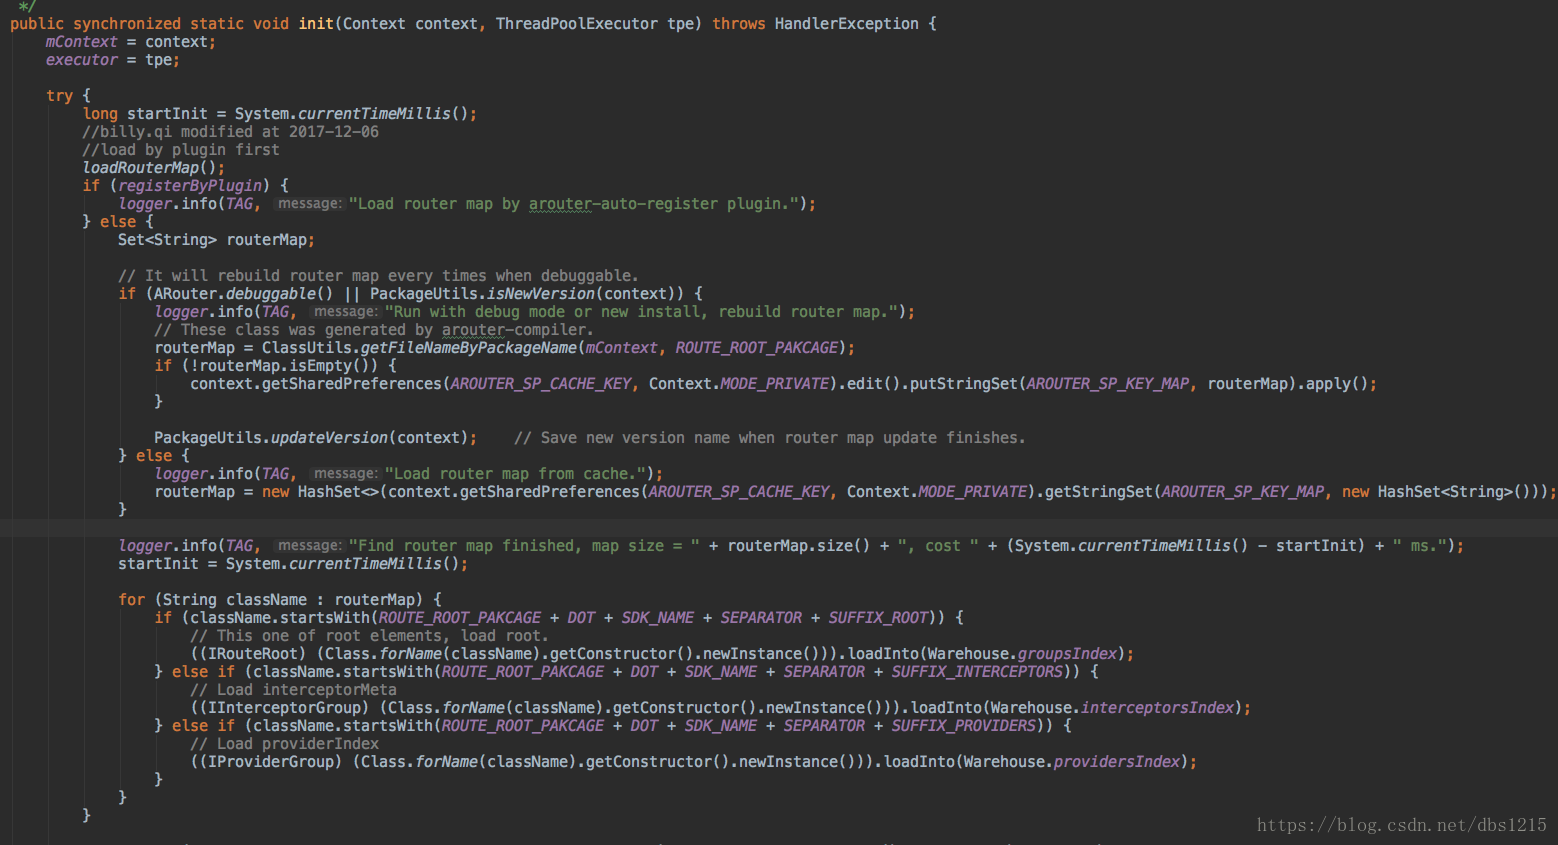
我们直接从第一个else语句后面看源代码如下
//LogisticsCenter.java
//public static final String ROUTE_ROOT_PAKCAGE = "com.alibaba.android.arouter.routes";
//public static final String DOT = ".";
//public static final String SDK_NAME = "ARouter";
if (ARouter.debuggable() || PackageUtils.isNewVersion(context)) {
logger.info(TAG, "Run with debug mode or new install, rebuild router map.");
// These class was generated by arouter-compiler.
//1、读取com.alibaba.android.arouter.routes包名下所有类
routerMap = ClassUtils.getFileNameByPackageName(mContext, ROUTE_ROOT_PAKCAGE);
if (!routerMap.isEmpty()) {
//2、把指定包名下的类都保存到本地了,便于下次直接从文件读取
context.getSharedPreferences(AROUTER_SP_CACHE_KEY, Context.MODE_PRIVATE)
.edit()
.putStringSet(AROUTER_SP_KEY_MAP, routerMap)
.apply();
}
// Save new version name when router map update finishes.
PackageUtils.updateVersion(context);
} else {
logger.info(TAG, "Load router map from cache.");
//3、从sp中直接读取类信息
routerMap = new HashSet<>(context
.getSharedPreferences(AROUTER_SP_CACHE_KEY, Context.MODE_PRIVATE)
.getStringSet(AROUTER_SP_KEY_MAP, new HashSet<String>()));
}
logger.info(TAG, "Find router map finished, map size = " + routerMap.size() + ", cost " + (System.currentTimeMillis() - startInit) + " ms.");
startInit = System.currentTimeMillis();
//4、将指定前缀的包名的类加载到内存中(Warehouse)
for (String className : routerMap) {
if (className.startsWith("com.alibaba.android.arouter.routes.ARouter$$Root")) {
// This one of root elements, load root.
((IRouteRoot) (Class.forName(className).getConstructor().newInstance()))
.loadInto(Warehouse.groupsIndex);
} else if (className.startsWith("com.alibaba.android.arouter.routes.ARouter$$Interceptors")) {
// Load interceptorMeta
((IInterceptorGroup) (Class.forName(className).getConstructor().newInstance()))
.loadInto(Warehouse.interceptorsIndex);
} else if (className.startsWith("com.alibaba.android.arouter.routes.ARouter$$Providers")) {
// Load providerIndex
((IProviderGroup) (Class.forName(className).getConstructor().newInstance()))
.loadInto(Warehouse.providersIndex);
}
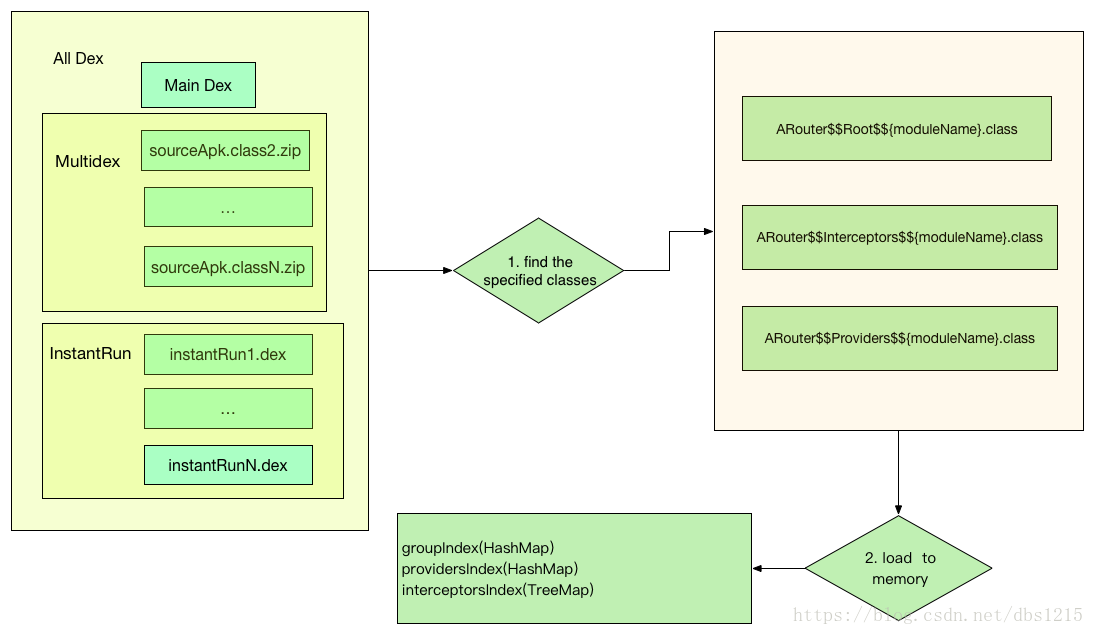
}小结上面代码,主要做了二件事情,
寻找指定包名的所有类
通过线程池读取所有dex中指定包名类,此处也就解释了为什么ARouter支持InstantRun、MultiDex
通过反射创建对象,并加载到内存(Warehouse)
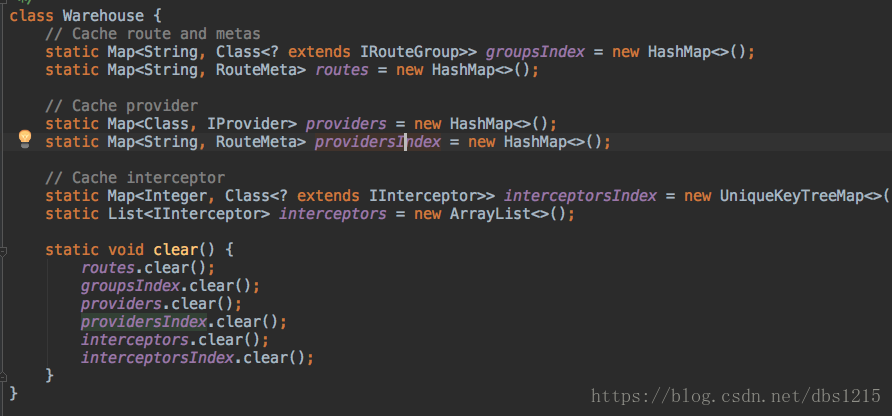
可以看到初始化过程其实加载到Warehouse类中有groupsIndex、interceptorsIndex、providersIndex
4. 路由做了什么 ?
ARouter跳转一般是这样
 ARouter.getInstance()
         .build("/test/activity")
         .navigation(this, new NavCallback() {
                 @Override
                 public void onArrival(Postcard postcard) {

                 }

                @Override
                public void onInterrupt(Postcard postcard) {
                Log.d("ARouter", "被拦截了");
                }
        });
跟踪代码可以发现ARouter.build最后还是委托给_Arouter.build来做,navigation也是同理
//_ARouter.java
/**
* Build postcard by path and default group
*/
protected Postcard build(String path) {
if (TextUtils.isEmpty(path)) {
throw new HandlerException(Consts.TAG + "Parameter is invalid!");
} else {
PathReplaceService pService = ARouter.getInstance().navigation(PathReplaceService.class);
if (null != pService) {
path = pService.forString(path);
}
return build(path, extractGroup(path));
}
}
/**
* Build postcard by uri
*/
protected Postcard build(Uri uri) {
if (null == uri || TextUtils.isEmpty(uri.toString())) {
throw new HandlerException(Consts.TAG + "Parameter invalid!");
} else {
PathReplaceService pService = ARouter.getInstance().navigation(PathReplaceService.class);
if (null != pService) {
uri = pService.forUri(uri);
}
return new Postcard(uri.getPath(), extractGroup(uri.getPath()), uri, null);
}
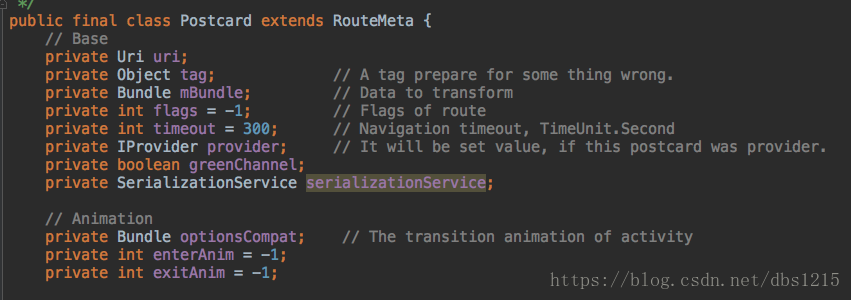
}最终返回了一个Postcard对象,可以将其理解为route过程中携带的数据包,该数据包括了path、group、参数,目标类等等
我们接下来重点看_ARouter.navigation内部怎么做的
protected Object navigation(final Context context,
final Postcard postcard,
final int requestCode,
final NavigationCallback callback) {
try {
//1、丰富postcard数据
LogisticsCenter.completion(postcard);
} catch (NoRouteFoundException ex) {
//2、异常处理
logger.warning(Consts.TAG, ex.getMessage());
if (debuggable()) { // Show friendly tips for user.
Toast.makeText(mContext, "There's no route matched!\n" +
" Path = [" + postcard.getPath() + "]\n" +
" Group = [" + postcard.getGroup() + "]", Toast.LENGTH_LONG).show();
}
if (null != callback) {
callback.onLost(postcard);
} else { // No callback for this invoke, then we use the global degrade service.
DegradeService degradeService = ARouter.getInstance().navigation(DegradeService.class);
if (null != degradeService) {
degradeService.onLost(context, postcard);
}
}
//直接返回了哦
return null;
}
//3、回调事件处理
if (null != callback) {
callback.onFound(postcard);
}
// It must be run in async thread, maybe interceptor cost too mush time made ANR.
if (!postcard.isGreenChannel()) {
//4、非绿色通道先过拦截器
interceptorService.doInterceptions(postcard, new InterceptorCallback() {
/**
* Continue process
*
* @param postcard route meta
*/
@Override
public void onContinue(Postcard postcard) {
//5、真正跳转逻辑
_navigation(context, postcard, requestCode, callback);
}
/**
* Interrupt process, pipeline will be destory when this method called.
*
* @param exception Reson of interrupt.
*/
@Override
public void onInterrupt(Throwable exception) {
if (null != callback) {
callback.onInterrupt(postcard);
}
logger.info(Consts.TAG, "Navigation failed, termination by interceptor : " + exception.getMessage());
}
});
} else {
return _navigation(context, postcard, requestCode, callback);
}
return null;
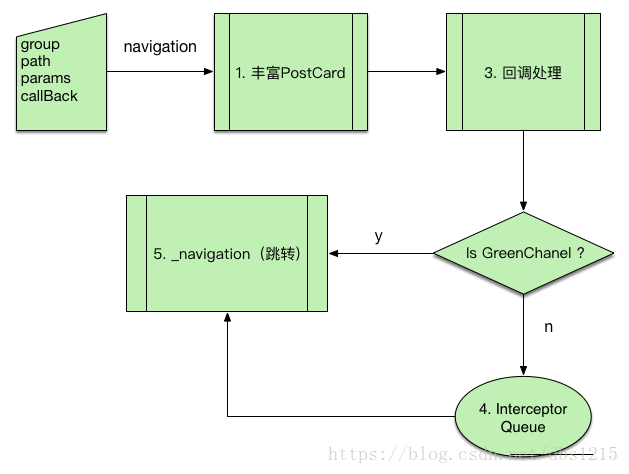
}总结下其实流程还是很清晰的
丰富postcard
你要知道跳转的目标类,首先你就得从根索引类中找,提取出注解相关的数据,并设置给postcard;这些都是LogisticsCenter.completion(postcard)干的活
异常处理
当你的path没找到,调用callback.onLost后直接返回了
回调事件处理
path找到了则直接调用callback.onFound
分发到拦截器
当路由请求为非绿色通道都是先过拦截器,拦截器归还控制权后继续执行第五流程
最后跳转流程
包含Activity跳转,Fragment、Provider实例的生成
附上navigation主流程图
下面我们继续对1、4、5子流程进行深入追踪
4.1 丰富postcard
//LogisticsCenter.java
public synchronized static void completion(Postcard postcard) {
    if (null == postcard) {
        throw new NoRouteFoundException(TAG + "No postcard!");
    }

    //从路由缓存中查找改path是否有路由记录
    RouteMeta routeMeta = Warehouse.routes.get(postcard.getPath());

    // Maybe its does't exist, or didn't load.
    if (null == routeMeta) {

        //如果routes不存在,尝试从根索引类入口寻找(明白了ARouter如何实现动态分组加载机制了吧?)
        Class<? extends IRouteGroup> groupMeta =
            Warehouse.groupsIndex.get(postcard.getGroup());  // Load route meta.

        if (null == groupMeta) {
            //没找到抛异常,交给上级处理
            throw new NoRouteFoundException(TAG
                                            + "There is no route match the path ["
                                            + postcard.getPath() + "], in group ["
                                            + postcard.getGroup() + "]");

        } else {
            // Load route and cache it into memory, then delete from metas.
            try {
                if (ARouter.debuggable()) {
                    logger.debug(TAG, String.format(Locale.getDefault(),
                                               "The group [%s] starts loading, trigger by [%s]", postcard.getGroup(), postcard.getPath()));
                }

                //找到对应分组类加载到内存,
                IRouteGroup iGroupInstance = groupMeta.getConstructor().newInstance();
                iGroupInstance.loadInto(Warehouse.routes);

                //从根索引类移除记录,因为该分组已加在到内存了
                Warehouse.groupsIndex.remove(postcard.getGroup());

                if (ARouter.debuggable()) {
                    logger.debug(TAG, String.format(Locale.getDefault(), "The group [%s] has already been loaded, trigger by [%s]", postcard.getGroup(), postcard.getPath()));
                }

            } catch (Exception e) {
                throw new HandlerException(TAG + "Fatal exception when loading group meta. [" + e.getMessage() + "]");
            }

            //此处调用自身方法,其实是执行了下面的else语句代码
            completion(postcard);   // Reload
        }
    } else {
        //丰富postcard对象数据(来源于注解的解析)

        postcard.setDestination(routeMeta.getDestination());
        postcard.setType(routeMeta.getType());
        postcard.setPriority(routeMeta.getPriority());
        postcard.setExtra(routeMeta.getExtra());

        Uri rawUri = postcard.getUri();
        if (null != rawUri) {   // Try to set params into bundle.
            Map<String, String> resultMap = TextUtils.splitQueryParameters(rawUri);
            Map<String, Integer> paramsType = routeMeta.getParamsType();

            if (MapUtils.isNotEmpty(paramsType)) {

                // Set value by its type, just for params which annotation by @Param
                //此处是通过url中的参数数据(eg:xxx/xxx?a=1&b=abc)并结合目标类中注解携带的信息
                //来确定每个参数的数据类型,进而设置到bundle中
                for (Map.Entry<String, Integer> params : paramsType.entrySet()) {
                    setValue(postcard,
                            params.getValue(),
                            params.getKey(),
                            resultMap.get(params.getKey()));
                }

                // Save params name which need auto inject.
                postcard.getExtras().putStringArray(ARouter.AUTO_INJECT, paramsType.keySet().toArray(new String[]{}));
            }

            // Save raw uri
            postcard.withString(ARouter.RAW_URI, rawUri.toString());
        }

        switch (routeMeta.getType()) {
            case PROVIDER:  // if the route is provider, should find its instance
                // Its provider, so it must implement IProvider
                Class<? extends IProvider> providerMeta = (Class<? extends IProvider>) routeMeta.getDestination();
                IProvider instance = Warehouse.providers.get(providerMeta);
                if (null == instance) { // There's no instance of this provider
                    IProvider provider;
                    try {
                        //生成服务接口,以做到解耦
                        provider = providerMeta.getConstructor().newInstance();
                        provider.init(mContext);
                        Warehouse.providers.put(providerMeta, provider);
                        instance = provider;
                    } catch (Exception e) {
                        throw new HandlerException("Init provider failed! " + e.getMessage());
                    }
                }
                postcard.setProvider(instance);
                postcard.greenChannel();    // Provider should skip all of interceptors
                break;
            case FRAGMENT:
                postcard.greenChannel();    // Fragment needn't interceptors
            default:
                break;
        }
    }
}所以我们知道completion方法目标就是很简单,就是给postcard设置诸多参数,为后面跳转做服务
4.2 分发到拦截器
从上面代码我们知道路由事件分发给拦截器是通过interceptorService.doInterceptions来实现的,那么interceptorService对象是什么时候被创建?跟踪代码发现是afterInit方法触发的,而afterInit只在ARouter初始化被调用
//_ARouter.java
static void afterInit() {
        // Trigger interceptor init, use byName.
        interceptorService = (InterceptorService) ARouter.getInstance()
            .build("/arouter/service/interceptor")
            .navigation();
}

//ARouter.java
/**
 * Init, it must be call before used router.
 */
public static void init(Application application) {
    if (!hasInit) {
        logger = _ARouter.logger;
        _ARouter.logger.info(Consts.TAG, "ARouter init start.");
        hasInit = _ARouter.init(application);

        if (hasInit) {
            _ARouter.afterInit();
        }

        _ARouter.logger.info(Consts.TAG, "ARouter init over.");
    }
}
现在我们明白了拦截器服务初始化时机,接下来看看拦截器服务实现类InterceptorServiceImpl
拦截器服务初始化时加载所有自定义拦截器,这样便于doInterceptions方法正常进行
@Route(path = "/arouter/service/interceptor")
public class InterceptorServiceImpl implements InterceptorService {

    private static boolean interceptorHasInit;
    private static final Object interceptorInitLock = new Object();

    //使用线程池(考虑到反射耗时)来加载所有拦截器
    @Override
    public void init(final Context context) {

        LogisticsCenter.executor.execute(new Runnable() {
            @Override
            public void run() {

                //interceptorsIndex类型是UniqueKeyTreeMap
                //这也解释了为什么能够自定义拦截器优先级了
                if (MapUtils.isNotEmpty(Warehouse.interceptorsIndex)) {
                    for (Map.Entry<Integer, Class<? extends IInterceptor>> entry
                         : Warehouse.interceptorsIndex.entrySet()) {

                        Class<? extends IInterceptor> interceptorClass =
                            entry.getValue();

                        try {
                            IInterceptor iInterceptor =
                                interceptorClass.getConstructor().newInstance();
                            iInterceptor.init(context);

                            //创建的所有拦截器放到数组中
                            Warehouse.interceptors.add(iInterceptor);

                        } catch (Exception ex) {
                            throw new HandlerException(TAG
                                          + "ARouter init interceptor error! name = ["
                                          + interceptorClass.getName()
                                          + "], reason = ["
                                          + ex.getMessage()
                                          + "]");
                        }
                    }

                    interceptorHasInit = true;

                    logger.info(TAG, "ARouter interceptors init over.");

                    synchronized (interceptorInitLock) {
                        //唤醒其他等待的线程
                        interceptorInitLock.notifyAll();
                    }
                }
            }
        });
    }

    private static void checkInterceptorsInitStatus() {
        synchronized (interceptorInitLock) {
            while (!interceptorHasInit) {
                try {
                    interceptorInitLock.wait(10 * 1000);
                } catch (InterruptedException e) {
                    throw new HandlerException(TAG + "Interceptor init cost too much time error! reason = [" + e.getMessage() + "]");
                }
            }
        }
    }

    @Override
    public void doInterceptions(final Postcard postcard,
                                final InterceptorCallback callback) {

        if (null != Warehouse.interceptors
            && Warehouse.interceptors.size() > 0) {

            //1、判断拦截器服务是否初始化完成,没完成等它10s再说
            checkInterceptorsInitStatus();

            if (!interceptorHasInit) {
                //2、10s还没搞定,直接回掉并返回
                callback.onInterrupt(new HandlerException("Interceptors"+
                                     "initialization takes too much time."));
                return;
            }

            LogisticsCenter.executor.execute(new Runnable() {
                @Override
                public void run() {
                   //3、使用CountDownLatch是为了在多线程中做到拦截器顺序执行
                   //使用线程池则是为了提高资源利用率
                    CancelableCountDownLatch interceptorCounter =
                        new CancelableCountDownLatch(Warehouse.interceptors.size());

                    try {
                        //4、按顺序(优先级)执行所有拦截器
                        _excute(0, interceptorCounter, postcard);

                        //在指定时间内等待_excute方法执行完成
                        interceptorCounter.await(postcard.getTimeout(), TimeUnit.SECONDS);

                        //5、主要是回掉事件的处理了
                        // Cancel the navigation this time, if it hasn't return anythings.
                        if (interceptorCounter.getCount() > 0) {

                            callback.onInterrupt(new HandlerException("The interceptor"+
                                                      "processing timed out."));

                        } else if (null != postcard.getTag()) {
                            // Maybe some exception in the tag.
                            callback.onInterrupt(new HandlerException(postcard.getTag()
                                                                         .toString()));
                        } else {
                            callback.onContinue(postcard);
                        }
                    } catch (Exception e) {
                        callback.onInterrupt(e);
                    }
                }
            });
        } else {
            //无拦截器则执行_navigation也就是下面要说的跳转流程,
            callback.onContinue(postcard);
        }
    }
}
小结下,拦截器服务主要做了一下几个时期
- 有声明的拦截器,在线程中(考虑到拦截器耗时)按优先级依次执行拦截器
- 无拦截器,则直接进入跳转流程
4.3 最后跳转
//_ARouter.java
private Object _navigation(final Context context,
                           final Postcard postcard,
                           final int requestCode,
                           final NavigationCallback callback) {

    final Context currentContext = null == context ? mContext : context;

    switch (postcard.getType()) {
        case ACTIVITY:

            //1、设置相关参数
            // Build intent
            final Intent intent = new Intent(currentContext, postcard.getDestination());
            intent.putExtras(postcard.getExtras());

            // Set flags.
            int flags = postcard.getFlags();
            if (-1 != flags) {
                intent.setFlags(flags);
            } else if (!(currentContext instanceof Activity)) {    // Non activity, need less one flag.
                intent.setFlags(Intent.FLAG_ACTIVITY_NEW_TASK);
            }

            //2、UI线程启动Activity
            // Navigation in main looper.
            new Handler(Looper.getMainLooper()).post(new Runnable() {
                @Override
                public void run() {
                    if (requestCode > 0) {  // Need start for result
                        ActivityCompat.startActivityForResult((Activity) currentContext, intent, requestCode, postcard.getOptionsBundle());
                    } else {
                        ActivityCompat.startActivity(currentContext, intent, postcard.getOptionsBundle());
                    }

                    //3、收尾操作包括动画及其回调处理
                    if ((-1 != postcard.getEnterAnim() && -1 != postcard.getExitAnim()) && currentContext instanceof Activity) {    // Old version.
                        ((Activity) currentContext).overridePendingTransition(postcard.getEnterAnim(), postcard.getExitAnim());
                    }

                    if (null != callback) { // Navigation over.
                        callback.onArrival(postcard);
                    }
                }
            });

            break;
        case PROVIDER:
            return postcard.getProvider();
        case BOARDCAST:
        case CONTENT_PROVIDER:
        case FRAGMENT:
            //从这里我们可以看到ARouter是通过反射方式创建fragment
            Class fragmentMeta = postcard.getDestination();
            try {
                Object instance = fragmentMeta.getConstructor().newInstance();
                if (instance instanceof Fragment) {
                    ((Fragment) instance).setArguments(postcard.getExtras());
                } else if (instance instanceof android.support.v4.app.Fragment) {
                    ((android.support.v4.app.Fragment) instance).setArguments(postcard.getExtras());
                }

                return instance;
            } catch (Exception ex) {
                logger.error(Consts.TAG, "Fetch fragment instance error, " + TextUtils.formatStackTrace(ex.getStackTrace()));
            }
        case METHOD:
        case SERVICE:
        default:
            return null;
    }

    return null;
}从上面我们可以看到目前ARouter只能支持Activity、Fragment、Provider三种方式;启动服务,ContentProvider目前还不支持;前面的丰富postcard操作就是为最后一步做铺垫的。
至此ARouter的route流程大体已讲解完毕;
5. 如何实现页面自动注入参数?
接下来我们来看下ARouter是如何自动注入参数的,以Activity为例
//Router 跳转
TestObj testObj = new TestObj("Rose", 777);

ARouter.getInstance().build("/test/activity1")
    .withString("name", "老王")
    .withInt("age", 18)
    .withBoolean("boy", true)
    .withObject("obj", testObj)
    .navigation();


//参数自动注入
// 为每一个参数声明一个字段,并使用 @Autowired 标注
// URL中不能传递Parcelable类型数据,通过ARouter api可以传递Parcelable对象
@Route(path = "/test/activity")
public class Test1Activity extends Activity {

   @Autowired
   public String name;

   @Autowired
   int age;

   @Autowired(name = "girl") // 通过name来映射URL中的不同参数
   boolean boy;

   @Autowired
   TestObj obj;    // 支持解析自定义对象,URL中使用json传递,需要序列化和反序列化服务接口支持

   @Override
   protected void onCreate(Bundle savedInstanceState) {
       super.onCreate(savedInstanceState);
       ARouter.getInstance().inject(this);
       // ARouter会自动对字段进行赋值,无需主动获取
       Log.d("param", name + age + boy);
   }
}


// 如果需要传递自定义对象,需要实现 SerializationService,并使用@Route注解标注(方便用户自行选择序列化方式),例如:
@Route(path = "/service/json")
public class JsonServiceImpl implements SerializationService {

    @Override
    public void init(Context context) {
    }

    @Override
    public <T> T json2Object(String text, Class<T> clazz) {
        return JSON.parseObject(text, clazz);
    }

    @Override
    public String object2Json(Object instance) {
        return JSON.toJSONString(instance);
    }
}
我们自然想到参数自动注入就是ARouter.getInstance().inject(this);搞的鬼,进去看看
//ARouter.java
/**
 * Inject params and services.
 */
public void inject(Object thiz) {
    _ARouter.inject(thiz);
}

//_ARouter.java
static void inject(Object thiz) {
        AutowiredService autowiredService =
            ((AutowiredService) ARouter.getInstance()
             .build("/arouter/service/autowired")
             .navigation());

        if (null != autowiredService) {
            autowiredService.autowire(thiz);
        }
}从上面可以看到ARouter.inject要做的事情委托给了_ARouter.inject;而__ARouter不愿干直接扔给一个叫AutowiredService类处理了;我们找找其实现类AutowiredServiceImpl它才是实现参数自动注入的关键代码
@Route(path = "/arouter/service/autowired")
public class AutowiredServiceImpl implements AutowiredService {
    private LruCache<String, ISyringe> classCache;
    private List<String> blackList;

    @Override
    public void init(Context context) {
        classCache = new LruCache<>(66);
        blackList = new ArrayList<>();
    }

    @Override
    public void autowire(Object instance) {
        String className = instance.getClass().getName();
        try {
            if (!blackList.contains(className)) {
                //1、从缓存查到代理类
                ISyringe autowiredHelper = classCache.get(className);
                if (null == autowiredHelper) {  // No cache.
                    //没找到,则尝试创建一个对象,该对象名字规则如下
                    //eg:xxxx.Test1Activity$$ARouter$$Autowired
                    autowiredHelper =
                        (ISyringe) Class.forName(instance.getClass().getName()
                         + SUFFIX_AUTOWIRED).getConstructor().newInstance();
                }

                //2、交给代理类去做了
                autowiredHelper.inject(instance);

                //3、缓存起来
                classCache.put(className, autowiredHelper);
            }
        } catch (Exception ex) {
            blackList.add(className);    // This instance need not autowired.
        }
    }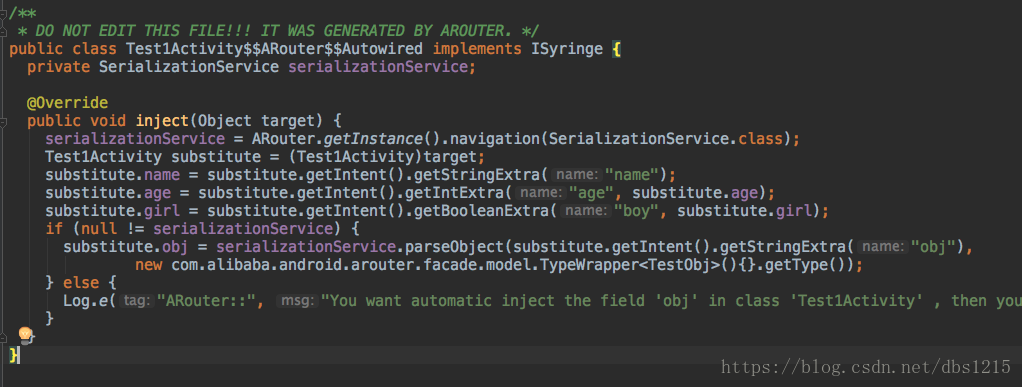
}所以说_ARouter、AutowiredServiceImpl的inject都不想干活最后还是Test1Activity$$ARouter$$Autowired类老老实实做,下图就是参数自动注入的代码了,代码很简单就不废话了;可以看到自定义对象是使用了一个叫serralizationService的反序列化服务来完成的;
至于Test1Activity$$ARouter$$Autowired类是如何生成的,有兴趣的同学可以看AutowiredProcessor类的内部实现;可能有同学有疑问,自定义对象数据是如何做到反序列化的?不知道大家有没注意在丰富postcard流程是有一句setValue代码,进去看看
private static void setValue(Postcard postcard, Integer typeDef, String key, String value) {
    if (TextUtils.isEmpty(key) || TextUtils.isEmpty(value)) {
        return;
    }

    try {
        if (null != typeDef) {
            if (typeDef == TypeKind.BOOLEAN.ordinal()) {
                postcard.withBoolean(key, Boolean.parseBoolean(value));
            } else if (typeDef == TypeKind.BYTE.ordinal()) {
                postcard.withByte(key, Byte.valueOf(value));
            } else if (typeDef == TypeKind.SHORT.ordinal()) {
                postcard.withShort(key, Short.valueOf(value));
            } else if (typeDef == TypeKind.INT.ordinal()) {
                postcard.withInt(key, Integer.valueOf(value));
            } else if (typeDef == TypeKind.LONG.ordinal()) {
                postcard.withLong(key, Long.valueOf(value));
            } else if (typeDef == TypeKind.FLOAT.ordinal()) {
                postcard.withFloat(key, Float.valueOf(value));
            } else if (typeDef == TypeKind.DOUBLE.ordinal()) {
                postcard.withDouble(key, Double.valueOf(value));
            } else if (typeDef == TypeKind.STRING.ordinal()) {
                postcard.withString(key, value);
            } else if (typeDef == TypeKind.PARCELABLE.ordinal()) {
                // TODO : How to description parcelable value with string?
            } else if (typeDef == TypeKind.OBJECT.ordinal()) {
               //解释了自定义对象为什么能实现序列化原因了
                postcard.withString(key, value);
            } else {    // Compatible compiler sdk 1.0.3, in that version, the string type = 18
                postcard.withString(key, value);
            }
        } else {
            postcard.withString(key, value);
        }
    } catch (Throwable ex) {
        logger.warning(Consts.TAG, "LogisticsCenter setValue failed! " + ex.getMessage());
    }
}
所以自定义对象数据其原始还是字符串承载,等到目标页面时再通过反序列化服务处理就OK了,同时也清楚为什么对于自定义对象参数时需要实现序列化服务了
至此ARouter的流程已基本梳理完毕!