1、jumpserver安装
1.1、环境介绍
系统: CentOS 7.4.1708
IP: 192.168.56.110
[root@linux-node1 ~]# uname -r
3.10.0-693.el7.x86_64
[root@linux-node1 ~]# cat /etc/redhat-release
CentOS Linux release 7.4.1708 (Core)
1.2、关闭 selinux 和防火墙
[root@linux-node1 ~]# setenforce 0  # 可以设置配置文件永久关闭
[root@linux-node1 ~]# systemctl stop firewalld.service
[root@linux-node1 ~]# systemctl disable firewalld.service
[root@linux-node1 ~]# iptables -F
[root@linux-node1 ~]# iptables-save
1.3、准备 Python3 和 Python 虚拟环境
(1)安装依赖包
[root@linux-node1 ~]# yum -y install wget sqlite-devel xz gcc automake zlib-devel openssl-devel epel-release git

(2)编译安装pyhton3.6.1
[root@linux-node1 ~]# wget https://www.python.org/ftp/python/3.6.1/Python-3.6.1.tar.xz
[root@linux-node1 ~]# tar xvf Python-3.6.1.tar.xz  && cd Python-3.6.1
[root@linux-node1 ~]# ./configure && make && make install

(3)建立 Python 虚拟环境

因为 CentOS 6/7 自带的是 Python2,而 Yum 等工具依赖原来的 Python,为了不扰乱原来的环境我们来使用 Python 虚拟环境

[root@linux-node1 ~]# cd /opt
[root@linux-node1 ~]# python3 -m venv py3
[root@linux-node1 ~]# source /opt/py3/bin/activate

# 看到下面的提示符代表成功,以后运行 Jumpserver 都要先运行以上 source 命令,以下所有命令均在该虚拟环境中运行
(py3) [root@linux-node1 ~]#
1.4、 安装 Jumpserver 1.0.0


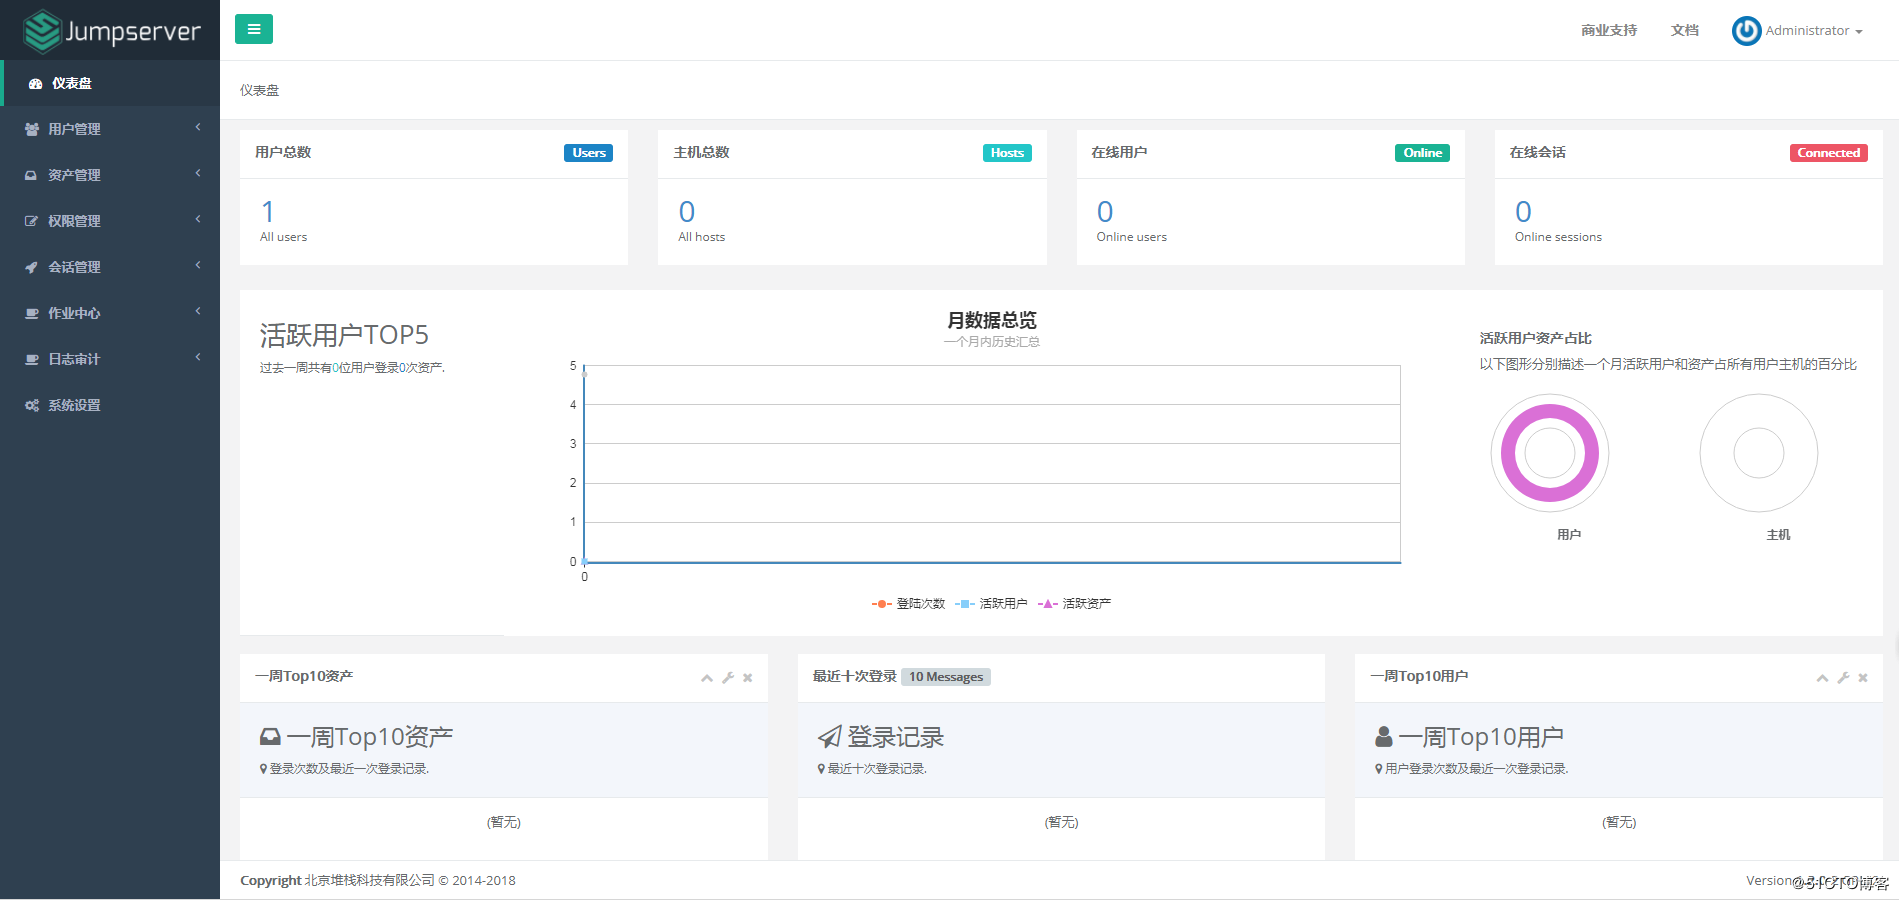
(1)下载或 Clone 项目

项目提交较多 git clone 时较大,你可以选择去 Github 项目页面直接下载zip包。

[root@linux-node1 ~]# cd /opt/
[root@linux-node1 ~]# git clone --depth=1 https://github.com/jumpserver/jumpserver.git && cd jumpserver && git checkout master

(2) 安装依赖 RPM 包

[root@linux-node1 ~]# cd /opt/jumpserver/requirements
[root@linux-node1 ~]# yum -y install $(cat rpm_requirements.txt)  # 如果没有任何报错请继续

(3)安装 Python 库依赖
[root@linux-node1 ~]# pip install -r requirements.txt  # 不要指定-i参数,因为镜像上可能没有最新的包,如果没有任何报错请继续

(4)安装 Redis, Jumpserver 使用 Redis 做 cache 和 celery broke
[root@linux-node1 ~]# yum -y install redis
[root@linux-node1 ~]# systemctl start redis

(5)安装 MySQL
[root@linux-node1 ~]# yum -y install mariadb mariadb-devel mariadb-server
[root@linux-node1 ~]# systemctl start mariadb

(6)创建数据库 Jumpserver 并授权
[root@linux-node1 ~]# mysql
> create database jumpserver default charset 'utf8';
> grant all on jumpserver.* to 'jumpserver'@'127.0.0.1' identified by 'jumpserver';

(7)修改 Jumpserver 配置文件

[root@linux-node1 ~]# cd /opt/jumpserver
[root@linux-node1 jumpserver]# cp config_example.py config.py
[root@linux-node1 ~]# vim config.py  # 我们计划修改 DevelopmentConfig中的配置,因为默认jumpserver是使用该配置,它继承自Config
注意: 配置文件是 Python 格式,不要用 TAB,而要用空格

class DevelopmentConfig(Config):
    DEBUG = True
    DB_ENGINE = 'mysql'
    DB_HOST = '127.0.0.1'
    DB_PORT = 3306
    DB_USER = 'jumpserver'
    DB_PASSWORD = 'somepassword'
    DB_NAME = 'jumpserver'
...

config = DevelopmentConfig()  # 确保使用的是刚才设置的配置文件

(8)生成数据库表结构和初始化数据

[root@linux-node1 ~]#  cd /opt/jumpserver/utils
[root@linux-node1 ~]#  bash make_migrations.sh

(9) 运行 Jumpserver

[root@linux-node1 ~]#  cd /opt/jumpserver
[root@linux-node1 ~]#  python run_server.py all
运行不报错,请浏览器访问 http://192.168.56.110:8080/ (这里只是 Jumpserver, 没有 Web Terminal,所以访问 Web Terminal 会报错)

账号: admin 密码: admin
1.5、安装 SSH Server 和 WebSocket Server: Coco
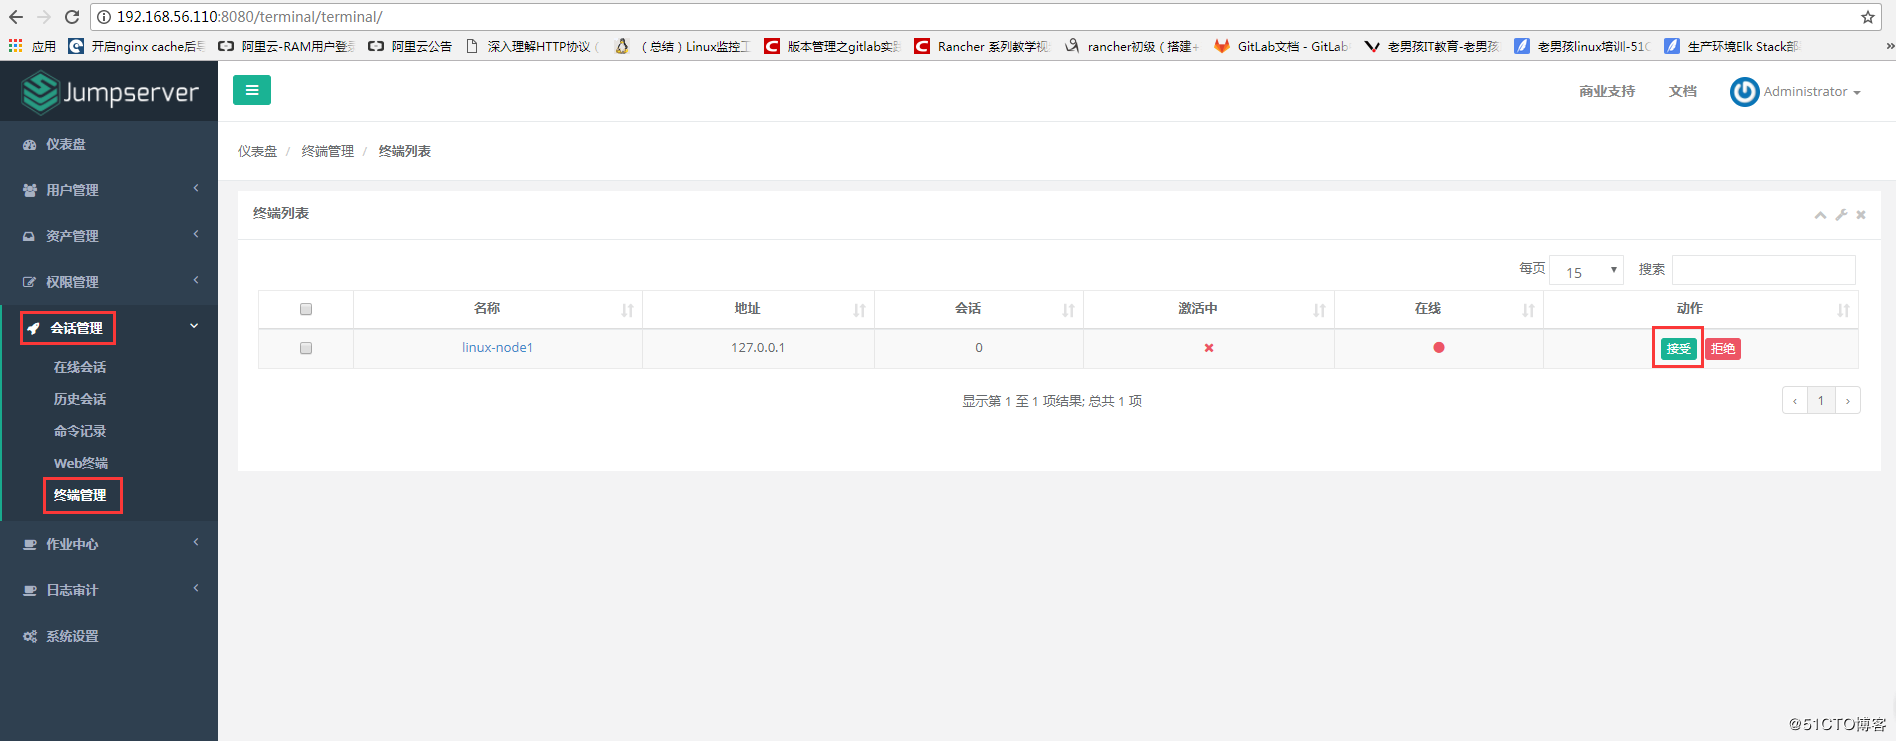
(1)下载或 Clone 项目

新开一个终端,连接测试机,别忘了 source /opt/py3/bin/activate

$ cd /opt
$ git clone https://github.com/jumpserver/coco.git && cd coco && git checkout master

(2)安装依赖

$ cd /opt/coco/requirements
$ yum -y  install $(cat rpm_requirements.txt)
$ pip install -r requirements.txt

(3)查看配置文件并运行

$ cd /opt/coco
$ cp conf_example.py conf.py
$ python run_server.py
这时需要去 Jumpserver 管理后台-会话管理-终端管理(http://192.168.56.110:8080/terminal/terminal/)接受 Coco 的注册

Coco version 0.4.0, more see https://www.jumpserver.org
Starting ssh server at 0.0.0.0:2222
Quit the server with CONTROL-C.
1.6、测试连接
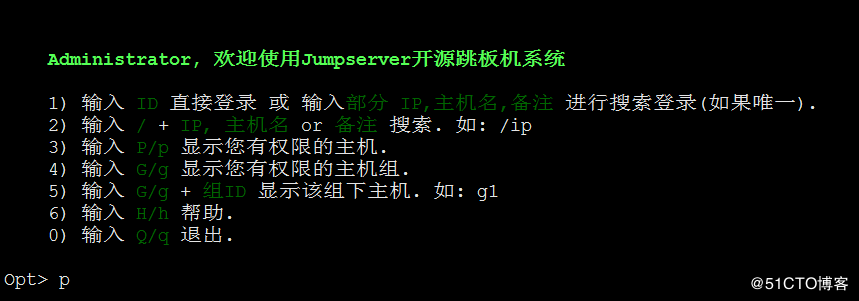
#命令行远程连接跳板机
[root@linux-node1 ~]#  ssh -p2222 admin@192.168.56.110
The authenticity of host '[192.168.56.110]:2222 ([192.168.56.110]:2222)' can't be established.
RSA key fingerprint is SHA256:+OT2q1lPHGXKkfKOeZiNaoHx5LPMBAa48MWsmqwaHKE.
RSA key fingerprint is MD5:3c:37:c3:20:ca:17:f9:c0:3e:92:dc:d9:b0:08:1a:7f.
Are you sure you want to continue connecting (yes/no)? yes
Warning: Permanently added '[192.168.56.110]:2222' (RSA) to the list of known hosts.
admin@192.168.56.110's password: 密码: admin
如图所示:
如果是用在 Windows 下,Xshell Terminal 登录语法如下
$ssh [email protected] 2222
密码: admin
如果能登陆代表部署成功
1.7、安装 Web Terminal 前端: Luna
Luna 已改为纯前端,需要 Nginx 来运行访问
访问(https://github.com/jumpserver/luna/releases)下载对应版本的 release 包,直接解压,不需要编译
(1)解压 Luna

[root@linux-node1 ~]# pwd
/opt/

[root@linux-node1 ~]# tar xvf luna.tar.gz
[root@linux-node1 ~]# ls /opt/luna
1.8、 配置 Nginx 整合各组件
(1)安装 Nginx 根据喜好选择安装方式和版本
[root@linux-node1 ~]# yum -y install nginx

(2)准备配置文件 修改 /etc/nginx/nginx.conf

[root@linux-node1 conf.d]# cat /etc/nginx/nginx.conf
user nginx;
worker_processes auto;
error_log /var/log/nginx/error.log;
pid /run/nginx.pid;

# Load dynamic modules. See /usr/share/nginx/README.dynamic.
include /usr/share/nginx/modules/*.conf;

events {
    worker_connections 1024;
}

http {
    log_format  main  '$remote_addr - $remote_user [$time_local] "$request" '
                      '$status $body_bytes_sent "$http_referer" '
                      '"$http_user_agent" "$http_x_forwarded_for"';

    access_log  /var/log/nginx/access.log  main;

    sendfile            on;
    tcp_nopush          on;
    tcp_nodelay         on;
    keepalive_timeout   65;
    types_hash_max_size 2048;

    include             /etc/nginx/mime.types;
    default_type        application/octet-stream;

    # Load modular configuration files from the /etc/nginx/conf.d directory.
    # See http://nginx.org/en/docs/ngx_core_module.html#include
    # for more information.
    include /etc/nginx/conf.d/*.conf;
    server {
    listen 80;

    proxy_set_header X-Real-IP $remote_addr;
    proxy_set_header Host $host;
    proxy_set_header X-Forwarded-For $proxy_add_x_forwarded_for;

    location /luna/ {
        try_files $uri / /index.html;
        alias /opt/luna/;
    }

    location /media/ {
        add_header Content-Encoding gzip;
        root /opt/jumpserver/data/;
    }

    location /static/ {
        root /opt/jumpserver/data/;
    }

    location /socket.io/ {
        proxy_pass       http://localhost:5000/socket.io/;
        proxy_buffering off;
        proxy_http_version 1.1;
        proxy_set_header Upgrade $http_upgrade;
        proxy_set_header Connection "upgrade";
    }

    location /guacamole/ {
        proxy_pass       http://localhost:8081/;
        proxy_buffering off;
        proxy_http_version 1.1;
        proxy_set_header X-Forwarded-For $proxy_add_x_forwarded_for;
        proxy_set_header Upgrade $http_upgrade;
        proxy_set_header Connection $http_connection;
        access_log off;
    }

    location / {
        proxy_pass http://localhost:8080;
    }
}
}

(3)运行 Nginx
[root@linux-node1 ~]# nginx -t
nginx: the configuration file /etc/nginx/nginx.conf syntax is ok
nginx: configuration file /etc/nginx/nginx.conf test is successful
[root@linux-node1 ~]# systemctl reload nginx

(4)访问 http://192.168.56.110,如图: