在同一个项目(项目归类于学习类,类似答题那种)开发中,又有了一个新的应用需求(上一个应用需求可查看链接:https://blog.csdn.net/Charles_Tian/article/details/80908442),就是要在用户答题结束之后,将用户答题的相关信息展示到一个“奖状”上去,然后将奖状和用户答题信息可通过用户点击一键保存事件,一起保存在用户的手机相册中。
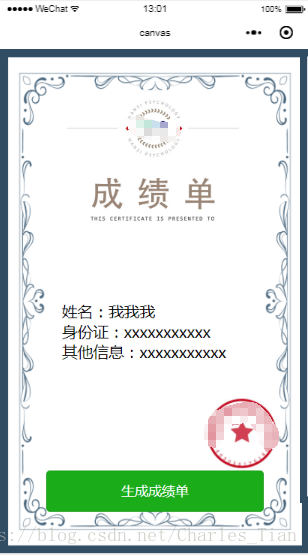
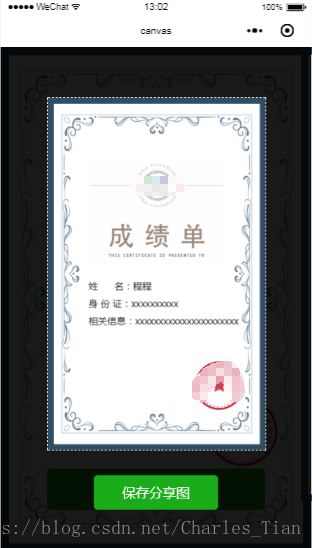
这里我先给出最后的效果图,然后再细讲怎么去实现,以及过程中的一些问题。我的效果图是这样的,用户进入这个界面后,会先展示给用户看其自己的奖状信息,下面一个按钮是生成预览图的,点击保存才会保存在用户相册中。
最终效果图:
于是,这又让我想到了用canvas去实现,因为小程序官网平台有一个api接口:wx.saveImageToPhotosAlbum(OBJECT)。
下面来看看关于这个接口的一些属性:
这个接口主要是将想要保存的内容(其实也就是一张图片,这个图片里面包含你想要生成的一些信息)生成一个暂存的路径,随后再利用接口:wx.saveImageToPhotosAlbum将这个暂存的路径保存在用户的手机相册中。
但利用wx.canvasToTempFilePath和wx.saveImageToPhotosAlbum这两个接口之前,还需要创建并返回绘图上下文context对象
即:const ctx = wx.createCanvasContext('shareImg')
好,下面开始直接上代码:
上传之前这里需要提醒大家的就是:在JS部分中,ctx.drawImg这个方法有点特别,就是它所带的照片位置属性不接受层级分层,
也就是说它已经将照片分层了,第一张照片的层级最低,越往后走,后面的照片层级越高,所以,一般是要把底层背景图放在第一个。
HTML部分:
<!-- 画布大小按需定制 这里我按照背景图尺寸的一半定的  -->
<canvas canvas-id="shareImg" style="width:375px;height:606px"></canvas>

<!-- 预览区域  -->
<view hidden='{{previewHidden}}' class='preview'>
  <image src='{{preurl}}' mode='widthFix' class='previewImg'></image>
  <button type='primary' bindtap='save'>保存分享图</button>
</view>

<!-- 界面展示区域 -->
<view class='originalView'>
   <image src='/images/chengjidan.png' class='chengjidan'></image>
   <image src='/images/transcript.jpg' class='transcript'></image>
   <view class='userScoreInfo'>
     <text class='name'>姓名:我我我\n</text>
     <text class='IDCard'>身份证:xxxxxxxxxxx\n</text>
     <text class='info'>其他信息:xxxxxxxxxxx</text>
   </view>
   <image src='/images/zhang.jpg' class='seal'></image>
</view>

<button class='share' type='primary' bindtap='share'>生成成绩单</button>
CSS部分:
canvas{
  position: fixed;
  top: 0;
  left: 400px;
}
.share{
  position: absolute;
  bottom: 100rpx;
  width: 70%;
  left: 15%;
  height: 100rpx;
  line-height: 100rpx;
}
.preview {
  width: 100%;
  height: 100%;
  background: rgba(0,0,0,.9);
  position: absolute;
  z-index: 2;
}
.previewImg{
  width: 70%;
  position: absolute;
  top: 10%;
  left: 15%;
  z-index: 3;
  border: 1px dashed #fff;
}
.preview button{
  width: 40%;
  position: absolute;
  bottom: 100rpx;
  left: 30%;
}

page{
  width: 100%;
  height: 100%;
}

.originalView{
  width: 100%;
  height: 100%;
}

.chengjidan{
  width: 100%;
  height: 100%;
  position: absolute;
  z-index: -1;
}

.transcript{
  width: 240px;
  height: 185px;
  position: absolute;
  left: 50%;
  margin-left: -120px;
  top: 100rpx;
}

.seal{
  width: 100px;
  height: 100px;
  position: absolute;
  right: 10%;
  bottom: 200rpx;
}

.userScoreInfo{
  position: absolute;
  width: 60%;
  margin-left: 20%;
  text-align: left;
  top: 50%;
}
JS部分:
Page({

  /**
   * 页面的初始数据
   */
  data: {
    previewHidden: true,
  },

  /**
   * 生命周期函数--监听页面加载
   */
  onLoad: function (options) {
    let promise1 = new Promise(function (resolve, reject) {
      wx.getImageInfo({
        src: '../../images/chengjidan.png',
        success: function (res) {
          console.log(res)
          resolve(res);
        }
      })
    });

    let promise2 = new Promise(function (resolve, reject) {
      wx.getImageInfo({
        src: '../../images/transcript.jpg',
        success: function (res) {
          console.log(res)
          resolve(res);
        }
      })
    });

    let promise3 = new Promise(function (resolve, reject) {
      wx.getImageInfo({
        src: '../../images/zhang.jpg',
        success: function (res) {
          console.log(res)
          resolve(res);
        }
      })
    });

    Promise.all([
      promise1, promise2, promise3
    ]).then(res => {
      console.log(res)
      const ctx = wx.createCanvasContext('shareImg')

      //主要就是计算好各个图文的位置
      ctx.drawImage('../../' + res[0].path, 0, 0, 375, 606)
      ctx.drawImage('../../' + res[1].path, 70, 100, 240, 185)
      ctx.drawImage('../../' + res[2].path, 250, 450, 90, 90)

      ctx.setTextAlign('left')
      ctx.setFillStyle('#000000')
      ctx.setFontSize(16)
      // 下面这三行是图片中的文字,这些文字也是要通过canvas画上去的
      ctx.fillText('姓    名:程程', 70, 330)
      ctx.fillText('身 份 证:xxxxxxxxxx', 70, 360)
      ctx.fillText('相关信息:xxxxxxxxxxxxxx', 70, 390)

      ctx.stroke()
      ctx.draw()
    })
  },


  /**
   * 生成分享图
  */
  share: function () {
    var that = this
    wx.showLoading({
      title: '努力生成中...'
    })
    /*
    wx.canvasToTempFilePath(OBJECT, this)
    x	          Number	  否	画布x轴起点(默认0)
    y	          Number	  否	画布y轴起点(默认0)
    width	  Number	  否	画布宽度(默认为canvas宽度-x)
    height	  Number	  否	画布高度(默认为canvas高度-y)
    destWidth	  Number	  否	输出图片宽度(默认为 width * 屏幕像素密度)
    destHeight	  Number	  否	输出图片高度(默认为 height * 屏幕像素密度)
    canvasId	  String	  是	画布标识,传入 <canvas/> 的 canvas-id
    fileType	  String	  否	目标文件的类型,只支持 'jpg' 或 'png'。默认为 'png'
    quality	  Number	  否	图片的质量,取值范围为 (0, 1],不在范围内时当作1.0处理
    success	  Function	  否	接口调用成功的回调函数
    fail	  Function	  否	接口调用失败的回调函数
    complete	  Function	  否	接口调用结束的回调函数(调用成功、失败都会执行)
    */
    wx.canvasToTempFilePath({
      x: 0,
      y: 0,
      width: 375,
      height: 606,
      destWidth: 375,
      destHeight: 606,
      canvasId: 'shareImg',
      success: function (res) {
        console.log(res.tempFilePath);
        that.setData({
          preurl: res.tempFilePath,
          previewHidden: false,
        })
        wx.hideLoading()
      },
      fail: function (res) {
        console.log(res)
      }
    })
  },

  /**
   * 保存到相册
  */
  save: function () {
    var that = this
    // 生产环境时 记得这里要加入获取相册授权的代码
    // 可以通过 wx.getSetting 先查询一下用户是否授权了 "scope.writePhotosAlbum" 这个 scope
    wx.getSetting({
      success(res) {
        if (!res.authSetting['scope.writePhotosAlbum']) {
          wx.authorize({
            scope: 'scope.writePhotosAlbum',
            success() {
              // 用户已经同意小程序相册功能,后续调用 wx.saveImageToPhotosAlbum 接口不会弹窗询问
              that.startSaveImage()
            }
          })
        }else{
          that.startSaveImage()
        }
      }
    })

  },

  startSaveImage: function () {
    let that = this;
    wx.saveImageToPhotosAlbum({
      filePath: that.data.preurl,
      success(res) {
        wx.showModal({
          content: '图片已保存到相册,赶紧晒一下吧~',
          showCancel: false,
          confirmText: '好哒',
          confirmColor: '#72B9C3',
          success: function (res) {
            if (res.confirm) {
              console.log('用户点击确定');
              that.setData({
                previewHidden: true
              })
            }
          }
        })
      }
    })
  },
})
哎,以上就是实现方法,或许有的童鞋就说,这样好麻烦啊,还要生成一个预览图,可不可以直接点击保存之后,就把奖状直接保存在用户手机中呢?答案是绝对可以的,那么下面我们就来实现点击保存按钮后直接保存的操作。直接上代码吧~
HTML部分:
<canvas canvas-id="shareImg" style="width:100%;height:100%;"></canvas>
<button type='primary' class='saveImg' bindtap='save'>保存图片</button>
CSS部分:
page{
  width: 100%;
  height: 100%;
  background: #000;
}

.saveImg{
  position: absolute;
  bottom: 10px;
  width: 90%;
  left: 5%;
  height: 50px;
}
JS部分(最重要的)
Page({

  /**
   * 页面的初始数据
   */
  data: {
    resultComment: '学霸' //测试数据
  },

  /**
   * 生命周期函数--监听页面加载
   */
  onLoad: function (options) {
    let that = this;
    // 测试数据
    let real_name = 'xxxx';
    let id_card = '123123';
    let school_id = 666
    let winWidth = wx.getSystemInfoSync().windowWidth;// 获取当前设备的可视宽度
    let winHeight = wx.getSystemInfoSync().windowHeight;// 获取当前设备的可视高度
    that.setData({
      winWidth: winWidth,
      winHeight: winHeight
    })

    //绘制canvas图
    let promise1 = new Promise(function (resolve, reject) {
      wx.getImageInfo({
        src: '../../images/chengjidanBG.png',
        success: function (res) {
          console.log(res)
          resolve(res);
        }
      })
    });
    let promise2 = new Promise(function (resolve, reject) {
      wx.getImageInfo({
        src: '../../images/chengjidan2.jpg',
        success: function (res) {
          console.log(res)
          resolve(res);
        }
      })
    });
    Promise.all([
      promise1, promise2
    ]).then(res => {
      console.log(res)
      const ctx = wx.createCanvasContext('shareImg')

      //主要就是计算好各个图文的位置,利用当前设备的宽高度对图片和文字进行居中
      ctx.drawImage('../../' + res[0].path, 0, 0, that.data.winWidth, that.data.winHeight - 70)
      ctx.drawImage('../../' + res[1].path, (that.data.winWidth / 2 - 120), 50, 240, 150)


      ctx.setTextAlign('center')
      ctx.setFillStyle('#9a8576')
      ctx.setFontSize(22)
      ctx.fillText(real_name, (that.data.winWidth) / 2, ((that.data.winHeight) / 2) - 30)

      ctx.setTextAlign('left')
      ctx.setFillStyle('#304d64')
      ctx.setFontSize(14)
      ctx.fillText('身份证号码:' + id_card, 70, ((that.data.winHeight) / 2) + 20)
      ctx.fillText('培训学校:' + school_id, 70, ((that.data.winHeight) / 2) + 50)
      ctx.fillText('成绩评定:' + that.data.resultComment, 70, ((that.data.winHeight) / 2) + 80)

      ctx.stroke()
      ctx.draw()
    })
  },

  /**
   * 保存到相册
  */
  save: function () {
    var that = this;
    //获取相册授权
    wx.getSetting({
      success(res) {
        if (!res.authSetting['scope.writePhotosAlbum']) {
          wx.authorize({
            scope: 'scope.writePhotosAlbum',
            success() {
              that.savaImageToPhoto();
            }
          })
        }else{
          that.savaImageToPhoto();
        }
      }
    })
  },

  savaImageToPhoto: function(){
    let that = this;
    wx.showLoading({
      title: '努力生成中...'
    })
    wx.canvasToTempFilePath({
      x: 0,
      y: 0,
      width: that.data.winWidth,
      height: that.data.winHeight - 70,
      destWidth: that.data.winWidth,
      destHeight: that.data.winHeight - 70,
      canvasId: 'shareImg',
      success: function (res) {
        wx.hideLoading()
        wx.saveImageToPhotosAlbum({
          filePath: res.tempFilePath,
          success(res) {
            wx.showModal({
              content: '图片已保存到相册了',
              showCancel: false,
              confirmText: '朕知道啦',
              confirmColor: '#72B9C3',
              success: function (res) {
                if (res.confirm) {
                  console.log('用户点击确定');
                  that.setData({
                    hidden: true
                  })
                }
              }
            })
          }
        })
      },
      fail: function (res) {
        console.log(res)
      }
    })
  },
})
其实这个页面呈现在用户眼前的效果,就是在onLoad里面中canvas绘图出来的效果。效果图如下: