当你创建TMXTiledMap* tilemap=TMXTiledMap::create(“test1.tmx”)或Sprite *sprite=Sprite(“HelloWorld.p-ng”),有没有产生这样的疑问–为什么把资源test1.tmx和HelloWorld.png放在项目目录下的Resources文件中即可直接引用而不用标明具体路径,并且可以在多个平台下引用?或许很多人就会这样说:“别人告诉我放在这个文件夹中就可以了,我自己使用确实可行,也没有出错,我就没有多去探究了”。如果你想知道这具体原因,就要阅读下面的分析了。如果你并不关心其原因,你可以关闭这个网页了。
我以TMXTiledMap::Create函数为讲解对象。
首先转到TMXTiledMap::Create的定义中,其定义是在CCFastTMXTiledMap.cpp文件中,代码1如下。其目录是E:\mycoscos2d\test2\cocos2d\cocos\2d中,这就说明这是与具体平台无关的,后面我们会看到已具体平台相关的代码。
代码1:
代码2:
代码3:
代码4:
代码5:
代码6:
代码7:
DirectoryAndFilename()函数定义中,如代码8。
代码8:
在代码7中,我们看到searchPath变量,从代码注释中可以看到//searchPath + file_path + resourceDirectory,就可以发现searchPath就是我们路径的名称。
在代码7中我们看到也只是字符串的连接,而且searchPath是作为参数传入的。于是我们就回到代码6中。
在代码6中,代码7中的searchPath只是_searchPathArray中的一个迭代器。好,这就说明路径就藏_searchPathArray中,最后我们在CCFileUtils.cpp文件中找到了FileUtils::init(),如代码9。
代码9:
于是我们就转到this->getInstance代码中,此时的目录是E:\mycoscos2d\test2\cocos2d\cocos\platform\win32\CCFileUtilsWin32.cpp,好的,终于转到与平台相关的目录中了。注意我用的VS2012来开发,所以才转到win32这个目录中,如果你是Eclipse来开发,你就转到E:\mycoscos2d\test2\cocos2d\cocos\platform\android\CCFileUtils-Android.cpp这个目录中。如果是IOS,你就转到E:\mycoscos2d\test2\cocos2d\cocos\platform\apple\CCFileUtils-Apple.mm。这是为什么转到相关的平台的CCFileUtilsxxx.cpp中呢,这是因为在每个与平台相关的头文件中有#if CC_TARGET_PLATFORM == CC_PLATFORM_XXX的条件预处理,也这样说在那个平台就包含那个头文件。例如:在CCFileUtilsWin32.h文件中有代码10。这是很巧妙的技巧!
代码10:
代码1:
- <span style=“font-size:18px;”>TMXTiledMap * TMXTiledMap::create(const std::string& tmxFile)
- {
- TMXTiledMap *ret = new TMXTiledMap();
- if (ret->initWithTMXFile(tmxFile))
- {
- ret->autorelease();
- return ret;
- }
- CC_SAFE_DELETE(ret);
- return nullptr;
- }</span>
<span style="font-size:18px;">TMXTiledMap * TMXTiledMap::create(const std::string& tmxFile)
{
    TMXTiledMap *ret = new TMXTiledMap();
    if (ret->initWithTMXFile(tmxFile))
    {
        ret->autorelease();
        return ret;
    }
    CC_SAFE_DELETE(ret);
    return nullptr;
}</span>代码2:
- <span style=“font-size:18px;”>bool TMXTiledMap::initWithTMXFile(const std::string& tmxFile)
- {
- CCASSERT(tmxFile.size()>0, ”FastTMXTiledMap: tmx file should not be empty”);
- setContentSize(Size::ZERO);
- TMXMapInfo *mapInfo = TMXMapInfo::create(tmxFile);
- if (! mapInfo)
- {
- return false;
- }
- CCASSERT( !mapInfo->getTilesets().empty(), ”FastTMXTiledMap: Map not found. Please check the filename.”);
- buildWithMapInfo(mapInfo);
- return true;
- }</span>
<span style="font-size:18px;">bool TMXTiledMap::initWithTMXFile(const std::string& tmxFile)
{
    CCASSERT(tmxFile.size()>0, "FastTMXTiledMap: tmx file should not be empty");
    setContentSize(Size::ZERO);
    TMXMapInfo *mapInfo = TMXMapInfo::create(tmxFile);
    if (! mapInfo)
    {
        return false;
    }
    CCASSERT( !mapInfo->getTilesets().empty(), "FastTMXTiledMap: Map not found. Please check the filename.");
    buildWithMapInfo(mapInfo);
    return true;
}</span>代码3:
- <span style=“font-size:18px;”>TMXMapInfo * TMXMapInfo::create(const std::string& tmxFile)
- {
- TMXMapInfo *ret = new TMXMapInfo();
- if(ret->initWithTMXFile(tmxFile))
- {
- ret->autorelease();
- return ret;
- }
- CC_SAFE_DELETE(ret);
- return nullptr;
- }</span>
<span style="font-size:18px;">TMXMapInfo * TMXMapInfo::create(const std::string& tmxFile)
{
    TMXMapInfo *ret = new TMXMapInfo();
    if(ret->initWithTMXFile(tmxFile))
    {
        ret->autorelease();
        return ret;
    }
    CC_SAFE_DELETE(ret);
    return nullptr;
}</span>代码4:
- <span style=“font-size:18px;”>bool TMXMapInfo::initWithTMXFile(const std::string& tmxFile)
- {
- internalInit(tmxFile, ”“);
- return parseXMLFile(_TMXFileName.c_str());
- }
- </span>
<span style="font-size:18px;">bool TMXMapInfo::initWithTMXFile(const std::string& tmxFile)
{
    internalInit(tmxFile, "");
    return parseXMLFile(_TMXFileName.c_str());
}
</span>代码5:
- <span style=“font-size:18px;”>void TMXMapInfo::internalInit(const std::string& tmxFileName, const std::string& resourcePath)
- {
- if (tmxFileName.size() > 0)
- {
- _TMXFileName = FileUtils::getInstance()->fullPathForFilename(tmxFileName);
- }
- if (resourcePath.size() > 0)
- {
- _resources = resourcePath;
- }
- …
- }</span>
<span style="font-size:18px;">void TMXMapInfo::internalInit(const std::string& tmxFileName, const std::string& resourcePath)
{
    if (tmxFileName.size() > 0)
    {
        _TMXFileName = FileUtils::getInstance()->fullPathForFilename(tmxFileName);
    }
    if (resourcePath.size() > 0)
    {
        _resources = resourcePath;
    }
    ...
}</span>代码6:
- <span style=“font-size:18px;”>std::string FileUtils::fullPathForFilename(const std::string &filename)
- {
- …
- std::string fullpath;
- for (auto searchIt = _searchPathArray.cbegin(); searchIt != _searchPathArray.cend(); ++searchIt)
- {
- for (auto resolutionIt = _searchResolutionsOrderArray.cbegin(); resolutionIt != _searchResolutionsOrderArray.cend(); ++resolutionIt)
- {
- fullpath = this->getPathForFilename(newFilename, *resolutionIt, *searchIt);
- if (fullpath.length() > 0)
- {
- // Using the filename passed in as key.
- _fullPathCache.insert(std::make_pair(filename, fullpath));
- return fullpath;
- }
- }
- }
- …
- }</span>
<span style="font-size:18px;">std::string FileUtils::fullPathForFilename(const std::string &filename)
{
    ...
    std::string fullpath;
    for (auto searchIt = _searchPathArray.cbegin(); searchIt != _searchPathArray.cend(); ++searchIt)
    {
        for (auto resolutionIt = _searchResolutionsOrderArray.cbegin(); resolutionIt != _searchResolutionsOrderArray.cend(); ++resolutionIt)
        {
            fullpath = this->getPathForFilename(newFilename, *resolutionIt, *searchIt);

            if (fullpath.length() > 0)
            {
                // Using the filename passed in as key.
                _fullPathCache.insert(std::make_pair(filename, fullpath));
                return fullpath;
            }
        }
    }
   ...
}</span>代码7:
- <span style=“font-size:18px;”>std::string FileUtils::getPathForFilename(const std::string& filename, const std::string& resolutionDirectory, const std::string& searchPath)
- {
- std::string file = filename;
- std::string file_path = ”“;
- size_t pos = filename.find_last_of(“/”);
- if (pos != std::string::npos)
- {
- file_path = filename.substr(0, pos+1);
- file = filename.substr(pos+1);
- }
- // searchPath + file_path + resourceDirectory
- std::string path = searchPath;
- path += file_path;
- path += resolutionDirectory;
- path = getFullPathForDirectoryAndFilename(path, file);
- //CCLOG(“getPathForFilename, fullPath = %s”, path.c_str());
- return path;
- }</span>
<span style="font-size:18px;">std::string FileUtils::getPathForFilename(const std::string& filename, const std::string& resolutionDirectory, const std::string& searchPath)
{
    std::string file = filename;
    std::string file_path = "";
    size_t pos = filename.find_last_of("/");
    if (pos != std::string::npos)
    {
        file_path = filename.substr(0, pos+1);
        file = filename.substr(pos+1);
    }
    // searchPath + file_path + resourceDirectory
    std::string path = searchPath;
    path += file_path;
    path += resolutionDirectory;
    path = getFullPathForDirectoryAndFilename(path, file);
    //CCLOG("getPathForFilename, fullPath = %s", path.c_str());
    return path;
}</span>DirectoryAndFilename()函数定义中,如代码8。
代码8:
- <span style=“font-size:18px;”>std::string FileUtils::getFullPathForDirectoryAndFilename(const std::string& directory, const std::string& filename)
- {
- // get directory+filename, safely adding ’/’ as necessary
- std::string ret = directory;
- if (directory.size() && directory[directory.size()-1] != ‘/’){
- ret += ’/’;
- }
- ret += filename;
- // if the file doesn’t exist, return an empty string
- if (!isFileExistInternal(ret)) {
- ret = ”“;
- }
- return ret;
- }</span>
<span style="font-size:18px;">std::string FileUtils::getFullPathForDirectoryAndFilename(const std::string& directory, const std::string& filename)
{
    // get directory+filename, safely adding '/' as necessary
    std::string ret = directory;
    if (directory.size() && directory[directory.size()-1] != '/'){
        ret += '/';
    }
    ret += filename;

    // if the file doesn't exist, return an empty string
    if (!isFileExistInternal(ret)) {
        ret = "";
    }
    return ret;
}</span>在代码7中,我们看到searchPath变量,从代码注释中可以看到//searchPath + file_path + resourceDirectory,就可以发现searchPath就是我们路径的名称。
在代码7中我们看到也只是字符串的连接,而且searchPath是作为参数传入的。于是我们就回到代码6中。
在代码6中,代码7中的searchPath只是_searchPathArray中的一个迭代器。好,这就说明路径就藏_searchPathArray中,最后我们在CCFileUtils.cpp文件中找到了FileUtils::init(),如代码9。
代码9:
- <span style=“font-size:18px;”>bool FileUtils::init()
- {
- _searchPathArray.push_back(_defaultResRootPath);
- _searchResolutionsOrderArray.push_back(”“);
- return true;
- }</span>
<span style="font-size:18px;">bool FileUtils::init()
{
    _searchPathArray.push_back(_defaultResRootPath);
    _searchResolutionsOrderArray.push_back("");
    return true;
}</span>于是我们就转到this->getInstance代码中,此时的目录是E:\mycoscos2d\test2\cocos2d\cocos\platform\win32\CCFileUtilsWin32.cpp,好的,终于转到与平台相关的目录中了。注意我用的VS2012来开发,所以才转到win32这个目录中,如果你是Eclipse来开发,你就转到E:\mycoscos2d\test2\cocos2d\cocos\platform\android\CCFileUtils-Android.cpp这个目录中。如果是IOS,你就转到E:\mycoscos2d\test2\cocos2d\cocos\platform\apple\CCFileUtils-Apple.mm。这是为什么转到相关的平台的CCFileUtilsxxx.cpp中呢,这是因为在每个与平台相关的头文件中有#if CC_TARGET_PLATFORM == CC_PLATFORM_XXX的条件预处理,也这样说在那个平台就包含那个头文件。例如:在CCFileUtilsWin32.h文件中有代码10。这是很巧妙的技巧!
代码10:
- <span style=“font-size:18px;”>#include “base/CCPlatformConfig.h”
- #if CC_TARGET_PLATFORM == CC_PLATFORM_WIN32
- #include “CCStdC.h”
- #include “platform/CCCommon.h”
- #include “platform/CCApplicationProtocol.h”
- #include <string></span>
<span style="font-size:18px;">#include "base/CCPlatformConfig.h"
代码11:
- <span style=“font-size:18px;”>FileUtils* FileUtils::getInstance()
- {
- if (s_sharedFileUtils == nullptr)
- {
- s_sharedFileUtils = new FileUtilsWin32();
- if(!s_sharedFileUtils->init())
- {
- delete s_sharedFileUtils;
- s_sharedFileUtils = nullptr;
- CCLOG(”ERROR: Could not init CCFileUtilsWin32”);
- }
- }
- return s_sharedFileUtils;
- }</span>
<span style="font-size:18px;">FileUtils* FileUtils::getInstance()
{
    if (s_sharedFileUtils == nullptr)
    {
        s_sharedFileUtils = new FileUtilsWin32();
        if(!s_sharedFileUtils->init())
        {
          delete s_sharedFileUtils;
          s_sharedFileUtils = nullptr;
          CCLOG("ERROR: Could not init CCFileUtilsWin32");
        }
    }
    return s_sharedFileUtils;
}</span>代码12:
- <span style=“font-size:18px;”>bool FileUtilsWin32::init()
- {
- _checkPath();
- _defaultResRootPath = s_resourcePath;
- return FileUtils::init();
- }</span>
<span style="font-size:18px;">bool FileUtilsWin32::init()
{
    _checkPath();
    _defaultResRootPath = s_resourcePath;
    return FileUtils::init();
}</span>代码13:
- <span style=“font-size:18px;”>static void _checkPath()
- {
- if (0 == s_resourcePath.length())
- {
- WCHAR utf16Path[CC_MAX_PATH] = {0};
- GetCurrentDirectoryW(sizeof(utf16Path)-1, utf16Path);
- char utf8Path[CC_MAX_PATH] = {0};
- int nNum = WideCharToMultiByte(CP_UTF8, 0, utf16Path, -1, utf8Path, sizeof(utf8Path), nullptr, nullptr);
- s_resourcePath = convertPathFormatToUnixStyle(utf8Path);
- s_resourcePath.append(”/”);
- }
- }</span>
<span style="font-size:18px;">static void _checkPath()
{
    if (0 == s_resourcePath.length())
    {
        WCHAR utf16Path[CC_MAX_PATH] = {0};
        GetCurrentDirectoryW(sizeof(utf16Path)-1, utf16Path);

        char utf8Path[CC_MAX_PATH] = {0};
        int nNum = WideCharToMultiByte(CP_UTF8, 0, utf16Path, -1, utf8Path, sizeof(utf8Path), nullptr, nullptr);

        s_resourcePath = convertPathFormatToUnixStyle(utf8Path);
        s_resourcePath.append("/");
    }
}</span>代码14:
- <span style=“font-size:18px;”>bool FileUtilsAndroid::init()
- {
- _defaultResRootPath = ”assets/”;
- return FileUtils::init();
- }</span>
<span style="font-size:18px;">bool FileUtilsAndroid::init()
{
    _defaultResRootPath = "assets/";
    return FileUtils::init();
}</span>代码15:
- <span style=“font-size:18px;”>bool FileUtils::init()
- {
- _searchPathArray.push_back(_defaultResRootPath);
- _searchResolutionsOrderArray.push_back(”“);
- return true;
- }
- </span>
<span style="font-size:18px;">bool FileUtils::init()
{
    _searchPathArray.push_back(_defaultResRootPath);
    _searchResolutionsOrderArray.push_back("");
    return true;
}
</span>我们现在回到代码6中,this->getPathForFilename(newFilename, *resolutionIt, *searchIt),为什么加入this?那就要看看代码6的函数调用者代码5,在代码5中有FileUtils::getInstance(),它返回的是由FileUtilsWin32转换而来的,而FileUtils中getPathForFilename为虚函数,根据C++多态,所以会调用FileUtilsWin32::getPathForFilename()。如代码16。
代码16:
- <span style=“font-size:18px;”>std::string FileUtilsWin32::getPathForFilename(const std::string& filename, const std::string& resolutionDirectory, const std::string& searchPath)
- {
- std::string unixFileName = convertPathFormatToUnixStyle(filename);
- std::string unixResolutionDirectory = convertPathFormatToUnixStyle(resolutionDirectory);
- std::string unixSearchPath = convertPathFormatToUnixStyle(searchPath);
- return FileUtils::getPathForFilename(unixFileName, unixResolutionDirectory, unixSearchPath);
- }</span>
<span style="font-size:18px;">std::string FileUtilsWin32::getPathForFilename(const std::string& filename, const std::string& resolutionDirectory, const std::string& searchPath)
{
    std::string unixFileName = convertPathFormatToUnixStyle(filename);
    std::string unixResolutionDirectory = convertPathFormatToUnixStyle(resolutionDirectory);
    std::string unixSearchPath = convertPathFormatToUnixStyle(searchPath);
    return FileUtils::getPathForFilename(unixFileName, unixResolutionDirectory, unixSearchPath);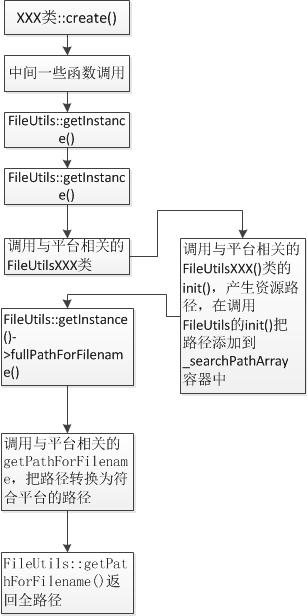
}</span>到此为止,我们详细讲解了cocos2d-x3.2如何通过FileUtils类来实现把资源放在Resources文件目录下达到多平台的引用。
最后,我们最后用一张图片作为总结。
如需转载,请标明出处,http://blog.csdn.net/cbbbc/article/details/38178753
当你创建TMXTiledMap* tilemap=TMXTiledMap::create(“test1.tmx”)或Sprite *sprite=Sprite(“HelloWorld.p-ng”),有没有产生这样的疑问–为什么把资源test1.tmx和HelloWorld.png放在项目目录下的Resources文件中即可直接引用而不用标明具体路径,并且可以在多个平台下引用?或许很多人就会这样说:“别人告诉我放在这个文件夹中就可以了,我自己使用确实可行,也没有出错,我就没有多去探究了”。如果你想知道这具体原因,就要阅读下面的分析了。如果你并不关心其原因,你可以关闭这个网页了。
我以TMXTiledMap::Create函数为讲解对象。
首先转到TMXTiledMap::Create的定义中,其定义是在CCFastTMXTiledMap.cpp文件中,代码1如下。其目录是E:\mycoscos2d\test2\cocos2d\cocos\2d中,这就说明这是与具体平台无关的,后面我们会看到已具体平台相关的代码。
代码1:
代码2:
代码3:
代码4:
代码5:
代码6:
代码7:
DirectoryAndFilename()函数定义中,如代码8。
代码8:
在代码7中,我们看到searchPath变量,从代码注释中可以看到//searchPath + file_path + resourceDirectory,就可以发现searchPath就是我们路径的名称。
在代码7中我们看到也只是字符串的连接,而且searchPath是作为参数传入的。于是我们就回到代码6中。
在代码6中,代码7中的searchPath只是_searchPathArray中的一个迭代器。好,这就说明路径就藏_searchPathArray中,最后我们在CCFileUtils.cpp文件中找到了FileUtils::init(),如代码9。
代码9:
于是我们就转到this->getInstance代码中,此时的目录是E:\mycoscos2d\test2\cocos2d\cocos\platform\win32\CCFileUtilsWin32.cpp,好的,终于转到与平台相关的目录中了。注意我用的VS2012来开发,所以才转到win32这个目录中,如果你是Eclipse来开发,你就转到E:\mycoscos2d\test2\cocos2d\cocos\platform\android\CCFileUtils-Android.cpp这个目录中。如果是IOS,你就转到E:\mycoscos2d\test2\cocos2d\cocos\platform\apple\CCFileUtils-Apple.mm。这是为什么转到相关的平台的CCFileUtilsxxx.cpp中呢,这是因为在每个与平台相关的头文件中有#if CC_TARGET_PLATFORM == CC_PLATFORM_XXX的条件预处理,也这样说在那个平台就包含那个头文件。例如:在CCFileUtilsWin32.h文件中有代码10。这是很巧妙的技巧!
代码10:
代码1:
- <span style=“font-size:18px;”>TMXTiledMap * TMXTiledMap::create(const std::string& tmxFile)
- {
- TMXTiledMap *ret = new TMXTiledMap();
- if (ret->initWithTMXFile(tmxFile))
- {
- ret->autorelease();
- return ret;
- }
- CC_SAFE_DELETE(ret);
- return nullptr;
- }</span>
<span style="font-size:18px;">TMXTiledMap * TMXTiledMap::create(const std::string& tmxFile)
{
    TMXTiledMap *ret = new TMXTiledMap();
    if (ret->initWithTMXFile(tmxFile))
    {
        ret->autorelease();
        return ret;
    }
    CC_SAFE_DELETE(ret);
    return nullptr;
}</span>代码2:
- <span style=“font-size:18px;”>bool TMXTiledMap::initWithTMXFile(const std::string& tmxFile)
- {
- CCASSERT(tmxFile.size()>0, ”FastTMXTiledMap: tmx file should not be empty”);
- setContentSize(Size::ZERO);
- TMXMapInfo *mapInfo = TMXMapInfo::create(tmxFile);
- if (! mapInfo)
- {
- return false;
- }
- CCASSERT( !mapInfo->getTilesets().empty(), ”FastTMXTiledMap: Map not found. Please check the filename.”);
- buildWithMapInfo(mapInfo);
- return true;
- }</span>
<span style="font-size:18px;">bool TMXTiledMap::initWithTMXFile(const std::string& tmxFile)
{
    CCASSERT(tmxFile.size()>0, "FastTMXTiledMap: tmx file should not be empty");
    setContentSize(Size::ZERO);
    TMXMapInfo *mapInfo = TMXMapInfo::create(tmxFile);
    if (! mapInfo)
    {
        return false;
    }
    CCASSERT( !mapInfo->getTilesets().empty(), "FastTMXTiledMap: Map not found. Please check the filename.");
    buildWithMapInfo(mapInfo);
    return true;
}</span>代码3:
- <span style=“font-size:18px;”>TMXMapInfo * TMXMapInfo::create(const std::string& tmxFile)
- {
- TMXMapInfo *ret = new TMXMapInfo();
- if(ret->initWithTMXFile(tmxFile))
- {
- ret->autorelease();
- return ret;
- }
- CC_SAFE_DELETE(ret);
- return nullptr;
- }</span>
<span style="font-size:18px;">TMXMapInfo * TMXMapInfo::create(const std::string& tmxFile)
{
    TMXMapInfo *ret = new TMXMapInfo();
    if(ret->initWithTMXFile(tmxFile))
    {
        ret->autorelease();
        return ret;
    }
    CC_SAFE_DELETE(ret);
    return nullptr;
}</span>代码4:
- <span style=“font-size:18px;”>bool TMXMapInfo::initWithTMXFile(const std::string& tmxFile)
- {
- internalInit(tmxFile, ”“);
- return parseXMLFile(_TMXFileName.c_str());
- }
- </span>
<span style="font-size:18px;">bool TMXMapInfo::initWithTMXFile(const std::string& tmxFile)
{
    internalInit(tmxFile, "");
    return parseXMLFile(_TMXFileName.c_str());
}
</span>代码5:
- <span style=“font-size:18px;”>void TMXMapInfo::internalInit(const std::string& tmxFileName, const std::string& resourcePath)
- {
- if (tmxFileName.size() > 0)
- {
- _TMXFileName = FileUtils::getInstance()->fullPathForFilename(tmxFileName);
- }
- if (resourcePath.size() > 0)
- {
- _resources = resourcePath;
- }
- …
- }</span>
<span style="font-size:18px;">void TMXMapInfo::internalInit(const std::string& tmxFileName, const std::string& resourcePath)
{
    if (tmxFileName.size() > 0)
    {
        _TMXFileName = FileUtils::getInstance()->fullPathForFilename(tmxFileName);
    }
    if (resourcePath.size() > 0)
    {
        _resources = resourcePath;
    }
    ...
}</span>代码6:
- <span style=“font-size:18px;”>std::string FileUtils::fullPathForFilename(const std::string &filename)
- {
- …
- std::string fullpath;
- for (auto searchIt = _searchPathArray.cbegin(); searchIt != _searchPathArray.cend(); ++searchIt)
- {
- for (auto resolutionIt = _searchResolutionsOrderArray.cbegin(); resolutionIt != _searchResolutionsOrderArray.cend(); ++resolutionIt)
- {
- fullpath = this->getPathForFilename(newFilename, *resolutionIt, *searchIt);
- if (fullpath.length() > 0)
- {
- // Using the filename passed in as key.
- _fullPathCache.insert(std::make_pair(filename, fullpath));
- return fullpath;
- }
- }
- }
- …
- }</span>
<span style="font-size:18px;">std::string FileUtils::fullPathForFilename(const std::string &filename)
{
    ...
    std::string fullpath;
    for (auto searchIt = _searchPathArray.cbegin(); searchIt != _searchPathArray.cend(); ++searchIt)
    {
        for (auto resolutionIt = _searchResolutionsOrderArray.cbegin(); resolutionIt != _searchResolutionsOrderArray.cend(); ++resolutionIt)
        {
            fullpath = this->getPathForFilename(newFilename, *resolutionIt, *searchIt);

            if (fullpath.length() > 0)
            {
                // Using the filename passed in as key.
                _fullPathCache.insert(std::make_pair(filename, fullpath));
                return fullpath;
            }
        }
    }
   ...
}</span>代码7:
- <span style=“font-size:18px;”>std::string FileUtils::getPathForFilename(const std::string& filename, const std::string& resolutionDirectory, const std::string& searchPath)
- {
- std::string file = filename;
- std::string file_path = ”“;
- size_t pos = filename.find_last_of(“/”);
- if (pos != std::string::npos)
- {
- file_path = filename.substr(0, pos+1);
- file = filename.substr(pos+1);
- }
- // searchPath + file_path + resourceDirectory
- std::string path = searchPath;
- path += file_path;
- path += resolutionDirectory;
- path = getFullPathForDirectoryAndFilename(path, file);
- //CCLOG(“getPathForFilename, fullPath = %s”, path.c_str());
- return path;
- }</span>
<span style="font-size:18px;">std::string FileUtils::getPathForFilename(const std::string& filename, const std::string& resolutionDirectory, const std::string& searchPath)
{
    std::string file = filename;
    std::string file_path = "";
    size_t pos = filename.find_last_of("/");
    if (pos != std::string::npos)
    {
        file_path = filename.substr(0, pos+1);
        file = filename.substr(pos+1);
    }
    // searchPath + file_path + resourceDirectory
    std::string path = searchPath;
    path += file_path;
    path += resolutionDirectory;
    path = getFullPathForDirectoryAndFilename(path, file);
    //CCLOG("getPathForFilename, fullPath = %s", path.c_str());
    return path;
}</span>DirectoryAndFilename()函数定义中,如代码8。
代码8:
- <span style=“font-size:18px;”>std::string FileUtils::getFullPathForDirectoryAndFilename(const std::string& directory, const std::string& filename)
- {
- // get directory+filename, safely adding ’/’ as necessary
- std::string ret = directory;
- if (directory.size() && directory[directory.size()-1] != ‘/’){
- ret += ’/’;
- }
- ret += filename;
- // if the file doesn’t exist, return an empty string
- if (!isFileExistInternal(ret)) {
- ret = ”“;
- }
- return ret;
- }</span>
<span style="font-size:18px;">std::string FileUtils::getFullPathForDirectoryAndFilename(const std::string& directory, const std::string& filename)
{
    // get directory+filename, safely adding '/' as necessary
    std::string ret = directory;
    if (directory.size() && directory[directory.size()-1] != '/'){
        ret += '/';
    }
    ret += filename;

    // if the file doesn't exist, return an empty string
    if (!isFileExistInternal(ret)) {
        ret = "";
    }
    return ret;
}</span>在代码7中,我们看到searchPath变量,从代码注释中可以看到//searchPath + file_path + resourceDirectory,就可以发现searchPath就是我们路径的名称。
在代码7中我们看到也只是字符串的连接,而且searchPath是作为参数传入的。于是我们就回到代码6中。
在代码6中,代码7中的searchPath只是_searchPathArray中的一个迭代器。好,这就说明路径就藏_searchPathArray中,最后我们在CCFileUtils.cpp文件中找到了FileUtils::init(),如代码9。
代码9:
- <span style=“font-size:18px;”>bool FileUtils::init()
- {
- _searchPathArray.push_back(_defaultResRootPath);
- _searchResolutionsOrderArray.push_back(”“);
- return true;
- }</span>
<span style="font-size:18px;">bool FileUtils::init()
{
    _searchPathArray.push_back(_defaultResRootPath);
    _searchResolutionsOrderArray.push_back("");
    return true;
}</span>于是我们就转到this->getInstance代码中,此时的目录是E:\mycoscos2d\test2\cocos2d\cocos\platform\win32\CCFileUtilsWin32.cpp,好的,终于转到与平台相关的目录中了。注意我用的VS2012来开发,所以才转到win32这个目录中,如果你是Eclipse来开发,你就转到E:\mycoscos2d\test2\cocos2d\cocos\platform\android\CCFileUtils-Android.cpp这个目录中。如果是IOS,你就转到E:\mycoscos2d\test2\cocos2d\cocos\platform\apple\CCFileUtils-Apple.mm。这是为什么转到相关的平台的CCFileUtilsxxx.cpp中呢,这是因为在每个与平台相关的头文件中有#if CC_TARGET_PLATFORM == CC_PLATFORM_XXX的条件预处理,也这样说在那个平台就包含那个头文件。例如:在CCFileUtilsWin32.h文件中有代码10。这是很巧妙的技巧!
代码10:
- <span style=“font-size:18px;”>#include “base/CCPlatformConfig.h”
- #if CC_TARGET_PLATFORM == CC_PLATFORM_WIN32
- #include “CCStdC.h”
- #include “platform/CCCommon.h”
- #include “platform/CCApplicationProtocol.h”
- #include <string></span>
<span style="font-size:18px;">#include "base/CCPlatformConfig.h"