在spring配置文件中开启注解配置支持:
	<!-- 开启shiro注解配置支持 -->
	<bean id="defaultAdvisorAutoProxyCreator"
		class="org.springframework.aop.framework.autoproxy.DefaultAdvisorAutoProxyCreator">
		<property name="proxyTargetClass" value="true"/>
	</bean>
	<!-- 配置shiro切面类 -->
	<bean class="org.apache.shiro.spring.security.interceptor.AuthorizationAttributeSourceAdvisor"></bean>
Action方法中添加注解@RequiresPermissions("对应权限字符串"),例如:
	/**
	 * 新增取派员
	 * @return
	 */
	@RequiresPermissions("staff-add")
	public String add(){
		staffService.save(model);
		return LIST;
	}
在struts.xml中配置全局异常捕获:
		<!-- 声明全局结果集 -->
		<global-results>
			<result name="login">/login.jsp</result>
			<!-- 权限不足处理页面 -->
			<result name="unauthorized">/unauthorized.jsp</result>
		</global-results>

		<!-- 配置全局异常处理 -->
		<global-exception-mappings>
			<!-- 权限不足异常 -->
			<exception-mapping result="unauthorized" exception="org.apache.shiro.authz.UnauthorizedException" />
		</global-exception-mappings>
使用shiro标签库控制界面元素:
1、引入shiro标签库
<%@ taglib prefix="shiro" uri="http://shiro.apache.org/tags"%>
2、使用shiro标签
<shiro:hasPermission name="对应权限字符串">
需要授权的页面元素......
</shiro:hasPermission>
BOSRealm(重写doGetAuthorizationInfo(PrincipalCollection principalCollection)方法):
@Override
	//授权
	protected AuthorizationInfo doGetAuthorizationInfo(PrincipalCollection principalCollection) {
		SimpleAuthorizationInfo info = new SimpleAuthorizationInfo();
		User user = (User) SecurityUtils.getSubject().getPrincipal();
		//根据当前用户,获取对应权限
		List<Function> list = null;
		if(user.getUsername().equals("admin")){
			//添加系统管理员独有权限
			info.addStringPermission("admin");
			DetachedCriteria detachedCriteria = DetachedCriteria.forClass(Function.class);
			//为系统管理员加载所有权限
			list = functionDao.findByCriteria(detachedCriteria);
		}else{
			list = functionDao.findFunctionByUserid(user.getId());
		}

		for (Function function : list) {
			info.addStringPermission(function.getCode());
		}

		return info;
	}
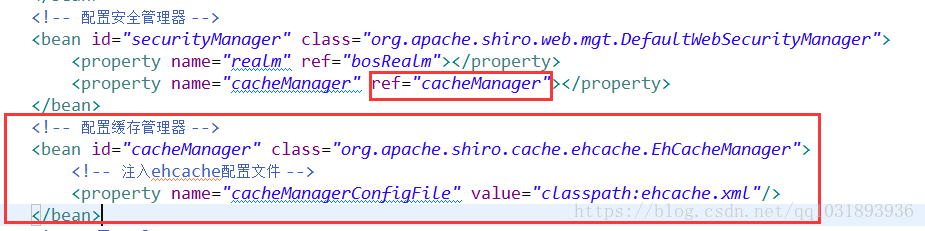
关于将权限数据加载到缓存中:
一、导入jar包(pom.xml)
		<!-- 引入ehcache的依赖 -->
		<dependency>
			<groupId>net.sf.ehcache</groupId>
			<artifactId>ehcache-core</artifactId>
			<version>2.6.6</version>
		</dependency>
二、准备ehcache配置文件
<ehcache xmlns:xsi="http://www.w3.org/2001/XMLSchema-instance"
	xsi:noNamespaceSchemaLocation="../config/ehcache.xsd">
    <!-- 配置临时文件目录位置 -->
    <diskStore path="java.io.tmpdir"/>

    <!--
 	   	相关属性配置:
 	   		maxElementsInMemory : 在内存中最多可存储的元素(即多少个JAVA对象)
 	   		eternal : 缓存的数据是否永久有效
 	   		timeToIdleSeconds : 最大空闲时间(单位:秒),超时将清理缓存数据
            timeToLiveSeconds : 最大有效时间(单位:秒),超时将清理缓存数据
            overflowToDisk : 内存溢出存入磁盘,即存入临时文件目录
            maxElementsOnDisk : 存入磁盘的元素最大值
            diskPersistent : 重启服务器时,磁盘上的数据是否持久化
            diskExpiryThreadIntervalSeconds : 缓存清理线程的执行周期,即每多少秒清理一次多余的失效的数据
            memoryStoreEvictionPolicy : 淘汰策略(LRU->最近最少优先。   FIFO->先进先出)
     -->
    <defaultCache
            maxElementsInMemory="10000"
            eternal="false"
            timeToIdleSeconds="120"
            timeToLiveSeconds="120"
            overflowToDisk="true"
            maxElementsOnDisk="10000000"
            diskPersistent="false"
            diskExpiryThreadIntervalSeconds="120"
            memoryStoreEvictionPolicy="LRU"
            />
</ehcache>