下载:
A version may be declared as a release candidate if it has been deployed to a sizable production cluster. Release candidates are declared as stable after we feel fairly confident there are no major bugs in the version. Check out the
Versioning
section for how we describe releases.
The current stable is tagged at version 0.10.0.
MySQL metadata store extension:
mysql-metadata-storage-0.10.0.tar.gz
. (Due to licensing, we've separated MySQL metadata store extension from main Druid release. If you would like to use it, please untar this tarball and follow the steps in
Include Extensions
)
安装
Select hardware
The
Coordinator
and
Overlord processes
can be co-located on a single server that is responsible for handling the metadata and coordination needs of your cluster(处理元数据以及集群之间的协调). The equivalent of an AWS
m3.xlarge
is sufficient for most clusters. This hardware offers:
- 4 vCPUs
- 15 GB RAM
- 80 GB SSD storage
Historicals
and
MiddleManagers
can be colocated on a single server to handle the actual data in your cluster. These servers benefit greatly from CPU, RAM, and SSDs. The equivalent of an AWS
r3.2xlarge
is a good starting point. This hardware offers:
- 8 vCPUs
- 61 GB RAM
- 160 GB SSD storage
Druid
Brokers
accept queries and farm them out to the rest of the cluster. They also optionally maintain an in-memory query cache. These servers benefit greatly from CPU and RAM, and can also be deployed on the equivalent of an AWS
r3.2xlarge
. This hardware offers:
- 8 vCPUs
- 61 GB RAM
- 160 GB SSD storage
You can consider co-locating any open source UIs or query libraries on the same server that the Broker is running on.
Very large clusters should consider selecting larger servers.
Select OS
We recommend running your favorite Linux distribution. You will also need:
- Java 8 or better
Download the distribution
First, download and unpack the release archive. It's best to do this on a single machine at first, since you will be editing the configurations and then copying the modified distribution out to all of your servers.
curl -O http://static.druid.io/artifacts/releases/druid-0.10.0-bin.tar.gztar -xzf druid-0.10.0-bin.tar.gz
cd
druid-0.10.0
步骤一:Configure deep storage
Druid relies on a distributed filesystem or large object (blob) store for data storage. The most commonly used deep storage implementations are S3 (popular for those on AWS) and HDFS (popular if you already have a Hadoop deployment).
S3 (略)
HDFS(我们使用)
- 手动替换所依赖的Hadoop的Jar包:
cd $DRUID_HOME
find -name "*hadoop*"
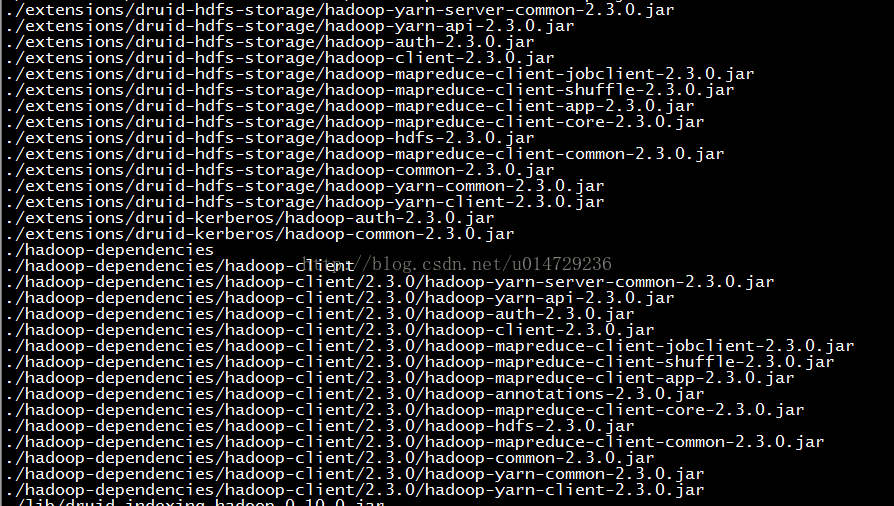
因为我们使用的Hadoop的版本是2.7.0。所以需要将Druid自带的Hadoop的jar包升级到2.7.0,替换2.3.0的jar包。
注意:
extensions/druid-hdfs-storage/中默认有guava-16.0.1.jar,而不是Hadoop依赖的guava-11.0.2.jar。这个是没问题的。
将本地的Hadoop的依赖复制到DRUID下。hadoop-client没有,网上下载。
cd $DRUID_HOME/extensions/druid-hdfs-storage
cp $HADOOP_HOME/share/hadoop/tools/lib/hadoop-auth-2.7.0.jar $DRUID_HOME/extensions/druid-hdfs-storage
cp $HADOOP_HOME/share/hadoop/common/hadoop-common-2.7.0.jar $DRUID_HOME/extensions/druid-hdfs-storage
cp $HADOOP_HOME/share/hadoop/hdfs/hadoop-hdfs-2.7.0.jar $DRUID_HOME/extensions/druid-hdfs-storage
cp $HADOOP_HOME/share/hadoop/mapreduce/hadoop-mapreduce-client-app-2.7.0.jar $DRUID_HOME/extensions/druid-hdfs-storage
cp $HADOOP_HOME/share/hadoop/mapreduce/hadoop-mapreduce-client-common-2.7.0.jar $DRUID_HOME/extensions/druid-hdfs-storage
cp $HADOOP_HOME/share/hadoop/mapreduce/hadoop-mapreduce-client-core-2.7.0.jar $DRUID_HOME/extensions/druid-hdfs-storage
cp $HADOOP_HOME/share/hadoop/mapreduce/hadoop-mapreduce-client-shuffle-2.7.0.jar $DRUID_HOME/extensions/druid-hdfs-storage
cp $HADOOP_HOME/share/hadoop/yarn/hadoop-yarn-api-2.7.0.jar $DRUID_HOME/extensions/druid-hdfs-storage
cp $HADOOP_HOME/share/hadoop/yarn/hadoop-yarn-client-2.7.0.jar $DRUID_HOME/extensions/druid-hdfs-storage
cp $HADOOP_HOME/share/hadoop/yarn/hadoop-yarn-common-2.7.0.jar $DRUID_HOME/extensions/druid-hdfs-storage
cp $HADOOP_HOME/share/hadoop/yarn/hadoop-yarn-server-common-2.7.0.jar $DRUID_HOME/extensions/druid-hdfs-storage
cp $HADOOP_HOME/share/hadoop/mapreduce/hadoop-mapreduce-client-jobclient-2.7.0.jar $DRUID_HOME/extensions/druid-hdfs-storage
cp $HADOOP_HOME/share/hadoop/common/lib/htrace-core-3.1.0-incubating.jar $DRUID_HOME/extensions/druid-hdfs-storage
mkdir $DRUID_HOME/hadoop-dependencies/hadoop-client/2.7.0
cd $DRUID_HOME/hadoop-dependencies/hadoop-client/2.7.0
cp $HADOOP_HOME/share/hadoop/hdfs/hadoop-hdfs-2.7.0.jar $DRUID_HOME/hadoop-dependencies/hadoop-client/2.7.0
cp $HADOOP_HOME/share/hadoop/common/hadoop-common-2.7.0.jar $DRUID_HOME/hadoop-dependencies/hadoop-client/2.7.0
cp $HADOOP_HOME/share/hadoop/common/lib/hadoop-auth-2.7.0.jar $DRUID_HOME/hadoop-dependencies/hadoop-client/2.7.0
cp $HADOOP_HOME/share/hadoop/common/lib/hadoop-annotations-2.7.0.jar $DRUID_HOME/hadoop-dependencies/hadoop-client/2.7.0
cp $HADOOP_HOME/share/hadoop/mapreduce/hadoop-mapreduce-client-app-2.7.0.jar $DRUID_HOME/hadoop-dependencies/hadoop-client/2.7.0
cp $HADOOP_HOME/share/hadoop/mapreduce/hadoop-mapreduce-client-common-2.7.0.jar $DRUID_HOME/hadoop-dependencies/hadoop-client/2.7.0
cp $HADOOP_HOME/share/hadoop/mapreduce/hadoop-mapreduce-client-core-2.7.0.jar $DRUID_HOME/hadoop-dependencies/hadoop-client/2.7.0
cp $HADOOP_HOME/share/hadoop/mapreduce/hadoop-mapreduce-client-jobclient-2.7.0.jar $DRUID_HOME/hadoop-dependencies/hadoop-client/2.7.0
cp $HADOOP_HOME/share/hadoop/mapreduce/hadoop-mapreduce-client-shuffle-2.7.0.jar $DRUID_HOME/hadoop-dependencies/hadoop-client/2.7.0
cp $HADOOP_HOME/share/hadoop/yarn/hadoop-yarn-server-common-2.7.0.jar $DRUID_HOME/hadoop-dependencies/hadoop-client/2.7.0
cp $HADOOP_HOME/share/hadoop/yarn/hadoop-yarn-common-2.7.0.jar $DRUID_HOME/hadoop-dependencies/hadoop-client/2.7.0
cp $HADOOP_HOME/share/hadoop/yarn/hadoop-yarn-client-2.7.0.jar $DRUID_HOME/hadoop-dependencies/hadoop-client/2.7.0
cp $HADOOP_HOME/share/hadoop/yarn/hadoop-yarn-api-2.7.0.jar $DRUID_HOME/hadoop-dependencies/hadoop-client/2.7.0
cp $HADOOP_HOME/share/hadoop/common/lib/htrace-core-3.1.0-incubating.jar $DRUID_HOME/hadoop-dependencies/hadoop-client/2.7.0
- 配置common.runtime.properties
配置
conf/druid/_common/
common.runtime.properties
文件。修改以下内容:
1)设置
druid.extensions.hadoopDependenciesDir=/hadoop/haozhuo/druid/druid-0.10.0/hadoop-dependencies
(注意这里不带hadoop-client/2.7.0
)
并且
在
conf/druid/middleManager/runtime.properties修改
druid.indexer.task.defaultHadoopCoordinates=["org.apache.hadoop:
hadoop-client:2.7.0
"]
这样运行时,会自动找到/hadoop/haozhuo/druid/druid-0.10.0/hadoop-dependencies/hadoop-client/2.7.0这个路径
或者另一种写法是:
设置
druid.extensions.hadoopDependenciesDir=/hadoop/haozhuo/druid/druid-0.10.0/hadoop-dependencies/hadoop-client/2.7.0
设置
druid.indexer.task.defaultHadoopCoordinates=[]
这两种方式都是可以的,任选其一
2)将
druid.extensions.loadList=
["druid-s3-extensions"]修改成
druid.extensions.loadList=
["
druid-hdfs-storage
"].
3) 注释掉:
#druid.storage.type=local#druid.storage.storageDirectory=var/druid/segments
解除注释:
druid.storage.type=hdfsdruid.storage.storageDirectory=/druid/segments
4)注释掉:
#druid.indexer.logs.type=file#druid.indexer.logs.directory=var/druid/indexing-logs解除注释:
druid.indexer.logs.type=hdfsdruid.indexer.logs.directory=/druid/indexing-logs
5)将Hadoop配置文件:
core-site.xml, hdfs-site.xml, yarn-site.xml, mapred-site.xml复制到
conf/druid/_common/目录下
步骤二:Configure addresses for Druid coordination
还是修改
conf/druid/_common/common.runtime.properties这个文件:
1)设置ZooKeeper的地址:
druid.zk.service.host=192.168.1.150:2181
2)修改metadata store的配置。我这里使用mysql作为metadata store。注释掉derby的配置。然后使用mysql相关配置
#druid.metadata.storage.type=derby
#druid.metadata.storage.connector.connectURI=jdbc:derby://metadata.store.ip:1527/var/druid/metadata.db;create=true
#druid.metadata.storage.connector.host=metadata.store.ip
#druid.metadata.storage.connector.port=1527
# For MySQL:
druid.metadata.storage.type=
mysql
druid.metadata.storage.connector.connectURI
=jdbc:mysql://192.168.1.162:3306/druid
druid.metadata.storage.connector.user=
datag
druid.metadata.storage.connector.password=
yjkdatag

3)从
http://druid.io/downloads.html
中下载
mysql-metadata-storage-0.10.0.tar.gz ,然后解压到$DRUID_HOME/extensions目录下:

步骤三:Configure Tranquility Server (optional)
需要配置
Data streams can be sent to Druid through a simple HTTP API powered by Tranquility Server. If you will be using this functionality, then at this point you should
configure Tranquility Server.
Loading streams
Streams can be ingested in Druid using either
Tranquility
(a Druid-aware client) and the
indexing service
or through standalone
Realtime nodes
. The first approach will be more complex to set up, but also offers scalability and high availability characteristics that advanced production setups may require. The second approach has some known
limitations
.
Stream push
If you have a program that generates a stream, then you can push that stream directly into Druid in real-time. With this approach, Tranquility is embedded in your data-producing application. Tranquility comes with bindings for the Storm and Samza stream processors.
It also has a direct API that can be used from any JVM-based program, such as Spark Streaming or a Kafka consumer.
Tranquility handles partitioning, replication, service discovery, and schema rollover for you, seamlessly and without downtime. You only have to define your Druid schema.
Spark Streaming往Druid发送数据:
有Spark2.10的包
Stream pull
If you have an external service that you want to pull data from, you have two options. The simplest option is to set up a "copying" service that reads from the data source and writes to Druid using the
stream push method
.
Another option is
stream pull
. With this approach, a Druid Realtime Node ingests data from a
Firehose
connected to the data you want to read. Druid includes builtin firehoses for Kafka, RabbitMQ, and various other streaming systems.
More information
步骤四:Configure Tranquility Kafka (optional )
暂时不配
Druid can consuming streams from Kafka through Tranquility Kafka. If you will be using this functionality, then at this point you should
configure Tranquility Kafka
.
步骤五:Configure for connecting to Hadoop
(optional)
配置
如果想要从Hadoop加载数据,那么就需要配置。注意,这里
从HDFS加载数据与
用HDFS作为deep storage是不同的概念。
1)修改
$DRUID_HOME/conf/druid/middleManager/runtime.properties
druid.service=druid/middleManager
druid.port=8091
# Number of tasks per middleManager
druid.worker.capacity=3
# Task launch parameters
druid.indexer.runner.javaOpts=-server -Xmx2g -Duser.timezone=
UTC+08:00
-Dfile.encoding=UTF-8 -Djava.util.logging.manager=org.apache.logging.log4j.jul.LogManager
druid.indexer.task.baseTaskDir=
/hadoop/haozhuo/druid/var/task
# HTTP server threads
druid.server.http.numThreads=20
# Processing threads and buffers
# druid.processing.buffer.sizeBytes=536870912
druid.processing.buffer.sizeBytes=
268435456
druid.processing.numThreads=2
# Hadoop indexing 是HDFS中的路径
druid.indexer.task.hadoopWorkingPath=
/druid/tmp/druid-indexing
# 具体根据之前设置的druid.extensions.hadoopDependenciesDir而定。
# 也可能是 druid.indexer.task.defaultHadoopCoordinates=[]
druid.indexer.task.defaultHadoopCoordinates=[
"org.apache.hadoop:hadoop-client:2.7.0"
]
3)将Hadoop配置文件:core-site.xml, hdfs-site.xml, yarn-site.xml, mapred-site.xml复制到conf/druid/_common/下。(这步骤在步骤1时已经做了)
4)最最重要的一步,也是官网中没有。在从Hadoop导入数据到DRUID时出现了问题,折磨了我好长时间才解决的:
解决guice冲突问题:
DRUID依赖的谷歌的guice的版本是:
./lib/jersey-guice-1.19.jar
./lib/guice-multibindings-4.1.0.jar
./lib/guice-servlet-4.1.0.jar
./lib/guice-4.1.0.jar
而Hadoop依赖的guice版本是
./share/hadoop/yarn/lib/guice-servlet-3.0.jar
./share/hadoop/yarn/lib/guice-3.0.jar
./share/hadoop/yarn/lib/jersey-guice-1.9.jar
./share/hadoop/mapreduce/lib/guice-servlet-3.0.jar
./share/hadoop/mapreduce/lib/guice-3.0.jar
./share/hadoop/mapreduce/lib/jersey-guice-1.9.jar
这样会导致Druid提交job到Hadoop执行MapReduce时会报以下错误:
java.lang.NoSuchMethodError: com.google.inject.util.Types.collectionOf(Ljava/lang/reflect/Type;)Ljava/lang/reflect/ParameterizedType;
at com.google.inject.multibindings.Multibinder.collectionOfProvidersOf(Multibinder.java:202)
at com.google.inject.multibindings.Multibinder$RealMultibinder.<init>(Multibinder.java:283)
at com.google.inject.multibindings.Multibinder$RealMultibinder.<init>(Multibinder.java:258)
at com.google.inject.multibindings.Multibinder.newRealSetBinder(Multibinder.java:178)
at com.google.inject.multibindings.Multibinder.newSetBinder(Multibinder.java:150)
at io.druid.guice.LifecycleModule.getEagerBinder(LifecycleModule.java:131)
at io.druid.guice.LifecycleModule.configure(LifecycleModule.java:137)
at com.google.inject.spi.Elements$RecordingBinder.install(Elements.java:223)
at com.google.inject.spi.Elements.getElements(Elements.java:101)
at com.google.inject.spi.Elements.getElements(Elements.java:92)
我的解决方法是:
cp $DRUID_HOME/lib/*guice* $HADOOP_HOME/share/hadoop/yarn/lib/
cp $DRUID_HOME/lib/*guice* $HADOOP_HOME/share/hadoop/mapreduce/lib/
这样,Hadoop中的guice的版本就有:
./share/hadoop/yarn/lib/jersey-guice-1.19.jar
./share/hadoop/yarn/lib/jersey-guice-1.9.jar
./share/hadoop/yarn/lib/guice-multibindings-4.1.0.jar
./share/hadoop/yarn/lib/guice-3.0.jar
./share/hadoop/yarn/lib/guice-servlet-4.1.0.jar
./share/hadoop/yarn/lib/guice-4.1.0.jar
./share/hadoop/yarn/lib/guice-servlet-3.0.jar
./share/hadoop/mapreduce/lib/jersey-guice-1.19.jar
./share/hadoop/mapreduce/lib/jersey-guice-1.9.jar
./share/hadoop/mapreduce/lib/guice-multibindings-4.1.0.jar
./share/hadoop/mapreduce/lib/guice-3.0.jar
./share/hadoop/mapreduce/lib/guice-servlet-4.1.0.jar
./share/hadoop/mapreduce/lib/guice-4.1.0.jar
./share/hadoop/mapreduce/lib/guice-servlet-3.0.jar
Hadoop中有了guice-4.1.0的版本后执行Druid任务就不会报错了。
解决guava冲突问题:
出现以下问题:
2017-07-19 22:39:43,122 ERROR [main] org.apache.hadoop.mapred.YarnChild: Error running child :
java.lang.NoSuchMethodError: com.google.common.base.Enums.getIfPresent
(Ljava/lang/Class;Ljava/lang/String;)Lcom/google/common/base/Optional;
原因跟上面一样,Druid需要guava-16.0.1.jar,而Hadoop中只有guava-11.0.2.jar。将Druid中的guava-16.0.1.jar复制到Hadoop中。
cp $DRUID_HOME/lib/guava-16.0.1.jar $HADOOP_HOME/share/hadoop/yarn/lib/
cp $DRUID_HOME/lib/guava-16.0.1.jar $HADOOP_HOME/share/hadoop/common/lib/
cp $DRUID_HOME/lib/guava-16.0.1.jar $HADOOP_HOME/share/hadoop/hdfs/lib/
结果如下:
./share/hadoop/tools/lib/guava-11.0.2.jar
./share/hadoop/common/lib/guava-16.0.1.jar
./share/hadoop/common/lib/guava-11.0.2.jar
./share/hadoop/kms/tomcat/webapps/kms/WEB-INF/lib/guava-11.0.2.jar
./share/hadoop/httpfs/tomcat/webapps/webhdfs/WEB-INF/lib/guava-11.0.2.jar
./share/hadoop/yarn/lib/guava-16.0.1.jar
./share/hadoop/yarn/lib/guava-11.0.2.jar
./share/hadoop/hdfs/lib/guava-16.0.1.jar
./share/hadoop/hdfs/lib/guava-11.0.2.jar
步骤六:Tune Druid Coordinator and Overlord
注意:设置时区,其他配置文件中都要修改!
由于Druid是时间序列数据库,所以对时间非常敏感。Druid底层采用绝对毫秒数存储时间,如果不指定时区,默认输出为零时区时间,即ISO8601中yyyy-MM-ddThh:mm:ss.SSSZ。我们生产环境中采用东八区,也就是Asia/Hong Kong时区,所以需要将集群所有UTC时间调整为UTC+08:00;同时导入的数据的timestamp列格式必须为:yyyy-MM-ddThh:mm:ss.SSS+08:00
如果不设置,Hadoop batch ingestion会失败,出现“
No buckets?? seems there is no data to index.”的错误
配置Coordinator:
cd $DRUID_HOME/conf/druid/coordinator
vi jvm.config
-server
-Xms3g
-Xmx3g
-Duser.timezone=
UTC+08:00
-Dfile.encoding=UTF-8
-Djava.io.tmpdir=
/hadoop/haozhuo/druid/var/tmp
-Djava.util.logging.manager=org.apache.logging.log4j.jul.LogManager
-Dderby.stream.error.file=
/hadoop/haozhuo/druid/var/derby.log(这个配置感觉并没啥卵用。用的是mysql作为元数据库)
vi runtime.properties(并没做什么修改,都是默认值)
druid.service=druid/coordinator
druid.port=8081
druid.coordinator.startDelay=PT30S
druid.coordinator.period=PT30S
配置Overlord
:
cd $DRUID_HOME/conf/druid/overlord
vi jvm.config
-server
-Xms3g
-Xmx3g
-Duser.timezone=
UTC+08:00
-Dfile.encoding=UTF-8
-Djava.io.tmpdir=
/hadoop/haozhuo/druid/var/tmp
-Djava.util.logging.manager=org.apache.logging.log4j.jul.LogManager
vi runtime.properties(并没做什么修改,都是默认值)
druid.service=druid/overlord
druid.port=8090
druid.indexer.queue.startDelay=PT30S
druid.indexer.runner.type=remote
druid.indexer.storage.type=metadata
步骤七:Tune Druid processes that serve queries
Druid
Historicals and
MiddleManagers can be co-located on the same hardware. Both Druid processes benefit greatly from being tuned to the hardware they run on. If you are running Tranquility Server or Kafka, you can also colocate
Tranquility with these two Druid processes. If you are using
r3.2xlarge EC2 instances, or similar hardware, the configuration in the distribution is a reasonable starting point.
If you are using different hardware, we recommend adjusting configurations for your specific hardware. The most commonly adjusted configurations are:
- -Xmx and -Xms
- druid.server.http.numThreads
- druid.processing.buffer.sizeBytes
- druid.processing.numThreads
- druid.query.groupBy.maxIntermediateRows
- druid.query.groupBy.maxResults
- druid.server.maxSize and druid.segmentCache.locations on Historical Nodes
- druid.worker.capacity on MiddleManagers

Please see the Druid
configuration documentation for a full description of all possible configuration options
cd $DRUID_HOME/conf/druid/historical
vi jvm.config
-server
-Xms
4g
-Xmx
4g
-XX:MaxDirectMemorySize=
3072m
-Duser.timezone=
UTC+08:00
-Dfile.encoding=UTF-8
-Djava.io.tmpdir=
/hadoop/haozhuo/druid/var/tmp
-Djava.util.logging.manager=org.apache.logging.log4j.jul.LogManager
vi runtime.properties
备注:端口本来应该是默认8023,但是该端口被其他程序占用了,所以修改成8283。druid.processing.numThreads和druid.processing.buffer.sizeBytes缩小了一半,内存不够用
druid.service=druid/historical
druid.port=
8283
# HTTP server threads
#druid.server.http.numThreads=25
druid.server.http.numThreads=
20
# Processing threads and buffers
#druid.processing.buffer.sizeBytes=536870912
druid.processing.buffer.sizeBytes=
268435456
#druid.processing.numThreads=7
druid.processing.numThreads=
3
# Segment storage
druid.segmentCache.locations=[{"path":"var/druid/segment-cache","maxSize"\:130000000000}]
druid.server.maxSize=130000000000
cd $DRUID_HOME/conf/druid/middleManager
vi jvm.config
-server
-Xms64m
-Xmx64m
-Duser.timezone=
UTC+08:00
-Dfile.encoding=UTF-8
-Djava.io.tmpdir=
/hadoop/haozhuo/druid/var/tmp
-Djava.util.logging.manager=org.apache.logging.log4j.jul.LogManager
vi runtime.properties
druid.service=druid/middleManager
druid.port=8091
# Number of tasks per middleManager
druid.worker.capacity=3
# Task launch parameters
druid.indexer.runner.javaOpts=-server -Xmx2g -Duser.timezone=
UTC+08:00
-Dfile.encoding=UTF-8 -Djava.util.logging.manager=org.apache.logging.log4j.jul.LogManager
druid.indexer.task.baseTaskDir=
/hadoop/haozhuo/druid/var/task
# HTTP server threads
druid.server.http.numThreads=20
# Processing threads and buffers
druid.processing.buffer.sizeBytes=
268435456
druid.processing.numThreads=2
# Hadoop indexing
druid.indexer.task.hadoopWorkingPath=
/druid/tmp/druid-indexing
druid.indexer.task.defaultHadoopCoordinates=["
org.apache.hadoop:hadoop-client:2.7.0
"]
步骤八:Tune Druid Brokers
Druid
Brokers also benefit greatly from being tuned to the hardware they run on. If you are using
r3.2xlarge EC2 instances, or similar hardware, the configuration in the distribution is a reasonable starting point.
If you are using different hardware, we recommend adjusting configurations for your specific hardware. The most commonly adjusted configurations are:
- -Xmx and -Xms
- druid.server.http.numThreads
- druid.cache.sizeInBytes
- druid.processing.buffer.sizeBytes
- druid.processing.numThreads
- druid.query.groupBy.maxIntermediateRows
- druid.query.groupBy.maxResults

Please see the Druid
configuration documentation for a full description of all possible configuration options.
cd $DRUID_HOME/conf/druid/broker
vi jvm.config
-server
-Xms
12g
-Xmx
12g
-XX:MaxDirectMemorySize=
3072m
-Duser.timezone=
UTC+08:00
-Dfile.encoding=UTF-8
-Djava.io.tmpdir=
/hadoop/haozhuo/druid/var/tmp
-Djava.util.logging.manager=org.apache.logging.log4j.jul.LogManager
vi runtime.properties
备注:端口本来应该是默认8022,但是该端口被其他程序占用了,所以修改成8282。
druid.service=druid/broker
druid.port=
8282
# HTTP server threads
druid.broker.http.numConnections=5
druid.server.http.numThreads=25
# Processing threads and buffers
druid.processing.buffer.sizeBytes=
268435456
druid.processing.numThreads=
3
# Query cache
druid.broker.cache.useCache=true
druid.broker.cache.populateCache=true
druid.cache.type=local
druid.cache.sizeInBytes=
1000000000
步骤九:Open ports (if using a firewall)
If you're using a firewall or some other system that only allows traffic on specific ports, allow inbound connections on the following:
- 1527 (Derby on your Coordinator; not needed if you are using a separate metadata store like MySQL or PostgreSQL)
- 2181 (ZooKeeper; not needed if you are using a separate ZooKeeper cluster)
- 8081 (Coordinator)
- 8082 (Broker) 注意:此端口已被其他程序占用。在conf/druid/historical/runtime.properties中修改成8282。
- 8083 (Historical) 注意:此端口已被其他程序占用。在conf/druid/historical/runtime.properties中修改成8283。
- 8084 (Standalone Realtime, if used)
- 8088 (Router, if used)
- 8090 (Overlord)
- 8091, 8100–8199 (Druid Middle Manager; you may need higher than port 8199 if you have a very highdruid.worker.capacity)
- 8200 (Tranquility Server, if used)
In production, we recommend deploying ZooKeeper and your metadata store on their own dedicated hardware, rather than on the Coordinator server.
步骤十:启动
修改:-Djava.io.tmpdir=var/tmp
修改:conf/druid/coordinator/jvm.config 中的-Dderby.stream.error.file=var/druid/derby.log
确保Zookeeper和MySQL已经启动。
我有三台机子,每台机子如下
| 机子 | 官网推荐配置 | druid启动部分 | 进程内存占用 | 总的内存占用 |
| 192.168.1.150 | 4 vCPUs, 15 GB RAM ,80 GB SSD storage | Coordinator | jvm:3g(默认3g) | jvm:6g |
| Overlord | jvm :3g(默认3g) | |||
| 192.168.1.152 | 8 vCPUs,61 GB RAM,160 GB SSD storage | historical | jvm:4g(默认8g),DirectMemory:3g(默认4g) | jvm:10g+ |
| middleManager | jvm:2g(默认2g),buffer:1g(默认1g) | |||
| Tranquility | 所需内存另算 | |||
| 192.168.1.153 | 8 vCPUs,61 GB RAM,160 GB SSD storage | Broker | jvm:12g(默认24g),DirectMemory:3g(默认4g) | jvm:15g |
注意historical中DirectMemory中的计算方式:
memoryNeeded[3,221,225,472] = druid.processing.buffer.sizeBytes[536,870,912] * (druid.processing.numMergeBuffers[2] + druid.processing.numThreads[3] + 1)
将druid-0.10.0复制到其他节点:
scp -r druid-0.10.0 hadoop@datanode152:/hadoop/haozhuo/druid
scp -r druid-0.10.0 hadoop@datanode153:/hadoop/haozhuo/druid
1) 在192.168.1.150上
Start Coordinator, Overlord
启动coordinator
cd $DRUID_HOME;nohup java `cat conf/druid/coordinator/jvm.config | xargs` -cp conf/druid/_common:conf/druid/coordinator:lib/* io.druid.cli.Main server
coordinator
&
tail -1000f nohup.out
启动 overlord
cd $DRUID_HOME; nohup java `cat conf/druid/overlord/jvm.config | xargs` -cp conf/druid/_common:conf/druid/overlord:lib/* io.druid.cli.Main server
overlord
&
2) 在192.168.1.152上
Start Historicals and MiddleManagers
启动historical
cd $DRUID_HOME; nohup java `cat conf/druid/historical/jvm.config | xargs` -cp conf/druid/_common:conf/druid/historical:lib/* io.druid.cli.Main server
historical
&
启动middleManager
cd $DRUID_HOME; nohup java `cat conf/druid/middleManager/jvm.config | xargs` -cp conf/druid/_common:conf/druid/middleManager:lib/* io.druid.cli.Main server
middleManager
&
是否需要部署Tranquility Server?
You can add more servers with Druid Historicals and MiddleManagers as needed.

这部分注意下,后面Spark Streaming流式摄入时可能会用到:
If you are doing push-based stream ingestion with Kafka or over HTTP, you can also start Tranquility Server on the same hardware that holds MiddleManagers and Historicals. For large scale production, MiddleManagers and Tranquility Server can still be co-located. If you are running Tranquility (not server) with a stream processor, you can co-locate Tranquility with the stream processor and not require Tranquility Server.
curl -O http://static.druid.io/tranquility/releases/tranquility-distribution-0.8.0.tgztar -xzf tranquility-distribution-0.8.0.tgzcd tranquility-distribution-0.8.0bin/tranquility <server or kafka> -configFile <path_to_druid_distro>/conf/tranquility/<server or kafka>.json
3)在192.168.1.153上
Start Druid Broker
cd $DRUID_HOME; nohup java `cat conf/druid/broker/jvm.config | xargs` -cp conf/druid/_common:conf/druid/broker:lib/* io.druid.cli.Main server broker &
自己写的脚本
所有机子添加:
stopDruid.sh
pids=`ps -ef | grep druid | awk '{print $2}'`
for pid in $pids
do
kill -9 $pid
done
部署coordinator和overlord的机子,添加
startDruid.sh
java `cat $DRUID_HOME/conf/druid/coordinator/jvm.config | xargs` -cp $DRUID_HOME/conf/druid/_common:$DRUID_HOME/conf/druid/coordinator:$DRUID_HOME/lib/* io.druid.cli.Main server coordinator >> $DRUID_HOME/start.log &
java `cat $DRUID_HOME/conf/druid/overlord/jvm.config | xargs` -cp $DRUID_HOME/conf/druid/_common:$DRUID_HOME/conf/druid/overlord:$DRUID_HOME/lib/* io.druid.cli.Main server overlord >> $DRUID_HOME/start.log &
部署
historical和
middleManager的机子,添加
startDruid.sh
java `cat $DRUID_HOME/conf/druid/historical/jvm.config | xargs` -cp $DRUID_HOME/conf/druid/_common:$DRUID_HOME/conf/druid/historical:$DRUID_HOME/lib/* io.druid.cli.Main server historical >> $DRUID_HOME/start.log &
java `cat $DRUID_HOME/conf/druid/middleManager/jvm.config | xargs` -cp $DRUID_HOME/conf/druid/_common:$DRUID_HOME/conf/druid/middleManager:$DRUID_HOME/lib/* io.druid.cli.Main server middleManager >> $DRUID_HOME/start.log &
部署
broker的机子,添加
startDruid.sh
java `cat $DRUID_HOME/conf/druid/broker/jvm.config | xargs` -cp $DRUID_HOME/conf/druid/_common:$DRUID_HOME/conf/druid/broker:$DRUID_HOME/lib/* io.druid.cli.Main server broker >> $DRUID_HOME/start.log &
Loading data
Congratulations, you now have a Druid cluster! The next step is to learn about recommended ways to load data into Druid based on your use case. Read more about
loading data.
Load streaming data
To load streaming data, we are going to push events into Druid over a simple HTTP API. To do this we will use [Tranquility], a high level data producer library for Druid.
To download Tranquility, issue the following commands in your terminal:
curl -O http://static.druid.io/tranquility/releases/tranquility-distribution-0.8.0.tgztar -xzf tranquility-distribution-0.8.0.tgz
cd
tranquility-distribution-0.8.0
We've included a configuration file in
conf-quickstart/tranquility/server.json
as part of the Druid distribution for a
metrics
datasource. We're going to start the Tranquility server process, which can be used to push events directly to Druid.
bin/tranquility server -configFile <path_to_druid_distro>/conf-quickstart/tranquility/server.json
This section shows you how to load data using Tranquility Server, but Druid also supports a wide variety of
other streaming ingestion options
, including from popular streaming systems like Kafka, Storm, Samza, and Spark Streaming.
The
dimensions
(attributes you can filter and split on) for this datasource are flexible. It's configured for
schemaless dimensions
, meaning it will accept any field in your JSON input as a dimension.
- count
- value_sum (derived from value in the input)
- value_min (derived from value in the input)
- value_max (derived from value in the input)
We've included a script that can generate some random sample metrics to load into this datasource. To use it, simply run in your Druid distribution repository:
bin/generate-example-metrics
|
curl -XPOST -H
'Content-Type: application/json'
--data-binary @- http://localhost:8200/v1/post/metrics
Which will print something like:
{"result":{"received":25,"sent":25}}
This indicates that the HTTP server received 25 events from you, and sent 25 to Druid. Note that this may take a few seconds to finish the first time you run it, as Druid resources must be allocated to the ingestion task. Subsequent POSTs should complete quickly.
Query data
Direct Druid queries
Druid supports a rich
family of JSON-based queries
. We've included an example topN query in
quickstart/wikiticker-top-pages.json
that will find the most-edited articles in this dataset:
curl -L -H
'Content-Type: application/json'
-XPOST --data-binary @quickstart/wikiticker-top-pages.json http://localhost:8082/druid/v2/?pretty
Visualizing data
Druid is ideal for power user-facing analytic applications. There are a number of different open source applications to visualize and explore data in Druid. We recommend trying
Pivot
,
Superset
, or
Metabase
to start visualizing the data you just ingested.
If you installed Pivot for example, you should be able to view your data in your browser at
localhost:9090
.
SQL and other query libraries
There are many more query tools for Druid than we've included here, including SQL engines, and libraries for various languages like Python and Ruby. Please see
the list of libraries
for more information.
测试从HDFS导入数据到Druid
overlord console:
http://192.168.1.150:8090/console.html
cd $DRUID_HOME
curl -X 'POST' -H 'Content-Type:application/json' -d @quickstart/wikiticker-index.json 192.168.1.150:8090/druid/indexer/v1/task
查询:
curl -L -H'Content-Type: application/json' -XPOST --data-binary @quickstart/wikiticker-top-pages2.json
http://192.168.1.153:8282/druid/v2/?pretty
流式摄入:
启动:
注意,必须在该目录下启动
cd /hadoop/haozhuo/druid/tranquility-distribution-0.8.2;
bin/tranquility server
-configFile $DRUID_HOME/conf/tranquility/server.json
//测试插入
cd $DRUID_HOME;
bin/generate-example-metrics
|
curl -XPOST -H
'Content-Type: application/json'
--data-binary @-
http://192.168.1.152:8200/v1/post/metrics
//查询
curl -L -H
'Content-Type: application/json'
-XPOST --data-binary @quickstart/wikiticker-top-pages.json
http://192.168.1.152:8082/druid/v2/?pretty
curl -L -H'Content-Type: application/json' -XPOST --data-binary @quickstart/wikiticker-top-pages2.json http://192.168.1.153:8282/druid/v2/?pretty
curl -L -H'Content-Type: application/json' -XPOST --data-binary @quickstart/test-top-pages.json http://192.168.1.153:8282/druid/v2/?pretty
下载:
A version may be declared as a release candidate if it has been deployed to a sizable production cluster. Release candidates are declared as stable after we feel fairly confident there are no major bugs in the version. Check out the
Versioning
section for how we describe releases.
The current stable is tagged at version 0.10.0.
MySQL metadata store extension:
mysql-metadata-storage-0.10.0.tar.gz
. (Due to licensing, we've separated MySQL metadata store extension from main Druid release. If you would like to use it, please untar this tarball and follow the steps in
Include Extensions
)
安装
Select hardware
The
Coordinator
and
Overlord processes
can be co-located on a single server that is responsible for handling the metadata and coordination needs of your cluster(处理元数据以及集群之间的协调). The equivalent of an AWS
m3.xlarge
is sufficient for most clusters. This hardware offers:
- 4 vCPUs
- 15 GB RAM
- 80 GB SSD storage
Historicals
and
MiddleManagers
can be colocated on a single server to handle the actual data in your cluster. These servers benefit greatly from CPU, RAM, and SSDs. The equivalent of an AWS
r3.2xlarge
is a good starting point. This hardware offers:
- 8 vCPUs
- 61 GB RAM
- 160 GB SSD storage
Druid
Brokers
accept queries and farm them out to the rest of the cluster. They also optionally maintain an in-memory query cache. These servers benefit greatly from CPU and RAM, and can also be deployed on the equivalent of an AWS
r3.2xlarge
. This hardware offers:
- 8 vCPUs
- 61 GB RAM
- 160 GB SSD storage
You can consider co-locating any open source UIs or query libraries on the same server that the Broker is running on.
Very large clusters should consider selecting larger servers.
Select OS
We recommend running your favorite Linux distribution. You will also need:
- Java 8 or better
Download the distribution
First, download and unpack the release archive. It's best to do this on a single machine at first, since you will be editing the configurations and then copying the modified distribution out to all of your servers.
curl -O http://static.druid.io/artifacts/releases/druid-0.10.0-bin.tar.gztar -xzf druid-0.10.0-bin.tar.gz
cd
druid-0.10.0
步骤一:Configure deep storage
Druid relies on a distributed filesystem or large object (blob) store for data storage. The most commonly used deep storage implementations are S3 (popular for those on AWS) and HDFS (popular if you already have a Hadoop deployment).
S3 (略)
HDFS(我们使用)
- 手动替换所依赖的Hadoop的Jar包:
cd $DRUID_HOME
find -name "*hadoop*"
因为我们使用的Hadoop的版本是2.7.0。所以需要将Druid自带的Hadoop的jar包升级到2.7.0,替换2.3.0的jar包。
注意:
extensions/druid-hdfs-storage/中默认有guava-16.0.1.jar,而不是Hadoop依赖的guava-11.0.2.jar。这个是没问题的。
将本地的Hadoop的依赖复制到DRUID下。hadoop-client没有,网上下载。
cd $DRUID_HOME/extensions/druid-hdfs-storage
cp $HADOOP_HOME/share/hadoop/tools/lib/hadoop-auth-2.7.0.jar $DRUID_HOME/extensions/druid-hdfs-storage
cp $HADOOP_HOME/share/hadoop/common/hadoop-common-2.7.0.jar $DRUID_HOME/extensions/druid-hdfs-storage
cp $HADOOP_HOME/share/hadoop/hdfs/hadoop-hdfs-2.7.0.jar $DRUID_HOME/extensions/druid-hdfs-storage
cp $HADOOP_HOME/share/hadoop/mapreduce/hadoop-mapreduce-client-app-2.7.0.jar $DRUID_HOME/extensions/druid-hdfs-storage
cp $HADOOP_HOME/share/hadoop/mapreduce/hadoop-mapreduce-client-common-2.7.0.jar $DRUID_HOME/extensions/druid-hdfs-storage
cp $HADOOP_HOME/share/hadoop/mapreduce/hadoop-mapreduce-client-core-2.7.0.jar $DRUID_HOME/extensions/druid-hdfs-storage
cp $HADOOP_HOME/share/hadoop/mapreduce/hadoop-mapreduce-client-shuffle-2.7.0.jar $DRUID_HOME/extensions/druid-hdfs-storage
cp $HADOOP_HOME/share/hadoop/yarn/hadoop-yarn-api-2.7.0.jar $DRUID_HOME/extensions/druid-hdfs-storage
cp $HADOOP_HOME/share/hadoop/yarn/hadoop-yarn-client-2.7.0.jar $DRUID_HOME/extensions/druid-hdfs-storage
cp $HADOOP_HOME/share/hadoop/yarn/hadoop-yarn-common-2.7.0.jar $DRUID_HOME/extensions/druid-hdfs-storage
cp $HADOOP_HOME/share/hadoop/yarn/hadoop-yarn-server-common-2.7.0.jar $DRUID_HOME/extensions/druid-hdfs-storage
cp $HADOOP_HOME/share/hadoop/mapreduce/hadoop-mapreduce-client-jobclient-2.7.0.jar $DRUID_HOME/extensions/druid-hdfs-storage
cp $HADOOP_HOME/share/hadoop/common/lib/htrace-core-3.1.0-incubating.jar $DRUID_HOME/extensions/druid-hdfs-storage
mkdir $DRUID_HOME/hadoop-dependencies/hadoop-client/2.7.0
cd $DRUID_HOME/hadoop-dependencies/hadoop-client/2.7.0
cp $HADOOP_HOME/share/hadoop/hdfs/hadoop-hdfs-2.7.0.jar $DRUID_HOME/hadoop-dependencies/hadoop-client/2.7.0
cp $HADOOP_HOME/share/hadoop/common/hadoop-common-2.7.0.jar $DRUID_HOME/hadoop-dependencies/hadoop-client/2.7.0
cp $HADOOP_HOME/share/hadoop/common/lib/hadoop-auth-2.7.0.jar $DRUID_HOME/hadoop-dependencies/hadoop-client/2.7.0
cp $HADOOP_HOME/share/hadoop/common/lib/hadoop-annotations-2.7.0.jar $DRUID_HOME/hadoop-dependencies/hadoop-client/2.7.0
cp $HADOOP_HOME/share/hadoop/mapreduce/hadoop-mapreduce-client-app-2.7.0.jar $DRUID_HOME/hadoop-dependencies/hadoop-client/2.7.0
cp $HADOOP_HOME/share/hadoop/mapreduce/hadoop-mapreduce-client-common-2.7.0.jar $DRUID_HOME/hadoop-dependencies/hadoop-client/2.7.0
cp $HADOOP_HOME/share/hadoop/mapreduce/hadoop-mapreduce-client-core-2.7.0.jar $DRUID_HOME/hadoop-dependencies/hadoop-client/2.7.0
cp $HADOOP_HOME/share/hadoop/mapreduce/hadoop-mapreduce-client-jobclient-2.7.0.jar $DRUID_HOME/hadoop-dependencies/hadoop-client/2.7.0
cp $HADOOP_HOME/share/hadoop/mapreduce/hadoop-mapreduce-client-shuffle-2.7.0.jar $DRUID_HOME/hadoop-dependencies/hadoop-client/2.7.0
cp $HADOOP_HOME/share/hadoop/yarn/hadoop-yarn-server-common-2.7.0.jar $DRUID_HOME/hadoop-dependencies/hadoop-client/2.7.0
cp $HADOOP_HOME/share/hadoop/yarn/hadoop-yarn-common-2.7.0.jar $DRUID_HOME/hadoop-dependencies/hadoop-client/2.7.0
cp $HADOOP_HOME/share/hadoop/yarn/hadoop-yarn-client-2.7.0.jar $DRUID_HOME/hadoop-dependencies/hadoop-client/2.7.0
cp $HADOOP_HOME/share/hadoop/yarn/hadoop-yarn-api-2.7.0.jar $DRUID_HOME/hadoop-dependencies/hadoop-client/2.7.0
cp $HADOOP_HOME/share/hadoop/common/lib/htrace-core-3.1.0-incubating.jar $DRUID_HOME/hadoop-dependencies/hadoop-client/2.7.0
- 配置common.runtime.properties
配置
conf/druid/_common/
common.runtime.properties
文件。修改以下内容:
1)设置
druid.extensions.hadoopDependenciesDir=/hadoop/haozhuo/druid/druid-0.10.0/hadoop-dependencies
(注意这里不带hadoop-client/2.7.0
)
并且
在
conf/druid/middleManager/runtime.properties修改
druid.indexer.task.defaultHadoopCoordinates=["org.apache.hadoop:
hadoop-client:2.7.0
"]
这样运行时,会自动找到/hadoop/haozhuo/druid/druid-0.10.0/hadoop-dependencies/hadoop-client/2.7.0这个路径
或者另一种写法是:
设置
druid.extensions.hadoopDependenciesDir=/hadoop/haozhuo/druid/druid-0.10.0/hadoop-dependencies/hadoop-client/2.7.0
设置
druid.indexer.task.defaultHadoopCoordinates=[]
这两种方式都是可以的,任选其一
2)将
druid.extensions.loadList=
["druid-s3-extensions"]修改成
druid.extensions.loadList=
["
druid-hdfs-storage
"].
3) 注释掉:
#druid.storage.type=local#druid.storage.storageDirectory=var/druid/segments
解除注释:
druid.storage.type=hdfsdruid.storage.storageDirectory=/druid/segments
4)注释掉:
#druid.indexer.logs.type=file#druid.indexer.logs.directory=var/druid/indexing-logs解除注释:
druid.indexer.logs.type=hdfsdruid.indexer.logs.directory=/druid/indexing-logs
5)将Hadoop配置文件:
core-site.xml, hdfs-site.xml, yarn-site.xml, mapred-site.xml复制到
conf/druid/_common/目录下
步骤二:Configure addresses for Druid coordination
还是修改
conf/druid/_common/common.runtime.properties这个文件:
1)设置ZooKeeper的地址:
druid.zk.service.host=192.168.1.150:2181
2)修改metadata store的配置。我这里使用mysql作为metadata store。注释掉derby的配置。然后使用mysql相关配置
#druid.metadata.storage.type=derby
#druid.metadata.storage.connector.connectURI=jdbc:derby://metadata.store.ip:1527/var/druid/metadata.db;create=true
#druid.metadata.storage.connector.host=metadata.store.ip
#druid.metadata.storage.connector.port=1527
# For MySQL:
druid.metadata.storage.type=
mysql
druid.metadata.storage.connector.connectURI
=jdbc:mysql://192.168.1.162:3306/druid
druid.metadata.storage.connector.user=
datag
druid.metadata.storage.connector.password=
yjkdatag
3)从
http://druid.io/downloads.html
中下载
mysql-metadata-storage-0.10.0.tar.gz ,然后解压到$DRUID_HOME/extensions目录下:
步骤三:Configure Tranquility Server (optional)
需要配置
Data streams can be sent to Druid through a simple HTTP API powered by Tranquility Server. If you will be using this functionality, then at this point you should
configure Tranquility Server.
Loading streams
Streams can be ingested in Druid using either
Tranquility
(a Druid-aware client) and the
indexing service
or through standalone
Realtime nodes
. The first approach will be more complex to set up, but also offers scalability and high availability characteristics that advanced production setups may require. The second approach has some known
limitations
.
Stream push
If you have a program that generates a stream, then you can push that stream directly into Druid in real-time. With this approach, Tranquility is embedded in your data-producing application. Tranquility comes with bindings for the Storm and Samza stream processors.
It also has a direct API that can be used from any JVM-based program, such as Spark Streaming or a Kafka consumer.
Tranquility handles partitioning, replication, service discovery, and schema rollover for you, seamlessly and without downtime. You only have to define your Druid schema.
Spark Streaming往Druid发送数据:
有Spark2.10的包
Stream pull
If you have an external service that you want to pull data from, you have two options. The simplest option is to set up a "copying" service that reads from the data source and writes to Druid using the
stream push method
.
Another option is
stream pull
. With this approach, a Druid Realtime Node ingests data from a
Firehose
connected to the data you want to read. Druid includes builtin firehoses for Kafka, RabbitMQ, and various other streaming systems.
More information
步骤四:Configure Tranquility Kafka (optional )
暂时不配
Druid can consuming streams from Kafka through Tranquility Kafka. If you will be using this functionality, then at this point you should
configure Tranquility Kafka
.
步骤五:Configure for connecting to Hadoop
(optional)
配置
如果想要从Hadoop加载数据,那么就需要配置。注意,这里
从HDFS加载数据与
用HDFS作为deep storage是不同的概念。
1)修改
$DRUID_HOME/conf/druid/middleManager/runtime.properties
druid.service=druid/middleManager
druid.port=8091
# Number of tasks per middleManager
druid.worker.capacity=3
# Task launch parameters
druid.indexer.runner.javaOpts=-server -Xmx2g -Duser.timezone=
UTC+08:00
-Dfile.encoding=UTF-8 -Djava.util.logging.manager=org.apache.logging.log4j.jul.LogManager
druid.indexer.task.baseTaskDir=
/hadoop/haozhuo/druid/var/task
# HTTP server threads
druid.server.http.numThreads=20
# Processing threads and buffers
# druid.processing.buffer.sizeBytes=536870912
druid.processing.buffer.sizeBytes=
268435456
druid.processing.numThreads=2
# Hadoop indexing 是HDFS中的路径
druid.indexer.task.hadoopWorkingPath=
/druid/tmp/druid-indexing
# 具体根据之前设置的druid.extensions.hadoopDependenciesDir而定。
# 也可能是 druid.indexer.task.defaultHadoopCoordinates=[]
druid.indexer.task.defaultHadoopCoordinates=[
"org.apache.hadoop:hadoop-client:2.7.0"
]
3)将Hadoop配置文件:core-site.xml, hdfs-site.xml, yarn-site.xml, mapred-site.xml复制到conf/druid/_common/下。(这步骤在步骤1时已经做了)
4)最最重要的一步,也是官网中没有。在从Hadoop导入数据到DRUID时出现了问题,折磨了我好长时间才解决的:
解决guice冲突问题:
DRUID依赖的谷歌的guice的版本是:
./lib/jersey-guice-1.19.jar
./lib/guice-multibindings-4.1.0.jar
./lib/guice-servlet-4.1.0.jar
./lib/guice-4.1.0.jar
而Hadoop依赖的guice版本是
./share/hadoop/yarn/lib/guice-servlet-3.0.jar
./share/hadoop/yarn/lib/guice-3.0.jar
./share/hadoop/yarn/lib/jersey-guice-1.9.jar
./share/hadoop/mapreduce/lib/guice-servlet-3.0.jar
./share/hadoop/mapreduce/lib/guice-3.0.jar
./share/hadoop/mapreduce/lib/jersey-guice-1.9.jar
这样会导致Druid提交job到Hadoop执行MapReduce时会报以下错误:
java.lang.NoSuchMethodError: com.google.inject.util.Types.collectionOf(Ljava/lang/reflect/Type;)Ljava/lang/reflect/ParameterizedType;
at com.google.inject.multibindings.Multibinder.collectionOfProvidersOf(Multibinder.java:202)
at com.google.inject.multibindings.Multibinder$RealMultibinder.<init>(Multibinder.java:283)
at com.google.inject.multibindings.Multibinder$RealMultibinder.<init>(Multibinder.java:258)
at com.google.inject.multibindings.Multibinder.newRealSetBinder(Multibinder.java:178)
at com.google.inject.multibindings.Multibinder.newSetBinder(Multibinder.java:150)
at io.druid.guice.LifecycleModule.getEagerBinder(LifecycleModule.java:131)
at io.druid.guice.LifecycleModule.configure(LifecycleModule.java:137)
at com.google.inject.spi.Elements$RecordingBinder.install(Elements.java:223)
at com.google.inject.spi.Elements.getElements(Elements.java:101)
at com.google.inject.spi.Elements.getElements(Elements.java:92)
我的解决方法是:
cp $DRUID_HOME/lib/*guice* $HADOOP_HOME/share/hadoop/yarn/lib/
cp $DRUID_HOME/lib/*guice* $HADOOP_HOME/share/hadoop/mapreduce/lib/
这样,Hadoop中的guice的版本就有:
./share/hadoop/yarn/lib/jersey-guice-1.19.jar
./share/hadoop/yarn/lib/jersey-guice-1.9.jar
./share/hadoop/yarn/lib/guice-multibindings-4.1.0.jar
./share/hadoop/yarn/lib/guice-3.0.jar
./share/hadoop/yarn/lib/guice-servlet-4.1.0.jar
./share/hadoop/yarn/lib/guice-4.1.0.jar
./share/hadoop/yarn/lib/guice-servlet-3.0.jar
./share/hadoop/mapreduce/lib/jersey-guice-1.19.jar
./share/hadoop/mapreduce/lib/jersey-guice-1.9.jar
./share/hadoop/mapreduce/lib/guice-multibindings-4.1.0.jar
./share/hadoop/mapreduce/lib/guice-3.0.jar
./share/hadoop/mapreduce/lib/guice-servlet-4.1.0.jar
./share/hadoop/mapreduce/lib/guice-4.1.0.jar
./share/hadoop/mapreduce/lib/guice-servlet-3.0.jar
Hadoop中有了guice-4.1.0的版本后执行Druid任务就不会报错了。
解决guava冲突问题:
出现以下问题:
2017-07-19 22:39:43,122 ERROR [main] org.apache.hadoop.mapred.YarnChild: Error running child :
java.lang.NoSuchMethodError: com.google.common.base.Enums.getIfPresent
(Ljava/lang/Class;Ljava/lang/String;)Lcom/google/common/base/Optional;
原因跟上面一样,Druid需要guava-16.0.1.jar,而Hadoop中只有guava-11.0.2.jar。将Druid中的guava-16.0.1.jar复制到Hadoop中。
cp $DRUID_HOME/lib/guava-16.0.1.jar $HADOOP_HOME/share/hadoop/yarn/lib/
cp $DRUID_HOME/lib/guava-16.0.1.jar $HADOOP_HOME/share/hadoop/common/lib/
cp $DRUID_HOME/lib/guava-16.0.1.jar $HADOOP_HOME/share/hadoop/hdfs/lib/
结果如下:
./share/hadoop/tools/lib/guava-11.0.2.jar
./share/hadoop/common/lib/guava-16.0.1.jar
./share/hadoop/common/lib/guava-11.0.2.jar
./share/hadoop/kms/tomcat/webapps/kms/WEB-INF/lib/guava-11.0.2.jar
./share/hadoop/httpfs/tomcat/webapps/webhdfs/WEB-INF/lib/guava-11.0.2.jar
./share/hadoop/yarn/lib/guava-16.0.1.jar
./share/hadoop/yarn/lib/guava-11.0.2.jar
./share/hadoop/hdfs/lib/guava-16.0.1.jar
./share/hadoop/hdfs/lib/guava-11.0.2.jar
步骤六:Tune Druid Coordinator and Overlord
注意:设置时区,其他配置文件中都要修改!
由于Druid是时间序列数据库,所以对时间非常敏感。Druid底层采用绝对毫秒数存储时间,如果不指定时区,默认输出为零时区时间,即ISO8601中yyyy-MM-ddThh:mm:ss.SSSZ。我们生产环境中采用东八区,也就是Asia/Hong Kong时区,所以需要将集群所有UTC时间调整为UTC+08:00;同时导入的数据的timestamp列格式必须为:yyyy-MM-ddThh:mm:ss.SSS+08:00
如果不设置,Hadoop batch ingestion会失败,出现“
No buckets?? seems there is no data to index.”的错误
配置Coordinator:
cd $DRUID_HOME/conf/druid/coordinator
vi jvm.config
-server
-Xms3g
-Xmx3g
-Duser.timezone=
UTC+08:00
-Dfile.encoding=UTF-8
-Djava.io.tmpdir=
/hadoop/haozhuo/druid/var/tmp
-Djava.util.logging.manager=org.apache.logging.log4j.jul.LogManager
-Dderby.stream.error.file=
/hadoop/haozhuo/druid/var/derby.log(这个配置感觉并没啥卵用。用的是mysql作为元数据库)
vi runtime.properties(并没做什么修改,都是默认值)
druid.service=druid/coordinator
druid.port=8081
druid.coordinator.startDelay=PT30S
druid.coordinator.period=PT30S
配置Overlord
:
cd $DRUID_HOME/conf/druid/overlord
vi jvm.config
-server
-Xms3g
-Xmx3g
-Duser.timezone=
UTC+08:00
-Dfile.encoding=UTF-8
-Djava.io.tmpdir=
/hadoop/haozhuo/druid/var/tmp
-Djava.util.logging.manager=org.apache.logging.log4j.jul.LogManager
vi runtime.properties(并没做什么修改,都是默认值)
druid.service=druid/overlord
druid.port=8090
druid.indexer.queue.startDelay=PT30S
druid.indexer.runner.type=remote
druid.indexer.storage.type=metadata
步骤七:Tune Druid processes that serve queries
Druid
Historicals and
MiddleManagers can be co-located on the same hardware. Both Druid processes benefit greatly from being tuned to the hardware they run on. If you are running Tranquility Server or Kafka, you can also colocate
Tranquility with these two Druid processes. If you are using
r3.2xlarge EC2 instances, or similar hardware, the configuration in the distribution is a reasonable starting point.
If you are using different hardware, we recommend adjusting configurations for your specific hardware. The most commonly adjusted configurations are:
- -Xmx and -Xms
- druid.server.http.numThreads
- druid.processing.buffer.sizeBytes
- druid.processing.numThreads
- druid.query.groupBy.maxIntermediateRows
- druid.query.groupBy.maxResults
- druid.server.maxSize and druid.segmentCache.locations on Historical Nodes
- druid.worker.capacity on MiddleManagers
Please see the Druid
configuration documentation for a full description of all possible configuration options
cd $DRUID_HOME/conf/druid/historical
vi jvm.config
-server
-Xms
4g
-Xmx
4g
-XX:MaxDirectMemorySize=
3072m
-Duser.timezone=
UTC+08:00
-Dfile.encoding=UTF-8
-Djava.io.tmpdir=
/hadoop/haozhuo/druid/var/tmp
-Djava.util.logging.manager=org.apache.logging.log4j.jul.LogManager
vi runtime.properties
备注:端口本来应该是默认8023,但是该端口被其他程序占用了,所以修改成8283。druid.processing.numThreads和druid.processing.buffer.sizeBytes缩小了一半,内存不够用
druid.service=druid/historical
druid.port=
8283
# HTTP server threads
#druid.server.http.numThreads=25
druid.server.http.numThreads=
20
# Processing threads and buffers
#druid.processing.buffer.sizeBytes=536870912
druid.processing.buffer.sizeBytes=
268435456
#druid.processing.numThreads=7
druid.processing.numThreads=
3
# Segment storage
druid.segmentCache.locations=[{"path":"var/druid/segment-cache","maxSize"\:130000000000}]
druid.server.maxSize=130000000000
cd $DRUID_HOME/conf/druid/middleManager
vi jvm.config
-server
-Xms64m
-Xmx64m
-Duser.timezone=
UTC+08:00
-Dfile.encoding=UTF-8
-Djava.io.tmpdir=
/hadoop/haozhuo/druid/var/tmp
-Djava.util.logging.manager=org.apache.logging.log4j.jul.LogManager
vi runtime.properties
druid.service=druid/middleManager
druid.port=8091
# Number of tasks per middleManager
druid.worker.capacity=3
# Task launch parameters
druid.indexer.runner.javaOpts=-server -Xmx2g -Duser.timezone=
UTC+08:00
-Dfile.encoding=UTF-8 -Djava.util.logging.manager=org.apache.logging.log4j.jul.LogManager
druid.indexer.task.baseTaskDir=
/hadoop/haozhuo/druid/var/task
# HTTP server threads
druid.server.http.numThreads=20
# Processing threads and buffers
druid.processing.buffer.sizeBytes=
268435456
druid.processing.numThreads=2
# Hadoop indexing
druid.indexer.task.hadoopWorkingPath=
/druid/tmp/druid-indexing
druid.indexer.task.defaultHadoopCoordinates=["
org.apache.hadoop:hadoop-client:2.7.0
"]
步骤八:Tune Druid Brokers
Druid
Brokers also benefit greatly from being tuned to the hardware they run on. If you are using
r3.2xlarge EC2 instances, or similar hardware, the configuration in the distribution is a reasonable starting point.
If you are using different hardware, we recommend adjusting configurations for your specific hardware. The most commonly adjusted configurations are:
- -Xmx and -Xms
- druid.server.http.numThreads
- druid.cache.sizeInBytes
- druid.processing.buffer.sizeBytes
- druid.processing.numThreads
- druid.query.groupBy.maxIntermediateRows
- druid.query.groupBy.maxResults
Please see the Druid
configuration documentation for a full description of all possible configuration options.
cd $DRUID_HOME/conf/druid/broker
vi jvm.config
-server
-Xms
12g
-Xmx
12g
-XX:MaxDirectMemorySize=
3072m
-Duser.timezone=
UTC+08:00
-Dfile.encoding=UTF-8
-Djava.io.tmpdir=
/hadoop/haozhuo/druid/var/tmp
-Djava.util.logging.manager=org.apache.logging.log4j.jul.LogManager
vi runtime.properties
备注:端口本来应该是默认8022,但是该端口被其他程序占用了,所以修改成8282。
druid.service=druid/broker
druid.port=
8282
# HTTP server threads
druid.broker.http.numConnections=5
druid.server.http.numThreads=25
# Processing threads and buffers
druid.processing.buffer.sizeBytes=
268435456
druid.processing.numThreads=
3
# Query cache
druid.broker.cache.useCache=true
druid.broker.cache.populateCache=true
druid.cache.type=local
druid.cache.sizeInBytes=
1000000000
步骤九:Open ports (if using a firewall)
If you're using a firewall or some other system that only allows traffic on specific ports, allow inbound connections on the following:
- 1527 (Derby on your Coordinator; not needed if you are using a separate metadata store like MySQL or PostgreSQL)
- 2181 (ZooKeeper; not needed if you are using a separate ZooKeeper cluster)
- 8081 (Coordinator)
- 8082 (Broker) 注意:此端口已被其他程序占用。在conf/druid/historical/runtime.properties中修改成8282。
- 8083 (Historical) 注意:此端口已被其他程序占用。在conf/druid/historical/runtime.properties中修改成8283。
- 8084 (Standalone Realtime, if used)
- 8088 (Router, if used)
- 8090 (Overlord)
- 8091, 8100–8199 (Druid Middle Manager; you may need higher than port 8199 if you have a very highdruid.worker.capacity)
- 8200 (Tranquility Server, if used)
In production, we recommend deploying ZooKeeper and your metadata store on their own dedicated hardware, rather than on the Coordinator server.
步骤十:启动
修改:-Djava.io.tmpdir=var/tmp
修改:conf/druid/coordinator/jvm.config 中的-Dderby.stream.error.file=var/druid/derby.log
确保Zookeeper和MySQL已经启动。
我有三台机子,每台机子如下
| 机子 | 官网推荐配置 | druid启动部分 | 进程内存占用 | 总的内存占用 |
| 192.168.1.150 | 4 vCPUs, 15 GB RAM ,80 GB SSD storage | Coordinator | jvm:3g(默认3g) | jvm:6g |
| Overlord | jvm :3g(默认3g) | |||
| 192.168.1.152 | 8 vCPUs,61 GB RAM,160 GB SSD storage | historical | jvm:4g(默认8g),DirectMemory:3g(默认4g) | jvm:10g+ |
| middleManager | jvm:2g(默认2g),buffer:1g(默认1g) | |||
| Tranquility | 所需内存另算 | |||
| 192.168.1.153 | 8 vCPUs,61 GB RAM,160 GB SSD storage | Broker | jvm:12g(默认24g),DirectMemory:3g(默认4g) | jvm:15g |
注意historical中DirectMemory中的计算方式:
memoryNeeded[3,221,225,472] = druid.processing.buffer.sizeBytes[536,870,912] * (druid.processing.numMergeBuffers[2] + druid.processing.numThreads[3] + 1)
将druid-0.10.0复制到其他节点:
scp -r druid-0.10.0 hadoop@datanode152:/hadoop/haozhuo/druid
scp -r druid-0.10.0 hadoop@datanode153:/hadoop/haozhuo/druid
1) 在192.168.1.150上
Start Coordinator, Overlord
启动coordinator
cd $DRUID_HOME;nohup java `cat conf/druid/coordinator/jvm.config | xargs` -cp conf/druid/_common:conf/druid/coordinator:lib/* io.druid.cli.Main server
coordinator
&
tail -1000f nohup.out
启动 overlord
cd $DRUID_HOME; nohup java `cat conf/druid/overlord/jvm.config | xargs` -cp conf/druid/_common:conf/druid/overlord:lib/* io.druid.cli.Main server
overlord
&
2) 在192.168.1.152上
Start Historicals and MiddleManagers
启动historical
cd $DRUID_HOME; nohup java `cat conf/druid/historical/jvm.config | xargs` -cp conf/druid/_common:conf/druid/historical:lib/* io.druid.cli.Main server
historical
&
启动middleManager
cd $DRUID_HOME; nohup java `cat conf/druid/middleManager/jvm.config | xargs` -cp conf/druid/_common:conf/druid/middleManager:lib/* io.druid.cli.Main server
middleManager
&
是否需要部署Tranquility Server?
You can add more servers with Druid Historicals and MiddleManagers as needed.
这部分注意下,后面Spark Streaming流式摄入时可能会用到:
If you are doing push-based stream ingestion with Kafka or over HTTP, you can also start Tranquility Server on the same hardware that holds MiddleManagers and Historicals. For large scale production, MiddleManagers and Tranquility Server can still be co-located. If you are running Tranquility (not server) with a stream processor, you can co-locate Tranquility with the stream processor and not require Tranquility Server.
curl -O http://static.druid.io/tranquility/releases/tranquility-distribution-0.8.0.tgztar -xzf tranquility-distribution-0.8.0.tgzcd tranquility-distribution-0.8.0bin/tranquility <server or kafka> -configFile <path_to_druid_distro>/conf/tranquility/<server or kafka>.json
3)在192.168.1.153上
Start Druid Broker
cd $DRUID_HOME; nohup java `cat conf/druid/broker/jvm.config | xargs` -cp conf/druid/_common:conf/druid/broker:lib/* io.druid.cli.Main server broker &
自己写的脚本
所有机子添加:
stopDruid.sh
pids=`ps -ef | grep druid | awk '{print $2}'`
for pid in $pids
do
kill -9 $pid
done
部署coordinator和overlord的机子,添加
startDruid.sh
java `cat $DRUID_HOME/conf/druid/coordinator/jvm.config | xargs` -cp $DRUID_HOME/conf/druid/_common:$DRUID_HOME/conf/druid/coordinator:$DRUID_HOME/lib/* io.druid.cli.Main server coordinator >> $DRUID_HOME/start.log &
java `cat $DRUID_HOME/conf/druid/overlord/jvm.config | xargs` -cp $DRUID_HOME/conf/druid/_common:$DRUID_HOME/conf/druid/overlord:$DRUID_HOME/lib/* io.druid.cli.Main server overlord >> $DRUID_HOME/start.log &
部署
historical和
middleManager的机子,添加
startDruid.sh
java `cat $DRUID_HOME/conf/druid/historical/jvm.config | xargs` -cp $DRUID_HOME/conf/druid/_common:$DRUID_HOME/conf/druid/historical:$DRUID_HOME/lib/* io.druid.cli.Main server historical >> $DRUID_HOME/start.log &
java `cat $DRUID_HOME/conf/druid/middleManager/jvm.config | xargs` -cp $DRUID_HOME/conf/druid/_common:$DRUID_HOME/conf/druid/middleManager:$DRUID_HOME/lib/* io.druid.cli.Main server middleManager >> $DRUID_HOME/start.log &
部署
broker的机子,添加
startDruid.sh
java `cat $DRUID_HOME/conf/druid/broker/jvm.config | xargs` -cp $DRUID_HOME/conf/druid/_common:$DRUID_HOME/conf/druid/broker:$DRUID_HOME/lib/* io.druid.cli.Main server broker >> $DRUID_HOME/start.log &
Loading data
Congratulations, you now have a Druid cluster! The next step is to learn about recommended ways to load data into Druid based on your use case. Read more about
loading data.
Load streaming data
To load streaming data, we are going to push events into Druid over a simple HTTP API. To do this we will use [Tranquility], a high level data producer library for Druid.
To download Tranquility, issue the following commands in your terminal:
curl -O http://static.druid.io/tranquility/releases/tranquility-distribution-0.8.0.tgztar -xzf tranquility-distribution-0.8.0.tgz
cd
tranquility-distribution-0.8.0
We've included a configuration file in
conf-quickstart/tranquility/server.json
as part of the Druid distribution for a
metrics
datasource. We're going to start the Tranquility server process, which can be used to push events directly to Druid.
bin/tranquility server -configFile <path_to_druid_distro>/conf-quickstart/tranquility/server.json
This section shows you how to load data using Tranquility Server, but Druid also supports a wide variety of
other streaming ingestion options
, including from popular streaming systems like Kafka, Storm, Samza, and Spark Streaming.
The
dimensions
(attributes you can filter and split on) for this datasource are flexible. It's configured for
schemaless dimensions
, meaning it will accept any field in your JSON input as a dimension.
- count
- value_sum (derived from value in the input)
- value_min (derived from value in the input)
- value_max (derived from value in the input)
We've included a script that can generate some random sample metrics to load into this datasource. To use it, simply run in your Druid distribution repository:
bin/generate-example-metrics
|
curl -XPOST -H
'Content-Type: application/json'
--data-binary @- http://localhost:8200/v1/post/metrics
Which will print something like:
{"result":{"received":25,"sent":25}}
This indicates that the HTTP server received 25 events from you, and sent 25 to Druid. Note that this may take a few seconds to finish the first time you run it, as Druid resources must be allocated to the ingestion task. Subsequent POSTs should complete quickly.
Query data
Direct Druid queries
Druid supports a rich
family of JSON-based queries
. We've included an example topN query in
quickstart/wikiticker-top-pages.json
that will find the most-edited articles in this dataset:
curl -L -H
'Content-Type: application/json'
-XPOST --data-binary @quickstart/wikiticker-top-pages.json http://localhost:8082/druid/v2/?pretty
Visualizing data
Druid is ideal for power user-facing analytic applications. There are a number of different open source applications to visualize and explore data in Druid. We recommend trying
Pivot
,
Superset
, or
Metabase
to start visualizing the data you just ingested.
If you installed Pivot for example, you should be able to view your data in your browser at
localhost:9090
.
SQL and other query libraries
There are many more query tools for Druid than we've included here, including SQL engines, and libraries for various languages like Python and Ruby. Please see
the list of libraries
for more information.
测试从HDFS导入数据到Druid
overlord console:
http://192.168.1.150:8090/console.html
cd $DRUID_HOME
curl -X 'POST' -H 'Content-Type:application/json' -d @quickstart/wikiticker-index.json 192.168.1.150:8090/druid/indexer/v1/task
查询:
curl -L -H'Content-Type: application/json' -XPOST --data-binary @quickstart/wikiticker-top-pages2.json
http://192.168.1.153:8282/druid/v2/?pretty
流式摄入:
启动:
注意,必须在该目录下启动
cd /hadoop/haozhuo/druid/tranquility-distribution-0.8.2;
bin/tranquility server
-configFile $DRUID_HOME/conf/tranquility/server.json
//测试插入
cd $DRUID_HOME;
bin/generate-example-metrics
|
curl -XPOST -H
'Content-Type: application/json'
--data-binary @-
http://192.168.1.152:8200/v1/post/metrics
//查询
curl -L -H
'Content-Type: application/json'
-XPOST --data-binary @quickstart/wikiticker-top-pages.json
http://192.168.1.152:8082/druid/v2/?pretty
curl -L -H'Content-Type: application/json' -XPOST --data-binary @quickstart/wikiticker-top-pages2.json http://192.168.1.153:8282/druid/v2/?pretty
curl -L -H'Content-Type: application/json' -XPOST --data-binary @quickstart/test-top-pages.json http://192.168.1.153:8282/druid/v2/?pretty