Neutron介绍
neutron是openstack重要组件之一,在以前是时候没有neutron项目
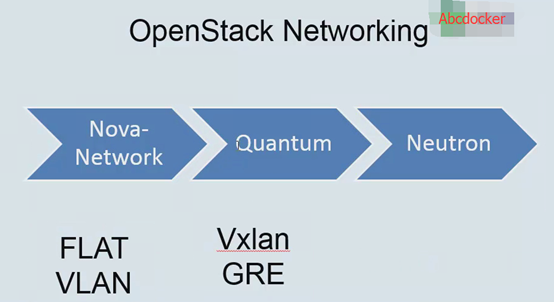
早期的时候是没有neutron,早期所使用的网络的nova-network,经过版本改变才有个neutron
Openstack Networking 网络:
在实际的物理环境下,我们使用交换机或者集线器把多个计算机连接起来形成了网络。在Neutron的世界里,网络也是将多个不同的云主机连接起来。 子网:
在实际的物理环境下,在一个网络中。我们可以将网络划分成多为逻辑子网。在Neutron的世界里,子网也是隶属于网络下的。 端口:
是实际的物理环境下,每个子网或者网络,都有很多的端口,比如交换机端口来供计算机连接。在Neutron的世界端口也是隶属于子网下,云主机的网卡会对应到一个端口上。 路由器:
在实际的网络环境下,不同网络或者不同逻辑子网之间如果需要进行通信,需要通过路由器进行路由。在Neutron的实际里路由也是这个作用。用来连接不同的网络或者子网。
Neutron 架构介绍 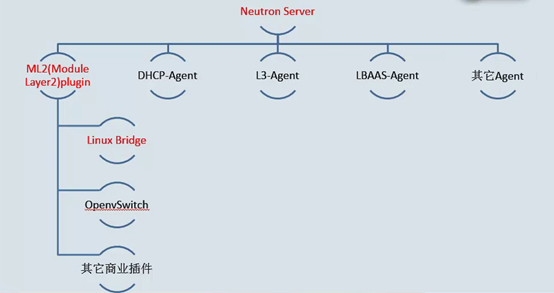
Neutron也分为控制节点和计算节点
openstack默认的网络是单一扁平网络(虚拟机跟宿主机在同一个网段)在官方文档上称为提供者网络
安装
数据库我们在一开始就已经创建完成
keystone用户我们也已经创建完成
配置网络选项
您可以部署网络服务使用选项1和选项2两种架构中的一种来部署网络服务。
选项1采用尽可能简单的架构进行部署,只支持实例连接到公有网络(外部网络)。没有私有网络(个人网络),路由器以及浮动IP地址。只有admin或者其他特权用户才可以管理公有网络
选项2在选项1的基础上多了layer-3服务,支持实例连接到私有网络。demo或者其他没有特权的用户可以管理自己的私有网络,包含连接公网和私网的路由器。另外,浮动IP地址可以让实例使用私有网络连接到外部网络,例如互联网
典型的私有网络一般使用覆盖网络。覆盖网络,例如VXLAN包含了额外的数据头,这些数据头增加了开销,减少了有效内容和用户数据的可用空间。在不了解虚拟网络架构的情况下,实例尝试用以太网 最大传输单元 (MTU) 1500字节发送数据包。网络服务会自动给实例提供正确的MTU的值通过DHCP的方式。但是,一些云镜像并没有使用DHCP或者忽视了DHCP MTU选项,要求使用元数据或者脚本来进行配置
我们先进行配置公共网络
在控制节点安装组件
[root@linux-node1 ~]#yum install openstack-neutron openstack-neutron-ml2 \openstack-neutron-linuxbridge ebtables
提示:neutron和其他组件的小区别是配置完数据库之后不可以马上进行同步,它还依赖其他配置文件
编辑/etc/neutron/neutron.conf文件并完成如下操作
在[database]配置数据库访问[root@linux-node1 ~]# vim /etc/neutron/neutron.conf684 connection = mysql+pymysql://neutron:[email protected]/neutron
提示:不需要同步数据库,684为684行
在 [DEFAULT] 和 [keystone_authtoken] 部分,配置认证服务访问
[DEFAULT]auth_strategy = keystone[keystone_authtoken]auth_uri = http://192.168.56.11:5000auth_url = http://192.168.56.11:35357memcached_servers = 192.168.56.11:11211auth_type = passwordproject_domain_name = defaultuser_domain_name = defaultproject_name = serviceusername = neutronpassword = neutron
rabbitmq(消息队列)配置
rpc_backend = rabbitrabbit_host = 192.168.56.11rabbit_userid = openstackrabbit_password = openstack
neutron核心配置有2个
启动ML2插件并禁用其他插件
[DEFAULT]…core_plugin = m12service_plugins =提示:service_plugins等号后面什么都不写就是禁用其他插件
配置网络服务来通知计算节点的网络拓扑变化:(配置nova相关)
[DEFAULT]…notify_nova_on_port_status_changes = truenotify_nova_on_port_data_changes = true
提示:简单的来说就是端口发生变化通知nova
[nova]nova标签的配置其实就是keystone的配置auth_url = http://192.168.56.11:35357auth_type = passwordproject_domain_name = defaultuser_domain_name = defaultregion_name = RegionOneproject_name = serviceusername = novapassword = nova
配置锁路径
[oslo_concurrency]lock_path = /var/lib/neutron/tmp
neutron配置小结:
[root@linux-node1 ~]# grep '^[a-z]' /etc/neutron/neutron.confauth_strategy = keystone #使用keystone进行验证core_plugin = ml2 #使用ml2插件service_plugins = #不使用其他插件notify_nova_on_port_status_changes = true #端口改变通知novanotify_nova_on_port_data_changes = true #端口改变通知novarpc_backend = rabbit #使用rabbitconnection = mysql+pymysql://neutron:[email protected]/neutron #数据库连接地址auth_uri = http://192.168.56.11:5000 #neutron keystone的配置auth_url = http://192.168.56.11:35357 #neutron keystone的配置memcached_servers = 192.168.56.11:11211 #neutron keystone的配置auth_type = password #neutron keystone的配置project_domain_name = default #neutron keystone的配置user_domain_name = default #neutron keystone的配置project_name = service #neutron keystone的配置username = neutron #neutron keystone的配置password = neutron #neutron keystone的配置auth_url = http://192.168.56.11:35357 #neutron nova的配置auth_type = password #neutron nova的配置project_domain_name = default #neutron nova的配置user_domain_name = default #neutron nova的配置region_name = RegionOne #neutron nova的配置project_name = service #neutron nova的配置username = nova #neutron nova的配置password = nova #neutron nova的配置lock_path = /var/lib/neutron/tmp #锁路径rabbit_host = 192.168.56.11 #rabbitmq配置rabbit_userid = openstack #rabbitmq配置rabbit_password = openstack #rabbitmq配置
配置Modular Layer 2 (ML2)
ML2插件使用Linuxbridge机制来为实例创建layer-2虚拟网络基础设施
编辑配置文件/etc/neutron/plugins/ml2/ml2_conf.ini
驱动的选择
[ml2]type_drivers = flat,vlan,gre,vxlan,geneve
设置使用那几个插件来创建网络
[ml2]mechanism_drivers = linuxbridge,openvswitch
提示:我们可以写多个,不管用不用都可以写上去
禁用私有网络
[ml2]tenant_network_types =
启动端口安全扩展驱动
[ml2]extension_drivers = port_security
在[ml2_type_flat]部分,配置公共虚拟网络为flat网络
[ml2_type_flat]flat_networks = public#配置公共的网络
在 [securitygroup]部分,启用 ipset增加安全组规则的高效性:
[securitygroup]enable_ipset = true
提示:ml2_conf里面的网络类型很多,我们需要那种网络类型配置即可
ML2插件配置小结:
[root@linux-node1 ~]# grep '^[a-z]' /etc/neutron/plugins/ml2/ml2_conf.initype_drivers = flat,vlan,gre,vxlan,geneve #驱动类型tenant_network_types = #租户的网络类型mechanism_drivers = linuxbridge,openvswitch #创建网络插件extension_drivers = port_security #打开端口安全flat_networks = public #网络类型publicenable_ipset = true #开启ipset
配置Linuxbridge代理
编辑/etc/neutron/plugins/ml2/linuxbridge_agent.ini文件并且完成以下操作
在[linux_bridge]部分,将公共虚拟网络和公共物理网络接口对应起来:[linux_bridge]physical_interface_mappings = public:eth0#是什么网卡就修改什么网卡,如果不是eth0请修改对应网卡
在[vxlan]部分,禁止VXLAN覆盖网络:
[vxlan]enable_vxlan = false
在[securitygroup]部分,启用安全组并配置 Linuxbridge iptables firewall driver:
[securitygroup]...enable_security_group = Truefirewall_driver = neutron.agent.linux.iptables_firewall.IptablesFirewallDriver#启动安全组并设置防火墙驱动
Linuxbridge代理总结如下:
[root@linux-node1 ~]# grep '^[a-z]' /etc/neutron/plugins/ml2/linuxbridge_agent.iniphysical_interface_mappings = public:eth0 #网络映射firewall_driver = neutron.agent.linux.iptables_firewall.IptablesFirewallDriver #防火墙enable_security_group = true #打开安全组enable_vxlan = false #关闭vxlan
配置DHCP代理
编辑/etc/neutron/dhcp_agent.ini文件并完成下面的操作:
在[DEFAULT]部分,配置Linuxbridge驱动接口,DHCP驱动并启用隔离元数据,这样在公共网络上的实例就可以通过网络来访问元数据
[DEFAULT]…interface_driver = neutron.agent.linux.interface.BridgeInterfaceDriver#虚拟接口驱动,使用Linuxbridgedhcp_driver = neutron.agent.linux.dhcp.Dnsmasq#dhcp驱动,默认使用Dnsmasq(是一个小的开源项目)来提供dhcp服务enable_isolated_metadata = false#刷新路由使用
DHCP配置小结
[root@linux-node1 ~]# grep '^[a-z]' /etc/neutron/dhcp_agent.iniinterface_driver = neutron.agent.linux.interface.BridgeInterfaceDriver #底层插件Linuxbridgedhcp_driver = neutron.agent.linux.dhcp.Dnsmasq #DHCPenable_isolated_metadata = false #推送路由使用
配置元数据代理 <Metadata agent>负责提供配置信息,例如:访问实例的凭证
编辑/etc/neutron/metadata_agent.ini文件并完成以下操作:
在[DEFAULT]部分,配置元数据主机以及共享密码:
nova_metadata_ip = 192.168.56.11 #元数据主机metadata_proxy_shared_secret = abcdocker #共享密钥
提示:这个共享密钥就是一个字符串
配置网络服务(nova-api)
编辑/etc/nova/nova.conf文件并完成以下操作:
在[neutron]部分,配置访问参数,启用元数据代理并设置密码:
url = http://192.168.56.11:9696auth_url = http://192.168.56.11:35357auth_type = passwordproject_domain_name = defaultuser_domain_name = defaultregion_name = RegionOneproject_name = serviceusername = neutronpassword = neutron
提示:9696是neutron-server的端口
[neutron]service_metadata_proxy=truemetadata_proxy_shared_secret = abcdocker #共享密钥
网络服务初始化脚本需要一个超链接 /etc/neutron/plugin.ini指向ML2插件配置文件/etc/neutron/plugins/ml2/ml2_conf.ini 如果超链接不存在,使用下面的命令创建它:
[root@linux-node1 ~]# ln -s /etc/neutron/plugins/ml2/ml2_conf.ini /etc/neutron/plugin.ini
提示:这里我们使用那个插件就用它做一个软连接即可
同步数据库
[root@linux-node1 ~]# su -s /bin/sh -c "neutron-db-manage --config-file /etc/neutron/neutron.conf \--config-file /etc/neutron/plugins/ml2/ml2_conf.ini upgrade head" neutron
注:数据库的同步发生在 Networking 之后,因为脚本需要完成服务器和插件的配置文件。
重启计算API 服务:
[root@linux-node1 ~]# systemctl restart openstack-nova-api.service
当系统启动时,启动Networking服务并配置它启动。
对于两种网络选项:
[root@linux-node1 ~]#systemctl enable neutron-server.service \neutron-linuxbridge-agent.service neutron-dhcp-agent.service \neutron-metadata-agent.service[root@linux-node1 ~]#systemctl start neutron-server.service \neutron-linuxbridge-agent.service neutron-dhcp-agent.service \neutron-metadata-agent.service
现在还需要将neutron在keystone上进行注册
创建neutron服务实体:
[root@linux-node1 ~]# source admin-openstack.sh[root@linux-node1 ~]#openstack service create --name neutron \--description "OpenStack Networking" network
创建网络服务API端点:
[root@linux-node1 ~]#openstack endpoint create --region RegionOne \network public http://192.168.56.11:9696[root@linux-node1 ~]# openstack endpoint create --region RegionOne network internal http://192.168.56.11:9696[root@linux-node1 ~]# openstack endpoint create --region RegionOne network admin http://192.168.56.11:9696
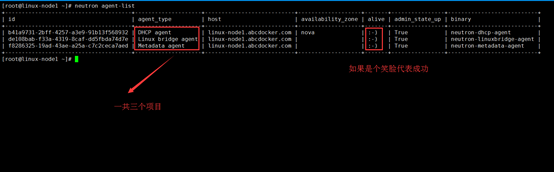
检查neutron是否安装成功
[root@linux-node1 ~]# neutron agent-list+---------------------+--------------------+---------------------+-------------------+-------+----------------+-------------------------+| id | agent_type | host | availability_zone | alive | admin_state_up | binary |+---------------------+--------------------+---------------------+-------------------+-------+----------------+-------------------------+| b41a9731-2bff-4257- | DHCP agent | linux- | nova | | True | neutron-dhcp-agent |
| a3e9-91b13f568932 | | node1.abcdocker.com | | | | || de108bab-f33a-4319 | Linux bridge agent | linux- | | | True | neutron-linuxbridge- || -8caf-dd5fbda74d7e | | node1.abcdocker.com | | | | agent || f8286325-19ad-43ae- | Metadata agent | linux- | | | True | neutron-metadata-agent || a25a-c7c2ceca7aed | | node1.abcdocker.com | | | | |+---------------------+--------------------+---------------------+-------------------+-------+----------------+-------------------------+
配置neutron计算节点
安装组件,安装的服务器在192.168.56.12 linux-node2.com上面
[root@linux-node2 ~]# yum install openstack-neutron-linuxbridge ebtables ipset -y
因为控制节点跟计算节点配置几乎一样,我们直接复制控制节点的文件进行修改控制节点拷贝
[root@linux-node1 ~]# scp /etc/neutron/neutron.conf root@192.168.56.12:/etc/neutron
在计算节点进行修改配置文件权限
[root@linux-node2 ~]# chown -R root:neutron /etc/neutron/neutron.conf[root@linux-node2 ~]# ll /etc/neutron/neutron.conf-rw-r----- 1 root neutron 53140 Nov 21 15:13 /etc/neutron/neutron.conf
计算节点设置
[root@linux-node2 ~]# vim /etc/neutron/neutron.conf#connection = #删除mysql连接路径[nova] #删除nova标签下所有配置#notify_nova_on_port_status_changes = true #注释#notify_nova_on_port_data_changes = true #注释#core_plugin = ml2 #注释插件#service_plugins = #注释
计算节点跟控制节点进行对比
[root@linux-node2 ~]# diff /etc/neutron/neutron.conf /tmp/neutron.conf30c30< #core_plugin = ml2---> core_plugin = ml233c33< #service_plugins =---> service_plugins =137c137< #notify_nova_on_port_status_changes = true---> notify_nova_on_port_status_changes = true141c141< #notify_nova_on_port_data_changes = true---> notify_nova_on_port_data_changes = true684c684< #connection =---> connection = mysql+pymysql://neutron:[email protected]/neutron936a937,944> auth_url = http://192.168.56.11:35357> auth_type = password> project_domain_name = default> user_domain_name = default> region_name = RegionOne> project_name = service> username = nova> password = nova
提示:不注释也没有问题,但是为了环境保持一致还是注释掉比较好
为计算节点配置网络服务
我们可以直接复制控制节点的配置进行修改
[root@linux-node1 ~]# vim /etc/nova/nova.conf…[neutron]url = http://192.168.56.11:9696auth_url = http://192.168.56.11:35357auth_type = passwordproject_domain_name = defaultuser_domain_name = defaultregion_name = RegionOneproject_name = serviceusername = neutronpassword = neutron
提示:在控制节点的时候我们在nova的配置文件中配置了neutron的节点选项,在neutron配置文件中配置了nova的选项。在计算节点的nova上要配置neutron
在计算节点配置Linuxbridge
配置网络选项
友情提示:这里的配置和控制节点配置一模一样
这里我们还是直接拷贝控制节点的/etc/neutron/plugins/ml2/linuxbridge_agent.ini
拷贝
[root@linux-node1 ~]# scp /etc/neutron/plugins/ml2/linuxbridge_agent.ini 192.168.56.12:/etc/neutron/plugins/ml2/root@192.168.56.12's password:linuxbridge_agent.ini
查看
[root@linux-node2 ~]# ll /etc/neutron/plugins/ml2/linuxbridge_agent.ini-rw-r----- 1 root root 7924 Nov 21 16:26 /etc/neutron/plugins/ml2/linuxbridge_agent.ini[root@linux-node2 ~]# grep '^[a-z]' /etc/neutron/plugins/ml2/linuxbridge_agent.iniphysical_interface_mappings = public:eth0firewall_driver = neutron.agent.linux.iptables_firewall.IptablesFirewallDriverenable_security_group = trueenable_vxlan = false[root@linux-node2 ~]# chown -R root:neutron /etc/neutron/plugins/ml2/linuxbridge_agent.ini
重启计算节点nova-compute
[root@linux-node2 ~]#systemctl restart openstack-nova-compute.service
启动Linuxbridge代理并设置开启启动
[root@linux-node2 ~]# systemctl enable neutron-linuxbridge-agent.serviceCreated symlink from /etc/systemd/system/multi-user.target.wants/neutron-linuxbridge-agent.service to /usr/lib/systemd/system/neutron-linuxbridge-agent.service.[root@linux-node2 ~]# systemctl start neutron-linuxbridge-agent.service
进入控制节点,进行检查
[root@linux-node1 ~]# source admin-openstack.sh[root@linux-node1 ~]# neutron agent-list+---------------------+--------------------+---------------------+-------------------+-------+----------------+-------------------------+| id | agent_type | host | availability_zone | alive | admin_state_up | binary |+---------------------+--------------------+---------------------+-------------------+-------+----------------+-------------------------+| b41a9731-2bff-4257- | DHCP agent | linux- | nova | | True | neutron-dhcp-agent || a3e9-91b13f568932 | | node1.abcdocker.com | | | | || de108bab-f33a-4319 | Linux bridge agent | linux- | | | True | neutron-linuxbridge- || -8caf-dd5fbda74d7e | | node1.abcdocker.com | | | | agent || eb879cc3-ca1d-470b- | Linux bridge agent | linux- | | | True | neutron-linuxbridge- || 9fe6-b0e5c2fedf2a | | node2.abcdocker.com | | | | agent || f8286325-19ad-43ae- | Metadata agent | linux- | | | True | neutron-metadata-agent || a25a-c7c2ceca7aed | | node1.abcdocker.com | | | | |+---------------------+--------------------+---------------------+-------------------+-------+----------------+-------------------------+
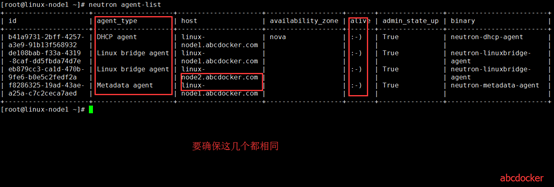
提示:如果网络接口不是eth0,你的配置文件没有修改就会启动不起来
故障解决套路:
1、netstat -lntup确认端口是否监听
2、openstack service list确保服务创建 openstack endpoint list确保三个endpoint创建无误
3、vim修改配置文件debug=true 重启 – 执行命令 – 看日志
M版本中文文档:http://docs.openstack.org/mitaka/zh_CN/install-guide-rdo/keystone-install.html