method_1
from selenium import webdriver

profile = webdriver.FirefoxProfile()
profile.set_preference('network.proxy.type', 1)
profile.set_preference('network.proxy.http', '127.0.0.1')
profile.set_preference('network.proxy.http_port', 17890)  # int
profile.update_preferences()
driver = webdriver.Firefox(firefox_profile=profile)
driver.get('http://httpbin.org/ip')
- 1
- 2
- 3
- 4
- 5
- 6
- 7
- 8
- 9
method_2
from selenium import webdriver
from selenium.webdriver.common.proxy import Proxy
from selenium.webdriver.common.proxy import ProxyType

proxy = Proxy(
    {
        'proxyType': ProxyType.MANUAL,
        'httpProxy': get_proxy_ip_port()
    }
)
driver = webdriver.Firefox(proxy=proxy)
driver.get('http://httpbin.org/ip')
- 1
- 2
- 3
- 4
- 5
- 6
- 7
- 8
- 9
- 10
- 11
- 12
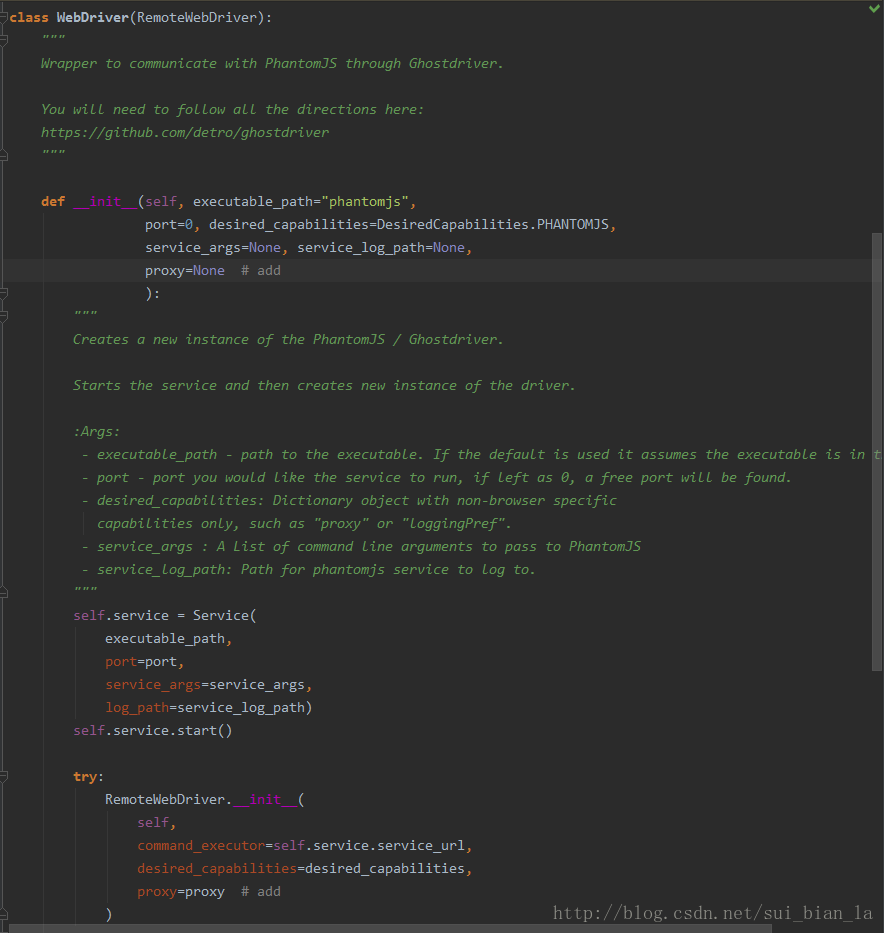
phantomjs中设置代理ip
方法一:太不优雅(还是看方法二吧)
在phantomjs中不能像上面的Firefox的method2一样传入proxy
phantomjs和Firefox均继承自WebDriver,父类WebDriver可以传入proxy
phantomjs在初始化WebDriver时就没有留proxy参数
所以可以像下图一样改一下phantomjs类的源码,就可以在phantomjs中传入proxy参数了
# 注意授权
# Licensed to the Software Freedom Conservancy (SFC) under one
# or more contributor license agreements.  See the NOTICE file
# distributed with this work for additional information
# regarding copyright ownership.  The SFC licenses this file
# to you under the Apache License, Version 2.0 (the
# "License"); you may not use this file except in compliance
# with the License.  You may obtain a copy of the License at
#
#   http://www.apache.org/licenses/LICENSE-2.0
#
# Unless required by applicable law or agreed to in writing,
# software distributed under the License is distributed on an
# "AS IS" BASIS, WITHOUT WARRANTIES OR CONDITIONS OF ANY
# KIND, either express or implied.  See the License for the
# specific language governing permissions and limitations
# under the License.
- 1
- 2
- 3
- 4
- 5
- 6
- 7
- 8
- 9
- 10
- 11
- 12
- 13
- 14
- 15
- 16
- 17
下面才是示例
from selenium import webdriver
from selenium.webdriver.common.proxy import Proxy
from selenium.webdriver.common.proxy import ProxyType

proxy = Proxy(
    {
        'proxyType': ProxyType.MANUAL,
        'httpProxy': get_proxy_ip_port()
    }
)
driver = webdriver.PhantomJS(
    executable_path="/path/of/phantomjs",
    proxy=proxy
    )
driver.get('http://httpbin.org/ip')
print driver.page_source
driver.close()
- 1
- 2
- 3
- 4
- 5
- 6
- 7
- 8
- 9
- 10
- 11
- 12
- 13
- 14
- 15
- 16
- 17
方法二:
from selenium import webdriver
from selenium.webdriver.common.proxy import Proxy
from selenium.webdriver.common.proxy import ProxyType
from selenium.webdriver.common.desired_capabilities import DesiredCapabilities


proxy = Proxy(
    {
        'proxyType': ProxyType.MANUAL,
        'httpProxy': 'ip:port'  # 代理ip和端口
    }
)
# 新建一个“期望的技能”,哈哈
desired_capabilities = DesiredCapabilities.PHANTOMJS.copy()
# 把代理ip加入到技能中
proxy.add_to_capabilities(desired_capabilities)
driver = webdriver.PhantomJS(
    executable_path="/path/of/phantomjs",
    desired_capabilities=desired_capabilities
    )
driver.get('http://httpbin.org/ip')
print driver.page_source
driver.close()
- 1
- 2
- 3
- 4
- 5
- 6
- 7
- 8
- 9
- 10
- 11
- 12
- 13
- 14
- 15
- 16
- 17
- 18
- 19
- 20
- 21
- 22
- 23
方法三(动态切换ip):
from selenium import webdriver
from selenium.webdriver.common.proxy import Proxy
from selenium.webdriver.common.proxy import ProxyType
from selenium.webdriver.common.desired_capabilities import DesiredCapabilities

proxy = Proxy(
    {
        'proxyType': ProxyType.MANUAL,
        'httpProxy': 'ip:port'  # 代理ip和端口
    }
)
# 新建一个“期望技能”,哈哈
desired_capabilities = DesiredCapabilities.PHANTOMJS.copy()
# 把代理ip加入到技能中
proxy.add_to_capabilities(desired_capabilities)
driver = webdriver.PhantomJS(
    executable_path="/path/of/phantomjs",
    desired_capabilities=desired_capabilities
)
# 测试一下
driver.get('http://httpbin.org/ip')
print driver.page_source

# 现在开始切换ip
# 再新建一个ip
proxy = Proxy(
    {
        'proxyType': ProxyType.MANUAL,
        'httpProxy': 'ip:port'  # 代理ip和端口
    }
)
# 再新建一个“期望技能”,()
desired_capabilities = DesiredCapabilities.PHANTOMJS.copy()
# 把代理ip加入到技能中
proxy.add_to_capabilities(desired_capabilities)
# 新建一个会话,并把技能传入
driver.start_session(desired_capabilities)
driver.get('http://httpbin.org/ip')
print driver.page_source
driver.close()
- 1
- 2
- 3
- 4
- 5
- 6
- 7
- 8
- 9
- 10
- 11
- 12
- 13
- 14
- 15
- 16
- 17
- 18
- 19
- 20
- 21
- 22
- 23
- 24
- 25
- 26
- 27
- 28
- 29
- 30
- 31
- 32
- 33
- 34
- 35
- 36
- 37
- 38
- 39
- 40
</article>