react-native热更新分两个方面,脚本更新和图片更新,我们将在图片更新的地方分析一下图片加载的源码:
1、脚本更新。
a、通过bundle文件更新
- bundle文件
bundle文件包含了当前所有脚本中的信息,一开始建项目的时候,在asset中会有一个index.android.bundle文件。之后
每次更新的时候,我们需要通过以下命令生成bundle文件。命令中的bundle文件夹可以指定到任何地方。

- 加载bundle文件
将生成的bundle文件放到服务器上。app每次启动的时候调用MainActivity,该Activity需要改成普通的Activity,而不是
ReactActivity。
为什么我们不直接替换asset下的bundle文件。因为我们没有权限修改asset文件夹。
MainActivity只做一件事,比较版本,决定是否下载新的bundle压缩文件,并且解压。最后跳转到react主页的
ReactActivity。另外,为了防止后退到MainActivity为空白,需要在跳转的时候调用finish()方法。
 @Override
    protected void onCreate(Bundle savedInstanceState) {
        super.onCreate(savedInstanceState);
        //setContentView(R.layout.activity_main);
        //startActivity(new Intent(this,RNActivity.class));
        // 下载更新包
        load();
    }
/**
* 下载更新包
*/
private void load() {
checkVersion();
}
/**
* 检查版本号
*/
private void checkVersion() {
// 版本获取待实现
// 如果不需要下载
//startActivity(new Intent(this,RNActivity.class));
// 如果需要下载
String url = "http://192.168.0.121/mshop/bundle/1.0.0.zip";
downLoadBundle(url);
}/**
* 下载最新Bundle
*/
private void downLoadBundle(String url) {
// 1.下载前检查SD卡是否存在更新包文件夹
HotUpdateUtil.checkPackage(getApplicationContext(), FileConstant.LOCAL_FOLDER);
// 2.下载
DownloadManager downloadManager = (DownloadManager) getSystemService(Context.DOWNLOAD_SERVICE);
DownloadManager.Request request = new DownloadManager
.Request(Uri.parse(url));
//request.setNotificationVisibility(DownloadManager.Request.VISIBILITY_HIDDEN);
request.setAllowedNetworkTypes(DownloadManager.Request.NETWORK_MOBILE| DownloadManager.Request.NETWORK_WIFI);
request.setDestinationUri(Uri.parse("file://"+ FileConstant.JS_PATCH_LOCAL_PATH));
mDownLoadId = downloadManager.enqueue(request);
registeReceiver();
}
private void registeReceiver() {
localReceiver = new CompleteReceiver(this);
registerReceiver(localReceiver,new IntentFilter(DownloadManager.ACTION_DOWNLOAD_COMPLETE));
}
private class CompleteReceiver extends BroadcastReceiver {
private Activity activity;
public CompleteReceiver(Activity activity){
this.activity = activity;
}
@Override
public void onReceive(Context context, Intent intent) {
long completeId = intent.getLongExtra(DownloadManager.EXTRA_DOWNLOAD_ID,-1);
if(completeId == mDownLoadId) {
Log.i(TAG, "下载完成");
HotUpdateUtil.handleZIP(getApplicationContext());
startActivity(new Intent(context,RNActivity.class));
this.activity.finish();
}
}
}主页的ReactActivity主要做一件事,绑定到主页对应的js脚本。
public class RNActivity extends ReactActivity {

    @Override    /**
     * Returns the name of the main component registered from JavaScript.
     * This is used to schedule rendering of the component.
     */
    protected String getMainComponentName() {
        return "HotUpdateProject";
    }

    @Override
    public void onBackPressed() {
        System.exit(0);
    }

}
目前为止,我们已经下载了服务器最新的bundle文件了。那么,我们怎么获取呢?接着往下走。
- 指定Bundle文件加载路径
react-native为我们提供了可指定bundle文件加载路径的方式,实现ReactApplication接口,实现其中的
getReactNativeHost方法,需要返回一个ReactNativeHost。在ReactNativeHost这个抽象类中,我们可以实现其中
的getJSBundleFile方法。该方法返回null,则加载asset下的bundle文件。否则加载返回值所在路径的bundle文件。
private final ReactNativeHost mReactNativeHost = new ReactNativeHost(this) {

      //@Nullable
      @Override
      protected String getJSBundleFile() {
        File file = new File (FileConstant.JS_BUNDLE_LOCAL_PATH);
        if(file != null && file.exists()) {
            Toast.makeText(MainApplication.getApplicationontext(), "更新的bundle", Toast.LENGTH_SHORT).show();
          return FileConstant.JS_BUNDLE_LOCAL_PATH;
        } else {
          return super.getJSBundleFile();
        }
      }

      @Override
      public boolean getUseDeveloperSupport() {
        return BuildConfig.DEBUG;
      }

      @Override
      protected List<ReactPackage> getPackages() {
        return Arrays.<ReactPackage>asList(
                new MainReactPackage(),
                mCommPackage
        );
      }
    };

  @Override
  public ReactNativeHost getReactNativeHost() {
    return mReactNativeHost;
  }
这样我们就可以热更新脚本了。
b、通过补丁文件更新
更新文件当然是越小越好,虽然我们之前把bundle压缩后传递的,但是如果能差异化更新就更好了。
这个留到下篇文章再做总结吧。
2、图片更新。
图片更新可能遇到的问题会有点多,所以这里从图片加载源码开始分析。react-native版本号为0.52.2
我们先找到Image模块所在的js,Image.android.js。看一下它的render方法
render: function() {
    const source = resolveAssetSource(this.props.source);
    const loadingIndicatorSource = resolveAssetSource(this.props.loadingIndicatorSource);

    // As opposed to the ios version, here we render `null` when there is no source, source.uri
    // or source array.

    if (source && source.uri === '') {
      console.warn('source.uri should not be an empty string');
    }

    if (this.props.src) {
      console.warn('The <Image> component requires a `source` property rather than `src`.');
    }

    if (this.props.children) {
      throw new Error('The <Image> component cannot contain children. If you want to render content on top of the image, consider using the <ImageBackground> component or absolute positioning.');
    }

    if (source && (source.uri || Array.isArray(source))) {
      let style;
      let sources;
      if (source.uri) {
        const {width, height} = source;
        style = flattenStyle([{width, height}, styles.base, this.props.style]);
        sources = [{uri: source.uri}];
      } else {
        style = flattenStyle([styles.base, this.props.style]);
        sources = source;
      }

      const {onLoadStart, onLoad, onLoadEnd, onError} = this.props;
      const nativeProps = merge(this.props, {
        style,
        shouldNotifyLoadEvents: !!(onLoadStart || onLoad || onLoadEnd || onError),
        src: sources,
        headers: source.headers,
        loadingIndicatorSrc: loadingIndicatorSource ? loadingIndicatorSource.uri : null,
      });

      if (this.context.isInAParentText) {
        return <RCTTextInlineImage {...nativeProps}/>;
      } else {
        return <RKImage {...nativeProps}/>;
      }
    }
    return null;
  }
});
a、首先,通过source属性,拿到我们的图片。注意这里有三种情况,分别是,使用require,得到的是资源id。使用路径字符串。
使用{uri:''}对象。
------------------------------------------------------------------------------------------------------------------------------------------
我们来看一下,resolveAssetSource做了一些什么操作。关键需要看
resolveAssetSource.js
/**
 * `source` is either a number (opaque type returned by require('./foo.png'))
 * or an `ImageSource` like { uri: '<http location || file path>' }
 */
function resolveAssetSource(source: any): ?ResolvedAssetSource {
  if (typeof source === 'object') {
    return source;
  }

  var asset = AssetRegistry.getAssetByID(source);
  if (!asset) {
    return null;
  }

  const resolver = new AssetSourceResolver(
    getDevServerURL(),
    getScriptURL(),
    getEmbeddedBundledURL(),
    asset,
  );
  if (_customSourceTransformer) {
    return _customSourceTransformer(resolver);
  }
  return resolver.defaultAsset();
}

module.exports = resolveAssetSource;
module.exports.pickScale = AssetSourceResolver.pickScale;
module.exports.setCustomSourceTransformer = setCustomSourceTransformer;
我们看到,如果我们传入的是对象,什么也不会做。asset为封装了资源信息的一个对象。可以看一下debug模式下的
情况。
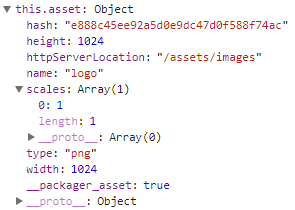
关键点为AssetSourceResovler,我们需要先明确几个变量
devServerURL:debug模式下,bundle文件的开发机地址。这也就是为什么开发时可以不用usb线连接设备,
热加载改动的代码的原因。如果是release,返回为null。
scriptURL:在上面url的基础上,拼接出找到bundle文件的地址。在release下,该值就是我们之前在
java中实现的getJSBundleFile方法中返回的index.android.bundle文件所在的路径,并且加上了"file://"。
如果是dev模式下,该值和devServerURL一样。
function getDevServerURL(): ?string {
  if (_serverURL === undefined) {
    var scriptURL = NativeModules.SourceCode.scriptURL;
    var match = scriptURL && scriptURL.match(/^https?:\/\/.*?\//);
    if (match) {
      // jsBundle was loaded from network
      _serverURL = match[0];
    } else {
      // jsBundle was loaded from file
      _serverURL = null;
    }
  }
  return _serverURL;
}
function getScriptURL(): ?string {
if (_scriptURL === undefined) {
const scriptURL = NativeModules.SourceCode.scriptURL;
_scriptURL = _coerceLocalScriptURL(scriptURL);
}
return _scriptURL;
}function _coerceLocalScriptURL(scriptURL: ?string): ?string {
if (scriptURL) {
if (scriptURL.startsWith('assets://')) {
// android: running from within assets, no offline path to use
return null;
}
scriptURL = scriptURL.substring(0, scriptURL.lastIndexOf('/') + 1);
if (!scriptURL.includes('://')) {
// Add file protocol in case we have an absolute file path and not a URL.
// This shouldn't really be necessary. scriptURL should be a URL.
scriptURL = 'file://' + scriptURL;
}
}
return scriptURL;
}这里可以发现,如果是dev模式,由于不以"assets://"开头,包含"://",因为是http协议,所以scriptURL和
devServerURL是一样的。
realse模式下,如果getJSBundleFile方法返回null,则走"assets://"开头的分支,则取asset下的bundle。
如果getJSBundleFile方法返回指定的路径,比如"/sdcard/xxx",则会自动添加"file://"。
------------------------------------------------------------------------------------------------------------------------------------
到此为止,所需的url,图片信息都已经准备就绪,接下来我们进入到AssetSourceResolver.js去看一下究竟是怎么加载的。
constructor(serverUrl: ?string,
    jsbundleUrl: ?string,
    embeddedBundleUrl: ?string,
    asset: PackagerAsset
  ) {
    this.serverUrl = serverUrl;
    this.jsbundleUrl = jsbundleUrl;
    this.embeddedBundleUrl = embeddedBundleUrl;
    this.asset = asset;
}首先,我们知道了之前的devServerURL对应serverUrl,scriptURL对应
jsbundleUrl
接下来看一下关键的方法
defaultAsset(): ResolvedAssetSource {
    if (this.isLoadedFromServer()) {
      return this.assetServerURL();
    }

    if (Platform.OS === 'android') {
      return this.isLoadedFromFileSystem() ?
        this.drawableFolderInBundle() :
        this.resourceIdentifierWithoutScale();
    } else {
      return this.scaledAssetURLNearBundle();
    }
  }
我们需要看一下isLoadedFromServer方法做了什么
isLoadedFromServer(): boolean {
    return !!this.serverUrl;
}通过签名的分析,我们知道serverUrl就是devServerURL,它在release模式下为null,在dev模式下为类似如下的字符串

因此dev模式,调用assetServerURL方法
/**
   * Returns an absolute URL which can be used to fetch the asset
   * from the devserver
   */
  assetServerURL(): ResolvedAssetSource {
    invariant(!!this.serverUrl, 'need server to load from');
    return this.fromSource(
      this.serverUrl + getScaledAssetPath(this.asset) +
      '?platform=' + Platform.OS + '&hash=' + this.asset.hash
    );
  }
可以很清楚的看到,他从开发机上加载图片资源。
我们是热更新,因此是release模式,我们继续往下走,我们是android平台。因此查看this.isLoadedFromFileSystem
方法。
isLoadedFromFileSystem(): boolean {
	return !!(this.jsbundleUrl && this.jsbundleUrl.startsWith('file://'));
}通过前面的分析,我们可以知道,如果是release模式,jsbundleUrl就是我们实现的getJSBundleFile方法中返回的bundle文件的路径,并在_coerceLocalScriptURL方法中添加了"file://"。如果没有bundle文件,
我们返回的是null。
然后我们看到,如果我们指定了bundle文件的路径,那么调用drawableFolderInBundle方法。否则调用
resourceIdentifierWithoutScale方法。这里,我们也就能够猜到,drawableFolderInBundle方法从指定的bundle路径加载图片,
resourceIdentifierWithoutScale方法通过asset加载图片。
/**
   * If the jsbundle is running from a sideload location, this resolves assets
   * relative to its location
   * E.g. 'file:///sdcard/AwesomeModule/drawable-mdpi/icon.png'
   */
  drawableFolderInBundle(): ResolvedAssetSource {
    const path = this.jsbundleUrl || 'file://';
    return this.fromSource(
      path + getAssetPathInDrawableFolder(this.asset)
    );
  }
/**
* The default location of assets bundled with the app, located by
* resource identifier
* The Android resource system picks the correct scale.
* E.g. 'assets_awesomemodule_icon'
*/
resourceIdentifierWithoutScale(): ResolvedAssetSource {
invariant(Platform.OS === 'android', 'resource identifiers work on Android');
return this.fromSource(assetPathUtils.getAndroidResourceIdentifier(this.asset));
}最后,还有一个问题,我们需要增量新增图片,而不是只要有bundle,就去指定的bundle路径中取图片。因此我们
需要改造isLoadedFromFileSystem方法
isLoadedFromFileSystem(): boolean {
	var imgFolder = getAssetPathInDrawableFolder(this.asset);
	var imgName = imgFolder.substr(imgFolder.indexOf("/") + 1);
	var isPatchImg = UpdateUtil.getImage().indexOf("|"+imgName+"|") > -1;
	return !!(this.jsbundleUrl && this.jsbundleUrl.startsWith('file://')) && isPatchImg;
  }
其中UpdateUtil为自己写的一个工具类,包含了需要更新的图片名
/**
	author: wulinfeng
	creteDate: 2018-02-26
**/

export default class UpdateUtil{

	 static getImage(){
		return "|js_img_logo.png|";
	 }

};
需要注意的是,增量更新的图片路径的"/"被转换成了"_"。这里的图片其实是js/img/logo.png
具体将"/"转换成"_"的源码,可以继续往下跟踪。最后定位到assetPathUtils.js的getAndroidResourceIdentifier
方法
function getAndroidResourceIdentifier(asset: PackagerAsset) {
  var folderPath = getBasePath(asset);
  return (folderPath + '/' + asset.name)
    .toLowerCase()
    .replace(/\//g, '_')           // Encode folder structure in file name
    .replace(/([^a-z0-9_])/g, '')  // Remove illegal chars
    .replace(/^assets_/, '');      // Remove "assets_" prefix
}另外还有一点值得注意,我们可以看到assetPathUtils.js中还有一个getAndroidResourceFolderName方法,
它则说明了另一个细节,在jsbundleUrl基础上拼接上相应的drawable文件夹,这样就完全获得了增量图片的路径
function getAndroidResourceFolderName(asset: PackagerAsset, scale: number) {
  if (!drawableFileTypes.has(asset.type)) {
    return 'raw';
  }
  var suffix = getAndroidAssetSuffix(scale);
  if (!suffix) {
    throw new Error(
      'Don\'t know which android drawable suffix to use for asset: ' +
      JSON.stringify(asset)
    );
  }
  const androidFolder = 'drawable-' + suffix;
  return androidFolder;
}
-----------------------------------------------------------------------------------------------------------------------------
回到resolveAssetSource.js继续分析,之前那么长的篇幅把a部分讲完了,我们来看下面的。
b、然后一些校验工作。接着将资源封装到一个sources数组,并且重新组合成一个名为nativeProps的对象。
c、最后将nativeProps对象作为属性渲染成RKImage,RKImage是什么呢?我们看一下依赖
var RKImage = requireNativeComponent('RCTImageView', Image, cfg);
var RCTTextInlineImage = requireNativeComponent('RCTTextInlineImage', Image, cfg);

module.exports = Image;我们知道它是RKImage,注意这里的requireNativeComponent和require。通过requireNativeComponent
应该可以对应到最终的java或者Object-c文件。这里就不做跟踪了,简单说一下跟踪下去的一些有意思的东西。
-----------------------------------------------------------------------------------------------------------------------------
这里是继续跟踪requireNativeComponent发现的有意思的内容,与本文的主题无关
createReactNativeComponentClass.js
'use strict';

const {
  __SECRET_INTERNALS_DO_NOT_USE_OR_YOU_WILL_BE_FIRED,
} = require('ReactNative');

module.exports =
  __SECRET_INTERNALS_DO_NOT_USE_OR_YOU_WILL_BE_FIRED.createReactNativeComponentClass;
本地的具体实现隐藏在ReactNative的__SECRET_INTERNALS_DO_NOT_USE_OR_YOU_WILL_BE_FIRED中的
createReactNativeComponentClass中。该成员变量的名称很有意思啊,"内部的秘密,不要使用,否则你将被
炒鱿鱼",这个facebook的程序员真的是蛮幽默的。
ReactNative.js
'use strict';

import type {ReactNativeType} from 'ReactNativeTypes';

let ReactNative;

if (__DEV__) {
  ReactNative = require('ReactNativeRenderer-dev');
} else {
  ReactNative = require('ReactNativeRenderer-prod');
}

module.exports = (ReactNative: ReactNativeType);
给我们一个启示,判断dev或者release,或许可以用__DEV__
InitializeCore.js
if (global.GLOBAL === undefined) {
  global.GLOBAL = global;
}

if (global.window === undefined) {
  global.window = global;
}
global的秘密在这里
另外很重要的两个文件,应该是js转换成原生的最关键的部分,但是没有读懂,它们是invariant.js和UIManager.js
---------------------------------------------------------------------------------------------------------------------------
我们来看一下怎么定位到原生的代码,我们知道image的实际控件是RCTImageView,我们直接搜索该关键字,就能搜索到
相关的原生代码文件。
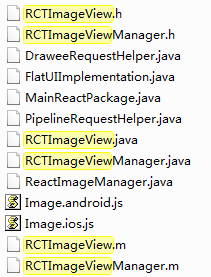
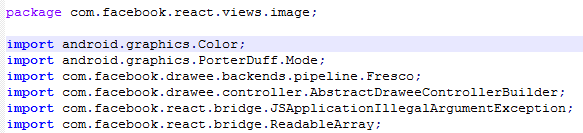
我们看到android对应的就是RCTImageView.java。ios对应的就是RCTImageView.h和RCTImageView.m
我们稍微看一下RCTImageView,从名称上我们可以猜测到,实际上image就是一个自定义的view。那么很可能所有
的控件在原生的实现中,就是一个自定义的view
再继续跟下去,我们会发现图片的加载用的是Fresco
因此在realse版本中,如果图片在mipmap下,我们可能需要这样来写
<Image source={{uri:'mipmap/'+fileName}}/>--------------------------------------------------------------------------------------------------------------------------
到此为止,源码已经分析完毕。由于上面提到的release下面加载mipmap下的图片的特殊性,我们可以封装一个类来做处理
import React, { Component } from 'react'
import UpdateUtil from './UpdateUtil'

/**
	author: wulinfeng
	creteDate: 2018-01-12
**/
export default class Profiles {
	static getImg({resourceId,fileName,platform}){
		if(Profiles.active==Profiles.dev){
			console.log("dev");
			if(!resourceId){
				console.log('file is null');
				throw exception;
			}
			return resourceId;
		}
		else if(Profiles.active==Profiles.production){
			console.log("production");
			if(!fileName){
				console.log('fileName is null');
				throw exception;
			}

			var isPatchImg = UpdateUtil.getImage().indexOf("|js_img_"+fileName+".png|") > -1;

			if(platform==="android"){
				if(isPatchImg) {
					return resourceId;
				}
				else {
					return {uri:'mipmap/'+fileName};
				}
			}
			return {uri:fileName};
		}
	}

	static active(profile){
		Profiles.active=profile;
	}
}

Profiles.dev="dev";
Profiles.production="production";
Profiles.active=Profiles.production;
这里估计可以改造成通过__DEV__来判断dev或者release模式,还没有确认。
使用方法为
<Image style={{width: 100,height:80}} source={Profiles.getImg({resourceId:require('./js/img/logo.png'),fileName:'logo',platform:Platform.OS})} />------------------------------------------------------------------------------------------------------------------------------
到此为止,本篇文章所有的内容就结束了。最后总结一下:
1、脚本通过bundle文件来热更新
a、需要在启动app的时候判断是否需要下载bundle,bundle最好打包为zip
b、下载的位置需要自己指定。方式为覆写getReactNativeHost方法,在实现的ReactNativeHost抽象类的
getJSBundleFile方法中判断加载路径,如果要从asset中加载,则返回null。否则返回加载路径中的bundle。
c、 getJSBundleFile与js的结合点在resolveAssetSource.js,其中getScriptURL方法返回的就是getJSBundleFile中
返回文件所在的路径,并且加上了"file://"
2、图片的热更新
a、Image的source属性不能是对象
b、增量更新需要修改源码,并且通过自己写的工具类指明需要更新的图片名
c、新增的图片名需要把路径中的"/"变为"_"