1、掌握RPC原理
2、掌握nio操作
3、掌握netty简单的api
4、掌握自定义RPC框架
1. RPC原理学习
1.1. 什么是RPC
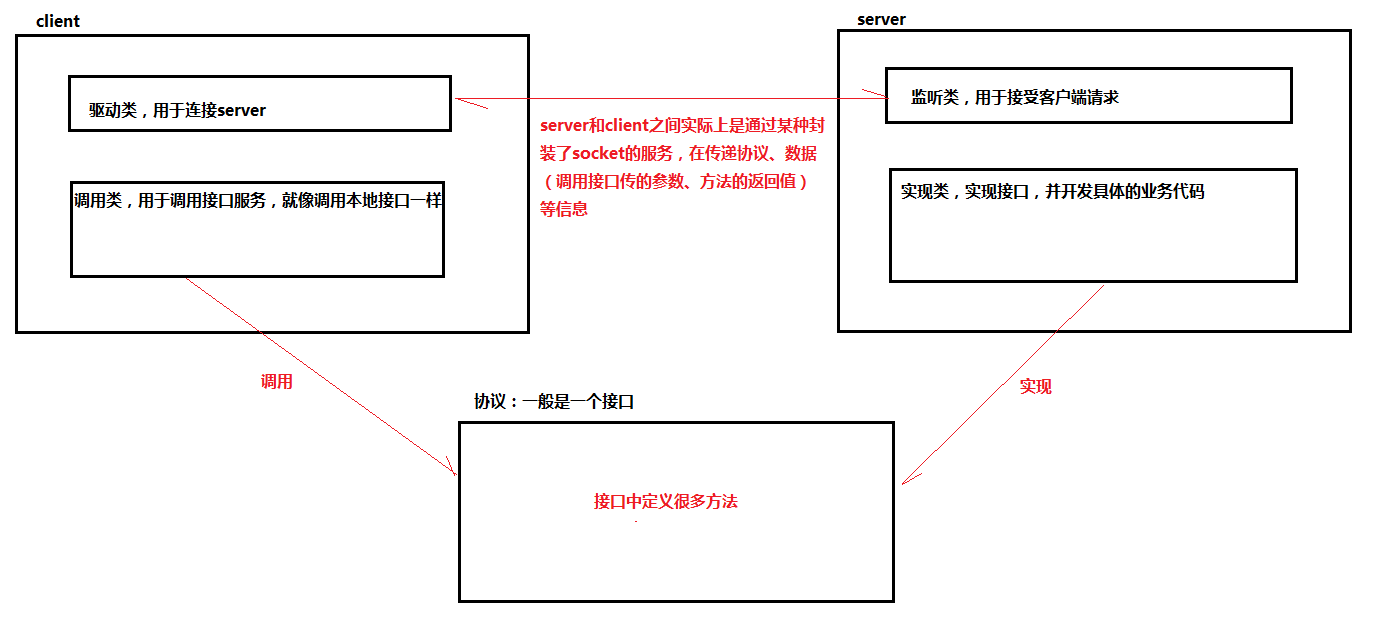
RPC(Remote Procedure Call Protocol)——远程过程调用协议,它是一种通过网络从远程计算机程序上请求服务,而不需要了解底层网络技术的协议。RPC协议假定某些传输协议的存在,如TCP或UDP,为通信程序之间携带信息数据。在OSI网络通信模型中,RPC跨越了传输层和应用层。RPC使得开发包括网络分布式多程序在内的应用程序更加容易。
RPC采用客户机/服务器模式。请求程序就是一个客户机,而服务提供程序就是一个服务器。首先,客户机调用进程发送一个有进程参数的调用信息到服务进程,然后等待应答信息。在服务器端,进程保持睡眠状态直到调用信息到达为止。当一个调用信息到达,服务器获得进程参数,计算结果,发送答复信息,然后等待下一个调用信息,最后,客户端调用进程接收答复信息,获得进程结果,然后调用执行继续进行。
1.2. RPC原理
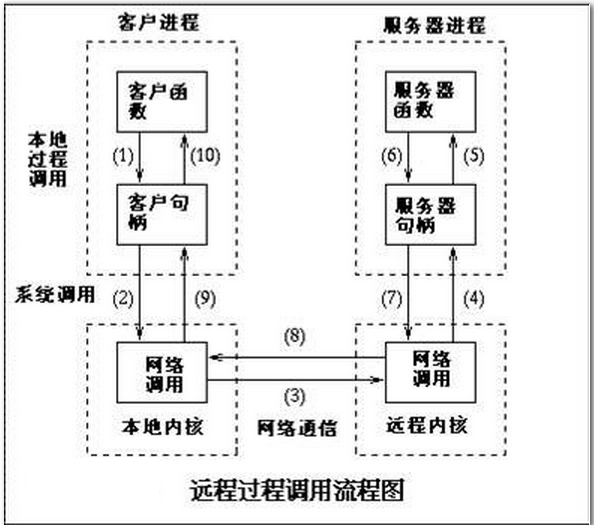
运行时,一次客户机对服务器的RPC调用,其内部操作大致有如下十步:
1.调用客户端句柄;执行传送参数
2.调用本地系统内核发送网络消息
3.消息传送到远程主机
4.服务器句柄得到消息并取得参数
5.执行远程过程
6.执行的过程将结果返回服务器句柄
7.服务器句柄返回结果,调用远程系统内核
8.消息传回本地主机
9.客户句柄由内核接收消息
10.客户接收句柄返回的数据
1.3. hadoopRPC演示
见代码
2. nio原理学习(nio的优势不在于数据传送的速度)
2.1. 简介
nio 是New IO 的简称,在jdk1.4 里提供的新api 。Sun 官方标榜的特性如下: 为所有的原始类型提供(Buffer)缓存支持。字符集编码解码解决方案。 Channel :一个新的原始I/O 抽象。 支持锁和内存映射文件的文件访问接口。 提供多路(non-bloking) 非阻塞式的高伸缩性网络I/O 。
2.2. 传统socket和socket nio代码
见代码
2.3. socket nio原理
2.3.1. 传统的I/O
使用传统的I/O程序读取文件内容, 并写入到另一个文件(或Socket), 如下程序:
File.read(fileDesc, buf, len);
Socket.send(socket, buf, len);
会有较大的性能开销, 主要表现在一下两方面:
1. 上下文切换(context switch), 此处有4次用户态和内核态的切换
2. Buffer内存开销, 一个是应用程序buffer, 另一个是系统读取buffer以及socket buffer
其运行示意图如下
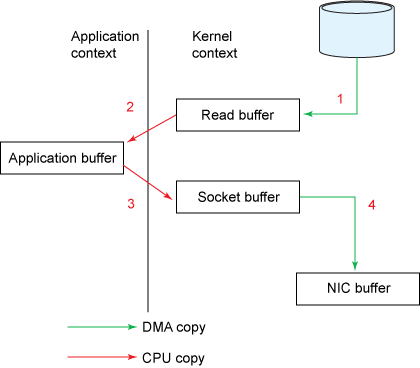
1) 先将文件内容从磁盘中拷贝到操作系统buffer
2) 再从操作系统buffer拷贝到程序应用buffer
3) 从程序buffer拷贝到socket buffer
4) 从socket buffer拷贝到协议引擎.
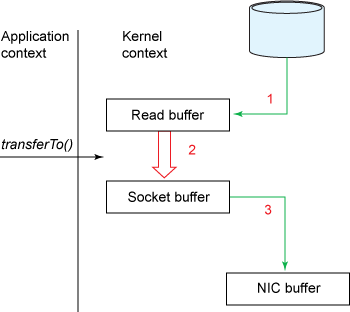
2.3.2. NIO
NIO技术省去了将操作系统的read buffer拷贝到程序的buffer, 以及从程序buffer拷贝到socket buffer的步骤, 直接将 read buffer 拷贝到 socket buffer. java 的 FileChannel.transferTo() 方法就是这样的实现, 这个实现是依赖于操作系统底层的sendFile()实现的.
publicvoid transferTo(long position, long count, WritableByteChannel target);
他的底层调用的是系统调用sendFile()方法
sendfile(int out_fd, int in_fd, off_t *offset, size_t count);
如下图
3. netty常用API学习
3.1. netty简介
Netty是基于Java NIO的网络应用框架.
Netty是一个NIO client-server(客户端服务器)框架,使用Netty可以快速开发网络应用,例如服务器和客户端协议。Netty提供了一种新的方式来使开发网络应用程序,这种新的方式使得它很容易使用和有很强的扩展性。Netty的内部实现时很复杂的,但是Netty提供了简单易用的api从网络处理代码中解耦业务逻辑。Netty是完全基于NIO实现的,所以整个Netty都是异步的。
网络应用程序通常需要有较高的可扩展性,无论是Netty还是其他的基于Java NIO的框架,都会提供可扩展性的解决方案。Netty中一个关键组成部分是它的异步特性.
3.2. netty的helloworld
3.2.1. 下载netty包
• 下载netty包,下载地址http://netty.io/
3.2.2. 服务端启动类
package com.netty.demo.server;


import io.netty.bootstrap.ServerBootstrap;

import io.netty.channel.Channel;

import io.netty.channel.ChannelFuture;

import io.netty.channel.ChannelInitializer;

import io.netty.channel.EventLoopGroup;

import io.netty.channel.nio.NioEventLoopGroup;

import io.netty.channel.socket.nio.NioServerSocketChannel;


/**

 * • 配置服务器功能,如线程、端口 • 实现服务器处理程序,它包含业务逻辑,决定当有一个请求连接或接收数据时该做什么

 *

 * @author ll

 *

 */

public class EchoServer {


private final int port;


public EchoServer(int port) {

this.port = port;

}


public void start() throws Exception {

EventLoopGroup eventLoopGroup = null;

try {

//创建ServerBootstrap实例来引导绑定和启动服务器

ServerBootstrap serverBootstrap = new ServerBootstrap();

//创建NioEventLoopGroup对象来处理事件,如接受新连接、接收数据、写数据等等

eventLoopGroup = new NioEventLoopGroup();

//指定通道类型为NioServerSocketChannel,设置InetSocketAddress让服务器监听某个端口已等待客户端连接。

serverBootstrap.group(eventLoopGroup).channel(NioServerSocketChannel.class).localAddress("localhost",port).childHandler(new ChannelInitializer<Channel>() {

//设置childHandler执行所有的连接请求

@Override

protected void initChannel(Channel ch) throws Exception {

ch.pipeline().addLast(new EchoServerHandler());

}

});

// 最后绑定服务器等待直到绑定完成,调用sync()方法会阻塞直到服务器完成绑定,然后服务器等待通道关闭,因为使用sync(),所以关闭操作也会被阻塞。

ChannelFuture channelFuture = serverBootstrap.bind().sync();

System.out.println("开始监听,端口为:" + channelFuture.channel().localAddress());

channelFuture.channel().closeFuture().sync();

} finally {

eventLoopGroup.shutdownGracefully().sync();

}

}


public static void main(String[] args) throws Exception {

new EchoServer(20000).start();

}

}
3.2.3. 服务端回调方法
package com.netty.demo.server;


import io.netty.buffer.ByteBuf;

import io.netty.buffer.Unpooled;

import io.netty.channel.ChannelFutureListener;

import io.netty.channel.ChannelHandlerContext;

import io.netty.channel.ChannelInboundHandlerAdapter;


import java.util.Date;


public class EchoServerHandler extends ChannelInboundHandlerAdapter {


@Override

public void channelRead(ChannelHandlerContext ctx, Object msg)

throws Exception {

System.out.println("server 读取数据……");

//读取数据

        ByteBuf buf = (ByteBuf) msg;

        byte[] req = new byte[buf.readableBytes()];

        buf.readBytes(req);

        String body = new String(req, "UTF-8");

        System.out.println("接收客户端数据:" + body);

        //向客户端写数据

        System.out.println("server向client发送数据");

        String currentTime = new Date(System.currentTimeMillis()).toString();

        ByteBuf resp = Unpooled.copiedBuffer(currentTime.getBytes());

        ctx.write(resp);

}


@Override

public void channelReadComplete(ChannelHandlerContext ctx) throws Exception {

System.out.println("server 读取数据完毕..");

        ctx.flush();//刷新后才将数据发出到SocketChannel

}


@Override

public void exceptionCaught(ChannelHandlerContext ctx, Throwable cause)

throws Exception {

cause.printStackTrace();

ctx.close();

}


}
3.2.4. 客户端启动类
package com.netty.demo.client;


import io.netty.bootstrap.Bootstrap;

import io.netty.channel.ChannelFuture;

import io.netty.channel.ChannelInitializer;

import io.netty.channel.EventLoopGroup;

import io.netty.channel.nio.NioEventLoopGroup;

import io.netty.channel.socket.SocketChannel;

import io.netty.channel.socket.nio.NioSocketChannel;


import java.net.InetSocketAddress;


/**

 * • 连接服务器 • 写数据到服务器 • 等待接受服务器返回相同的数据 • 关闭连接

 *

 * @author ll

 *

 */

public class EchoClient {


private final String host;

private final int port;


public EchoClient(String host, int port) {

this.host = host;

this.port = port;

}


public void start() throws Exception {

EventLoopGroup nioEventLoopGroup = null;

try {

//创建Bootstrap对象用来引导启动客户端

Bootstrap bootstrap = new Bootstrap();

//创建EventLoopGroup对象并设置到Bootstrap中,EventLoopGroup可以理解为是一个线程池,这个线程池用来处理连接、接受数据、发送数据

nioEventLoopGroup = new NioEventLoopGroup();

//创建InetSocketAddress并设置到Bootstrap中,InetSocketAddress是指定连接的服务器地址

bootstrap.group(nioEventLoopGroup).channel(NioSocketChannel.class).remoteAddress(new InetSocketAddress(host, port))

.handler(new ChannelInitializer<SocketChannel>() {

//添加一个ChannelHandler,客户端成功连接服务器后就会被执行

@Override

protected void initChannel(SocketChannel ch)

throws Exception {

ch.pipeline().addLast(new EchoClientHandler());

}

});

// • 调用Bootstrap.connect()来连接服务器

ChannelFuture f = bootstrap.connect().sync();

// • 最后关闭EventLoopGroup来释放资源

f.channel().closeFuture().sync();

} finally {

nioEventLoopGroup.shutdownGracefully().sync();

}

}


public static void main(String[] args) throws Exception {

new EchoClient("localhost", 20000).start();

}

}
3.2.5. 客户端回调方法
package com.netty.demo.client;


import io.netty.buffer.ByteBuf;

import io.netty.buffer.ByteBufUtil;

import io.netty.buffer.Unpooled;

import io.netty.channel.ChannelHandlerContext;

import io.netty.channel.SimpleChannelInboundHandler;


public class EchoClientHandler extends SimpleChannelInboundHandler<ByteBuf> {

      //客户端连接服务器后被调用

    @Override

    public void channelActive(ChannelHandlerContext ctx) throws Exception {

    	System.out.println("客户端连接服务器,开始发送数据……");

    	byte[] req = "QUERY TIME ORDER".getBytes();

    	ByteBuf  firstMessage = Unpooled.buffer(req.length);

        firstMessage.writeBytes(req);

        ctx.writeAndFlush(firstMessage);

    }

  //•	从服务器接收到数据后调用

    @Override

    protected void channelRead0(ChannelHandlerContext ctx, ByteBuf msg) throws Exception {

    	 System.out.println("client 读取server数据..");

         //服务端返回消息后

         ByteBuf buf = (ByteBuf) msg;

         byte[] req = new byte[buf.readableBytes()];

         buf.readBytes(req);

         String body = new String(req, "UTF-8");

         System.out.println("服务端数据为 :" + body);

}

  //•	发生异常时被调用

    @Override

    public void exceptionCaught(ChannelHandlerContext ctx, Throwable cause) throws Exception {

    	 System.out.println("client exceptionCaught..");

         // 释放资源

         ctx.close();

    }

}
3.3. netty中handler的执行顺序
3.3.1. 简介
Handler在netty中,无疑占据着非常重要的地位。Handler与Servlet中的filter很像,通过Handler可以完成通讯报文的解码编码、拦截指定的报文、统一对日志错误进行处理、统一对请求进行计数、控制Handler执行与否。一句话,没有它做不到的只有你想不到的。
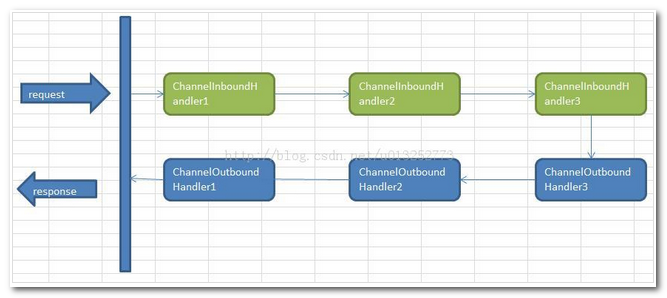
Netty中的所有handler都实现自ChannelHandler接口。按照输出输出来分,分为ChannelInboundHandler、ChannelOutboundHandler两大类。ChannelInboundHandler对从客户端发往服务器的报文进行处理,一般用来执行解码、读取客户端数据、进行业务处理等;ChannelOutboundHandler对从服务器发往客户端的报文进行处理,一般用来进行编码、发送报文到客户端。
Netty中,可以注册多个handler。ChannelInboundHandler按照注册的先后顺序执行;ChannelOutboundHandler按照注册的先后顺序逆序执行,如下图所示,按照注册的先后顺序对Handler进行排序,request进入Netty后的执行顺序为:
3.3.2. 总结
在使用Handler的过程中,需要注意:
1、ChannelInboundHandler之间的传递,通过调用 ctx.fireChannelRead(msg) 实现;调用ctx.write(msg) 将传递到ChannelOutboundHandler。
2、ctx.write()方法执行后,需要调用flush()方法才能令它立即执行。
3、流水线pipeline中outhandler不能放在最后,否则不生效
4、Handler的消费处理放在最后一个处理。
3.4. netty发送对象
3.4.1. 简介
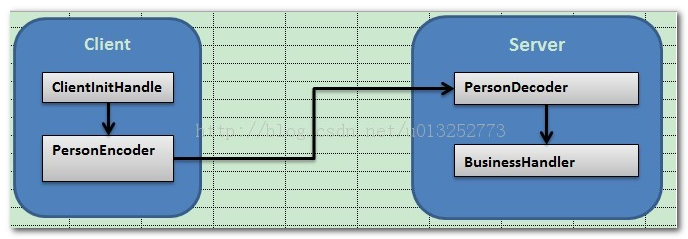
Netty中,通讯的双方建立连接后,会把数据按照ByteBuf的方式进行传输,例如http协议中,就是通过HttpRequestDecoder对ByteBuf数据流进行处理,转换成http的对象。基于这个思路,我自定义一种通讯协议:Server和客户端直接传输java对象。
实现的原理是通过Encoder把java对象转换成ByteBuf流进行传输,通过Decoder把ByteBuf转换成java对象进行处理,处理逻辑如下图所示:
3.4.2. 代码
见代码
4. Spring(IOC/AOP)注解学习
4.1. spring的初始化顺序
在spring的配置文件中配置bean,如下
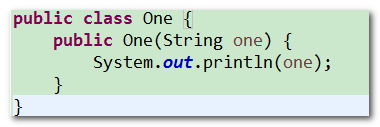
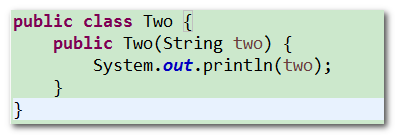
<bean class="com.spring3.hello.BeanFactory.One">
	<constructor-arg name="one" value ="one">
</bean>

<bean class="com.spring3.hello.BeanFactory.Two">
	<constructor-arg name="two" value ="two">
</bean>
在One类和Two类中,分别实现一个参数的构造如下
加载spring配置文件,初始化bean如下

那么。结果如何呢?

结论:spring会按照bean的顺序依次初始化xml中配置的所有bean
4.1.1. 通过ApplicationContextAware加载Spring上下文环境
在One中实现ApplicationContextAware接口会出现如何的变换呢?
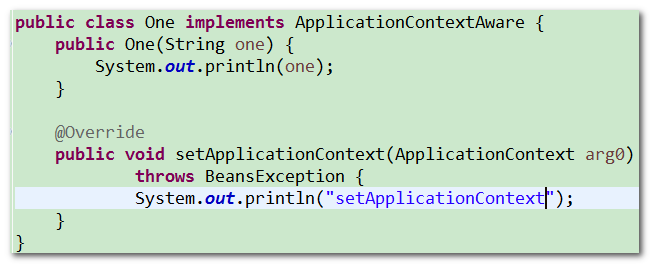
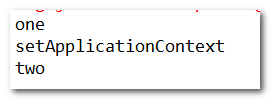
结果
4.1.2. InitializingBean的作用
在One中实现InitializingBean接口呢?

结果:

4.1.3. 如果使用注解@Component
使用@Component注入类,那么它的顺序是如何呢?
4.1.4. 结论
1、 spring先检查注解注入的bean,并将它们实例化
2、 然后spring初始化bean的顺序是按照xml中配置的顺序依次执行构造
3、 如果某个类实现了ApplicationContextAware接口,会在类初始化完成后调用setApplicationContext()方法进行操作
4、 如果某个类实现了InitializingBean接口,会在类初始化完成后,并在setApplicationContext()方法执行完毕后,调用afterPropertiesSet()方法进行操作
4.2. 注解使用回顾
1、在spring中,用注解来向Spring容器注册Bean。需要在applicationContext.xml中注册<context:component-scan base-package=”pagkage1[,pagkage2,…,pagkageN]”/>。
2、如果某个类的头上带有特定的注解@Component/@Repository/@Service/@Controller,就会将这个对象作为Bean注册进Spring容器
3、在使用spring管理的bean时,无需在对调用的对象进行new的过程,只需使用@Autowired将需要的bean注入本类即可
4.3. 自定义注解
4.3.1. 解释
1、自定义注解的作用:在反射中获取注解,以取得注解修饰的“类、方法、属性”的相关解释。
2、java内置注解
@Target 表示该注解用于什么地方,可能的 ElemenetType 参数包括:
ElemenetType.CONSTRUCTOR 构造器声明
ElemenetType.FIELD 域声明(包括 enum 实例)
ElemenetType.LOCAL_VARIABLE 局部变量声明
ElemenetType.METHOD 方法声明
ElemenetType.PACKAGE 包声明
ElemenetType.PARAMETER 参数声明
ElemenetType.TYPE 类,接口(包括注解类型)或enum声明
@Retention 表示在什么级别保存该注解信息。可选的 RetentionPolicy 参数包括:
RetentionPolicy.SOURCE 注解将被编译器丢弃
RetentionPolicy.CLASS 注解在class文件中可用,但会被VM丢弃
RetentionPolicy.RUNTIME JVM将在运行期也保留注释,因此可以通过反射机制读取注解的信息。
4.3.2. 实现
定义自定义注解
@Target({ ElementType.TYPE })//注解用在接口上

@Retention(RetentionPolicy.RUNTIME)//VM将在运行期也保留注释,因此可以通过反射机制读取注解的信息

@Component

public @interface RpcService {

String value();

}2、将直接类加到需要使用的类上,我们可以通过获取注解,来得到这个类
@RpcService("HelloService")

public class HelloServiceImpl implements HelloService {

    public String hello(String name) {

        return "Hello! " + name;

    }

}3、类实现的接口
public interface HelloService {

    String hello(String name);

}4、通过ApplicationContext获取所有标记这个注解的类
@Component

public class MyServer implements ApplicationContextAware {

@SuppressWarnings("resource")

public static void main(String[] args) {

       new ClassPathXmlApplicationContext("spring2.xml");

    }

public void setApplicationContext(ApplicationContext ctx)

throws BeansException {

Map<String, Object> serviceBeanMap = ctx

.getBeansWithAnnotation(RpcService.class);

for (Object serviceBean : serviceBeanMap.values()) {

try {

Method method = serviceBean.getClass().getMethod("hello", new Class[]{String.class});

Object invoke = method.invoke(serviceBean, "bbb");

System.out.println(invoke);

} catch (Exception e) {

e.printStackTrace();

}

}

}

}5、结合spring实现junit测试
@RunWith(SpringJUnit4ClassRunner.class)

@ContextConfiguration(locations = "classpath:spring2.xml")

public class MyServer implements ApplicationContextAware {

@Test

public void helloTest1() {


}


public void setApplicationContext(ApplicationContext ctx)

throws BeansException {

Map<String, Object> serviceBeanMap = ctx

.getBeansWithAnnotation(RpcService.class);

for (Object serviceBean : serviceBeanMap.values()) {

try {

Method method = serviceBean.getClass().getMethod("hello",

new Class[] { String.class });

Object invoke = method.invoke(serviceBean, "bbb");

System.out.println(invoke);

} catch (Exception e) {

e.printStackTrace();

}

}

}


}
5. 轻量级RPC框架开发
5.1. 轻量级RPC框架需求分析及原理分析
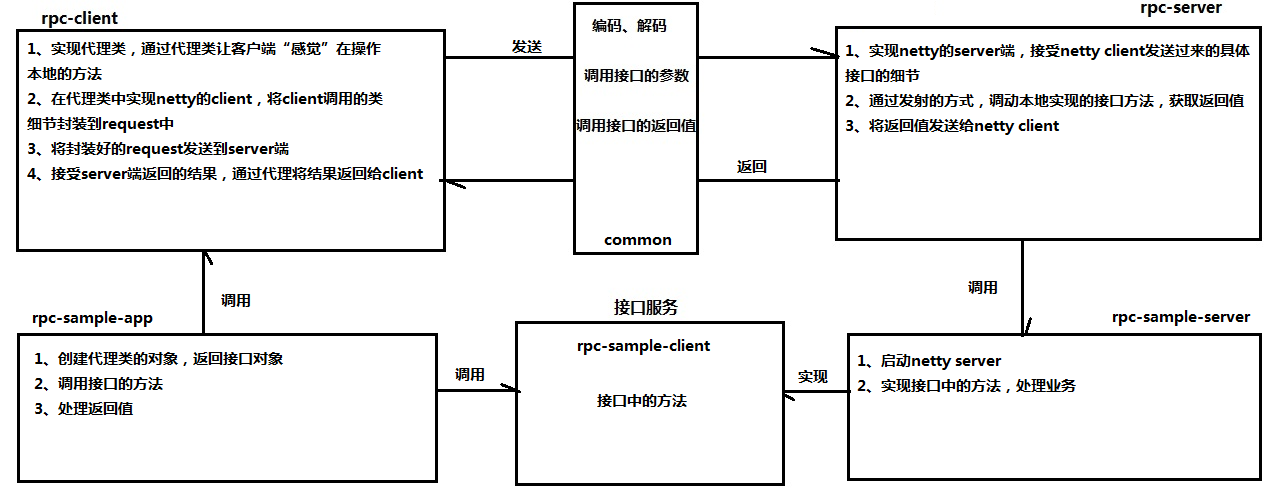
5.1.1. netty实现的RPC的缺点
在我们平常使用的RPC中,例如webservice,使用的习惯类似于下图
但是netty的实现过于底层,我们不能够像以前一样只关心方法的调用,而是要关心数据的传输,对于不熟悉netty的开发者,需要了解很多netty的概念和逻辑,才能实现RPC的调用。
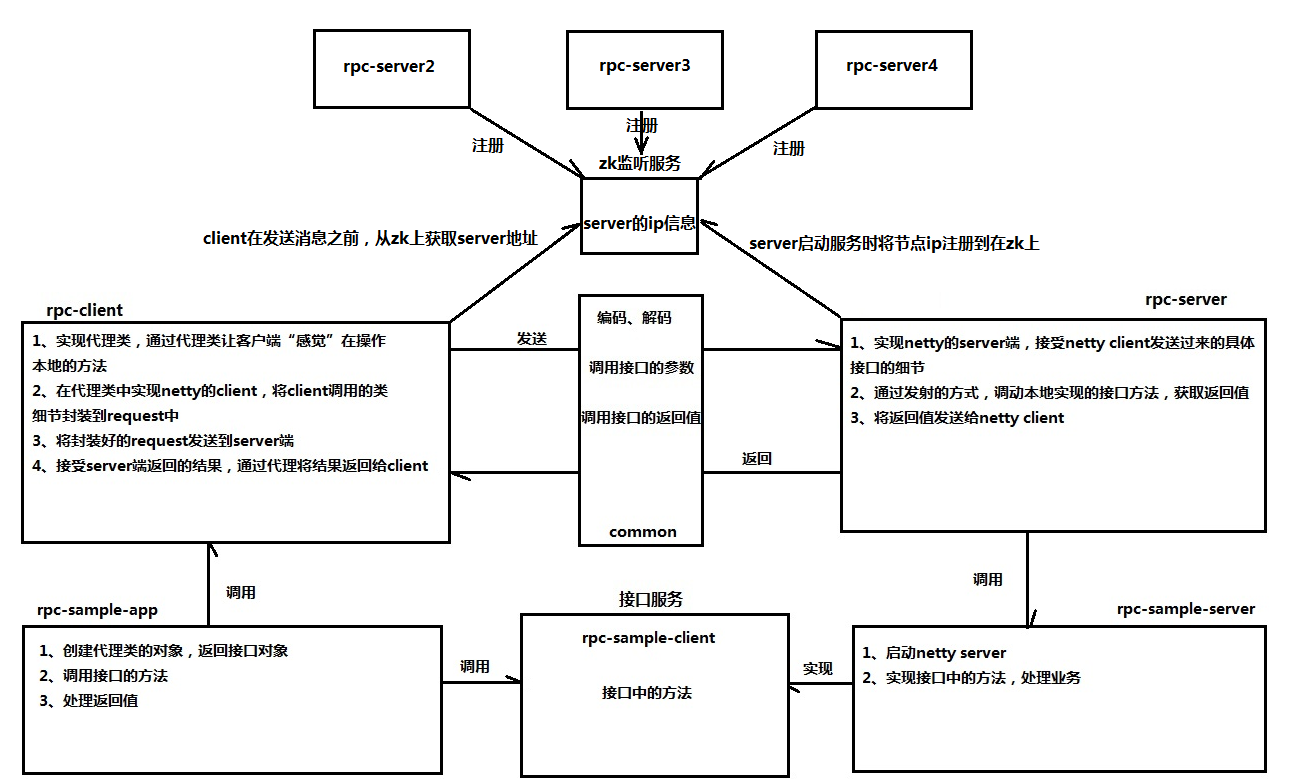
应上面的需求,我们需要基于netty实现一个我们熟悉的RPC框架。逻辑如下:
5.2. 轻量级RPC框架开发
见代码
5.3. zookeeper API简单使用及框架介绍
5.3.1. zk简介和单机版搭建
https://blog.csdn.net/simonchi/article/details/43019401
5.3.2. zk简单api使用
https://blog.csdn.net/liyonghui_2013li/article/details/51557214
5.3.3. zk在框架中的实现
在上面的框架中,server端存在着一个问题,就是单点问题,也就是说,当服务端“挂了”之后,框架的使用就造成了单点屏障。
我们可以通过zookeeper来实现服务端的负载均衡