前言:
项目需要获取屏幕宽度和高度.上网搜了下获取宽高的方法,有多种方式(有的经过验证压根就不对).因此抽空总结一下,无外乎下列3种.下面这三种全都经过本人验证,都是可以的.请放心大胆使用.
Android 获取屏幕宽高的3种方式:
 private void getScreenSize() {
        //1、通过WindowManager获取
        WindowManager manager = this.getWindowManager();
        DisplayMetrics outMetrics = new DisplayMetrics();
        manager.getDefaultDisplay().getMetrics(outMetrics);
        int width = outMetrics.widthPixels;
        int height = outMetrics.heightPixels;
        Log.i(TAG, "Method 1: height::" + height + "  width::" + width);

        //2、通过Resources获取
        DisplayMetrics dm1 = getResources().getDisplayMetrics();
        int height1 = dm1.heightPixels;
        int width1 = dm1.widthPixels;
        Log.i(TAG, "Method 2: height::" + height1 + "  width::" + width1);

        //3、获取屏幕的默认分辨率
        Display display = getWindowManager().getDefaultDisplay();
        int height2 = display.getWidth();
        int width2 = display.getHeight();
        Log.i(TAG, "Method 3: height::" + height2 + "  width::" + width2);//Method 3: height::1080  width::1920
    }
获取控件宽高:
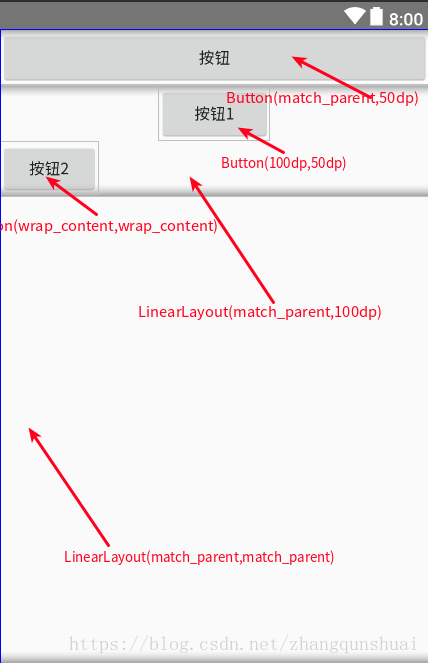
为了更好的演示不同宽高属性的控件的效果,先将布局文件贴出来:
<?xml version="1.0" encoding="utf-8"?>
<LinearLayout xmlns:android="http://schemas.android.com/apk/res/android"
    xmlns:tools="http://schemas.android.com/tools"
    android:layout_width="match_parent"
    android:layout_height="match_parent"
    android:orientation="vertical"
    tools:context=".MainActivity">

    <Button
        android:id="@+id/btn"
        android:layout_width="match_parent"
        android:layout_height="50dp"
        android:text="按钮" />


    <LinearLayout
        android:id="@+id/ll"
        android:layout_width="match_parent"
        android:layout_height="100dp"
        android:orientation="vertical">

        <Button
            android:id="@+id/btn1"
            android:layout_width="100dp"
            android:layout_height="50dp"
            android:layout_gravity="center_horizontal"
            android:text="按钮1" />

        <Button
            android:id="@+id/btn2"
            android:layout_width="wrap_content"
            android:layout_height="wrap_content"
            android:text="按钮2" />

    </LinearLayout>

</LinearLayout>
就知道你懒得看,上图吧.
好了,上主要代码.
@Override
    public void onWindowFocusChanged(boolean hasFocus) {
        super.onWindowFocusChanged(hasFocus);
        Log.i(TAG, "onWindowFocusChanged: hasFocus::" + hasFocus + "  btn::" + btn);
        if (btn != null) {
            int width = btn.getWidth();
            int height = btn.getHeight();
            Log.d(TAG, "onWindowFocusChanged: 按钮(match,50) width = " + width + "   height = " + height);//width = 1080   height = 150


            int left = btn.getLeft();
            int top = btn.getTop();
            int right = btn.getRight();
            int bottom = btn.getBottom();
            //left::0 top::0 right::1080 bottom::150
            Log.i(TAG, "onWindowFocusChanged: left::" + left + " top::" + top + " right::" + right + " bottom::" + bottom);


            int measuredWidth = btn.getMeasuredWidth();
            int btnMeasuredHeight = btn.getMeasuredHeight();
            Log.d(TAG, "onWindowFocusChanged: 按钮(match,50) measuredWidth = " + measuredWidth + "   btnMeasuredHeight = " + btnMeasuredHeight);
            //measuredWidth = 1080   btnMeasuredHeight = 150
        }

        if (btn1 != null) {
            int width1 = btn1.getWidth();
            int height1 = btn1.getHeight();
            Log.d(TAG, "onWindowFocusChanged: 按钮(100,50) width = " + width1 + "   height = " + height1);//width = 300   height = 150

            int left = btn1.getLeft();
            int top = btn1.getTop();
            int right = btn1.getRight();
            int bottom = btn1.getBottom();
            //left::390 top::0 right::690 bottom::150
            Log.i(TAG, "onWindowFocusChanged: left::" + left + " top::" + top + " right::" + right + " bottom::" + bottom);
        }

        if (btn2 != null) {
            int width2 = btn2.getWidth();
            int height2 = btn2.getHeight();
            Log.d(TAG, "onWindowFocusChanged: 按钮 width(wrap,wrap) width= " + width2 + "   height = " + height2);//width = 264   height = 144
        }

        if (ll != null) {
            int width3 = ll.getWidth();
            int height3 = ll.getHeight();
            Log.d(TAG, "onWindowFocusChanged: 线性(match,100) width = " + width3 + "   height = " + height3);//width = 1080   height = 300
        }

}上述代码,添加了getWidth()/ getHeight()/ getLeft()/ getTop()/ getRight()/ getBottom()方法主要就是想让大家再温习下这几个方法的使用.本来想以log 的形式展示出来,但是知道你懒.我直接在代码中将打印结果标出来了.看看就行了.
只不过有一下几点需要强调下.
Step 1:
上述 getLeft()/ getTop()/ getRight()/ getBottom()方法是相对于其所在父布局,注意是相对于父布局,不是相对于同级控件.
对于上述方法的含义,来上一个经典图:
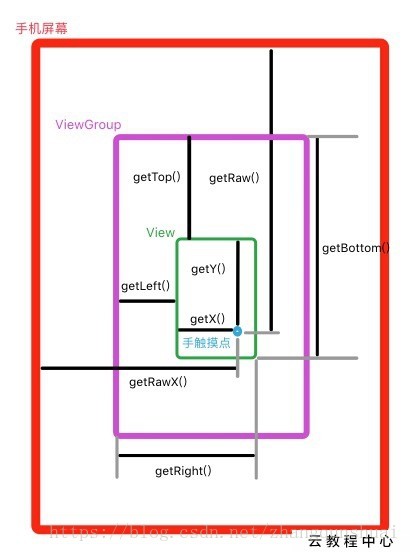
标注含义:
View提供的获取的坐标以及距离的方法:
getTop() : 获取到的是view自身的顶边到其父布局顶边的距离
getLeft() : 获取到的是view自身的左边到其父布局左边的距离
getRight() : 获取到的是view自身的右边到其父布局左边的距离
getBottom() : 获取到的是view自身底边到其父布局顶边的距离MotionEvent提供的方法:
getX() : 获取点击事件距离控件左边的距离,即视图坐标
getY() : 获取点击事件距离控件顶边的距离,即视图坐标
getRawX() : 获取到的是点击事件距离整个屏幕左边的距离,即绝对坐标
getRawY() : 获取到的是点击事件距离整个屏幕顶边的距离,即绝对坐标
Step 2:
为什么要将获取逻辑放在onWindowFocusChanged()中去???
 @Override
    public void onWindowFocusChanged(boolean hasFocus) {
        super.onWindowFocusChanged(hasFocus);
            .....
        }
}答:如果onCreate的时候直接用view.getWidth()或view.getHeight()会得到0.这是因为在onCreate执行的时候,控件还没有被绘制出来.之所以放在onWindowFocusChanged()中是因为在这个时候,view已经初始化完毕了,宽/高已经准备好了,这个时候去获取宽高是可以成功获取的。但是需要注意的是onWindowFocusChanged函数会被调用多次,当Activity的窗口得到焦点和失去焦点时均会被调用一次,如果频繁地进行onResume和onPause,那么onWindowFocusChanged也会被频繁地调用。
关于获取view宽高为0的多种解决方法可参照android onCreate中获取view宽高为0的多种解决方法.
Step 3:
在布局中设置的宽高单位是dp,但是日志中打印出来的宽高单位是px,上述log是以1080p的小米手机为例的.
友情推荐:关于getMeasuredWidth和getWidth区别建议大家移步Android开发之getMeasuredWidth和getWidth区别从源码分析,里面有对下列错误说法的更正.

好的,至此完结.如有问题请留言,让我们共同学习!