本文链接: Android面经-基础篇(持续更新…) - CSDN博客 ,在此说明本人可能用到很多博客的链接以及话语引用没有说明,请相关的博主莫怪,本人也没有想过靠这些来进行吸引来达到盈利的目的,纯碎是为了保存好这些自己觉得写得很好的博文
自定义View
- Android LayoutInflater原理分析,带你一步步深入了解View(一) - 郭霖的专栏 - CSDN博客 -三篇
- Android View 事件分发机制 源码解析 (上) - Hongyang - CSDN博客 -几篇
- Android绘图机制(一)——自定义View的基础属性和方法 - 刘桂林的博客 - CSDN博客-三篇
- Android学习Scroller(五)——详解Scroller调用过程以及View的重绘 - CSDN博客
- scrollTo与scrollBy用法以及TouchSlop与VelocityTracker解析 - zejian的博客 - CSDN博客 -两篇
- 自定义控件三部曲之动画篇(四)——ValueAnimator基本使用 - 启舰 - CSDN博客 -他写的东西都很广很全容易理解
- 你真的会用OnTouchListener、OnClickListener、OnLongClickListener监听事件么? - thuai - 博客园
探讨:加载布局inflate(int resource, ViewGroup root, boolean attachToRoot)
- 如果root为null,attachToRoot将失去作用,设置任何值都没有意义。
- 如果root不为null,attachToRoot设为true,则会给加载的布局文件的指定一个父布局,即root。
- 如果root不为null,attachToRoot设为false,则会将布局文件最外层的所有layout属性进行设置,当该view被添加到父view当中时,这些layout属性会自动生效。
- 在不设置attachToRoot参数的情况下,如果root不为null,attachToRoot参数默认为true。
郭霖先生的博客讲解到:Android LayoutInflater原理分析,带你一步步深入了解View(一) - 郭霖的专栏 - CSDN博客
验证代码:
1.activity_main.xml:
<?xml version="1.0" encoding="utf-8"?>
<LinearLayout
    xmlns:android="http://schemas.android.com/apk/res/android"
    xmlns:tools="http://schemas.android.com/tools"
    android:id="@+id/main_layout"
    android:layout_width="match_parent"
    android:layout_height="match_parent"
    android:orientation="vertical">

    <LinearLayout
        android:id="@+id/lyo_content"
        android:layout_width="200dp"
        android:layout_height="200dp"
        android:background="#ff0"
        android:orientation="vertical"/>

</LinearLayout>
2.button_layout.xml:
<?xml version="1.0" encoding="utf-8"?>
<Button
    xmlns:android="http://schemas.android.com/apk/res/android"
    android:layout_width="300dp"
    android:layout_height="80dp"
    android:text="Button">

</Button>
3.button_layout1.xml:
<?xml version="1.0" encoding="utf-8"?>
<RelativeLayout
    xmlns:android="http://schemas.android.com/apk/res/android"
    android:layout_width="match_parent"
    android:layout_height="match_parent">

    <Button
        android:layout_width="300dp"
        android:layout_height="80dp"
        android:text="Button"/>

</RelativeLayout>
4.
        mainLayout = (LinearLayout) findViewById(R.id.main_layout);
        lyo_content = (LinearLayout) findViewById(R.id.lyo_content);
        LayoutInflater layoutInflater = LayoutInflater.from(this);


        View buttonLayout0 = layoutInflater.inflate(R.layout.button_layout, null);
        mainLayout.addView(buttonLayout0);

        View buttonLayout00 = layoutInflater.inflate(R.layout.button_layout, null);
        lyo_content.addView(buttonLayout00);


        View buttonLayout1 = layoutInflater.inflate(R.layout.button_layout, mainLayout, true);
        //mainLayout.addView(buttonLayout);不可以再设置父布局buttonLayout1,因为它有了父布局


        View buttonLayout2 = layoutInflater.inflate(R.layout.button_layout, mainLayout, false);
        mainLayout.addView(buttonLayout2);

        View buttonLayout22 = layoutInflater.inflate(R.layout.button_layout, mainLayout, false);
        lyo_content.addView(buttonLayout22);


        View buttonLayout3 = layoutInflater.inflate(R.layout.button_layout1, null);
        mainLayout.addView(buttonLayout3);
结果:
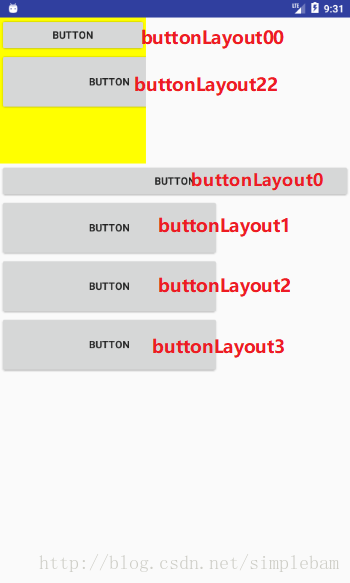
解释:当一个view加载的时候没有父布局(没有xml中设置以及代码加载时候没有指定),设置的layout_width跟layout_height都是无用的,一个布局有且仅有绑定在一个布局(只可以绑定一次),一旦绑定必须解绑才可以绑定到其他布局去
这里有两个有趣的问题:
1.如下面代码所示,两个加载布局都是用mainLayout属性属性进行加载的(当时都没有绑定),之后一个绑定在mainLayout,一个绑定在lyo_content上,造成了上面截图的结果
        View buttonLayout2 = layoutInflater.inflate(R.layout.button_layout, mainLayout, false);
        mainLayout.addView(buttonLayout2);

        View buttonLayout22 = layoutInflater.inflate(R.layout.button_layout, mainLayout, false);
        lyo_content.addView(buttonLayout22);
2.为什么activity_main布局的第一层是有效的
因为它预先加载了一个id为content的FrameLayout来装载activity_main这个布局
3.关于B拦截了子视图C的Move事件B本身不消费,是否上交给上司处理呢? - CSDN博客
4.Android关于触摸事件跟点击事件两个方法的关系 - CSDN博客
5.Android中事件分发机制 - qq97206858的博客 - CSDN博客
异步消息
- Android异步消息处理机制完全解析,带你从源码的角度彻底理解 - CSDN博客
- android 异步通信机制Handler的分析与运用 - 掘金
- 在dispatchMessage里面
- 第一个msg.callback指的callback接口是Message.obtain(handler,callback)
;这里的callback其实就是一个Runnable类型 - mCallback是构造方法Handler(looper,callback,async)传进来;这里的callback
是一个接口,里面有handleMessage方法 - 最后一个handleMessage(msg)才是我们熟悉的handler创建时候需要重写的方法
(这个方法本身为空实现,需要我们自己重写)。
- 第一个msg.callback指的callback接口是Message.obtain(handler,callback)
- tips:
- Handler post()方法传入的runnable之后属于msg.callback
- View post()方法调用的是 Handler post()方法
- Activity runOnUiThread()方法如果当前线程是主线程,直接调用run方法;
否则调用的是Handler post()方法
- 在dispatchMessage里面
设计模式
- 真正的深入浅出“设计模式” - 最易懂的设计模式解析 - 简书
- 常用设计模式:模式宗师养成宝典之Java版学习路径慕课网
- simplebam/JavaDesignPatterns: Java常用的设计模式 -这里需要推荐一本入门书<<大话设计模式>>
网路框架
计算机网络(博客按顺序看)
- 计算机网络(第7版)PDF 下载_Java知识分享网-免费Java资源下载
- 计算机网络基础1 - 你过来看看 - SegmentFault
- 计算机网络基础2 - 你过来看看 - SegmentFault
- IP子网划分_百度百科
- 你应该知道的计算机网络知识 - 简书
- HTTPS科普扫盲帖 - 程序猿小卡的前端专栏 - SegmentFault
- HTTP/1.1与HTTP/1.0的区别 - CSDN博客 –粗略看一下就好
- SSL/TLS协议运行机制的概述 - 阮一峰的网络日志
- TCP/UDP区别以及UDP如何实现可靠传输 - CSDN博客
- Android网络请求心路历程 - 简书
Socket
Volley
- 先要看懂java多线程设计模式之消费者生产者模式
- 生产者/消费者模式(阻塞队列) - CSDN博客
- Android Volley完全解析(一),初识Volley的基本用法 - 郭霖的专栏 - CSDN博客
- Android Volley完全解析(二),使用Volley加载网络图片 - 郭霖的专栏 - CSDN博客
- Android Volley完全解析(三),定制自己的Request - 郭霖的专栏 - CSDN博客
- Android Volley完全解析(四),带你从源码的角度理解Volley - 郭霖的专栏 - CSDN博客
- 聊下Volley源码(整体流程) - CSDN博客 -看郭霖先生的先
- 手撕 Volley (一) - 简书 -看郭霖先生的先
- 手撕 Volley(二) - 简书 -看郭霖先生的先
OkHttp
- OkHttp使用教程 - 泡在网上的日子 –这里有很多方法对于3.9.0的OkHttp已经是失效的,建议看下面的一篇
- OkHttp使用完全教程 - 简书 -跟上篇差不多,但涉及Http基础介绍,更值得一看
- 也可以看一下鸿洋的封装自己的Okhttp库的文章,在前面的部分也提及到一些基础用法
- OkHttp3之Cookies管理及持久化 - Akioss Share - SegmentFault
- OkHttp踩坑记:为何 response.body().string() 只能调用一次?
- Okhttp使用指南与源码分析 - 简书 –有空就要仔细研读一下源码!!!!
- Okhttp缓存源码分析和自定义缓存实现 - 简书
- 拆轮子系列:拆 OkHttp - Piasy的博客 | Piasy Blog
OkHttp取消的问题
在3.0之后不可以通过okHttpClient.cancel(tag)来取消一个请求
        call.cancel();//直接取消当前的请求
        client.dispatcher().cancelAll();//取消当前客户端上的全部请求
你也可以自己封装一个方法,按TAG来取消所有请求:
    public void cancle(Object tag,OkHttpClient okHttpClient){
        Dispatcher dispatcher = okHttpClient.dispatcher();
        synchronized (dispatcher){
            //遍历请求队列里面的
            for (Call call : dispatcher.queuedCalls()) {
                if (tag.equals(call.request().tag())) {
                    call.cancel();
                }
            }

            //遍历在运行队列里面的
            for (Call call : dispatcher.runningCalls()) {
                if (tag.equals(call.request().tag())) {
                    call.cancel();
                }
            }
        }
}实际上,我们一般使用OkHttp开源库居多一点:OkHttpFinal OkHttp 封装的一个简单易用 HTTP 请求和文件下载管理框架。 @codeKK Android 开源站
Retrofit2
- 你真的会用Gson吗?Gson使用指南(一) - 简书 4篇文章都很经典,建议你需要看看哈,为了理解注解,反射等Java基础
- 你真的会用Retrofit2吗?Retrofit2完全教程 - 简书
- Retrofit2 的baseUrl 真的必须以 /(斜线) 结尾吗? - 简书
- Retrofit2 完全解析 探索与okhttp之间的关系 - CSDN博客
事件总线
- Android事件总线EventBus详解 - CSDN博客
- Android事件总线(一)EventBus3.0用法全解析 - 刘望舒的专栏 - CSDN博客
- Android事件总线(二)EventBus3.0源码解析 | 刘望舒的博客
- Android事件总线(三)otto用法全解析 | 刘望舒的博客
- Android事件总线(四)源码解析otto | 刘望舒的博客
注:刘望舒的《Android进阶之光》个人认为不要买,虽然里面都是安卓最新的知识,但讲解上跟鸿洋以及郭霖先生的通俗易懂差距很大,他的书籍的思维跳跃性大,文笔啰嗦,表达能力差,我买了之后都是根据里面的知识点查看博客来弄懂的
函数式响应编程-RxJava2.0
- 目前最好的RxJava入门文章,没有之一:给初学者的RxJava2.0教程(一) - 简书
以及对应的项目教程源码:ssseasonnn/RxJava2Demo - 这可能是最好的RxJava 2.x 教程(完结版)- 简书
- 其他RxJava文章推荐:RxJava2 学习资料推荐
- RxJava之过滤操作符 - 行云间 - CSDN博客
- RxJava2使用过程中遇到的坑 - CSDN博客
- 这是一份全面 & 详细 的RxJava操作符 使用攻略
注解与依赖注入框架
图片框架
Glide
- Android图片加载框架最全解析(一),Glide的基本用法 - 郭霖的专栏 - CSDN博客 -这个是3.x系列的Glide
- 带你全面了解Glide 4的用法
Gradle
项目框架
MVP
- Android App的设计架构:MVC,MVP,MVVM与架构经验谈 - 伍歌歌 - 博客园
- Android mvp 架构的自述 - CSDN博客
- 如何更高效的使用MVP以及官方MVP架构解析 - CSDN博客
- Android MVP Plugin,一键完成MVP结构代码编写
Git
- Pro Git(中文版)
- Git用法的全面解析,结合Android Studio来讲Git
- 从什么都不懂开始(三) 实践带你飞之Branch操作 - CSDN博客
- Git使用教程 - 龙恩0707 - 博客园
推荐阅读
- Android 开发之版本统一规范 | Blankj’s Blog
- 构建 Android 应用程序一定要绕过的 30 个坑
- Android干货框架集锦,搭建项目必不可少
- Android 中内存泄漏的原因和解决方案 - 简书
- 推荐一些值得订阅的 Android 技术专栏
- 讲给Android程序员看的前端和后台教程 - 谷哥的小弟 - CSDN博客
Android源码级分析
性能优化
- 小细节,大用途,35 个 Java 代码性能优化总结!
- 必知必会 | Android 性能优化的方面方面都在这儿
- Android 性能优化必知必会 | Android Performance - Android - 掘金
- Android布局优化之ViewStub、include、merge使用与源码分析 - CSDN博客
Android面经
- 2017 Android秋招面试总结 - 简书
- 最接地气的Android面试总结心得 - 简书
- 收藏夹中,收藏的那些Android干货(必须收藏)
- Android开发工程师面试指南(面试题集附答案、简历模板) - 掘金
- Android 面试 | 全站式导航 - Android - 掘金
- Android工程师之Android面试大纲
- Android笔试面试指南
- 还是要提升自己的算法的:Blankj/awesome-java-leetcode: LeetCode of algorithms with java solution(updating).
面试通用
- 干 货 | 春招网申即将到来!一分钟教你避免这些巨坑!
- 干 货 | 面试时,如何在一分钟内更好的展现自己?
- 如何完美地做自我介绍?
- 面试热问|你最大的优点是什么?(回答技巧及范例)
- 你的简历总被拒,原因是写的太详细 | 应届生的绝地求生3
- 3分钟读懂:校招面试,业务Leader、HR、总监分别都在考什么? | 应届生的绝地求生4
- 【别死在一面】无领导小组面试最全攻略:要点 评分 角色 说什么
- 最详细的三方协议毁约流程 - 乔布简历
- 干货丨HR和我谈五险一金,我该知道哪些以防被坑?
- 95%的人在面试时不会谈薪,包括你!
- 不想租房被坑?看这里!
- 面试最容易被刷的问题:你的缺点是什么?
- 面试:如何正确回答“你有什么问题想问我吗?”
-
————-我是低调的分割线————————–
博客美化 - 萌小Q - 博客园
如果对你有帮助,可以点击“推荐”哦`(*∩_∩*)′
