1、IDE工具的安装和使用
-
1.1、下载IDE
-
1.2、介绍
- maven是学习Spring Boot必备之一
- Spring Tool Suite可快速搭建Spring Boot项目
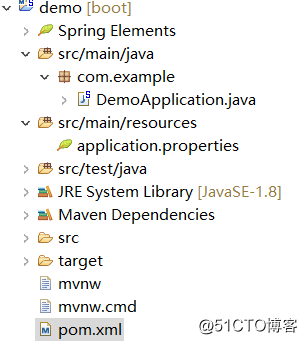
- 1.3、Spring Boot项目结构预览
2、RESTfull API简单项目的快速搭建
-
2.1、搭建一个简单的RESTfull API接口项目
-
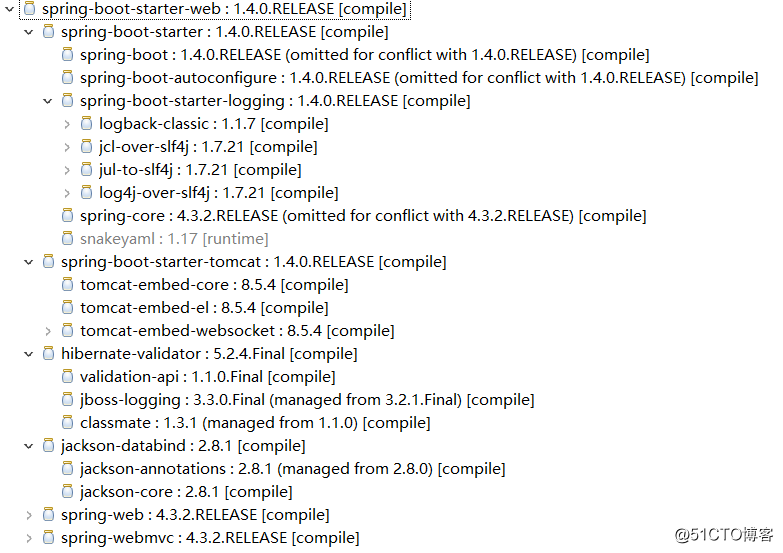
2.2、引入spring-boot-starter-web
-
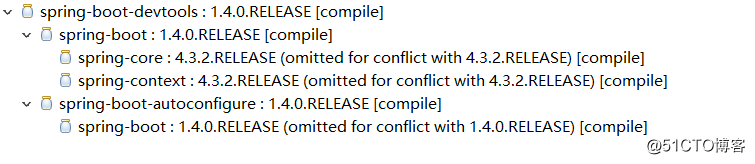
2.3、引入spring-boot-devtools
-
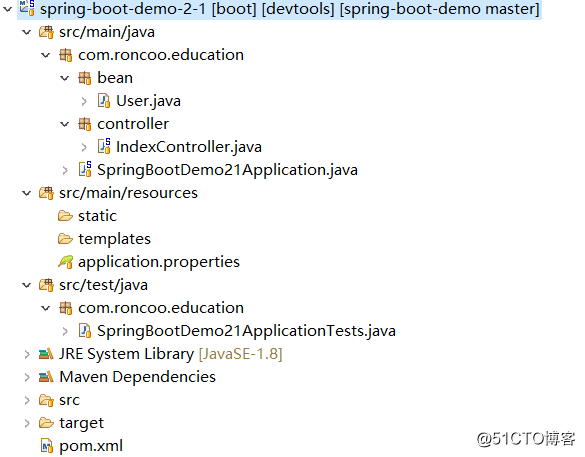
2.4、代码的实现
User.java:
import java.util.Date;

/**
 * 实体类
 */
public class User {
    private int id;
    private String name;
    private Date date;

    public int getId() {
        return id;
    }

    public void setId(int id) {
        this.id = id;
    }

    public String getName() {
        return name;
    }

    public void setName(String name) {
        this.name = name;
    }

    public Date getDate() {
        return date;
    }

    public void setDate(Date date) {
        this.date = date;
    }
}
IndexController.java:
import java.util.Date; import java.util.HashMap; import org.springframework.web.bind.annotation.PathVariable; import org.springframework.web.bind.annotation.RequestMapping; import org.springframework.web.bind.annotation.RequestParam; import org.springframework.web.bind.annotation.RestController; import com.roncoo.education.bean.User; /** * spring-boot-demo-2-1 */ @RestController @RequestMapping(value = "/index") public class IndexController { @RequestMapping public String index() { return "hello world"; } // @RequestParam 简单类型的绑定,可以出来get和post @RequestMapping(value = "/get") public HashMap<String, Object> get(@RequestParam String name) { HashMap<String, Object> map = new HashMap<String, Object>(); map.put("title", "hello world"); map.put("name", name); return map; } // @PathVariable 获得请求url中的动态参数 @RequestMapping(value = "/get/{id}/{name}") public User getUser(@PathVariable int id, @PathVariable String name) { User user = new User(); user.setId(id); user.setName(name); user.setDate(new Date()); return user; } } -
2.5、运行项目
- 直接运行main方法或者使用maven命令:
spring-boot:run - 测试:
http://localhost:8080/index - 带参数:
http://localhost:8080/index/get?name=wujing - 带参数有中文:
http://localhost:8080/index/get?name=测试 - url测试:
http://localhost:8080/index/get/1/wujing - url测试:
http://localhost:8080/index/get/1/测试
- 直接运行main方法或者使用maven命令:
- 2.6、打包
- 命令:
clean package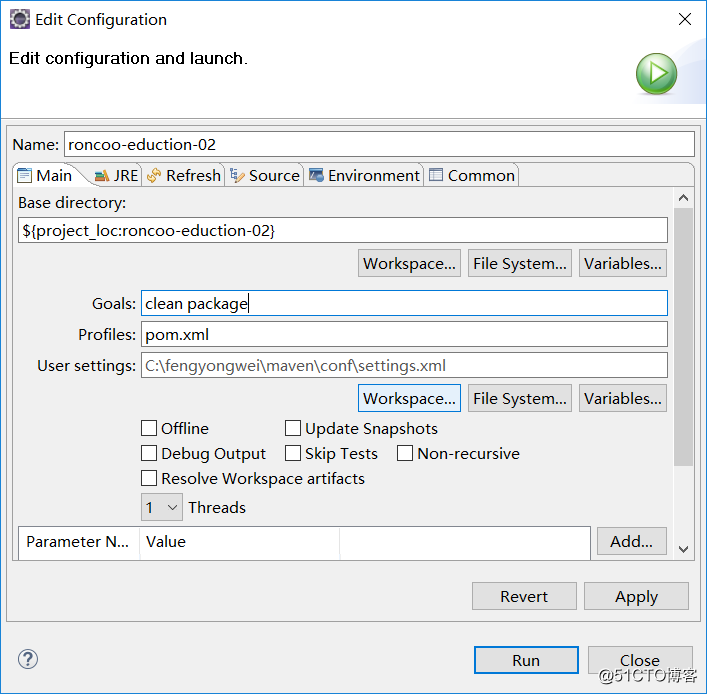

- 运行命令:
java –jar roncoo-education-0.0.1-SNAPSHOT.jar
- 命令:
3、配置文件详解:Properties和YAML
-
3.1、配置文件的生效顺序,会对值进行覆盖:
- 1.
@TestPropertySource注解 - 2.命令行参数
- 3.Java系统属性(
System.getProperties()) - 4.操作系统环境变量
- 5.只有在
random.*里包含的属性会产生一个RandomValuePropertySource - 6.在打包的jar外的应用程序配置文件(
application.properties,包含YAML和profile变量) - 7.在打包的jar内的应用程序配置文件(
application.properties,包含YAML和profile变量) - 8.在
@Configuration类上的@PropertySource注解 - 9.默认属性(使用
SpringApplication.setDefaultProperties指定)
- 1.
-
3.2、配置随机值(自定义,只有重启项目才会重新生成随机值)
roncoo.secret=${random.value} roncoo.number=${random.int} roncoo.bignumber=${random.long} roncoo.number.less.than.ten=${random.int(10)} roncoo.number.in.range=${random.int[1024,65536]}- 读取使用注解:
@Value(value = "${roncoo.secret}") - 注:出现黄点提示,是要提示配置元数据,可以不配置
- 读取使用注解:
-
3.3、属性占位符
当application.properties里的值被使用时,它们会被存在的Environment过滤,所以你能够引用先前定义的值(比如,系统属性)。
roncoo.name=www.roncoo.com roncoo.desc=${roncoo.name} is a domain name -
3.4、Application属性文件,按优先级排序,位置高的将覆盖位置低的
- 1.当前目录下的一个
/config子目录 - 2.当前目录
- 3.一个
classpath下的/config包 - 4.
classpath根路径(root—默认生成路径) - 这个列表是按优先级排序的(列表中位置高的将覆盖位置低的)
- 1.当前目录下的一个
-
3.5、配置应用端口和其他配置的介绍
#端口配置: server.port=8090 #时间格式化 spring.jackson.date-format=yyyy-MM-dd HH:mm:ss #时区设置(若使用jackson格式化时间字符串需设置本地时区,默认是美国的时区) spring.jackson.time-zone=Asia/Chongqing - 3.6、使用YAML代替Properties
- 注意写法:冒号后要加个空格
4、配置文件-多环境配置
-
4.1、多环境配置的好处
- 1.不同环境配置可以配置不同的参数
- 2.便于部署,提高效率,减少出错
-
4.2、Properties多环境配置
- 1.配置激活选项
spring.profiles.active=dev
- 2.添加其他配置文件
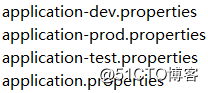
- 1.配置激活选项
-
4.3、YAML多环境配置
① 配置激活选项spring: profiles: active: dev② 在配置文件添加三个英文状态下的短横线即可区分不同文件
--- spring: profiles: dev -
4.4、两种配置方式的比较
- 1.Properties配置多环境,需要添加多个配置文件,YAML只需要一个配件文件
- 2.书写格式的差异,yaml相对比较简洁,优雅
- 3.YAML的缺点:不能通过
@PropertySource注解加载。如果需要使用@PropertySource注解的方式加载值,那就要使用properties文件。
- 4.5、运行使用
java -jar myapp.jar --spring.profiles.active=dev
5、致谢名单
- 冯永伟