本文主要介绍caffe2 C++接口测试demo.
测试模型采用squeezenet,模型下载在:
https://github.com/caffe2/models/tree/master/squeezenet
我的Github:https://github.com/liyemei
caffe2的官网:https://caffe2.ai/
代码如下:
代码比较粗糙,但是可以运行,在caffe2的predictor_verifier项目中添加新项C++即可,设置predictor_verifier生成为否。
#include "caffe2/core/flags.h"
#include "caffe2/core/init.h"
#include "caffe2/core/predictor.h"
#include "caffe2/utils/proto_utils.h"
#include <opencv2/opencv.hpp>
#include <ctime>
#include <string>
#include <iosfwd>
#include <iostream>
#include <vector>
using std::string;
namespace caffe2 {
std::unique_ptr<Blob> randomTensor(
const std::vector<TIndex>& dims,
CPUContext* ctx
) {
auto blob = make_unique<Blob>();
auto* t = blob->GetMutable<TensorCPU>();
t->Resize(dims);
math::RandUniform<float, CPUContext>(
t->size(), -1.0, 1.0, t->template mutable_data<float>(), ctx
);
return blob;
}
void run() {
// 定义初始化网络结构与权重值
caffe2::NetDef init_net, predict_net;
DeviceOption op;
op.set_random_seed(1701);
std::unique_ptr<CPUContext> ctx_;
ctx_ = caffe2::make_unique<CPUContext>(op);
// 读入网络结构文件
CAFFE_ENFORCE(ReadProtoFromFile("init_net.pb", &init_net));
CAFFE_ENFORCE(ReadProtoFromFile("predict_net.pb", &predict_net));
// Can be large due to constant fills
VLOG(1) << "Init net: " << ProtoDebugString(init_net);
LOG(INFO) << "Predict net: " << ProtoDebugString(predict_net);
auto predictor = caffe2::make_unique<Predictor>(init_net, predict_net);
LOG(INFO) << "Checking that a null forward-pass works";
// 用opencv的方式读入文件
cv::Mat bgr_img = cv::imread("C:/caffe2-master/caffe2/python/models/squeezenet/cat.jpg", -1);
int height = bgr_img.rows;
int width = bgr_img.cols;
//cv::imshow("bgr_img", bgr_img);
//cv::waitKey(1);
//load label
std::vector<string> labels_;
std::string label_file = "C:/caffe2-master/caffe2/python/models/squeezenet/synset_words.txt";
std::ifstream labels(label_file.c_str());
CHECK(labels) << "Unable to open labels file " << label_file;
std::string line;//line获取标签文件中的每一行(每一个标签)
while (std::getline(labels, line))
{
labels_.push_back(string(line));//将所有的标签放入labels_
}
// 输入图像大小
const int predHeight = 256;
const int predWidth = 256;
const int crops = 1; // crops等于1表示batch的数量为1
const int channels = 3; // 通道数为3,表示BGR,为1表示灰度图
const int size = predHeight * predWidth;
const float hscale = ((float)height) / predHeight; // 计算缩放比例
const float wscale = ((float)width) / predWidth;
const float scale = std::min(hscale, wscale);
// 初始化网络的输入,因为可能要做batch操作,所以分配一段连续的存储空间
std::vector<float> inputPlanar(crops * channels * predHeight * predWidth);
std::cout << "before resizing, bgr_img.cols=" << bgr_img.cols << ", bgr_img.rows=" << bgr_img.rows << std::endl;
// resize成想要的输入大小
cv::Size dsize = cv::Size(bgr_img.cols / wscale, bgr_img.rows / hscale);
cv::resize(bgr_img, bgr_img, dsize);
std::cout << "after resizing, bgr_img.cols=" << bgr_img.cols << ", bgr_img.rows=" << bgr_img.rows << std::endl;
// Scale down the input to a reasonable predictor size.
// 这里是将图像复制到连续的存储空间内,用于网络的输入,因为是BGR三通道,所以有三个赋值
// 注意imread读入的图像格式是unsigned char,如果你的网络输入要求是float的话,下面的操作就不对了。
for (auto i = 0; i<predHeight; i++) {
//printf("+\n");
for (auto j = 0; j<predWidth; j++) {
inputPlanar[i * predWidth + j + 0 * size] = (float)bgr_img.data[(i*predWidth + j) * 3 + 0];
inputPlanar[i * predWidth + j + 1 * size] = (float)bgr_img.data[(i*predWidth + j) * 3 + 1];
inputPlanar[i * predWidth + j + 2 * size] = (float)bgr_img.data[(i*predWidth + j) * 3 + 2];
}
}
// 输入是float格式
//for (auto i = 0; i < predHeight; i++) {
// 模版的输入格式是float
// const float* inData = bgr_img.ptr<float>(i);
// for (auto j = 0; j < predWidth; j++) {
// inputPlanar[i * predWidth + j + 0 * size] = (float)((inData[j]) * 3 + 0);
// inputPlanar[i * predWidth + j + 1 * size] = (float)((inData[j]) * 3 + 1);
// inputPlanar[i * predWidth + j + 2 * size] = (float)((inData[j]) * 3 + 2);
// }
//}
//typedef Tensor<CPUContext> TensorCPU;
// input就是网络的输入,所以把之前准备好的数据赋值给input就可以了
caffe2::TensorCPU input;
input.Resize(std::vector<int>({ crops, channels, predHeight, predWidth }));
input.ShareExternalPointer(inputPlanar.data());
//Predictor::TensorVector inputVec{inputData->template GetMutable<TensorCPU>()};
Predictor::TensorVector inputVec{ &input };
Predictor::TensorVector outputVec;
//predictor->run(inputVec, &outputVec);
//CAFFE_ENFORCE_GT(outputVec.size(), 0);
std::clock_t begin = clock(); //begin time of inference
// 预测
predictor->run(inputVec, &outputVec);
//std::cout << "CAFFE2_LOG_THRESHOLD=" << CAFFE2_LOG_THRESHOLD << std::endl;
//std::cout << "init_net.name()" << init_net.name();
std::clock_t end = clock();
double elapsed_secs = double(end - begin) / CLOCKS_PER_SEC;
std::cout << "(inference takes)-time " << elapsed_secs << std::endl;
float max_value = 0;
int best_match_index = -1;
// 迭代输出结果,output的大小就是网络输出的大小
for (auto output : outputVec) {
for (auto i = 0; i<output->size(); ++i) {
// val对应的就是每一类的概率值
float val = output->template data<float>()[i];
if (val>0.001) {
//printf("%i: %s : %f\n", i, labels_[i], val);
if (val>max_value) {
max_value = val;
best_match_index = i;
}
}
}
}
// 这里是用imagenet数据集为例
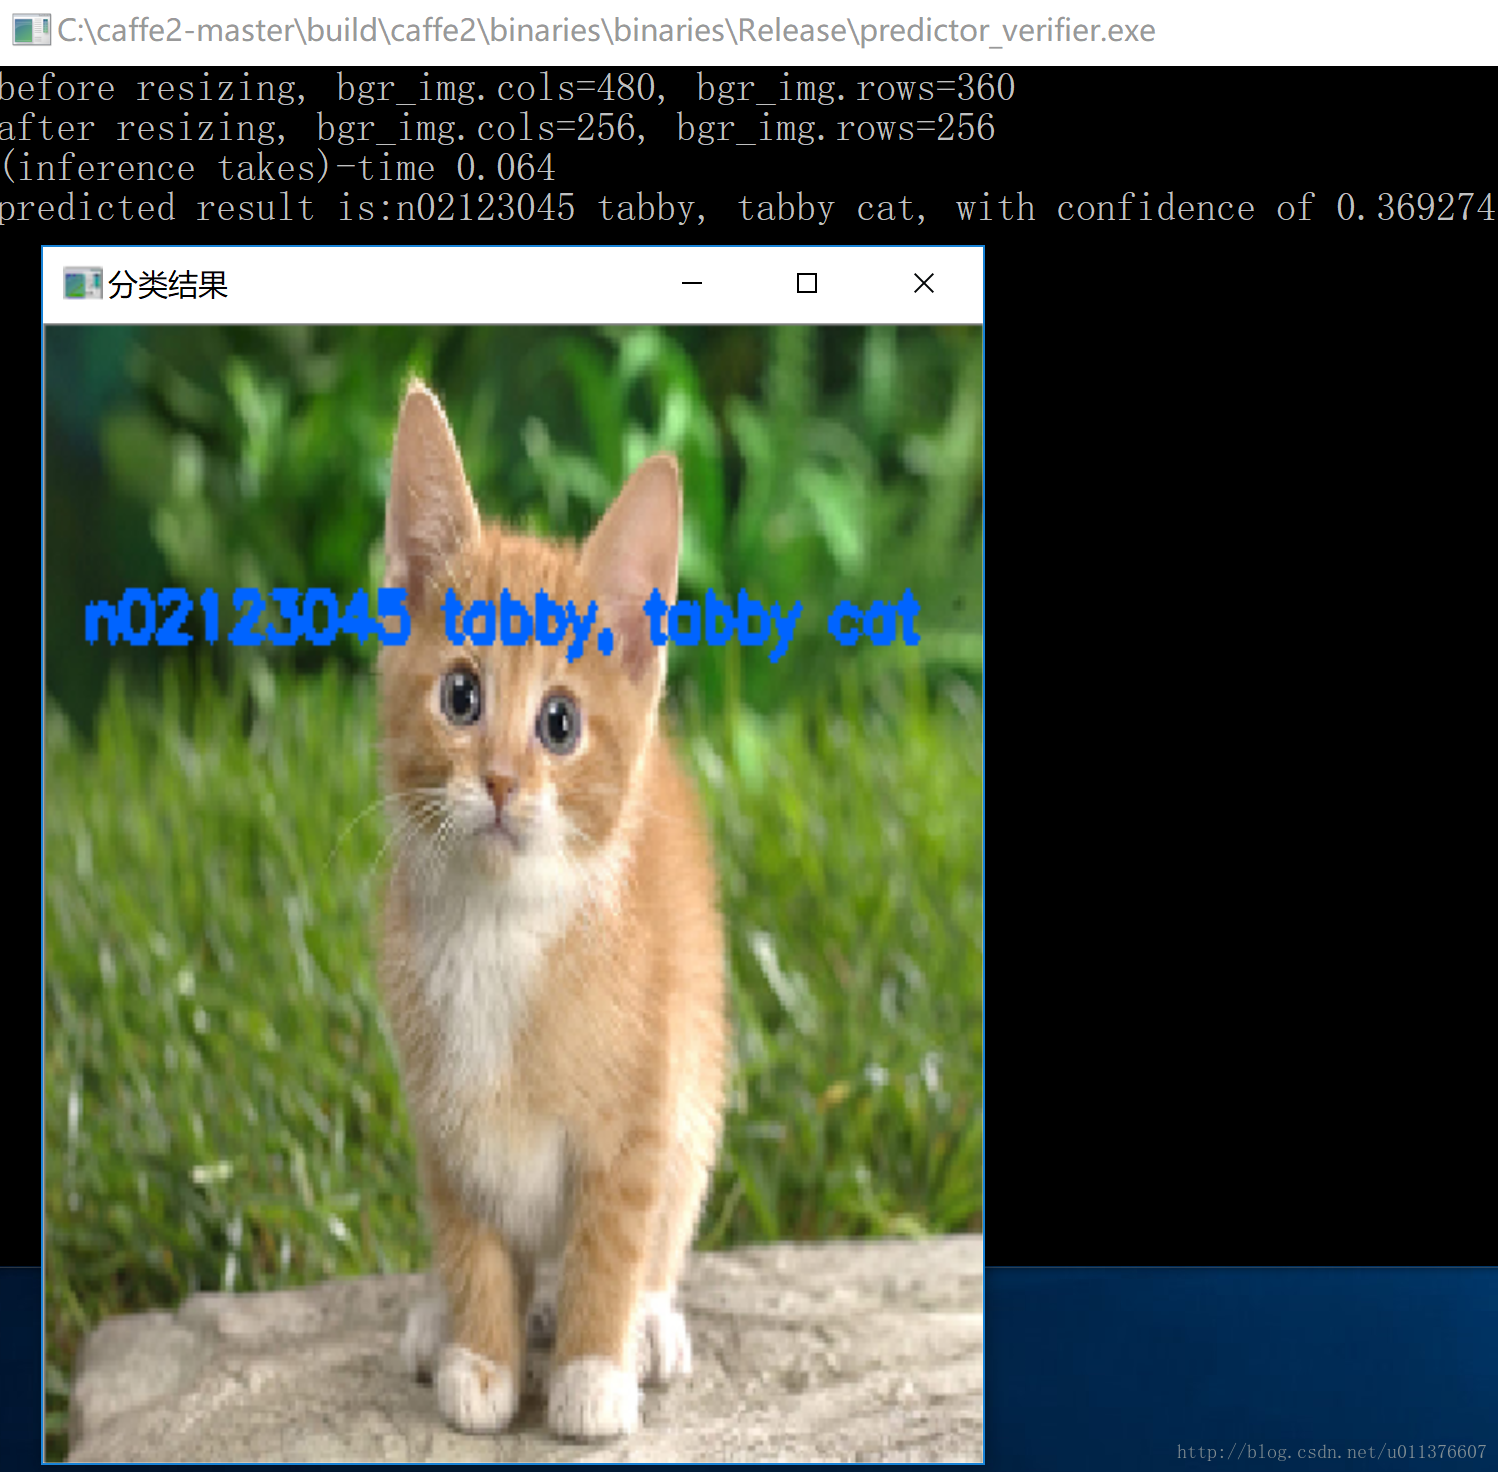
std::cout << "predicted result is:" << labels_[best_match_index] << ", with confidence of " << max_value << std::endl;
cv::putText(bgr_img, labels_[best_match_index], cv::Point(10, 10 + 30*2 ), CV_FONT_HERSHEY_SIMPLEX, 0.5, cv::Scalar(255, 100, 0), 2, 2);
cv::namedWindow("分类结果", 0);
cv::imshow("分类结果", bgr_img);
//cv::imwrite("dog_result.jpg", m);
cv::waitKey(0);
}
}
void main(int argc, char** argv)
{
caffe2::GlobalInit(&argc, &argv);
caffe2::run();
//// This is to allow us to use memory leak checks.
google::protobuf::ShutdownProtobufLibrary();
//return 0;
system("pause");
}