一、基础环境搭建
1,导包
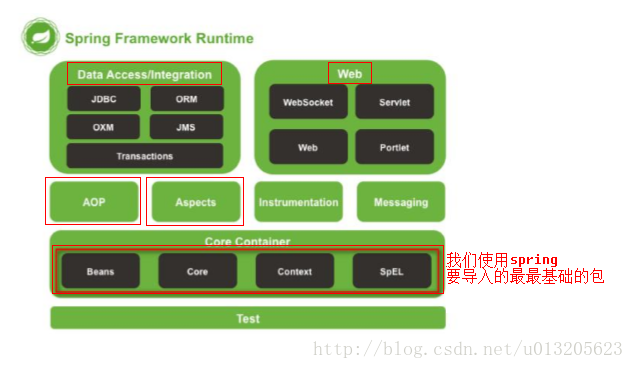
当前只是spring初始阶段,只使用spring最核心的包及相关支持。spring关系如图所示:
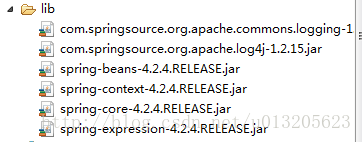
最终,导入项目的包结构如图所示:
2,创建对象
public class Worker {
	// 姓名
	private String name;
	// 薪水
	private Integer salary;

	public void setName(String name) {
		this.name = name;
	}

	public void setSalary(Integer salary) {
		this.salary = salary;
	}

	@Override
	public String toString() {
		return "Worker [name=" + name + ", salary=" + salary + "]";
	}

}
3,书写配置注册对象到容器
创建xml文件注册对象到容器,原则上命名和路径没有指定,推荐在src目录下创建applicationContext.xml文件:
<?xml version="1.0" encoding="UTF-8"?>
<beans xmlns:xsi="http://www.w3.org/2001/XMLSchema-instance"
	xmlns="http://www.springframework.org/schema/beans"
	xsi:schemaLocation="http://www.springframework.org/schema/beans http://www.springframework.org/schema/beans/spring-beans-4.2.xsd ">

	<bean name="worker" class="com.future.domain.Worker"></bean>

</beans>
4,代码测试
创建测试类,并书写测试代码:
public class TestDemo {
	/*
	 * 整体流程
	 * 1,导包
	 * 2,构建bean类
	 * 3,将bean与spring关联【配置】
	 * 4,获取bean对象并使用
	 */
	@Test
	public void test() {
		// 创建容器对象
		ApplicationContext ac = new ClassPathXmlApplicationContext(
				"applicationContext.xml");
		//从spring中获取对象
		Worker worker = (Worker) ac.getBean("worker");
		//使用对象
		System.out.print("worker:"+worker);
		//引出:构造方法的调用,属性初始化
	}
}
展示结果如图所示,表示存储对象及对象调用成功。

二、创建对象的方式
1,通过空参构造方法创建对象
如上面简单实例,已经使用空参构造方法创建对象。为使bean类更趋于完善,添加初始化及销毁方法。
	// 添加初始化/销毁方法
	public void init() {
		System.out.println("初始化方法!");
	}

	public void destory() {
		System.out.println("销毁方法!");
	}
	<bean name="worker1" class="com.future.domain.Worker" init-method="init"
		destroy-method="destory">
	</bean>
2,静态工厂方法
(1)工厂类的实现
public class WorkerFactory {
	// 静态工厂
	public static Worker createWorker1() {
		System.out.println("静态工厂创建Worker");
		return new Worker();
	}

	// 实例工厂
	public Worker createWorker2() {
		System.out.println("实例工厂创建Worker");
		return new Worker();
	}
}
(2)配置文件的修改
	<!-- 2:静态工厂方法 -->
	<bean name="worker2" class="com.future.create.WorkerFactory"
		factory-method="createWorker1">
	</bean>
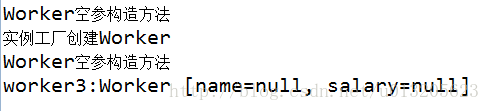
如2所展示,实例工厂方法实现如上,当前修改配置文件实现即可。
	<!-- 3:实例工厂方法 -->
	<bean name="worker3"
	factory-bean="WorkerFactory"
	factory-method="createWorker2">
	</bean>

	<bean name="WorkerFactory"
	class="com.future.create.WorkerFactory">
	</bean>
三、属性注入
为以下功能的完善实现,为基础bean类添加bean属性对象。并完善对应构造方法,包含空参,部分参数,部分参数调整位置,全参数构造方法。最后调整实现bean类如下:
public class Worker {
	// 姓名
	private String name;
	// 薪水
	private Integer salary;

	// 添加对象型成员变量
	private House house;


	public void setName(String name) {
		this.name = name;
	}

	public void setSalary(Integer salary) {
		this.salary = salary;
	}

	// 添加构造函数
	public Worker() {
		System.out.println("Worker空参构造方法");
	}

	// 添加初始化/销毁方法
	public void init() {
		System.out.println("初始化方法!");
	}

	public void destory() {
		System.out.println("销毁方法!");
	}

	// 对象型成员变量
	public House getHouse() {
		return house;
	}

	public void setHouse(House house) {
		this.house = house;
	}

	@Override
	public String toString() {
		return "Worker [name=" + name + ", salary=" + salary + ", house="
				+ house + "]";
	}

	// 创建带参构造方法
	public Worker(String name, Integer salary) {
		System.out.println("带参顺序构造方法");
		this.name = name;
		this.salary = salary;
	}

	public Worker(Integer salary,String name) {
		System.out.println("带参混乱顺序构造方法");
		this.name = name;
		this.salary = salary;
	}

	public Worker(Integer salary,String name,House house) {
		System.out.println("全参构造方法");
		this.name = name;
		this.salary = salary;
		this.house = house;
	}
}
其中,bean类属性的类对象实现如下:
public class House {
	//地标
	private String place;
	//地段
	private String location;


	public String getPlace() {
		return place;
	}
	public void setPlace(String place) {
		this.place = place;
	}
	public String getLocation() {
		return location;
	}
	public void setLocation(String location) {
		this.location = location;
	}

	@Override
	public String toString() {
		return "House [place=" + place + ", location=" + location + "]";
	}
}
	<!-- set方法注入 -->
	<bean name="worker1" class="com.future.domain.Worker">
		<property name="name" value="zhangsan"></property>
		<property name="salary" value="16000"></property>
		<!-- 对象型属性,引用配置好对象 -->
		<property name="house" ref="house"></property>
	</bean>

	<bean name="house" class="com.future.domain.House">
		<property name="place" value="上地华联"></property>
		<property name="location" value="上地创业大厦"></property>
	</bean>
2,通过构造方法注入
	<!-- 构造函数注入 -->
	<bean name="worker2" class="com.future.domain.Worker">
		<!-- name属性: 构造函数的参数名 -->
		<!-- index属性: 构造函数的参数索引 -->
		<!-- type属性: 构造函数的参数类型 -->
		<constructor-arg name="name" index="1" type="java.lang.String"
			value="lisi"></constructor-arg>
		<constructor-arg name="salary" index="0"
			type="java.lang.Integer" value="999"></constructor-arg>
		<constructor-arg name="house" ref="house" index="2"></constructor-arg>
	</bean>
引入p空间:
xmlns:p="http://www.springframework.org/schema/p"
	<!-- p名称空间注入, 走set方法
		1.导入P名称空间 xmlns:p="http://www.springframework.org/schema/p"
		2.使用p:属性完成注入 |-值类型: p:属性名="值" |-对象类型: p:属性名-ref="bean名称" -->

	<bean name="worker3" class="com.future.domain.Worker" p:name="jack"
		p:salary="20000" p:house-ref="house">
	</bean>
	<!-- spel注入: spring Expression Language sping表达式语言 -->
	<bean name="worker4" class="com.future.domain.Worker">
		<property name="name" value="#{worker2.name}"></property>
		<property name="salary" value="#{worker3.salary}"></property>
		<property name="house" ref="house"></property>
	</bean>
(1)复杂数据的bean对象实现
//复杂数据类型注入
public class CollectionBean {
	//数组
	private String[] arr;
	//集合
	private List list;
	//key-value
	private Map map;
	//属性
	private Properties prop;


	public String[] getArr() {
		return arr;
	}
	public void setArr(String[] arr) {
		this.arr = arr;
	}
	public List getList() {
		return list;
	}
	public void setList(List list) {
		this.list = list;
	}
	public Map getMap() {
		return map;
	}
	public void setMap(Map map) {
		this.map = map;
	}
	public Properties getProp() {
		return prop;
	}
	public void setProp(Properties prop) {
		this.prop = prop;
	}

	@Override
	public String toString() {
		return "CollectionBean [arr=" + Arrays.toString(arr) + ", list=" + list
				+ ", map=" + map + ", prop=" + prop + "]";
	}
}
(2)数据注入实现
<bean name="collectionBean" class="com.future.domain.CollectionBean">
		<!-- 数组 -->
		<property name="arr">
			<array>
				<value>hello</value>
				<value>world</value>
				<value>javaEE</value>
			</array>
		</property>
		<!-- list 集合 -->
		<property name="list">
			<list>
				<value>画画</value>
				<value>唱歌</value>
				<value>写字</value>
				<value>冥想</value>
			</list>
		</property>

		<!-- key-value -->
		<property name="map">
			<map>
				<entry key="脸为什么黄了" value="防冷涂的蜡"></entry>
				<entry key="天王盖地虎" value="宝塔镇河妖"></entry>
			</map>
		</property>

		<!-- 属性值 -->
		<property name="prop">
			<props>
				<prop key="用户名">root</prop>
				<prop key="密码">123456</prop>
				<prop key="验证码">天上掉下个林妹妹</prop>
			</props>
		</property>
	</bean>
整体数据注入测试类实现:
//测试注入属性
public class TestInjection {

	// set方法注入
	@Test
	public void test1() {
		ApplicationContext ac = new ClassPathXmlApplicationContext(
				"/com/future/injection/applicationContext.xml");
		Worker worker1 = (Worker) ac.getBean("worker1");
		System.out.println("worker1:" + worker1);
	}

	// 构造方法注入
	@Test
	public void test2() {
		ApplicationContext ac = new ClassPathXmlApplicationContext(
				"/com/future/injection/applicationContext.xml");
		Worker worker2 = (Worker) ac.getBean("worker2");
		System.out.println("worker2:" + worker2);
	}

	// p名称空间注入
	@Test
	public void test3() {
		ApplicationContext ac = new ClassPathXmlApplicationContext(
				"/com/future/injection/applicationContext.xml");
		Worker worker3 = (Worker) ac.getBean("worker3");
		System.out.println("worker3:" + worker3);
	}

	// spel注入
	@Test
	public void test4() {
		ApplicationContext ac = new ClassPathXmlApplicationContext(
				"/com/future/injection/applicationContext.xml");
		Worker worker4 = (Worker) ac.getBean("worker4");
		System.out.println("worker4:" + worker4);
	}

	// 复杂数据注入
	@Test
	public void test5() {
		ApplicationContext ac = new ClassPathXmlApplicationContext(
				"/com/future/injection/applicationContext.xml");
		CollectionBean collectionBean = (CollectionBean) ac
				.getBean("collectionBean");
		System.out.println("collectionBean:" + collectionBean);
	}

}
其中部分测试结果:

爱在左,情在右,走在生命的两旁。随时撒种,随时开花,将这一路长径点缀得花香弥漫,使穿枝拂叶的行人,踏着荆棘,不觉得痛苦,有泪可落,却不是凄凉。