一、前言
上一篇介绍了注解,也是为这一篇做铺垫,传统的都是通过配置文件来启动spring,那spring boot到底是做了什么能让我们快速开发昵?
二、启动原理
看下程序启动的入口,主要两处地方一是SpringBootApplication注解,另外就是run方法,首先我们看注解部分,上一篇我们也说过注解应该不难看懂,我们看下这个注解里面有什么神奇的东西;


@SpringBootApplication
public class DemoApplication {

    public static void main(String[] args) {
        SpringApplication.run(DemoApplication.class, args);
    }
}

@Target(ElementType.TYPE)
@Retention(RetentionPolicy.RUNTIME)
@Documented
@Inherited
@SpringBootConfiguration
@EnableAutoConfiguration
@ComponentScan(excludeFilters = {
        @Filter(type = FilterType.CUSTOM, classes = TypeExcludeFilter.class),
        @Filter(type = FilterType.CUSTOM, classes = AutoConfigurationExcludeFilter.class) })
public @interface SpringBootApplication {

    /**
     * Exclude specific auto-configuration classes such that they will never be applied.
     * @return the classes to exclude
     */
    @AliasFor(annotation = EnableAutoConfiguration.class)
    Class<?>[] exclude() default {};

    /**
     * Exclude specific auto-configuration class names such that they will never be
     * applied.
     * @return the class names to exclude
     * @since 1.3.0
     */
    @AliasFor(annotation = EnableAutoConfiguration.class)
    String[] excludeName() default {};

    /**
     * Base packages to scan for annotated components. Use {@link #scanBasePackageClasses}
     * for a type-safe alternative to String-based package names.
     * @return base packages to scan
     * @since 1.3.0
     */
    @AliasFor(annotation = ComponentScan.class, attribute = "basePackages")
    String[] scanBasePackages() default {};

    /**
     * Type-safe alternative to {@link #scanBasePackages} for specifying the packages to
     * scan for annotated components. The package of each class specified will be scanned.
     * <p>
     * Consider creating a special no-op marker class or interface in each package that
     * serves no purpose other than being referenced by this attribute.
     * @return base packages to scan
     * @since 1.3.0
     */
    @AliasFor(annotation = ComponentScan.class, attribute = "basePackageClasses")
    Class<?>[] scanBasePackageClasses() default {};

}
看上面代码,除去元注解,主要有3个注解,
@ComponentScan
这个不需要我们多说太多,这个主要有2个作用,组件扫描和自动装配;
@SpringBootConfiguration
这个我们也不需要说太多,这个注解主要是继承@Configuration注解,这个我们就是为了加载配置文件用的;
@EnableAutoConfiguration
这个是我们的重点:
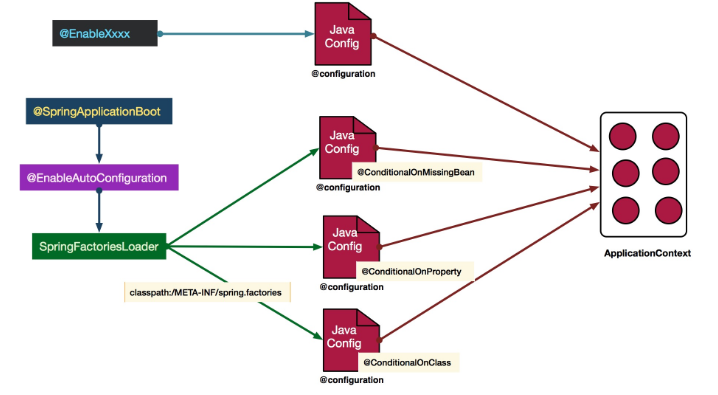
看图我们来走一下代码,这里有一个重点就是@Import注解,这个里面引入了AutoConfigurationImportSelector.class这个文件,所以我们就需要看下这里面有那些玩意,值得我们注意的,这个类里面代码有点多我将重点放到下一个代码片段中,让大家结构清晰一些;
@Target(ElementType.TYPE)
@Retention(RetentionPolicy.RUNTIME)
@Documented
@Inherited
@AutoConfigurationPackage
@Import(AutoConfigurationImportSelector.class)
public @interface EnableAutoConfiguration {

    String ENABLED_OVERRIDE_PROPERTY = "spring.boot.enableautoconfiguration";

    /**
     * Exclude specific auto-configuration classes such that they will never be applied.
     * @return the classes to exclude
     */
    Class<?>[] exclude() default {};

    /**
     * Exclude specific auto-configuration class names such that they will never be
     * applied.
     * @return the class names to exclude
     * @since 1.3.0
     */
    String[] excludeName() default {};

}
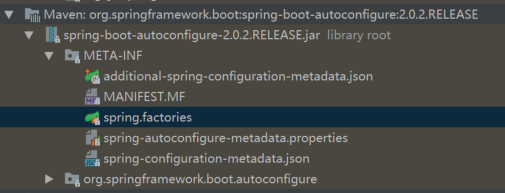
这是中间比较关键的代码,我们主要看下loadFactories方法,这个里面有个常量的配置,位置如下图所示,整段代码实现了把配置文件中的信息通过反射实例化成为@Configuration的配置文件,然后通过@Configuration最后汇总到容器当中;
    protected List<AutoConfigurationImportFilter> getAutoConfigurationImportFilters() {
        return SpringFactoriesLoader.loadFactories(AutoConfigurationImportFilter.class,
                this.beanClassLoader);
    }

public abstract class SpringFactoriesLoader {

    /**
     * The location to look for factories.
     * <p>Can be present in multiple JAR files.
     */
    public static final String FACTORIES_RESOURCE_LOCATION = "META-INF/spring.factories";


    private static final Log logger = LogFactory.getLog(SpringFactoriesLoader.class);

    private static final Map<ClassLoader, MultiValueMap<String, String>> cache = new ConcurrentReferenceHashMap<>();


    /**
     * Load and instantiate the factory implementations of the given type from
     * {@value #FACTORIES_RESOURCE_LOCATION}, using the given class loader.
     * <p>The returned factories are sorted through {@link AnnotationAwareOrderComparator}.
     * <p>If a custom instantiation strategy is required, use {@link #loadFactoryNames}
     * to obtain all registered factory names.
     * @param factoryClass the interface or abstract class representing the factory
     * @param classLoader the ClassLoader to use for loading (can be {@code null} to use the default)
     * @see #loadFactoryNames
     * @throws IllegalArgumentException if any factory implementation class cannot
     * be loaded or if an error occurs while instantiating any factory
     */
    public static <T> List<T> loadFactories(Class<T> factoryClass, @Nullable ClassLoader classLoader) {
        Assert.notNull(factoryClass, "'factoryClass' must not be null");
        ClassLoader classLoaderToUse = classLoader;
        if (classLoaderToUse == null) {
            classLoaderToUse = SpringFactoriesLoader.class.getClassLoader();
        }
        List<String> factoryNames = loadFactoryNames(factoryClass, classLoaderToUse);
        if (logger.isTraceEnabled()) {
            logger.trace("Loaded [" + factoryClass.getName() + "] names: " + factoryNames);
        }
        List<T> result = new ArrayList<>(factoryNames.size());
        for (String factoryName : factoryNames) {
            result.add(instantiateFactory(factoryName, factoryClass, classLoaderToUse));
        }
        AnnotationAwareOrderComparator.sort(result);
        return result;
    }

    /**
     * Load the fully qualified class names of factory implementations of the
     * given type from {@value #FACTORIES_RESOURCE_LOCATION}, using the given
     * class loader.
     * @param factoryClass the interface or abstract class representing the factory
     * @param classLoader the ClassLoader to use for loading resources; can be
     * {@code null} to use the default
     * @see #loadFactories
     * @throws IllegalArgumentException if an error occurs while loading factory names
     */
    public static List<String> loadFactoryNames(Class<?> factoryClass, @Nullable ClassLoader classLoader) {
        String factoryClassName = factoryClass.getName();
        return loadSpringFactories(classLoader).getOrDefault(factoryClassName, Collections.emptyList());
    }

    private static Map<String, List<String>> loadSpringFactories(@Nullable ClassLoader classLoader) {
        MultiValueMap<String, String> result = cache.get(classLoader);
        if (result != null) {
            return result;
        }

        try {
            Enumeration<URL> urls = (classLoader != null ?
                    classLoader.getResources(FACTORIES_RESOURCE_LOCATION) :
                    ClassLoader.getSystemResources(FACTORIES_RESOURCE_LOCATION));
            result = new LinkedMultiValueMap<>();
            while (urls.hasMoreElements()) {
                URL url = urls.nextElement();
                UrlResource resource = new UrlResource(url);
                Properties properties = PropertiesLoaderUtils.loadProperties(resource);
                for (Map.Entry<?, ?> entry : properties.entrySet()) {
                    List<String> factoryClassNames = Arrays.asList(
                            StringUtils.commaDelimitedListToStringArray((String) entry.getValue()));
                    result.addAll((String) entry.getKey(), factoryClassNames);
                }
            }
            cache.put(classLoader, result);
            return result;
        }
        catch (IOException ex) {
            throw new IllegalArgumentException("Unable to load factories from location [" +
                    FACTORIES_RESOURCE_LOCATION + "]", ex);
        }
    }

    @SuppressWarnings("unchecked")
    private static <T> T instantiateFactory(String instanceClassName, Class<T> factoryClass, ClassLoader classLoader) {
        try {
            Class<?> instanceClass = ClassUtils.forName(instanceClassName, classLoader);
            if (!factoryClass.isAssignableFrom(instanceClass)) {
                throw new IllegalArgumentException(
                        "Class [" + instanceClassName + "] is not assignable to [" + factoryClass.getName() + "]");
            }
            return (T) ReflectionUtils.accessibleConstructor(instanceClass).newInstance();
        }
        catch (Throwable ex) {
            throw new IllegalArgumentException("Unable to instantiate factory class: " + factoryClass.getName(), ex);
        }
    }

}
基本上注解这块就是说完了,但是中间少说了几个比较重要的东西,这里要说下需要注意的2个问题,
1.exclude和excludeName这个两个主要时排除你不想加载的配置,用法很简答,不需要说他太多;
2.scanBasePackages和scanBasePackageClasses这个是为了指定运行目录,好多小伙伴做了项目分离以后,会读取不到Mappr等,可以考虑下是不是这个错误;
重点来了,上面说了加载什么东西,那这些东西啥时候被调用被触发,那我们看下我们重点run方法:
1.调用run方法之前,首先初始化SpringApplication对象实例,这个对象初始化的过程中也做了不少事情让我们来慢慢看起来,接上上面思路,继续完成我们的取经;
//初始化SpringApplication对象
public SpringApplication(ResourceLoader resourceLoader, Class<?>... primarySources) {
          //加载classpatch文件下面的配置文件
        this.resourceLoader = resourceLoader;
        Assert.notNull(primarySources, "PrimarySources must not be null");
        this.primarySources = new LinkedHashSet<>(Arrays.asList(primarySources));
                //判断是否是web运行环境
        this.webApplicationType = deduceWebApplicationType();
                //使用SpringFactoriesLoader在应用的classpath中查找并加载所有可用的ApplicationContextInitializer。
        setInitializers((Collection) getSpringFactoriesInstances(
                ApplicationContextInitializer.class));
               //使用SpringFactoriesLoader在应用的classpath中查找并加载所有可用的ApplicationListener。
        setListeners((Collection) getSpringFactoriesInstances(ApplicationListener.class));
                //获得当前执行main方法的类对象
        this.mainApplicationClass = deduceMainApplicationClass();
}
ApplicationContextInitializer 接口是在spring容器刷新之前执行的一个回调函数,主要有2点作用:1.在上下文(ConfigurableApplicationContext)刷新(refresh)之前调用,2.通常被用作web应用,在一些程序设计在spring容器初始化使用。比如说注册一些配置或者激活一些配置文件针对(ConfigurableApplicationContext的getEnvironment()方法)。另外这个函数支持支持Order注解。并且代表着执行顺序。我在下面也写了一个简单的例子,同时这个也是支持在配置文件中配置的context.initializer.classes=后面加上回调函数的全限定名称;另外假设我们在当前项目中要引入别的jar,这个jar要在加载前做一些配置,这个时候我们项目下的resources下新建META-INF文件夹,文件夹下新建spring.factories文件,然后写上org.springframework.context.ApplicationContextInitializer=后面加上需要回调函数的全限定名称,这个是在主项目启动的时候就会优先加载了;
ApplicationListener接口是spring boot的监听器,有7种类型,我准备好了demo大家执行一下,我相信对下面run方法的运行就不是很迷惑了;
@Order(3)
public class TestApplicationContextInitializer implements ApplicationContextInitializer {
    @Override
    public void initialize(ConfigurableApplicationContext applicationContext) {
        System.out.println(applicationContext.getBeanDefinitionCount()+applicationContext.getBeanDefinitionNames().toString());
    }
}

@Order(1)
public class TestApplicationContextInitializer2 implements ApplicationContextInitializer {
    @Override
    public void initialize(ConfigurableApplicationContext applicationContext) {
        System.out.println(applicationContext.getDisplayName());
    }
}

@SpringBootApplication
public class DemoApplication {

    public static void main(String[] args) {
//        SpringApplication.run(DemoApplication.class, args);
        SpringApplication springApplication=new SpringApplication(DemoApplication.class);
        springApplication.addListeners((ApplicationListener<ApplicationStartingEvent>) event->{
            System.out.println("Starting");
        });
        springApplication.addListeners((ApplicationListener<ApplicationStartedEvent>) event->{
            System.out.println("Started");
        });
        springApplication.addListeners((ApplicationListener<ApplicationFailedEvent>) event->{
            System.out.println("Failed");
        });
        springApplication.addListeners((ApplicationListener<ApplicationPreparedEvent>) event->{
            System.out.println("Prepared");
        });

        springApplication.addListeners((ApplicationListener<SpringApplicationEvent>) event->{
            System.out.println("SpringApplication");
        });

        springApplication.addListeners((ApplicationListener<ApplicationEnvironmentPreparedEvent>) event->{
            System.out.println("EnvironmentPrepare");
        });

        springApplication.addListeners((ApplicationListener<ApplicationReadyEvent>) event->{
            System.out.println("Ready");
        });
        springApplication.addInitializers(new TestApplicationContextInitializer());
        springApplication.addInitializers(new TestApplicationContextInitializer2());


        springApplication.run(args);
    }
}
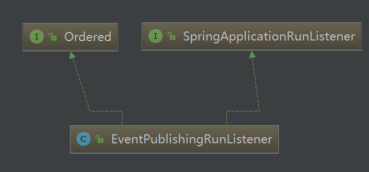
2.实例化完成开始执行run方法,这个里面流程比较多,我们先来看一个继承关系,然后结合上面ApplicationListener的demo我相信大家已经对其广播实现已经有了一个了解,这里我还是提一下通过SpringApplicationRunListener在ApplicationContext初始化过程中各个时点发布各种广播事件,并由ApplicationListener负责接收广播事件。接下来我们看下启动流程:
public ConfigurableApplicationContext run(String... args) {
        StopWatch stopWatch = new StopWatch();
        stopWatch.start();
        ConfigurableApplicationContext context = null;
                //收集异常
        Collection<SpringBootExceptionReporter> exceptionReporters = new ArrayList<>();
            //设置Headless模式为全局
        configureHeadlessProperty();
          //加载所有classpath下面的META-INF/spring.factories SpringApplicationRunListener(不同的时间点发送事件通知)
        SpringApplicationRunListeners listeners = getRunListeners(args);
          //spring boot启动初始化开始
        listeners.starting();
        try {
                        //装配参数和环境
            ApplicationArguments applicationArguments = new DefaultApplicationArguments(
                    args);
            ConfigurableEnvironment environment = prepareEnvironment(listeners,
                    applicationArguments);
            configureIgnoreBeanInfo(environment);
                        //打印Banner
            Banner printedBanner = printBanner(environment);
                        //创建ApplicationContext()
            context = createApplicationContext();
                        //返回异常
            exceptionReporters = getSpringFactoriesInstances(
                    SpringBootExceptionReporter.class,
                    new Class[] { ConfigurableApplicationContext.class }, context);
                        //装配Context
            prepareContext(context, environment, listeners, applicationArguments,
                    printedBanner);
            //执行context的refresh方法,并且调用context的registerShutdownHook方法(这一步执行完成之后,spring容器加载完成)
            refreshContext(context);
             //回调,获取容器中所有的ApplicationRunner、CommandLineRunner接口
            afterRefresh(context, applicationArguments);
            stopWatch.stop();
            if (this.logStartupInfo) {
                new StartupInfoLogger(this.mainApplicationClass)
                        .logStarted(getApplicationLog(), stopWatch);
            }
             //容器初始化完成
            listeners.started(context);
            //遍历所有注册的ApplicationRunner和CommandLineRunner,并执行其run()方法。
           //该过程可以理解为是SpringBoot完成ApplicationContext初始化前的最后一步工作,
            callRunners(context, applicationArguments);
        }
        catch (Throwable ex) {
            handleRunFailure(context, ex, exceptionReporters, listeners);
            throw new IllegalStateException(ex);
        }

        try {
            //容器开始被调用
            listeners.running(context);
        }
        catch (Throwable ex) {
            handleRunFailure(context, ex, exceptionReporters, null);
            throw new IllegalStateException(ex);
        }
        return context;
}
写了这么多我忘记放入执行结果了这里补进去:

三、总结
要是想在spring boot初始化的时候搞点事情的化,那么有3种方法:
1.创建ApplicationContextInitializer的实现类
2.创建ApplicationListener的实现类
3.创建ApplicationRunner和CommandLineRunner的实现类
上面2种已经有了demo,我再来写一个第3种的demo;
@Order(2)
@Component
public class CommandLineRunnerDemo implements CommandLineRunner {
    @Override
    public void run(String... args) throws Exception {
        System.out.println("CommandLineRunnerDemo");
    }
}

@Order(1)
@Component
public class ApplicationRunnerDemo implements ApplicationRunner {
    @Override
    public void run(ApplicationArguments args) throws Exception {
        System.out.println("ApplicationRunner");
    }
}
知道启动的流程又懂了扩展,我们接下来开始spring cloud吧。
上面有什么的不懂的可以加群:438836709
也可以关注我公众号