本文记录观看尚学堂spring cloud视频记录总结。
spring-cloud采用 Dalston.SR1
spring-boot采用 1.5.9.RELEASE
管理工具maven
数据库mysql
一、微服务的注册和发现eureka解释
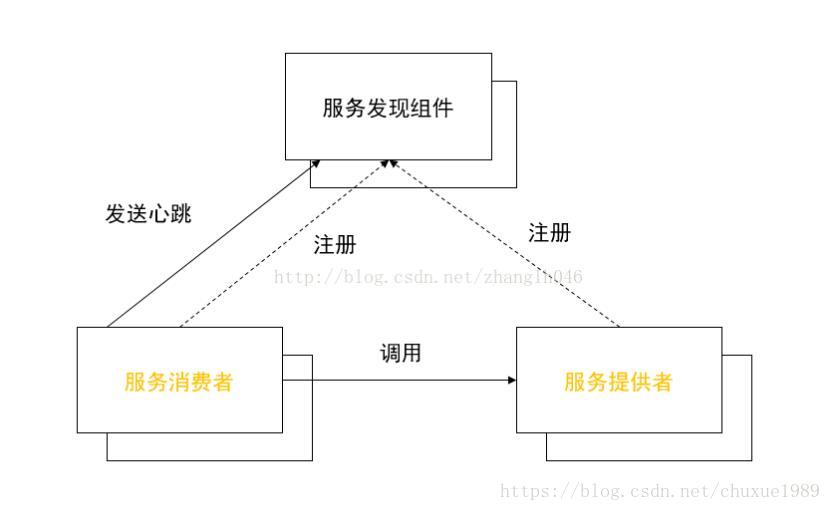
Register:服务注册
当Eureka客户端向Eureka Server注册时,它提供自身的元数据,比如IP地址、端口,运行状况指示符URL,主页等。
Renew:服务续约
Eureka客户会每隔30秒发送一次心跳来续约。 通过续约来告知Eureka Server该Eureka客户仍然存在,没有出现问题。 正常情况下,如果Eureka Server在90秒没有收到Eureka客户的续约,它会将实例从其注册表中删除。 建议不要更改续约间隔。
Fetch Registries:获取注册列表信息
Eureka客户端从服务器获取注册表信息,并将其缓存在本地。客户端会使用该信息查找其他服务,从而进行远程调用。该注册列表信息定期(每30秒钟)更新一次。每次返回注册列表信息可能与Eureka客户端的缓存信息不同, Eureka客户端自动处理。如果由于某种原因导致注册列表信息不能及时匹配,Eureka客户端则会重新获取整个注册表信息。 Eureka服务器缓存注册列表信息,整个注册表以及每个应用程序的信息进行了压缩,压缩内容和没有压缩的内容完全相同。Eureka客户端和Eureka 服务器可以使用JSON / XML格式进行通讯。在默认的情况下Eureka客户端使用压缩JSON格式来获取注册列表的信息。
Cancel:服务下线
Eureka客户端在程序关闭时向Eureka服务器发送取消请求。 发送请求后,该客户端实例信息将从服务器的实例注册表中删除。该下线请求不会自动完成,它需要调用以下内容:
DiscoveryManager.getInstance().shutdownComponent();
Eviction 服务剔除
在默认的情况下,当Eureka客户端连续90秒没有向Eureka服务器发送服务续约,即心跳,Eureka服务器会将该服务实例从服务注册列表删除,即服务剔除。
Eureka 的自我保护模式
当一个新的Eureka Server出现时,它尝试从相邻节点获取所有实例注册表信息。如果从Peer节点获取信息时出现问题,Eureka Serve会尝试其他的Peer节点。如果服务器能够成功获取所有实例,则根据该信息设置应该接收的更新阈值。如果有任何时间,Eureka Serve接收到的续约低于为该值配置的百分比(默认为15分钟内低于85%),则服务器开启自我保护模式,即不再剔除注册列表的信息。
这样做的好处就是,如果是Eureka Server自身的网络问题,导致Eureka Client的续约不上,Eureka Client的注册列表信息不再被删除,也就是Eureka Client还可以被其他服务消费。
二、微服务的服务器配置
需要建立一个新的maven模块,这样eureka服务器也是一个微服务项目
1. pom中引入

 <!--eureka-server服务端 -->
 <dependency>
      <groupId>org.springframework.cloud</groupId>
      <artifactId>spring-cloud-starter-eureka-server</artifactId>
  </dependency>
2. 配置yml
server:
  port: 7001

eureka:
  instance:
    hostname: eureka7001.com #eureka服务端的实例名称
  client:
    register-with-eureka: false     #false表示不向注册中心注册自己。
    fetch-registry: false     #false表示自己端就是注册中心,我的职责就是维护服务实例,并不需要去检索服务
    service-url:
      #单机 defaultZone: http://${eureka.instance.hostname}:${server.port}/eureka/       #设置与Eureka Server交互的地址查询服务和注册服务都需要依赖这个地址(单机)。
      defaultZone: http://eureka7002.com:7002/eureka/
注意:这里的eureka采用的集群配置,比如有三个eureka节点 a b c 在 a中defaultZone配置 b和c; 在b中配置 a和c ;在c中配置 a和b 例如上面的例子只有两个节点 a和b,所以a中把另外一个节点b配置上即可
3.配置启动类
@SpringBootApplication
@EnableEurekaServer // 微服务服务端
public class EurekaServer7001_App
{
    public static void main(String[] args)
    {
        SpringApplication.run(EurekaServer7001_App.class, args);
    }
}
三、微服务的提供者
1. pom文件修改
<dependency>
    <groupId>org.springframework.cloud</groupId>
     <artifactId>spring-cloud-starter-eureka</artifactId>
 </dependency>
 <dependency>
     <groupId>org.springframework.cloud</groupId>
     <artifactId>spring-cloud-starter-config</artifactId>
 </dependency>
2. yml配置
spring:
  application:
    name: microservicecloud-dept #这里就是微服务的在注册中心的名字

eureka:
  instance:
      instance-id: microservicecloud-dept8001
      prefer-ip-address: true     #访问路径可以显示IP地址
  client: #客户端注册进eureka服务列表内
    service-url:
      #defaultZone: http://localhost:7001/eureka
      defaultZone: http://eureka7001.com:7001/eureka/,http://eureka7002.com:7002/eureka/
3. 配置启动类
@EnableEurekaClient ////本服务启动后会自动注册进eureka服务中
@EnableDiscoveryClient //开启服务发现,对外暴露服务
public class DeptProvider8001_App
{
    public static void main(String[] args)
    {
        SpringApplication.run(DeptProvider8001_App.class, args);
    }
}
四、微服务的提供者
1. pom文件
<!-- spring cloud -->
 <dependency>
     <groupId>org.springframework.cloud</groupId>
     <artifactId>spring-cloud-starter-eureka</artifactId>
 </dependency>
  <dependency>
      <groupId>org.springframework.cloud</groupId>
      <artifactId>spring-cloud-starter-config</artifactId>
  </dependency>
<!-- spring cloud 客户端负载均衡-->
  <dependency>
      <groupId>org.springframework.cloud</groupId>
      <artifactId>spring-cloud-starter-ribbon</artifactId>
  </dependency>
2. yml配置
eureka:
  client:
    register-with-eureka: false #本微服务不向eureka注册服务
    service-url:
      defaultZone: http://eureka7001.com:7001/eureka/,http://eureka7002.com:7002/eureka/
defaultZone:把所有eureka节点全部配置上去
3. 启动类
@SpringBootApplication
@EnableSwagger2
@EnableDiscoveryClient//这里为什么会放到这里?
public class DeptConsumer80_App
{
    public static void main(String[] args)
    {
        SpringApplication.run(DeptConsumer80_App.class, args);
    }
}
4. 实际调用
@Bean
@LoadBalanced//Spring Cloud Ribbon是基于Netflix Ribbon实现的一套客户端       负载均衡的工具。
public RestTemplate getRestTemplate()
{
    return new RestTemplate();
}
package com.atguigu.springcloud.controller;
import java.util.List;
import org.springframework.beans.factory.annotation.Autowired;
import org.springframework.http.HttpMethod;
import org.springframework.web.bind.annotation.PathVariable;
import org.springframework.web.bind.annotation.RequestMapping;
import org.springframework.web.bind.annotation.RequestMethod;
import org.springframework.web.bind.annotation.RestController;
import org.springframework.web.client.RestTemplate;
import com.atguigu.springcloud.entities.Dept;
@RestController
public class DeptController_Consumer
{
private static final String REST_URL_PREFIX = "http://MICROSERVICECLOUD-DEPT";
/**
* 使用 使用restTemplate访问restful接口非常的简单粗暴无脑。 (url, requestMap,
* ResponseBean.class)这三个参数分别代表 REST请求地址、请求参数、HTTP响应转换被转换成的对象类型。
*/
@Autowired
private RestTemplate restTemplate;
@RequestMapping(value = "/consumer/dept/add",method = {RequestMethod.POST})
public boolean add(Dept dept)
{
return restTemplate.postForObject(REST_URL_PREFIX + "/dept/add", dept, Boolean.class);
}
}这里是spring cloud初步使用和配置。未完待续….