(一)mysql版本介绍
MySQL 中的命名方案使用由三个数字和一个可选后缀组成的版本名称(例如, mysql-8.0.1-dmr)。版本名称中的数字解释如下:
-
第一个数字 ( 8 ) 是主版本号。
-
第二个数字 ( 0 ) 是次要版本号。总的来说,主要和次要的数字构成了发布序列号。序列号描述了稳定的功能集。
-
第三个数字 ( 1 ) 是发布系列中的版本号。每个新的错误修复版本都会增加。在大多数情况下,系列中的最新版本是最佳选择。
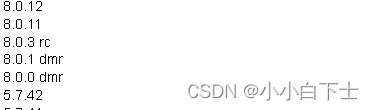
dmr表示开发里程碑版本 (DMR)。rc表示候选版本 (RC)。候选版本被认为是稳定的,已经通过了 MySQL 的所有内部测试。
没有后缀表示一般可用性 (GA) 或生产版本。GA 版本是稳定的,已经成功地通过了早期的发布阶段,并且被认为是可靠的,没有严重的错误,并且适合在生产系统中使用。
(二)安装介绍
MySQL是一个关系型数据库管理系统,常用于LAMP和LNMP等网站场景中。本教程介绍如何在Linux系统(centos7)上安装mysql 8、配置以及远程访问MySQL数据库。
相关默认安装路径
- 配置文件:/etc/my.cnf
- 数据存储:/var/lib/mysql
- 命令文件:/usr/bin和/usr/sbin
这里我用的redhat7的mysql包,el7;比如使用linux8,就不要用el7的包安装,找el8的,否则安装时有时候有依赖问题一直解决不了。
(三)mysql 8安装
(1)在线下载安装包
wget https://cdn.mysql.com//Downloads/MySQL-8.0/mysql-8.0.34-1.el7.x86_64.rpm-bundle.tar(2)解压并安装
解压目录可以通过 -C 选项指定解压目录
tar -xvf mysql-8.0.34-1.el7.x86_64.rpm-bundle.tar开始安装
#mariadb的lib包和mysql的lib包冲突,删掉
rpm -qa | grep mariadb | xargs rpm -e --nodeps
#安装mysql服务
rpm -ivh mysql-community-common-8.0.34-1.el7.x86_64.rpm
rpm -ivh mysql-community-client-plugins-8.0.34-1.el7.x86_64.rpm
rpm -ivh mysql-community-client-8.0.34-1.el7.x86_64.rpm
rpm -ivh mysql-community-libs-8.0.34-1.el7.x86_64.rpm
rpm -ivh mysql-community-libs-compat-8.0.34-1.el7.x86_64.rpm
rpm -ivh mysql-community-icu-data-files-8.0.34-1.el7.x86_64.rpm
rpm -ivh mysql-community-server-8.0.34-1.el7.x86_64.rpm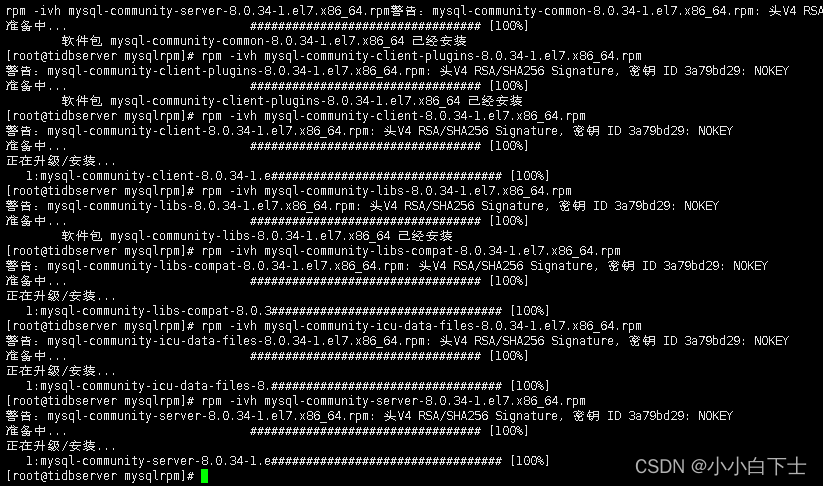
可以检查mysql版本号,有回显安装的没问题
![]()
(3)初始化数据库
创建用户和用户组,创建存储目录?
其实没必要,初始化的时候如果没有mysql用户和组,或者对应的目录没有,会自己增加的,不用多此一举了。数据库目录和文件是由mysql登录帐户拥有,从系统root帐户启动mysqld,使用--user选项指定mysql用户,注意看这里用root操作初始化,权限所有者还是mysql。
默认的安装目录是/var/lib/mysql,可以进去看看,没初始化的时候是空的目录
这里用root用户就行,因为还没创建mysql呢
mysqld --initialize --user=mysql 这里初始化有--initialize-insecure 和 --initialize 选项,前者在初始化时不生成管理员root用户的密码,后者会在日志里有临时密码。其他选项 --basedir=MySQL安装目录 --datadir=数据库存储目录 可以自行配置。

(4)启动mysql并配置
在输入密码时,系统为了最大限度的保证数据安全,命令行将不做任何回显。您只需要输入正确的密码信息,然后按Enter键即可。
#systemctl start mysqld   启动mysql数据库
[root@tidbserver mysql]# systemctl start mysqld
#grep 'temporary password' /var/log/mysqld.log  查看临时密码
[root@tidbserver mysql]# grep 'temporary password' /var/log/mysqld.log
2023-09-08T06:52:53.546042Z 6 [Note] [MY-010454] [Server] A temporary password is generated for root@localhost: JpsG?Vgfq8G7
#mysql_secure_installation  安全向导
[root@tidbserver mysql]# mysql_secure_installation

Securing the MySQL server deployment.

Enter password for user root:  #输入已获取的root用户初始临时密码

The existing password for the user account root has expired. Please set a new password.

New password:          #设置mysql root用户新密码

Re-enter new password: #确认密码

VALIDATE PASSWORD COMPONENT can be used to test passwords
and improve security. It checks the strength of password
and allows the users to set only those passwords which are
secure enough. Would you like to setup VALIDATE PASSWORD component?

Press y|Y for Yes, any other key for No: no #是否安装组件 这个是校验密码强度的,建议安装 Y ;如果没有略过
Using existing password for root.
Change the password for root ? ((Press y|Y for Yes, any other key for No) : n #是否修改root密码 刚改了 就不用了 n

 ... skipping.
By default, a MySQL installation has an anonymous user,
allowing anyone to log into MySQL without having to have
a user account created for them. This is intended only for
testing, and to make the installation go a bit smoother.
You should remove them before moving into a production
environment.

Remove anonymous users? (Press y|Y for Yes, any other key for No) : y ##输入Y删除MySQL默认的匿名用户。
Success.


Normally, root should only be allowed to connect from
'localhost'. This ensures that someone cannot guess at
the root password from the network.

Disallow root login remotely? (Press y|Y for Yes, any other key for No) : y #输入Y禁止root远程登录。
Success.

By default, MySQL comes with a database named 'test' that
anyone can access. This is also intended only for testing,
and should be removed before moving into a production
environment.


Remove test database and access to it? (Press y|Y for Yes, any other key for No) :  #输入Y删除test库以及对test库的访问权限。当然也可以留着

 ... skipping.
Reloading the privilege tables will ensure that all changes
made so far will take effect immediately.

Reload privilege tables now? (Press y|Y for Yes, any other key for No) : y #输入Y重新加载授权表。
Success.

All done!
完成
(四)创建远程连接用户
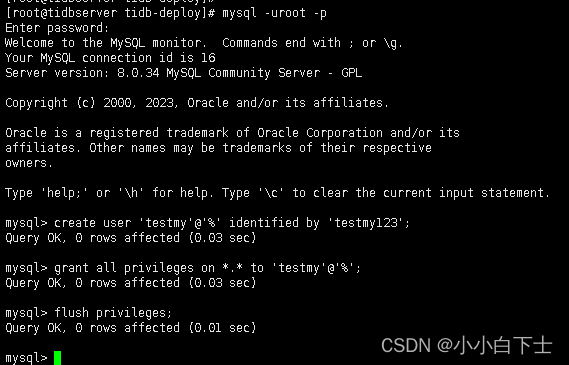
mysql -uroot -p
输入刚刚配置安全时设置的密码

#创建数据库用户testmy,并授予远程连接权限。
create user 'testmy'@'%' identified by 'testmy123';

#为testmy用户授权数据库所有权限。
grant all privileges on *.* to 'testmy'@'%';

#创建新用户会默认使用新的 caching_sha2_password,客户端不支持新的加密方式,修改
ALTER USER 'testmy'@'%' IDENTIFIED WITH mysql_native_password BY 'testmy123';

#刷新权限。
flush privileges;
建议使用非root账号远程登录MySQL数据库
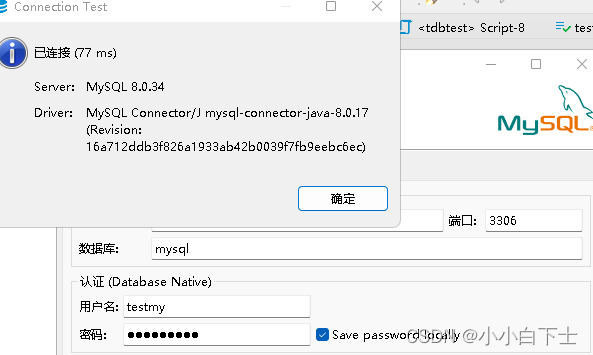
(五)使用dbeaver客户端连接
这里使用我们刚创建的远程连接的用户testmy,不要使用root用户远程连接
稳健(*^▽^*)!