文章目录
一、WebSocket简介:
HTML5规范在传统的web交互基础上为我们带来了众多的新特性,随着web技术被广泛用于web APP的开发,这些新特性得以推广和使用,而websocket作为一种新的web通信技术具有巨大意义。WebSocket是HTML5新增的协议,它的目的是在浏览器和服务器之间建立一个不受限的双向通信的通道,比如说,服务器可以在任意时刻发送消息给浏览器。支持双向通信。
二、WebSocket通信原理及机制:
websocket是基于浏览器端的web技术,那么它的通信肯定少不了http,websocket本身虽然也是一种新的应用层协议,但是它也不能够脱离http而单独存在。具体来讲,我们在客户端构建一个websocket实例,并且为它绑定一个需要连接到的服务器地址,当客户端连接服务端的时候,会向服务端发送一个消息报文
三、WebSocket特点和优点:
- 支持双向通信,实时性更强。
- 更好的二进制支持。
- 较少的控制开销。连接创建后,ws客户端、服务端进行数据交换时,协议控制的数据包头部较小。在不包含头部的情况下,服务端到客户端的包头只有2~10字节(取决于数据包长度),客户端到服务端的的话,需要加上额外的4字节的掩码。而HTTP协议每次通信都需要携带完整的头部。
- 支持扩展。ws协议定义了扩展,用户可以扩展协议,或者实现自定义的子协议。(比如支持自定义压缩算法等)
- 建立在tcp协议之上,服务端实现比较容易
- 数据格式比较轻量,性能开销小,通信效率高
- 和http协议有着良好的兼容性,默认端口是80和443,并且握手阶段采用HTTP协议,因此握手的时候不容易屏蔽,能通过各种的HTTP代理
四、WebSocket心跳机制:
- 在使用websocket过程中,可能会出现网络断开的情况,比如信号不好,或者网络临时性关闭,这时候websocket的连接已经断开,而浏览器不会执行websocket 的 onclose方法,我们无法知道是否断开连接,也就无法进行重连操作。如果当前发送websocket数据到后端,一旦请求超时,onclose便会执行,这时候便可进行绑定好的重连操作。
- 心跳机制是每隔一段时间会向服务器发送一个数据包,告诉服务器自己还活着,同时客户端会确认服务器端是否还活着,如果还活着的话,就会回传一个数据包给客户端来确定服务器端也还活着,否则的话,有可能是网络断开连接了。需要重连~
五、在后端Spring Boot 和前端VUE中如何建立通信:
【1】在Spring Boot 中 pom.xml中添加 websocket依赖
<dependency>
	<groupId>org.springframework.boot</groupId>
	<artifactId>spring-boot-starter-websocket</artifactId>
</dependency>
【2】创建 WebSocketConfig.java 开启websocket支持
package com.example.demo.websocket;

import org.springframework.context.annotation.Bean;
import org.springframework.context.annotation.Configuration;
import org.springframework.web.socket.server.standard.ServerEndpointExporter;

/**
 * 开启WebSocket支持
 * @author zh
 */
@Configuration
public class WebSocketConfig {


    @Bean
    public ServerEndpointExporter serverEndpointExporter() {


        return new ServerEndpointExporter();
    }
}
【3】创建 WebSocketServer.java 链接
package com.example.demo.websocket;

import com.alibaba.fastjson.JSON;
import org.slf4j.Logger;
import org.slf4j.LoggerFactory;
import org.springframework.stereotype.Component;

import javax.websocket.*;
import javax.websocket.server.ServerEndpoint;
import java.io.IOException;
import java.util.HashMap;
import java.util.Map;
import java.util.concurrent.CopyOnWriteArraySet;


@ServerEndpoint("/websocket/testsocket")
@Component
public class WebSocketServer {


    private static Logger log = LoggerFactory.getLogger(WebSocketServer.class);
    //静态变量,用来记录当前在线连接数。应该把它设计成线程安全的。
    private static int onlineCount = 0;
    //concurrent包的线程安全Set,用来存放每个客户端对应的MyWebSocket对象。
    private static CopyOnWriteArraySet<WebSocketServer> webSocketSet = new CopyOnWriteArraySet<WebSocketServer>();

    //与某个客户端的连接会话,需要通过它来给客户端发送数据
    private Session session;

    /**
     * 连接建立成功调用的方法*/
    @OnOpen
    public void onOpen(Session session) {


        this.session = session;
        webSocketSet.add(this);     //加入set中
        addOnlineCount();           //在线数加1
        log.info("有新窗口开始监听,当前在线人数为" + getOnlineCount());
        try {


            sendMessage("连接成功");
        } catch (Exception e) {


            log.error("websocket IO异常");
        }
    }

    /**
     * 连接关闭调用的方法
     */
    @OnClose
    public void onClose(Session session) {


        try {


            webSocketSet.remove(this);  //从set中删除
            subOnlineCount();           //在线数减1
            session.close();
            log.info("有一连接关闭!当前在线人数为" + getOnlineCount());
        } catch (IOException e) {


            e.printStackTrace();
        }
    }

    /**
     * 收到客户端消息后调用的方法
     *
     * @param message 客户端发送过来的消息*/
    @OnMessage
    public void onMessage(String message, Session session) {


        log.info("收到的信息:"+message);
        Map<String, Object> maps = new HashMap<>();
        maps.put("type", message);
        this.sendInfo(maps);
    }

    /**
     *
     * @param session
     * @param error
     */
    @OnError
    public void onError(Session session, Throwable error) {


        log.error("发生错误");
        error.printStackTrace();
    }
    /**
     * 实现服务器主动推送
     */
    public void sendMessage(Object obj)  {


        try {


            synchronized (this.session) {


                this.session.getBasicRemote().sendText((JSON.toJSONString(obj)));
            }
        } catch (Exception e) {


            e.printStackTrace();
        }

    }


    /**
     * 群发自定义消息
     * */
    public static void sendInfo(Object obj) {


        for (WebSocketServer item : webSocketSet) {


            try {


                item.sendMessage(obj);
            } catch (Exception e) {


                continue;
            }
        }
    }

    public static synchronized int getOnlineCount() {


        return onlineCount;
    }

    public static synchronized void addOnlineCount() {


        WebSocketServer.onlineCount++;
    }

    public static synchronized void subOnlineCount() {


        WebSocketServer.onlineCount--;
    }
}
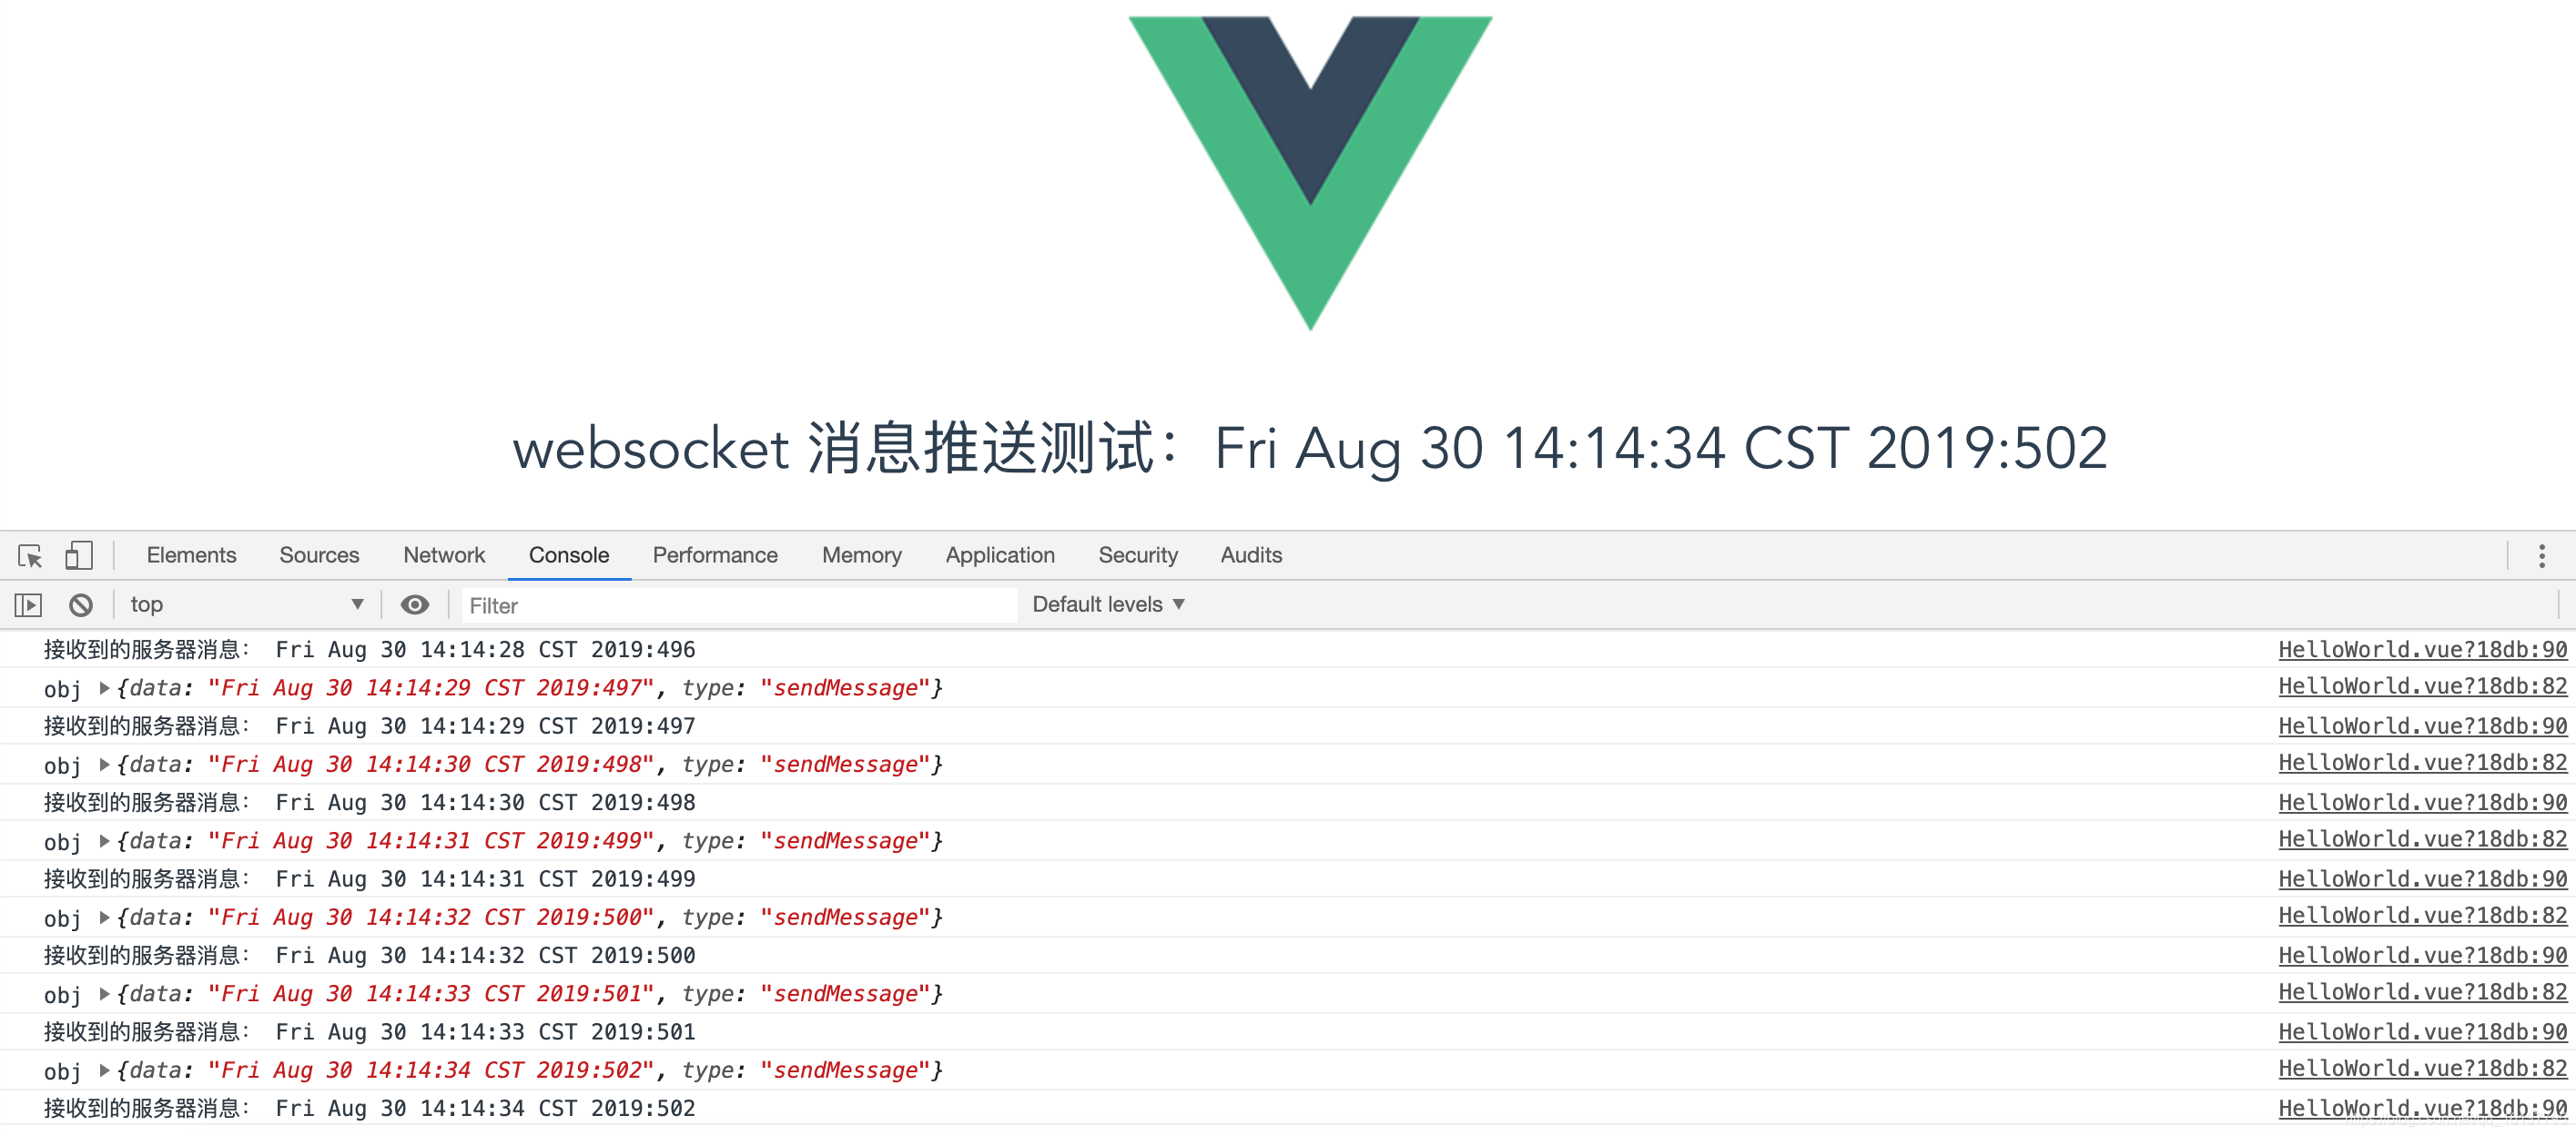
【4】创建一个测试调用websocket发送消息 TimerSocketMessage.java (用定时器发送推送消息)
package com.example.demo.websocket;

import org.springframework.scheduling.annotation.EnableScheduling;
import org.springframework.scheduling.annotation.Scheduled;
import org.springframework.stereotype.Component;

import java.util.HashMap;
import java.util.Map;


@Component
@EnableScheduling
public class TimerSocketMessage {


    /**
     * 推送消息到前台
     */
    @Scheduled(cron = "*/1 * * * * * ")
    public void SocketMessage(){


        Map<String, Object> maps = new HashMap<>();
        maps.put("type", "sendMessage");
        maps.put("data","11111");
        WebSocketServer.sendInfo(maps);
    }
}
【5】在VUE中创建和后端 websocket服务的连接并建立心跳机制
<template>
  <div class="hello">
    <h1> websocket 消息推送测试:{

   {data}}</h1>
  </div>
</template>

<script>
  export default {
    name: 'HelloWorld',
    data () {
      return {
        data:0,
        timeout: 28 * 1000,//30秒一次心跳
        timeoutObj: null,//心跳心跳倒计时
        serverTimeoutObj: null,//心跳倒计时
        timeoutnum: null,//断开 重连倒计时
        websocket: null,
      }
    },
    created () {
      // 初始化websocket
      this.initWebSocket()
    },
    methods:{
      initWebSocket () {
        let url = 'ws://localhost:8086/websocket/testsocket'
        this.websocket = new WebSocket(url)
        // 连接错误
        this.websocket.onerror = this.setErrorMessage

        // 连接成功
        this.websocket.onopen = this.setOnopenMessage

        // 收到消息的回调
        this.websocket.onmessage = this.setOnmessageMessage

        // 连接关闭的回调
        this.websocket.onclose = this.setOncloseMessage

        // 监听窗口关闭事件,当窗口关闭时,主动去关闭websocket连接,防止连接还没断开就关闭窗口,server端会抛异常。
        window.onbeforeunload = this.onbeforeunload
      },
      reconnect () { // 重新连接
        if(this.lockReconnect) return;
        this.lockReconnect = true;
        //没连接上会一直重连,设置延迟避免请求过多
        this.timeoutnum && clearTimeout(this.timeoutnum);
        this.timeoutnum = setTimeout(() => {
          //新连接
          this.initWebSocket();
          this.lockReconnect = false;
        }, 5000);
      },
      reset () { // 重置心跳
        // 清除时间
        clearTimeout(this.timeoutObj);
        clearTimeout(this.serverTimeoutObj);
        // 重启心跳
        this.start();
      },
      start () { // 开启心跳
        this.timeoutObj && clearTimeout(this.timeoutObj);
        this.serverTimeoutObj && clearTimeout(this.serverTimeoutObj);
        this.timeoutObj = setTimeout(() => {
          // 这里发送一个心跳,后端收到后,返回一个心跳消息,
          if (this.websocket && this.websocket.readyState == 1) { // 如果连接正常
            this.websocketsend('heartbeat');
          } else { // 否则重连
            this.reconnect();
          }
          this.serverTimeoutObj = setTimeout(() => {
            //超时关闭
            this.websocket.close();
          }, this.timeout);

        }, this.timeout)
      },
      setOnmessageMessage (event) {
        let obj = JSON.parse(event.data);
        console.log("obj",obj)
        switch(obj.type) {
          case 'heartbeat':
            //收到服务器信息,心跳重置
            this.reset();
            break;
          case 'sendMessage':
            this.data = obj.data
            console.log("接收到的服务器消息:",obj.data)
        }

      },
      setErrorMessage () {
        //重连
        this.reconnect();
        console.log("WebSocket连接发生错误" + '   状态码:' + this.websocket.readyState)
      },
      setOnopenMessage () {
        //开启心跳
        this.start();
        console.log("WebSocket连接成功" + '   状态码:' + this.websocket.readyState)
      },
      setOncloseMessage () {
        //重连
        this.reconnect();
        console.log( "WebSocket连接关闭" + '   状态码:' + this.websocket.readyState)
      },
      onbeforeunload () {
        this.closeWebSocket();
      },
      //websocket发送消息
      websocketsend(messsage) {
        this.websocket.send(messsage)
      },
      closeWebSocket() { // 关闭websocket
        this.websocket.close()
          },
  }
}
</script>

<!-- Add "scoped" attribute to limit CSS to this component only -->
<style scoped>
h1, h2 {
  font-weight: normal;
}
ul {
  list-style-type: none;
  padding: 0;
}
li {
  display: inline-block;
  margin: 0 10px;
}
a {
  color: #42b983;
}
</style>
【6】启动项目开始测试结果

