新手做毕设-后台管理系统
任务十三 JWT+SpringSecurity实现基于Token的登录
任务十四 权限菜单之菜单管理
前面的任务我们完成了基于JWT验证的系统登录。任务十四-任务十六开始我将进行权限菜单模块的开发,也就是要实现根据不同角色赋予不同权限(可以访问的菜单和可以进行的操作),不同用户赋予不同角色,当用户登录时,不仅进行账号判断还需要获取不同用户对应不同角色的权限,即认证、授权;本次任务完成菜单管理,主要是菜单表的增删改查、一级、二级菜单设计等,通过本次任务,大家能够:
(1)熟练掌握前面定义的统一接口规范使用;
(2)熟练使用ElementUI树型菜单,进行权限菜单分配;
一、数据表设计
1. 数据表
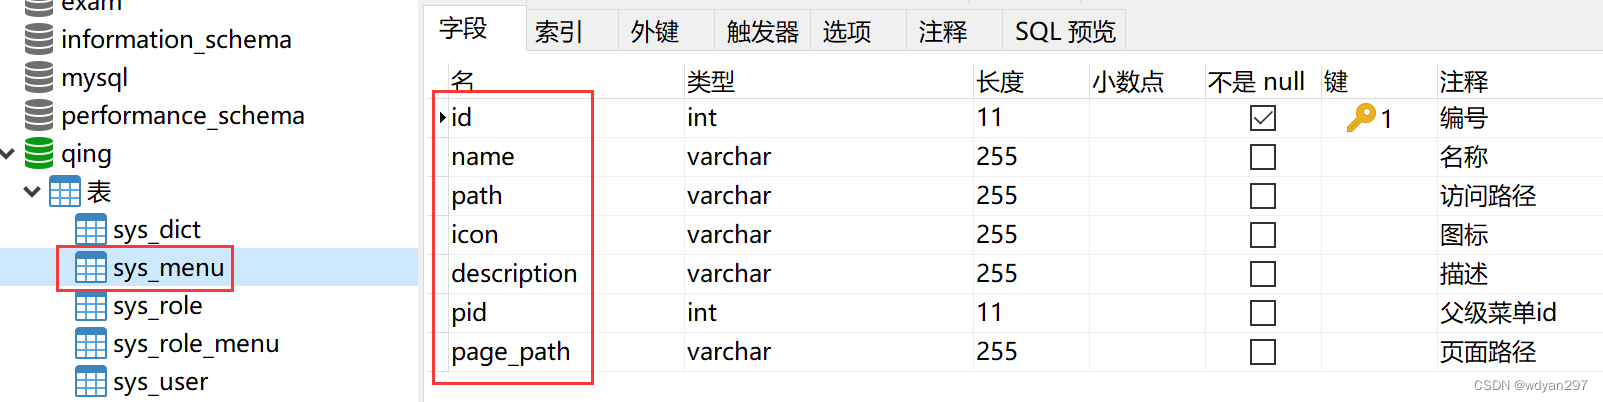
新建数据表sys_menu如下图:
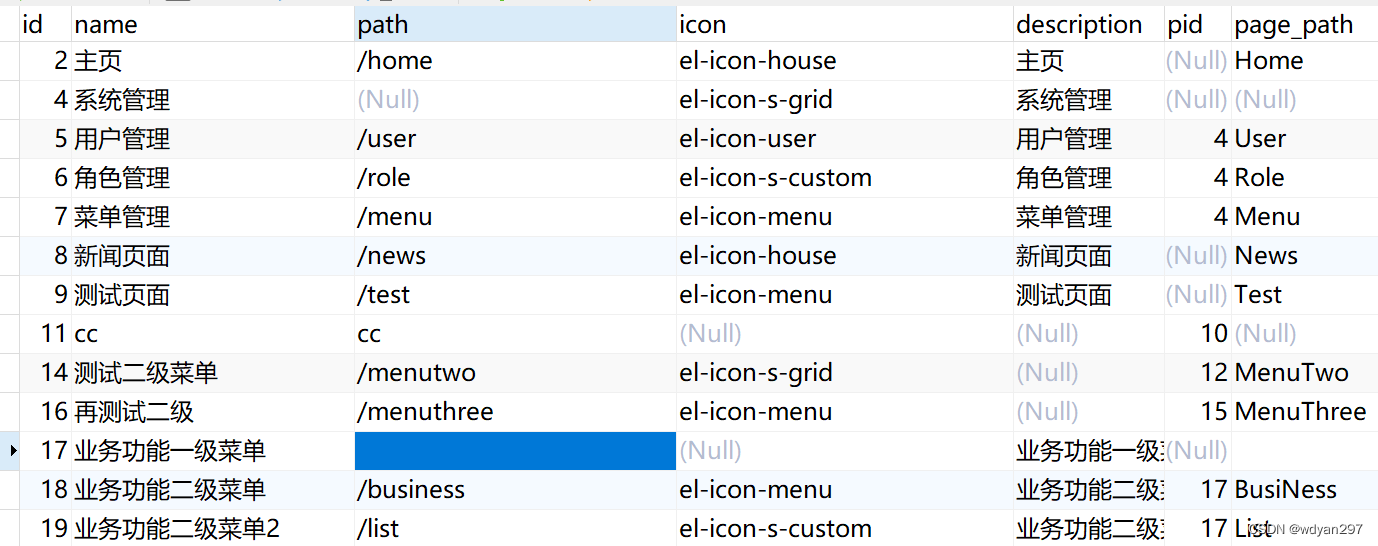
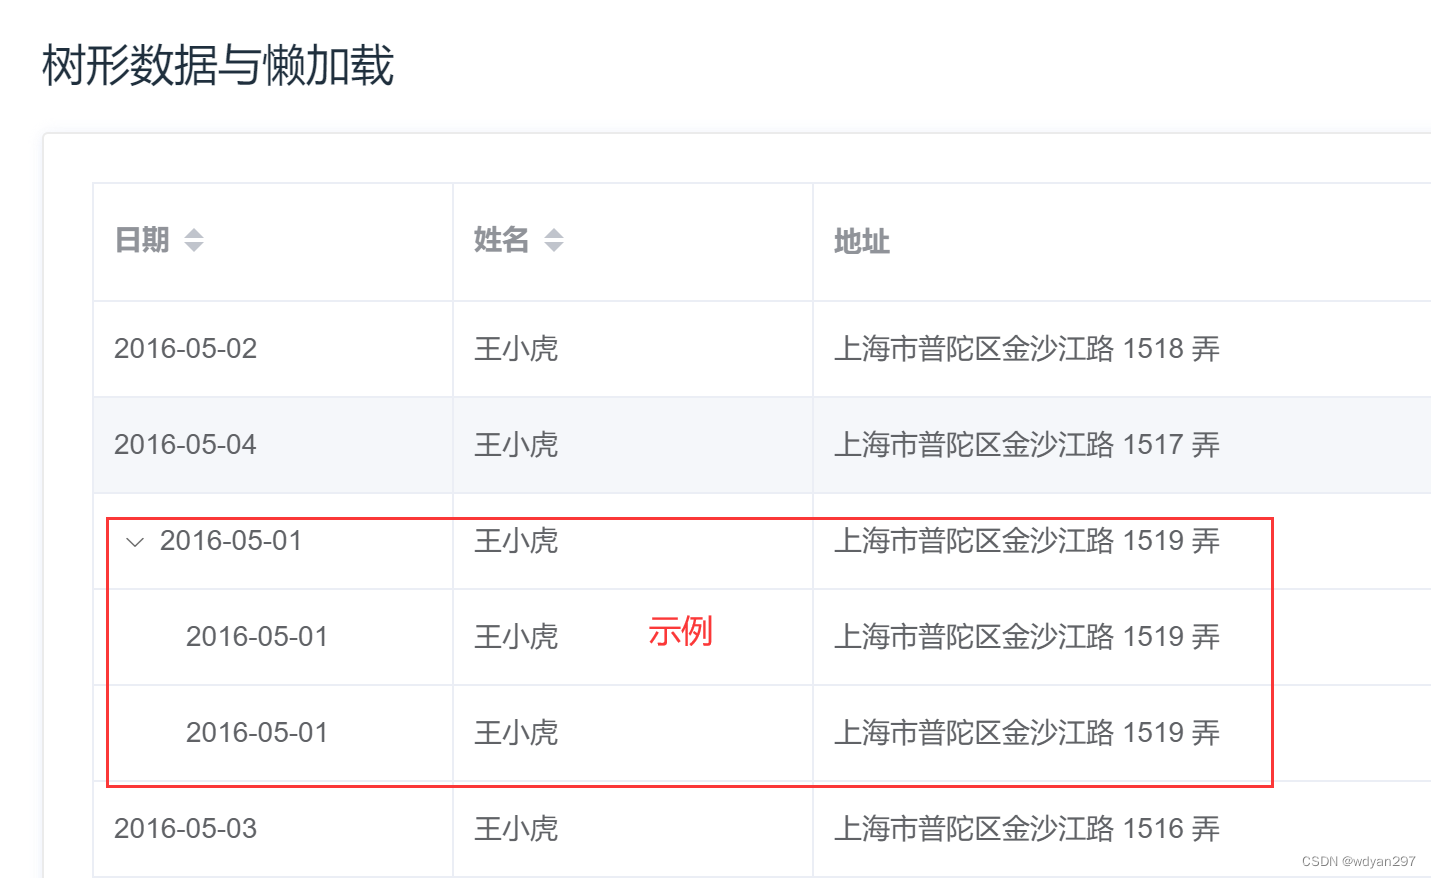
数据示例:
2. 添加实体类Menu
新建实体类Menu。
package com.example.demo.entity;


import com.baomidou.mybatisplus.annotation.IdType;
import com.baomidou.mybatisplus.annotation.TableField;
import com.baomidou.mybatisplus.annotation.TableId;
import com.baomidou.mybatisplus.annotation.TableName;
import lombok.Data;

import java.util.List;

@Data
//可以使用 @TableName 表名注解指定当前实体类对应的表名,比如下面 Menu 实体类对应表名为 sys_menu
@TableName(value="sys_menu")
public class Menu {

    //可以使用 @TableId 注解(标注在主键上)和 @TableField 注解(标注在其他成员属性上)来指定对应的字段名
    @TableId(value = "id",type = IdType.AUTO)
    private Integer id;
    private String name;
    private String path;
    private String icon;
    private String description;

    //在数据表中没有children这个字段,这个在做菜单的时候会用到,所以使用exist=false忽略
    @TableField(exist = false)
    private List<Menu> children;

    private Integer pid;
    @TableField(value="page_path")//这样处理的主要目的是java对带有下划线的字段不识别,所以改为驼峰形式
    private String pagePath;
}
二、后端增删改查接口设计
1. 添加MenuMapper接口
在mapper包中创建一个MenuMapper接口,现在都是用Mybatis-plus框架,所以只要继承BaseMapper。
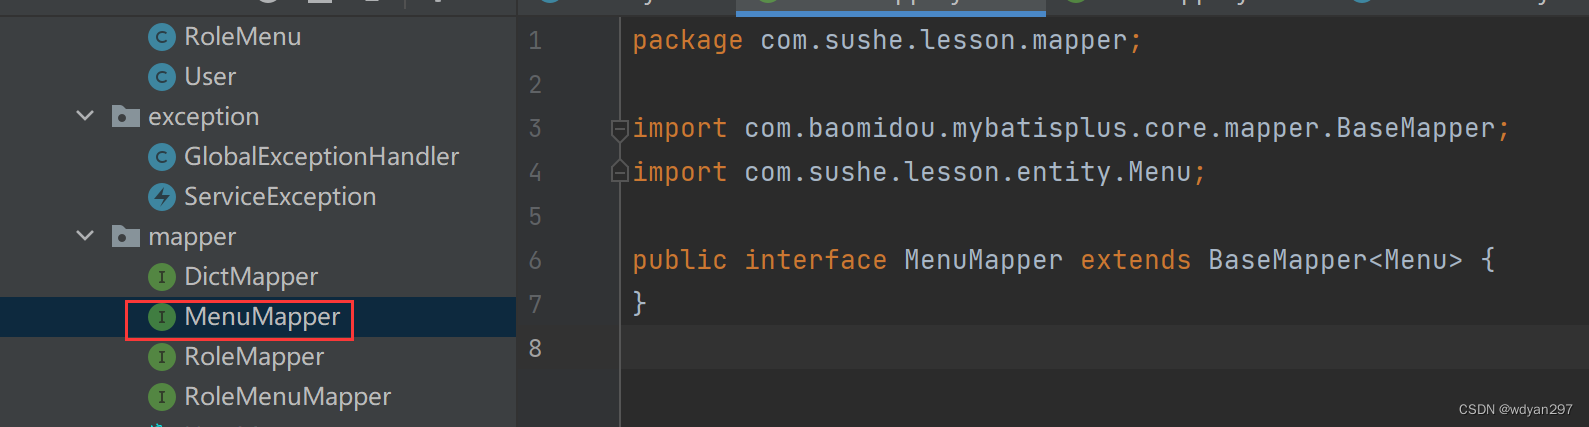
packagecom.example.demo.mapper;

import com.baomidou.mybatisplus.core.mapper.BaseMapper;
import com.example.demo.entity.Menu;

public interface MenuMapper extends BaseMapper<Menu> {
}
2.添加MenuService类
在service包中新建一个MenuService类,进行数据业务逻辑处理,现在都是用Mybatis-plus框架,所以只要继承ServiceImpl。
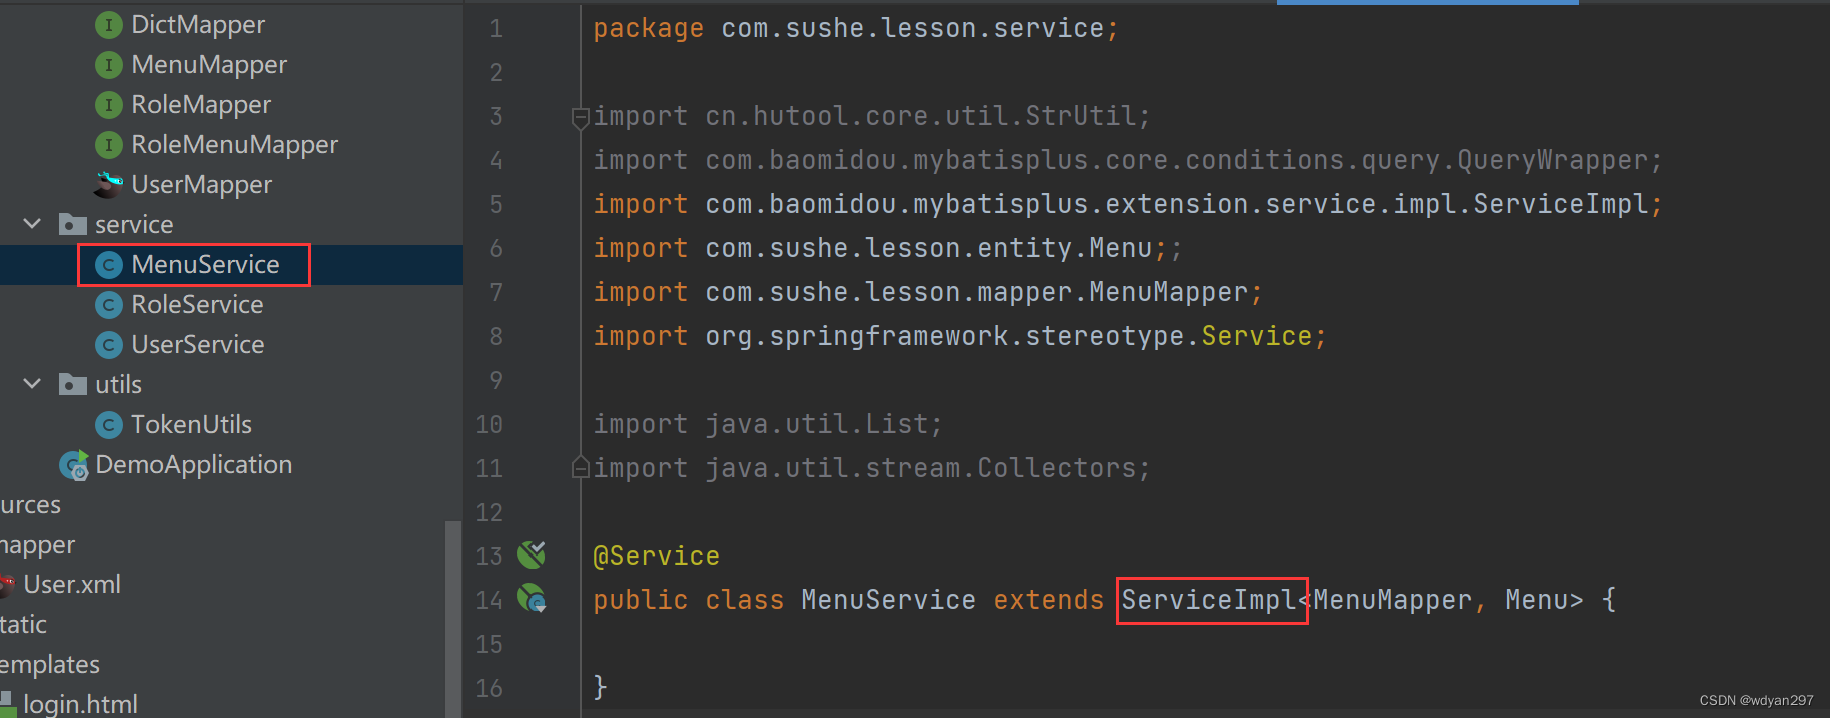
package com.example.demo.service;

import cn.hutool.core.util.StrUtil;
import com.baomidou.mybatisplus.core.conditions.query.QueryWrapper;
import com.baomidou.mybatisplus.extension.service.impl.ServiceImpl;
import com.example.demo.entity.Menu;;
import com.example.demo.mapper.MenuMapper;
import org.springframework.stereotype.Service;

import java.util.List;
import java.util.stream.Collectors;

@Service
public class MenuService extends ServiceImpl<MenuMapper, Menu> {

}
3. 添加MenuController类
这个类中实现各类增删改查。
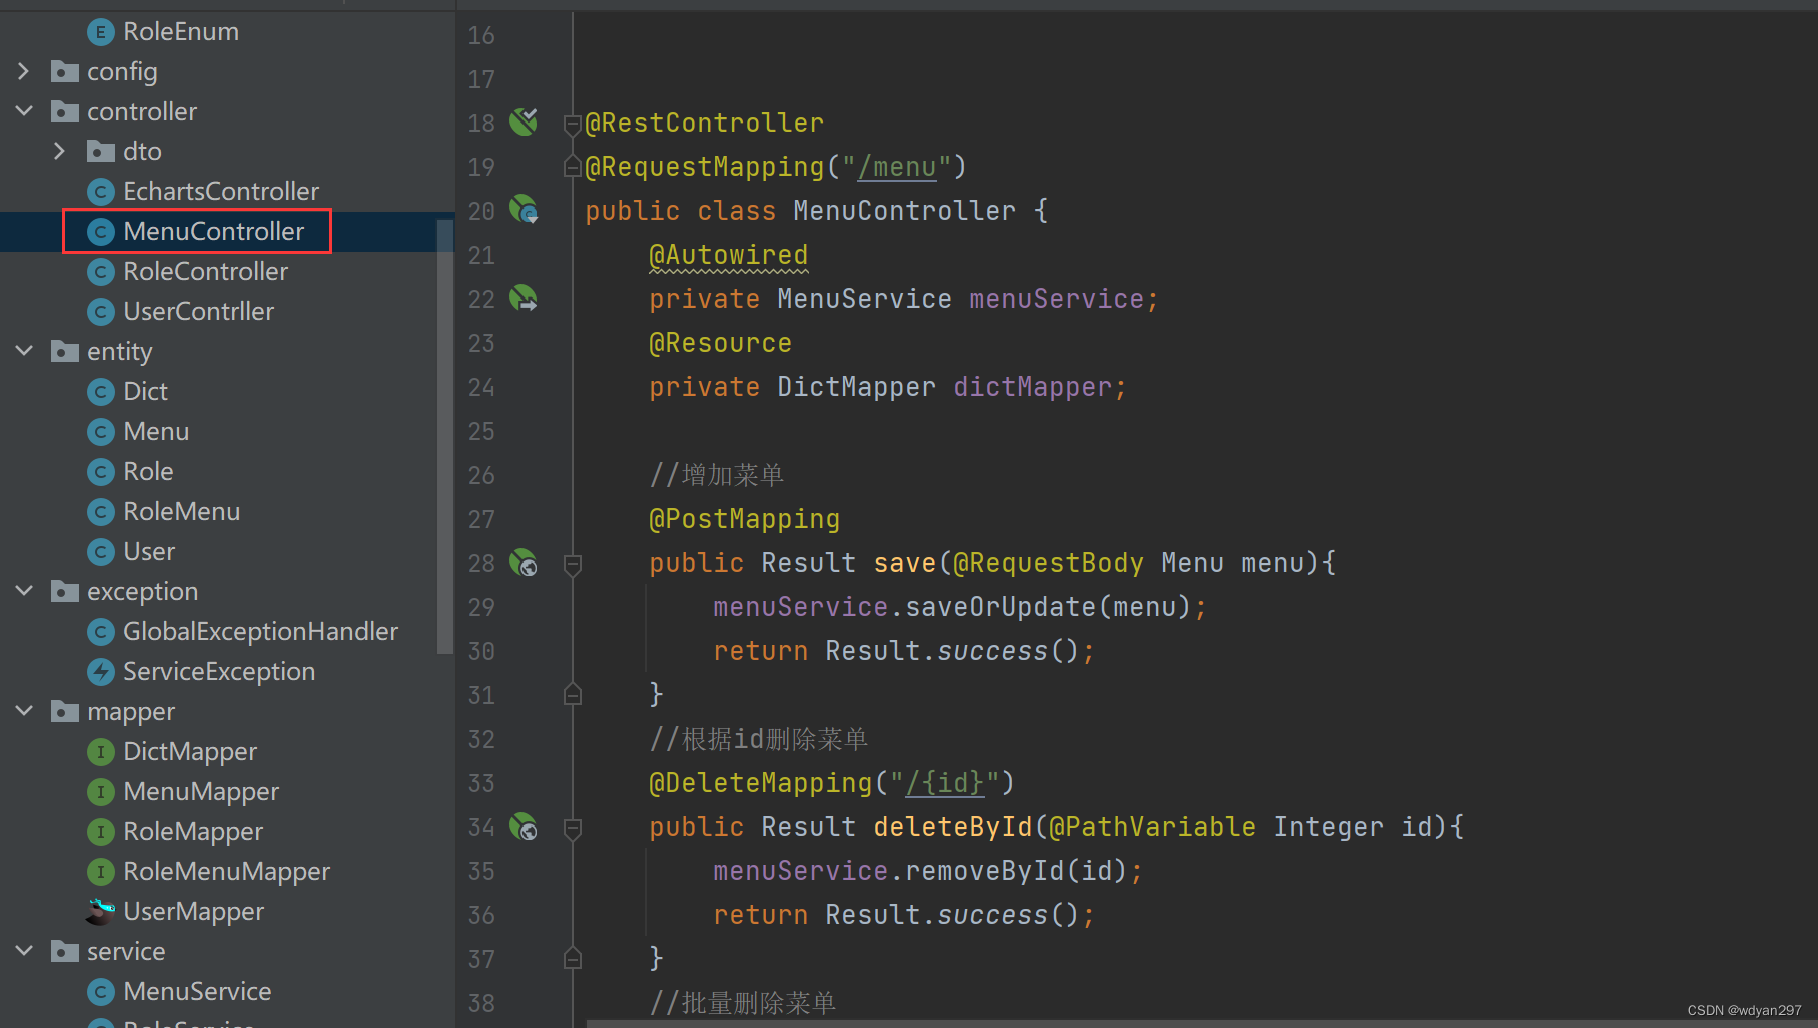
(1)增加或修改菜单
  package com.example.demo.controller;

import com.baomidou.mybatisplus.core.conditions.query.QueryWrapper;
import com.baomidou.mybatisplus.extension.plugins.pagination.Page;
import com.example.demo.common.Constants;
import com.example.demo.common.Result;
import com.example.demo.entity.Menu;
import com.example.demo.mapper.DictMapper;
import com.example.demo.service.MenuService;
import org.springframework.beans.factory.annotation.Autowired;
import org.springframework.web.bind.annotation.*;

import javax.annotation.Resource;
import java.util.List;
import java.util.stream.Collectors;


@RestController
@RequestMapping("/menu")
public class MenuController {
    @Autowired
    private MenuService menuService;
    @Resource
    private DictMapper dictMapper;

    //增加菜单
    @PostMapping
    public Result save(@RequestBody Menu menu){
        menuService.saveOrUpdate(menu);
        return Result.success();
    }
(2)删除菜单
//根据id删除菜单
@DeleteMapping("/{id}")
public Result deleteById(@PathVariable Integer id){
    menuService.removeById(id);
    return Result.success();
}
(3)批量删除菜单
    //批量删除菜单
    @PostMapping("/del/batch")
    public Result deleteBatch(@RequestBody List<Integer> ids){
        menuService.removeByIds(ids);
        return Result.success();
    }
(4)根据id查找菜单
    //根据id查找菜单
    @GetMapping("/{id}")
    public Result findById(@PathVariable Integer id){

        return Result.success(menuService.getById(id));
    }
(5)分页查找
    //分页查找
    @GetMapping("/page")
    public Result findPage(@RequestParam Integer pageNum,
                           @RequestParam Integer pageSize,
                           @RequestParam(defaultValue = "") String name){
        QueryWrapper<Menu> queryWrapper=new QueryWrapper<>();
        queryWrapper.like("name",name);
        queryWrapper.orderByDesc("id");
        return Result.success(menuService.page(new Page<>(pageNum,pageSize),queryWrapper));
    }
(6)查找全部菜单
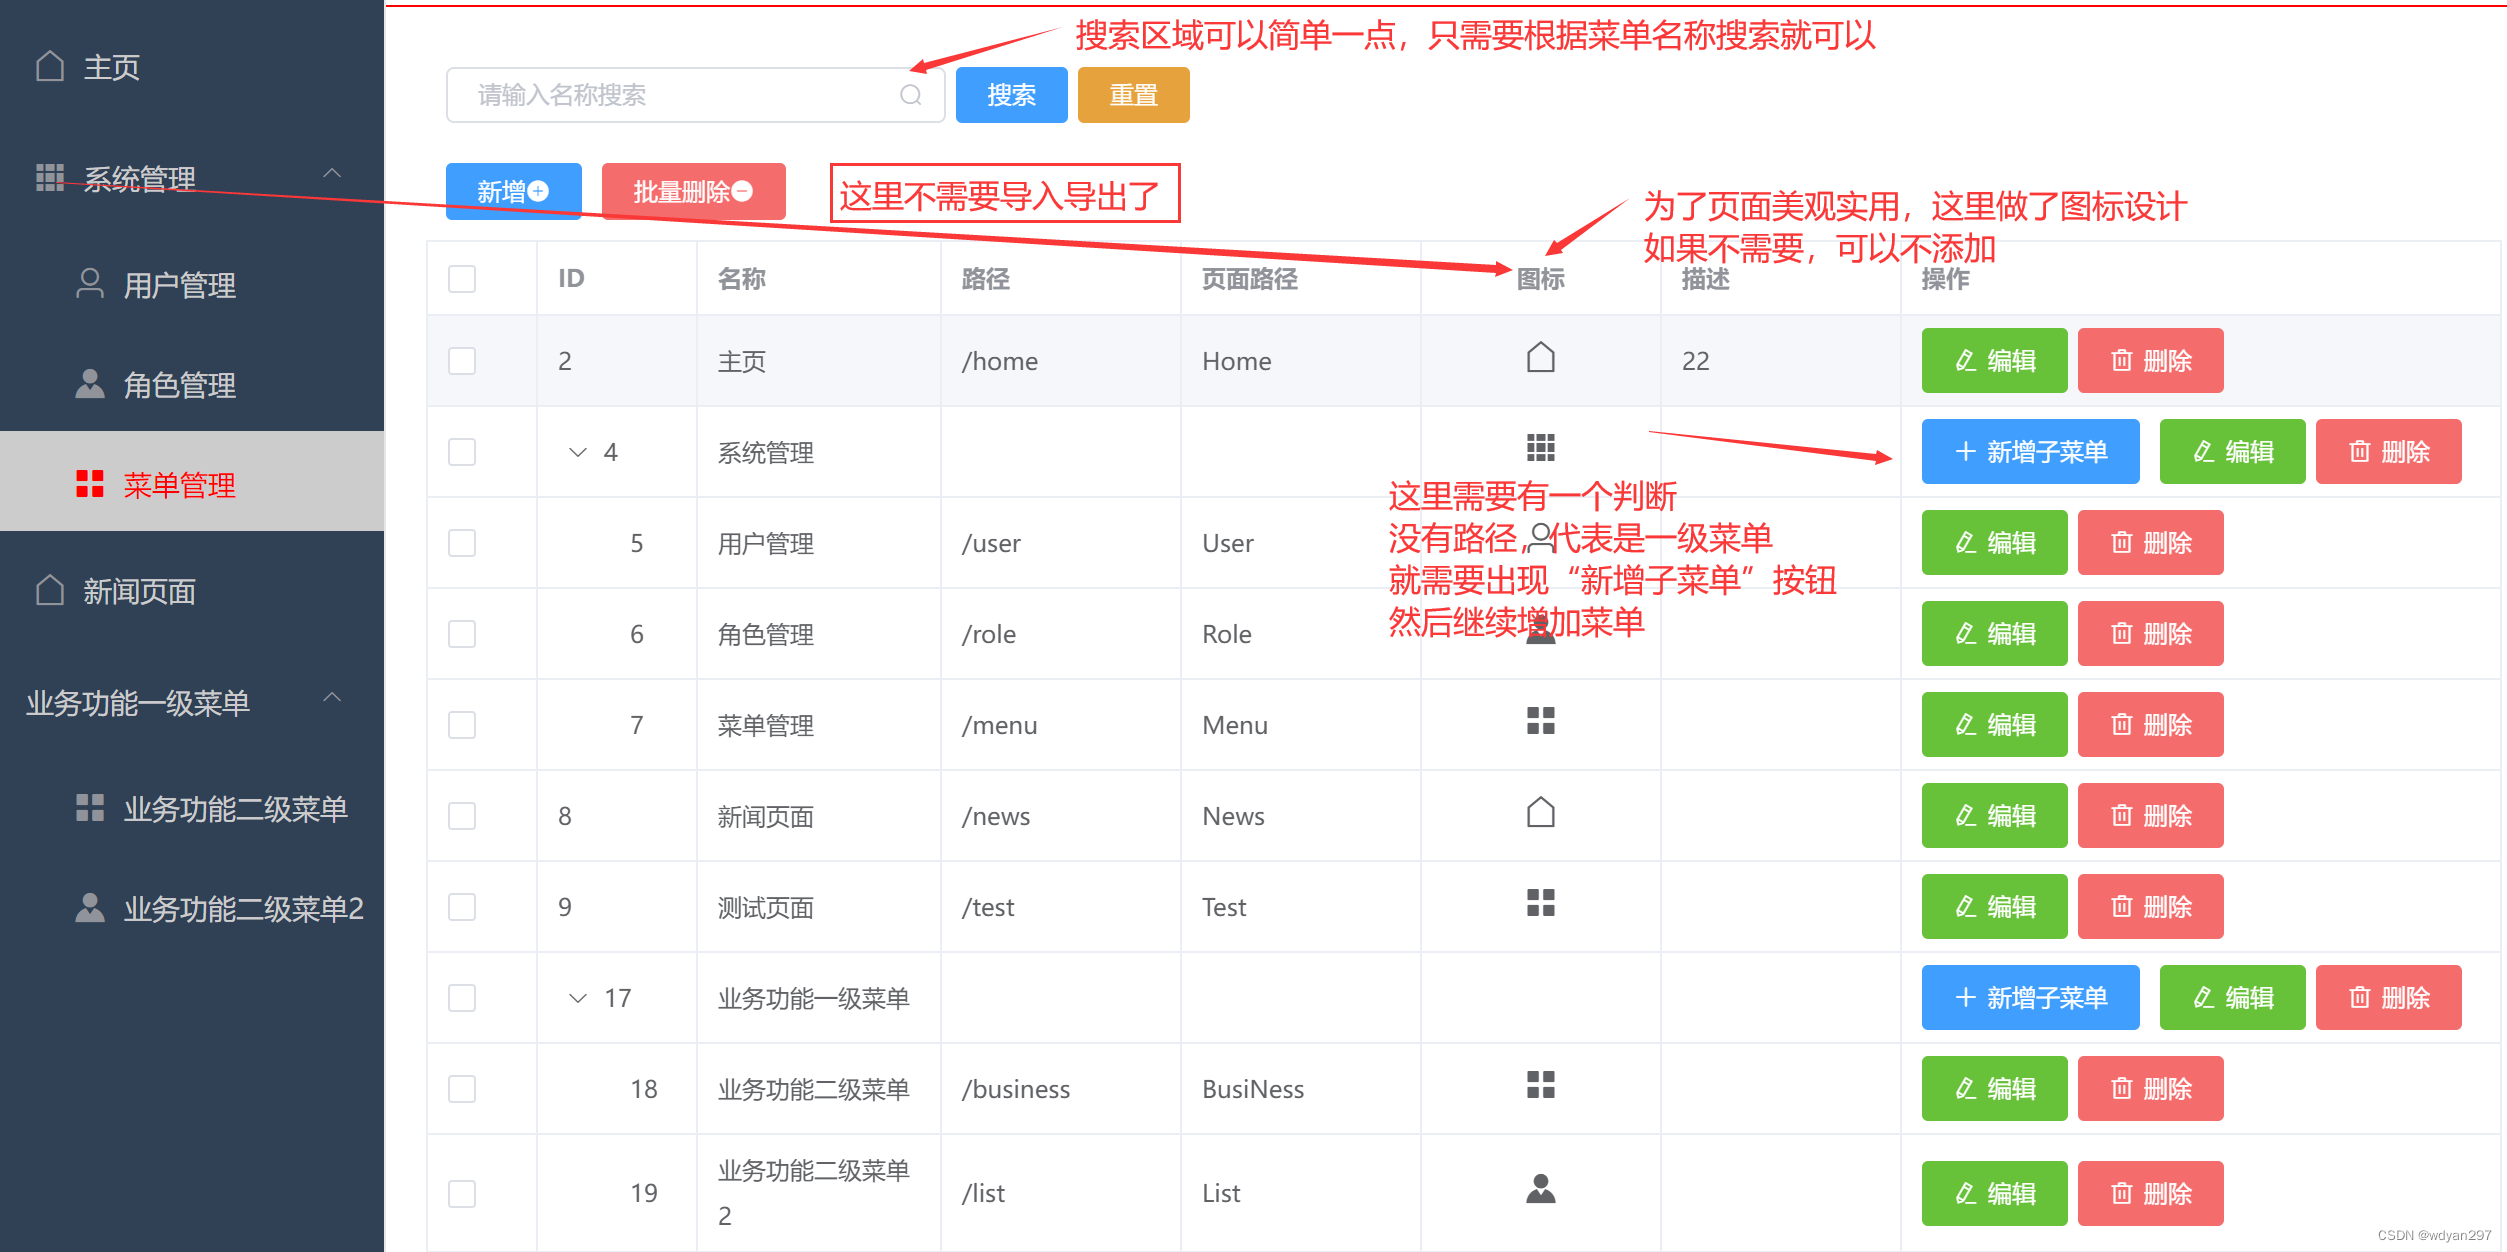
请大家特别注意,这里的菜单查找,不是简单的获取数据表中的所有值即可。因为菜单前端在设计的时候会设计一级菜单、二级菜单。比如:一级菜单没有页面路径以及访问路径,只有二级菜单才有。也就是说需要进行判断,如果是一级菜单就直接呈现,如果是二级菜单需要根据对应的id和pid,找出一级菜单为null的二级菜单放到Children中,这个实体类中的Children字段在数据表中是没有的。这是因为它本身不需要存在,只是在做树形数据的时候需要。后面做前端表格中必须有Children这个属性。在做前端页面的时候大家特别注意一下。
所以:MenuController中首先定义findAll接口,调用menuService.findMenus(name)方法。这里用了一个name参数,是因为前端模糊查找的搜索按钮“”复用了加载load方法,都是调用这里的findAll。如果你的程序中菜单不多,用不着查找,也可以不要这个参数
    //查询全部菜单
    @GetMapping
    public Result findAll( @RequestParam(defaultValue = "") String name){

        return Result.success(menuService.findMenus(name));
    }
(7)menuService中添加findMenus方法

findMenus
menuService.findMenus(name) 的代码如下。
    public List<Menu> findMenus(String name) {
        QueryWrapper<Menu> queryWrapper=new QueryWrapper<>();
        if(StrUtil.isNotBlank(name)){
            queryWrapper.like("name",name);
        }
        List<Menu> list = list(queryWrapper);
        // 找出pid为null的一级菜单
        List<Menu> parentNodes=list.stream().filter(menu -> menu.getPid()==null).collect(Collectors.toList());
        //找出一级菜单为null的二级菜单放到Children中
        for(Menu menu:parentNodes){
            menu.setChildren(list.stream().filter(m->menu.getId().equals(m.getPid())).collect(Collectors.toList()));
        }
        return parentNodes;
    }
三、前端Menu.vue页面设计
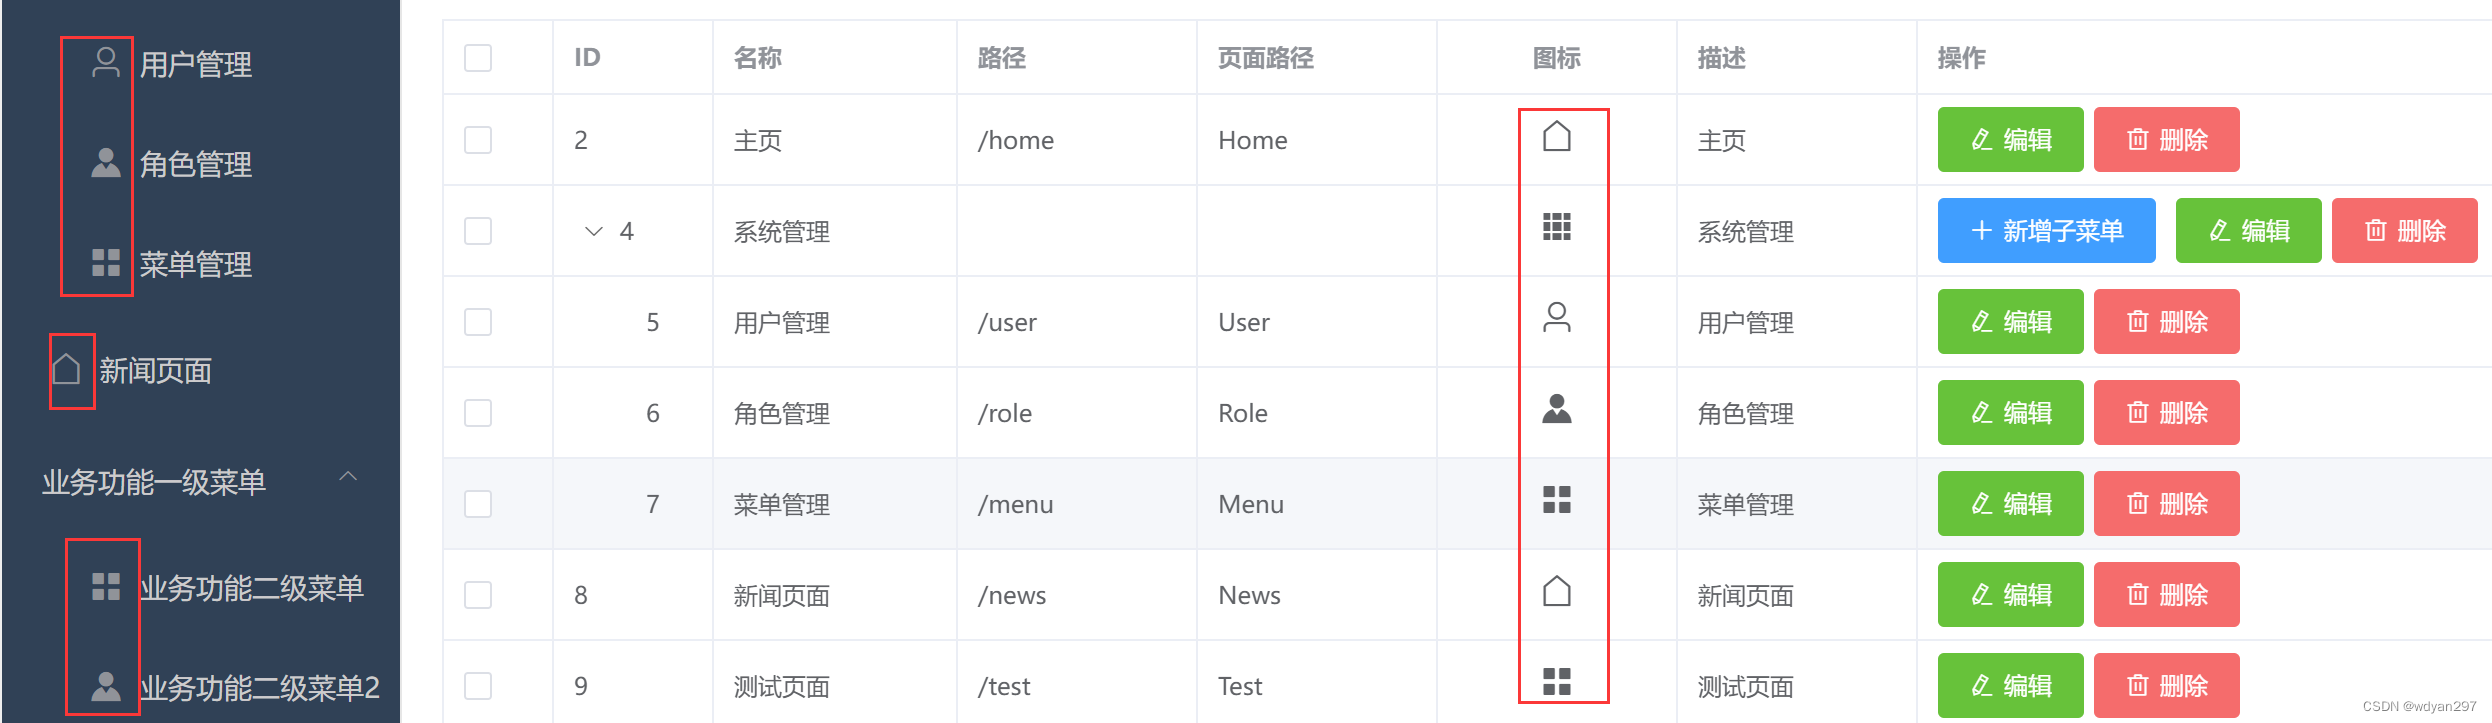
前端页面基本结构与User.vue差不多。区别主要有图上标注的一些。
1.`完整代码
<template>
<div>
<div style="padding:10px">
<el-input style="width:250px" suffix-icon="el-icon-search" placeholder="请输入名称搜索" v-model="name"></el-input>
<el-button style="margin-left:5px" type="primary" @click="load">搜索</el-button>
<el-button style="margin-left:5px" type="warning" @click="reset">重置</el-button>
</div>
<div style="margin:10px">
<el-button type="primary" @click="handleAdd">新增<i class="el-icon-circle-plus"></i></el-button>
<el-button type="danger" @click="delBatch">批量删除<i class="el-icon-remove"></i></el-button>
</div>
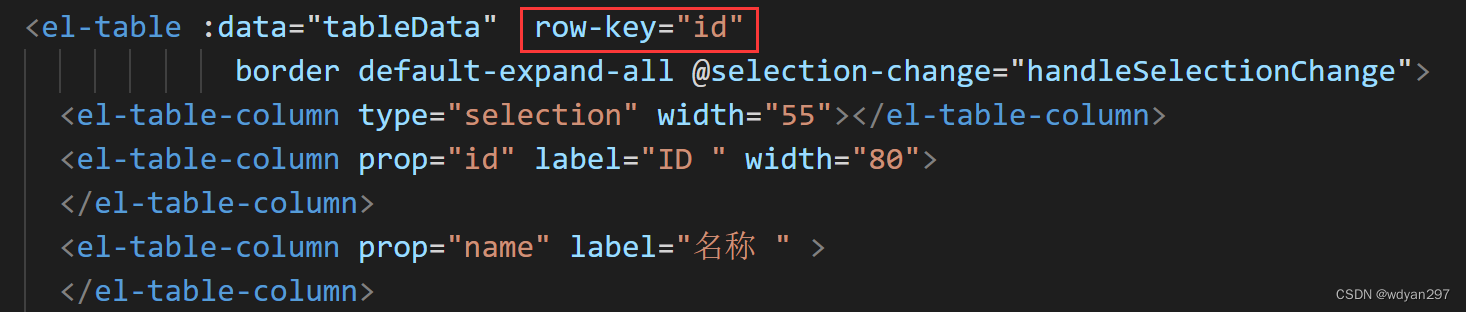
<el-table :data="tableData" row-key="id"
border default-expand-all @selection-change="handleSelectionChange">
<el-table-column type="selection" width="55"></el-table-column>
<el-table-column prop="id" label="ID " width="80">
</el-table-column>
<el-table-column prop="name" label="名称 " >
</el-table-column>
<el-table-column prop="path" label="路径 " >
</el-table-column>
<el-table-column prop="pagePath" label="页面路径 " >
</el-table-column>
<el-table-column label="图标 " align="center">
<template slot-scope="scope">
<i style="font-size:18px" :class="scope.row.icon"/>
</template>
</el-table-column>
<el-table-column prop="description" label="描述" >
</el-table-column>
<el-table-column fixed="right" width="300px" label="操作" >
<template slot-scope="scope">
<el-button type="primary" size="small" icon="el-icon-plus" @click="childmenuAdd(scope.row.id)" v-if="!scope.row.pid && !scope.row.path">新增子菜单</el-button>
<el-button type="success" size="small" icon="el-icon-edit" @click="handleEdit(scope.row)">编辑</el-button>
<el-popconfirm style="margin-left:5px"
confirm-button-text='确定'
cancel-button-text='再想想'
icon="el-icon-info"
icon-color="red"
title="您确定删除吗?"
@confirm="handleDelete(scope.row.id)"
>
<el-button type="danger" size="small" slot="reference" icon="el-icon-delete" >删除</el-button>
</el-popconfirm>
</template>
</el-table-column>
</el-table>
<el-dialog title="菜单信息" :visible.sync="dialogFormVisible" width="30%">
<el-form label-width="80px" size="small">
<el-form-item label="名称">
<el-input v-model="form.name" autocomplete="off"></el-input>
</el-form-item>
<el-form-item label="路径">
<el-input v-model="form.path" autocomplete="off"></el-input>
</el-form-item>
<el-form-item label="页面路径">
<el-input v-model="form.pagePath" autocomplete="off"></el-input>
</el-form-item>
<el-form-item label="图标">
<el-select clearable v-model="form.icon" placeholder="请选择" style="width:100%;">
<el-option v-for="item in options" :key="item.name" :label="item.name" :value="item.value">
<i :class="item.value"/>{
{item.name}}
</el-option>
</el-select>
</el-form-item>
<el-form-item label="描述">
<el-input v-model="form.description" autocomplete="off"></el-input>
</el-form-item>
</el-form>
<div slot="footer" class="dialog-footer">
<el-button @click="dialogFormVisible = false">取 消</el-button>
<el-button type="primary" @click="save">确 定</el-button>
</div>
</el-dialog>
</div>
</template>
<script>
export default {
name:"Menu",
data(){
return{
tableData:[],
name:"",
dialogFormVisible:false,
form:{},
multipleSelection:[],
options:[]
}
},
created(){
this.load();
},
methods:{
//搜索重置
reset(){
this.name="";
this.load();
},
//打开新增菜单对话框,同时获取图标数据
handleAdd(){
this.dialogFormVisible = true;
this.form={};//如果之前有填过值,可以置空
this.request.get("http://localhost:8084/menu/icons").then(res=>{ //不管是新增还是编辑都直接获取图标数据即可,不需要与当前id对应
console.log(res);
this.options=res.data;
})
},
//实现新增菜单
save(){
this.request.post("http://localhost:8084/menu",this.form).then(res=>{
if(res.code=='200'){
this.$message.success("保存成功");
this.dialogFormVisible=false;
this.load();
}else{
this.$message.error("保存失败");
}
})
},
//编辑菜单
handleEdit(row){ //编辑
this.form=row;//把当前行的数据赋值给form
this.dialogFormVisible=true;
this.request.get("http://localhost:8084/menu/icons").then(res=>{ //不管是新增还是编辑都直接获取图标数据即可,不需要与当前id对应
console.log(res);
this.options=res.data;
})
},
//多行选择
handleSelectionChange(val){
console.log(val);
this.multipleSelection =val;
},
//批量删除
delBatch(){
let ids=this.multipleSelection.map(v=>v.id);//map这个方法可以实现将multipleSelection中的对象扁平化处理。
this.request.post("http://localhost:8084/menu/del/batch",ids).then(res=>{
if(res.code=='200'){
this.$message.success("批量删除成功");
this.load();
}else{
this.$message.error("批量删除失败");
}
})
},
//根据选择行的id删除
handleDelete(id){
this.request.delete("http://localhost:8084/menu/"+id+"").then(res=>{
if(res.code=='200'){
this.$message.success("删除成功");
this.load();
}else{
this.$message.error("删除失败");
}
})
},
//将请求数据封装为一个方法
load() {
//使用axios封装的request,获取所有菜单数据
this.request.get("http://localhost:8084/menu",{
params:{
name:this.name
}
}).then(res=>{
console.log(res);
this.tableData=res.data;
})
},
//新增子菜单,打开新增菜单对话框,把父菜单的id传递到form中
childmenuAdd(pid){
this.dialogFormVisible = true;
this.form={};//如果之前有填过值,可以置空
if(pid){
this.form.pid=pid;//传递父菜单的id
}
this.request.get("http://localhost:8084/menu/icons").then(res=>{ //不管是新增还是编辑都直接获取图标数据即可,不需要与当前id对应
console.log(res);
this.options=res.data;
})
}
}
}
</script>
<style scoped>
</style>
重点注意:
(1)是否出现“新增子菜单”按钮,取决于是否是一级菜单,做了一个 v-if="!scope.row.pid && !scope.row.path"的判断,也就是说如果他的父级菜单和访问地址路径都为空,说明是一个一级菜单,就出现“新增子菜单”按钮。
(2)根据ElementUI官网解释,支持树类型数据的显示,row中包含children字段时,被视为树形数据。渲染树形数据时,必须要指定 row-key。
所以:一方面后端查找菜单的时候要进行判断,如果是一级菜单就直接呈现,如果是二级菜单需要根据对应的id和pid,找出一级菜单为null的二级菜单放到Children中,实体类中的Children字段在数据表中是没有的。这是因为它本身不需要存在,只是在做树形数据的时候需要。另一方面

另一方面,注意观察表格代码中的row-key一定要写上。
(3)关于菜单前面是否要加一个图标,完全根据实际项目的需要与否进行设计。一般并不是强制需要的,这里加上这个知识点,主要是让大家有所接触。用的上的时候有资料可以查找到。下面就是图标实现的功能。
四、菜单图标设计
图标本身没有特别的含义和意义,当做当前菜单项的一个属性,但是图标通常也做成一个数据表,在“新增”、“编辑”、“新增子菜单”的时候,打开图标表,选择其中的一个即可。
1. 菜单图标数据表
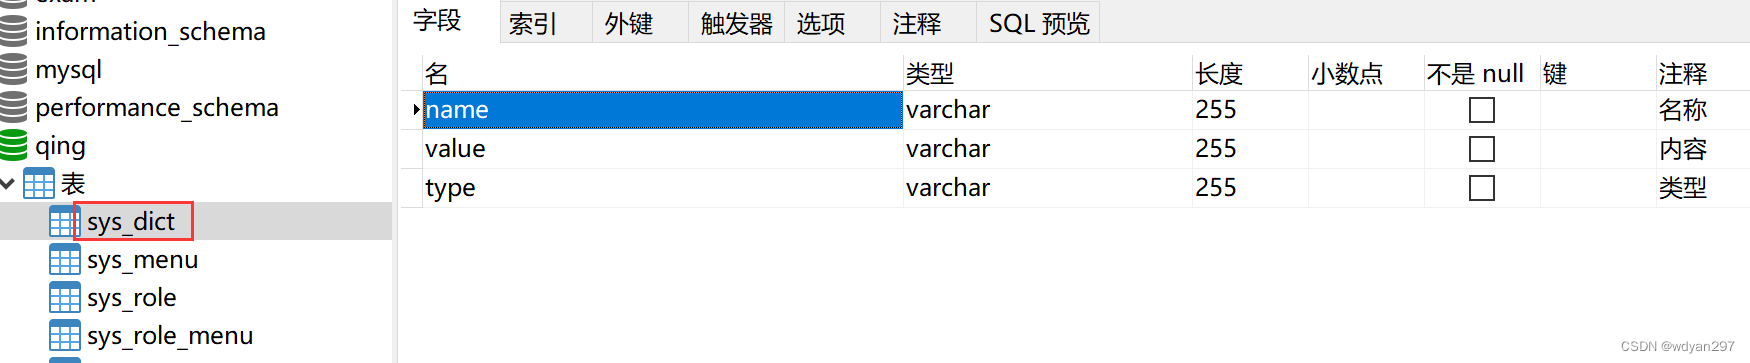
数据示例:
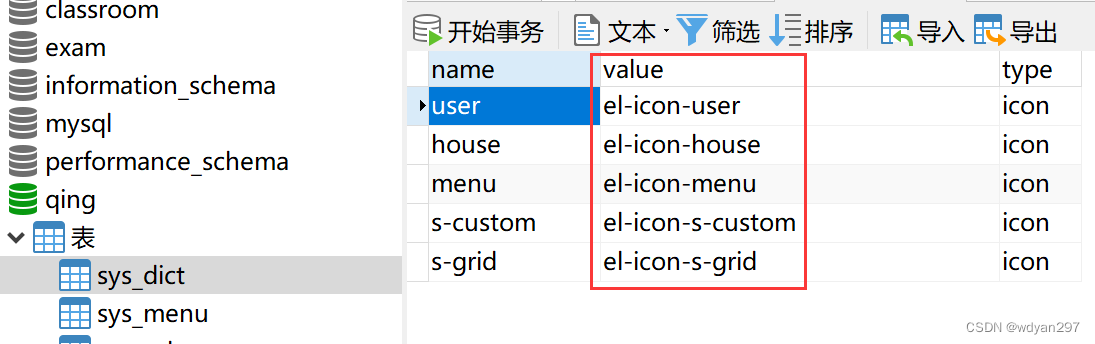
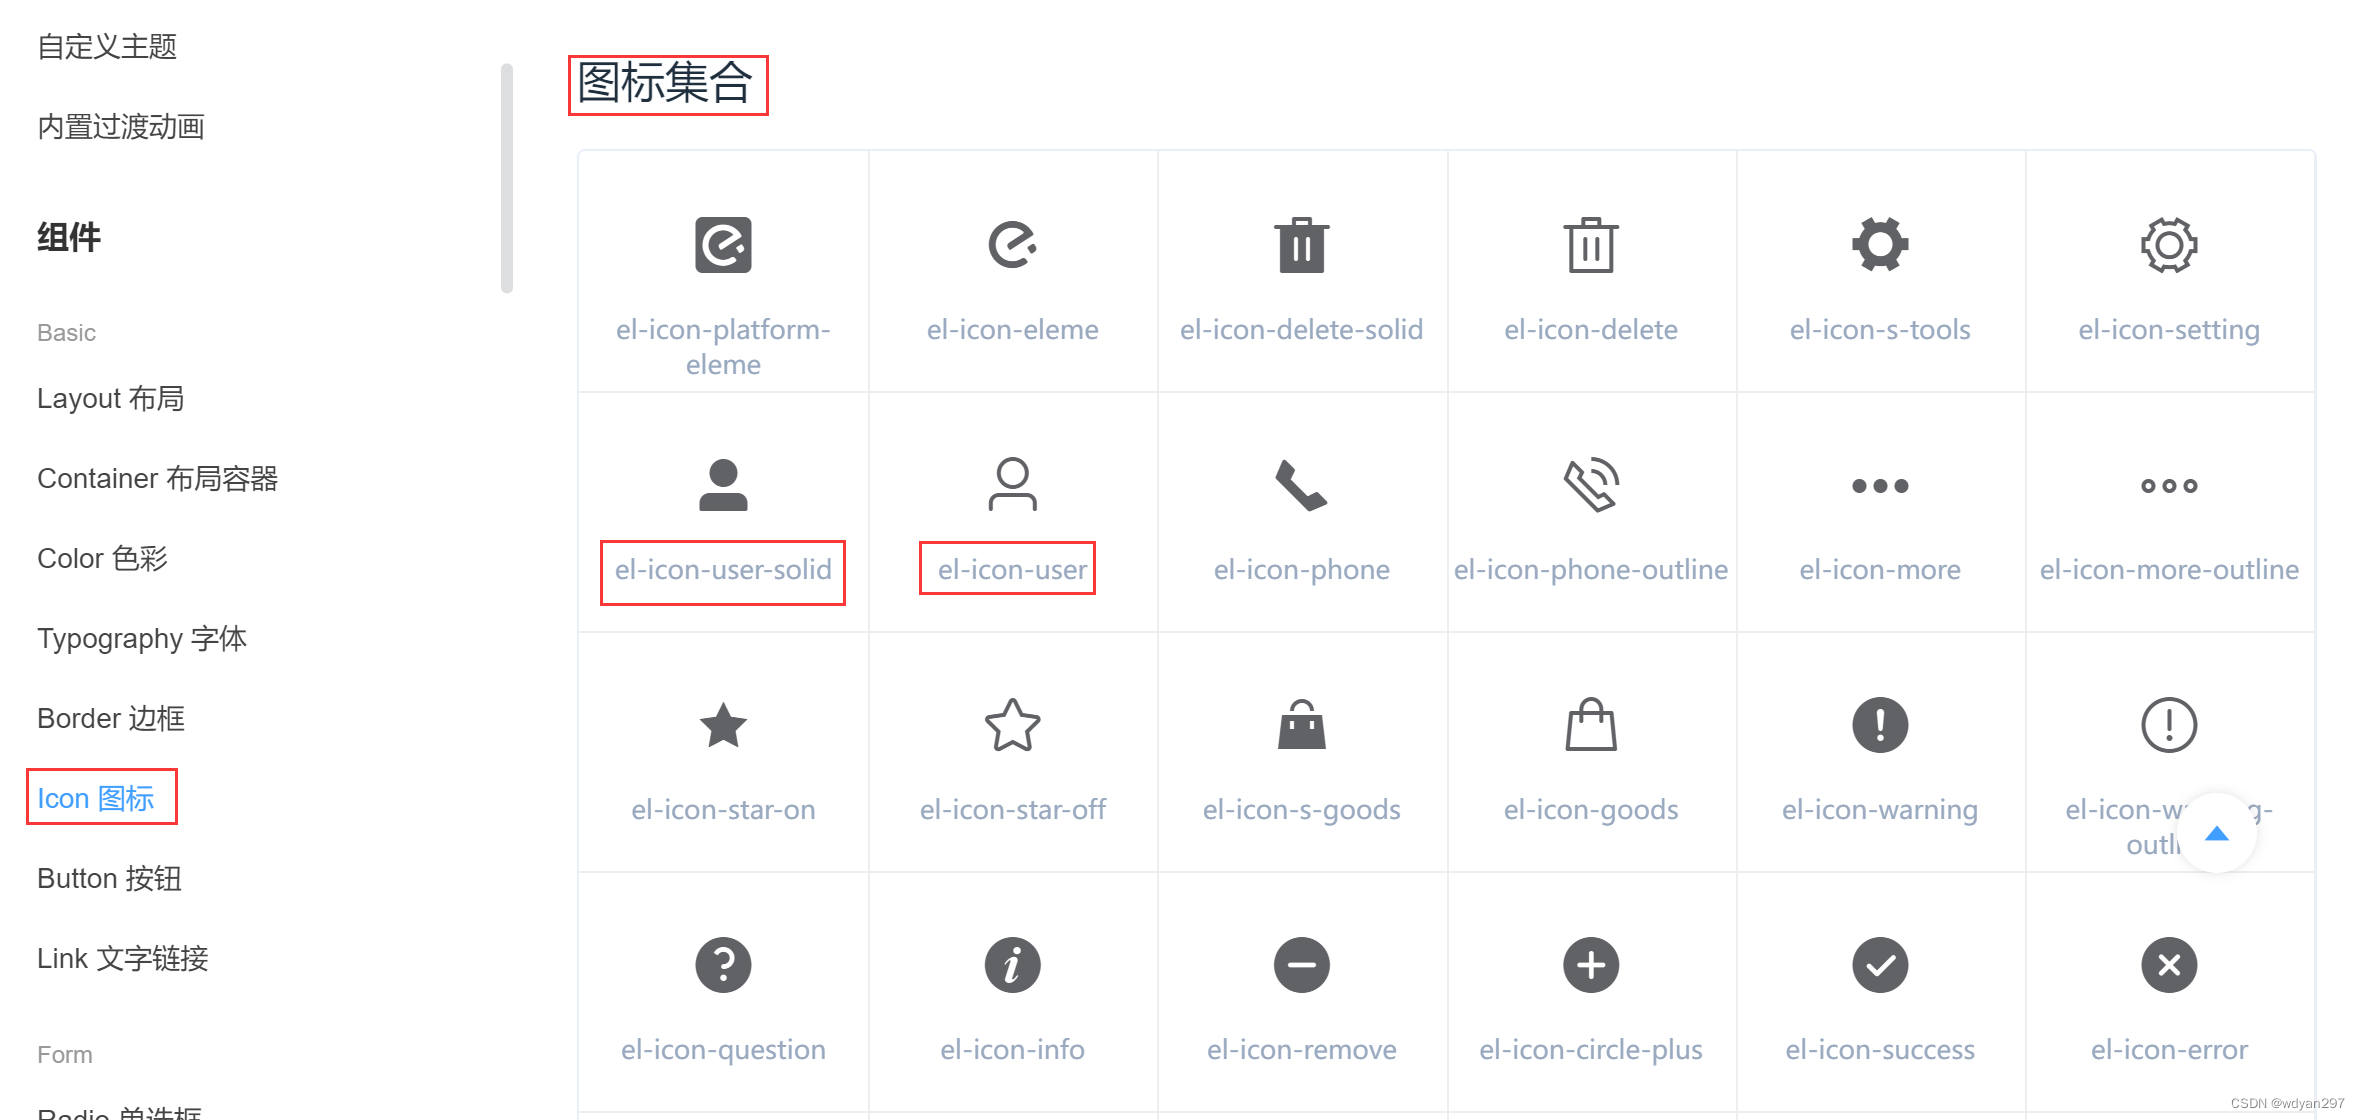
这里的value值可以到ElementUI官网的图标库中查找相应的类名即可。
2. 添加实体类
新建实体类Dict。
package com.example.demo.entity;

import com.baomidou.mybatisplus.annotation.TableName;
import lombok.Data;

@Data
//可以使用 @TableName 表名注解指定当前实体类对应的表名,比如下面 Dict 实体类对应表名为 sys_dict
@TableName(value="sys_dict")
public class Dict {
    private String name;
    private String value;
    private String type;
}
3.添加DictMapper接口
在mapper包中创建一个DictMapper接口,现在都是用Mybatis-plus框架,所以只要继承BaseMapper。
package com.example.demo.mapper;

import com.baomidou.mybatisplus.core.mapper.BaseMapper;
import com.example.demo.entity.Dict;

public interface DictMapper extends BaseMapper<Dict> {
}
4.在MenuController类中添加getIcons接口
这个接口非常简单,只需要把图标取出即可,在MenuController类中添加getIcons接口,直接使用dictMapper.selectList(null)方法。
    //查找图标
    @GetMapping("/icons")
    public Result getIcons(){
        QueryWrapper<Menu> queryWrapper=new QueryWrapper<>();
        queryWrapper.eq("type", "icon");
        return Result.success(dictMapper.selectList(null));
    }
5.前端调用
this.request.get("http://localhost:8084/menu/icons").then(res=>{ //不管是新增还是编辑都直接获取图标数据即可,不需要与当前id对应
          console.log(res);
          this.options=res.data;
          })
这里的代码在前端Menu.vue的完整代码中均已使用,不需要重复添加,这里只是单独拎出来,供大家理解。
代码中的this.options值即所有选项。

6. 运行项目
不论新增、编辑、添加子菜单等都直接获取图标数据即可。

任务总结
通过本次任务,大家可以:
(1)掌握管理系统中菜单数据的增删改查;
(2)掌握一级菜单、二级菜单的逻辑关系(父子级关系);
(3)继续熟悉Element UI的各类组件如图标、下拉框、form表单、表格中树形数据显示等。