实验 3-1 IBGP与EBGP
学习目的
- 掌握区域内部BGP的配置方法
- 掌握多区域BGP的配置方法
- 观察BGP的邻居表和数据库
- 掌握BGP更新源的配置方法
- 掌握EBGP多跳的配置方法
- 观察IBGP和EBGP中路由的下一跳的变化
- 掌握IBGP中下一跳的配置
- 掌握BGP的Network命令的配置方法
拓扑图
场景
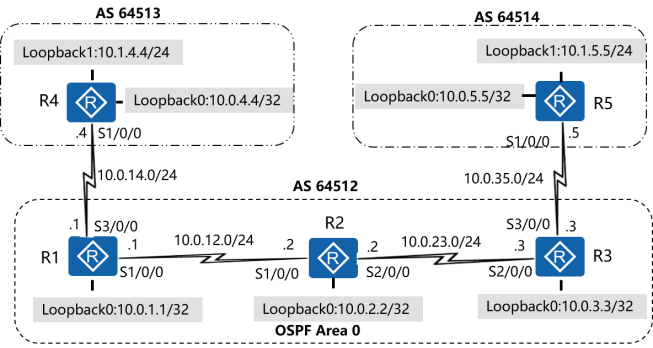
你是公司的网络管理员。公司的网络采用了BGP协议作为路由协议。公司的网络由多个自治系统组成,不同的分支机构使用了不同的AS号,现在你需要完成公司网络的搭建工作。在公司总部使用了OSPF作为IGP,公司内部不同分支机构使用的是私有的BGP AS号。在完成网络搭建以后,你还需要观察BGP路由信息的传递。
配置
首先还是配置IP地址
<R1>system-view
Enter system view, return user view with Ctrl+Z.
[R1]interface Serial 1/0/0
[R1-Serial1/0/0]ip address 10.0.12.1 24
[R1-Serial1/0/0]quit
[R1]interface Serial 3/0/0
[R1-Serial3/0/0]ip address 10.0.14.1 24
[R1-Serial3/0/0]quit
[R1]interface LoopBack 0
[R1-LoopBack0]ip address 10.0.1.1 32
[R1-LoopBack0]quit

<R2>system-view
Enter system view, return user view with Ctrl+Z.
[R2]interface Serial 1/0/0
[R2-Serial1/0/0]ip address 10.0.12.2 24
[R2-Serial1/0/0]quit
[R2]interface Serial 2/0/0
[R2-Serial2/0/0]ip address 10.0.23.2 24
[R2-Serial2/0/0]quit
[R2]interface LoopBack 0
[R2-LoopBack0]ip address 10.0.2.2 32

<R3>system-view
Enter system view, return user view with Ctrl+Z.
[R3]interface Serial 2/0/0
[R3-Serial2/0/0]ip address 10.0.23.3 24
[R3-Serial2/0/0]quit
[R3]interface Serial 3/0/0
[R3-Serial3/0/0]ip address 10.0.35.3 24
[R3-Serial3/0/0]quit
[R3]interface LoopBack 0
[R3-LoopBack0]ip address 10.0.3.3 32

<R4>system-view
Enter system view, return user view with Ctrl+Z.
[R4]interface Serial 1/0/0
[R4-Serial1/0/0]ip address 10.0.14.4 24
[R4-Serial1/0/0]quit
[R3]interface LoopBack 0
[R4-LoopBack0]ip address 10.0.4.4 32

<R5>system-view
Enter system view, return user view with Ctrl+Z.
[R5]interface Serial 1/0/0
[R5-Serial1/0/0]ip address 10.0.35.5 24
[R5-Serial1/0/0]quit
[R3]interface LoopBack 0
[R5-LoopBack0]ip address 10.0.5.5 32
配置IGP,在AS 64512中使用OSPF作为IGP,将Loopback 0连接的网段发布进OSPF。
[R1]router id 10.0.1.1
[R1]ospf 1
[R1-ospf-1]area 0
[R1-ospf-1-area-0.0.0.0]network 10.0.12.1 0.0.0.0
[R1-ospf-1-area-0.0.0.0]network 10.0.1.1 0.0.0.0
[R1-ospf-1-area-0.0.0.0]quit
[R1-ospf-1]quit

[R2]router id 10.0.2.2
[R2]ospf 1
[R2-ospf-1]area 0
[R2-ospf-1-area-0.0.0.0]network 10.0.12.2 0.0.0.0
[R2-ospf-1-area-0.0.0.0]network 10.0.23.2  0.0.0.0
[R2-ospf-1-area-0.0.0.0]network 10.0.2.2 0.0.0.0
[R2-ospf-1-area-0.0.0.0]quit
[R2-ospf-1]quit

[R3]router id 10.0.3.3
[R3]ospf 1
[R3-ospf-1]area 0
[R3-ospf-1-area-0.0.0.0]network 10.0.23.3 0.0.0.0
[R3-ospf-1-area-0.0.0.0]network 10.0.3.3 0.0.0.0
[R3-ospf-1-area-0.0.0.0]quit
[R3-ospf-1]quit
建立IBGP对等体
[R1]bgp 64512
[R1-bgp]peer 10.0.2.2 as-number 64512
[R1-bgp]peer 10.0.2.2 connect-interface LoopBack 0
[R1-bgp]peer 10.0.3.3 as-number 64512
[R1-bgp]peer 10.0.3.3 connect-interface LoopBack 0
[R1-bgp]quit

[R2]bgp 64512
[R2-bgp]peer 10.0.1.1 as-number 64512
[R2-bgp]peer 10.0.1.1 connect-interface loopback 0
[R2-bgp]peer 10.0.3.3 as-number 64512
[R2-bgp]peer 10.0.3.3 connect-interface LoopBack 0
[R2-bgp]quit

[R3]bgp 64512
[R3-bgp]peer 10.0.1.1 as-number 64512
[R3-bgp]peer 10.0.1.1 connect-interface loopback 0
[R3-bgp]peer 10.0.2.2 as-number 64512
[R3-bgp]peer 10.0.2.2 connect-interface LoopBack 0
[R3-bgp]quit
可以尝试修改BGP的keepalive发送和Active hold time的时间(默认60/180)
[R1-bgp] bgp 64512
[R1-bgp] timer keepalive 30 hold 90
Warning: Changing the parameter in this command resets the peer session. Continue?[Y/N]:y
[R1-bgp]quit
配置EBGP对等体时,如果想指定更新源为Loopback 0接口地址,则ebgp-max-hop需改为>=2。
[R1]ip route-static 10.0.4.4 32 10.0.14.4

[R4]ip route-static 10.0.1.1 32 10.0.14.1

[R1]bgp 64512
[R1-bgp]peer 10.0.4.4 as-number 64513
[R1-bgp]peer 10.0.4.4 ebgp-max-hop 2
[R1-bgp]peer 10.0.4.4 connect-interface LoopBack0
[R1-bgp]quit

[R4]router id 10.0.4.4
[R4]bgp 64513
[R4-bgp]peer 10.0.1.1 as-number 64512
[R4-bgp]peer 10.0.1.1 ebgp-max-hop 2
[R4-bgp]peer 10.0.1.1 connect-interface LoopBack0
[R4-bgp]quit
在R3和R5之间也建立EBGP对等体关系。直接使用物理接口地址建立连接。
[R3]bgp 64512
[R3-bgp]peer 10.0.35.5 as-number 64514
[R3-bgp]quit

[R5]router id 10.0.5.5
[R5]bgp 64514
[R5-bgp]peer 10.0.35.3 as-number 64512
[R5-bgp]quit
尝试使用Network发布路由信息
[R4]interface LoopBack 1
[R4-LoopBack1]ip address 10.1.4.4 24
[R4-LoopBack1]quit
[R4]bgp 64513
[R4-bgp]network 10.1.4.4 24
[R4-bgp]quit
配完后,在R3的ip路由表上并没有发现10.1.4.4的路由
原因是这条路由的NextHop为10.0.4.4,而R3上并没有到达地址10.0.4.4的路由。根据BGP选路原则,当BGP路由的下一跳不可达时,忽略此路由。
所以要在R1上,将路由的下一跳更改为自己
[R1]bgp 64512
[R1-bgp]peer 10.0.3.3  next-hop-local
[R1-bgp]peer 10.0.2.2  next-hop-local
[R1-bgp]quit
R5通过network宣告路由信息,同样的操作在R3上也执行
[R5]interface LoopBack 1
[R5-LoopBack1]ip address 10.1.5.5 24
[R5-LoopBack1]quit

[R5]bgp 64514
[R5-bgp]network 10.1.5.0 24

[R3]bgp 64512
[R3-bgp]peer 10.0.1.1 next-hop-local
[R3-bgp]peer 10.0.2.2 next-hop-local