Jenkins是代码持续集成工具,Sonar则是一个代码质量管理平台。在编译代码时,可以使用SonarQube提供的sonar-maven-plugin插件执行执行sonar代码质量检查,将检查结果传给SonarQube服务器,这种方法需要在settings.xml文件中配置sonar.host.url属性,指向SonarQube服务器。
可以使用SonarQube的Jenkins插件(SonarQube Scanner for Jenkins),通过Jenkins的流水线,执行代码质量检查,这种方法需要在项目根目录下配置sonar-project.properties文件,在文件中配置sonar执行所需要的属性,而Sonar命令执行所需的SonarQube服务器配置,以及Sonar Scanner的配置,则配置在Jenkins中,本文主要讲述的是第二种方法,即Jenkins和SonarQube集成过程中需要注意的一些事项。
本文使用的Jenkins是最新的2.93版本,SonarQube是最新的6.7版本。
1)安装配置SonarQube Scanner
从以下页面下载最新的SonarQube Scanner
https://docs.sonarqube.org/display/SCAN/Analyzing+with+SonarQube+Scanner
由于我们安装Jenkins和Sonar的服务器是Linux服务器,因此下载页面中的Linux 64 bit版本
下载的压缩包名称是
sonar-scanner-cli-3.0.3.778-linux.zip
解压缩,添加到/usr/local/sonar-scanner的链接
ln -s /opt/soft/sonar-scanner-3.0.3.778-linux/ /usr/local/sonar-scanner添加sonar-scanner到PATH环境变量中
export PATH=$PATH:/usr/local/sonar-scanner/bin2)安装Sonar Qube 6.7.1
从https://www.sonarqube.org/downloads/下载SonarQube 6.7.1的压缩包sonarqube-6.7.1.zip
解压缩,并将解压缩目录移动到/usr/local目录下,并设置777权限,便于非root用户启动
mv sonarqube-6.7.1 /usr/local
chmod 777 -R /usr/local/sonarqube-6.7.1
构建sonar用户,用于启动sonar服务
groupadd sonar
useradd -g sonar sonar
将sonar用户加入/etc/sudoers文件
sonar ALL=(ALL) ALL修改/usr/local/sonarqube-6.7.1/conf/sonar.properties文件,主要修改以下几项(白字显示部分)
# Property values can:
# - reference an environment variable, for example sonar.jdbc.url= ${env:SONAR_JDBC_URL}
# - be encrypted. See https://redirect.sonarsource.com/doc/settings-encryption.html

#--------------------------------------------------------------------------------------------------
# DATABASE
#
# IMPORTANT:
# - The embedded H2 database is used by default. It is recommended for tests but not for
#   production use. Supported databases are MySQL, Oracle, PostgreSQL and Microsoft SQLServer.
# - Changes to database connection URL (sonar.jdbc.url) can affect SonarSource licensed products.

# User credentials.
# Permissions to create tables, indices and triggers must be granted to JDBC user.
# The schema must be created first.
sonar.jdbc.username=sonar
sonar.jdbc.password=sonar

#----- Embedded Database (default)
# H2 embedded database server listening port, defaults to 9092
#sonar.embeddedDatabase.port=9092

#----- MySQL 5.6 or greater
# Only InnoDB storage engine is supported (not myISAM).
# Only the bundled driver is supported. It can not be changed.
sonar.jdbc.url=jdbc:mysql://192.168.56.102:3306/sonar?useUnicode=true&characterEncoding=utf8&rewriteBatchedStatements=true&useConfigs=maxPerformance&useSSL=false


#    Startup can be long if entropy source is short of entropy. Adding
#    -Djava.security.egd=file:/dev/./urandom is an option to resolve the problem.
#    See https://wiki.apache.org/tomcat/HowTo/FasterStartUp#Entropy_Source
#
sonar.web.javaOpts=-Xmx512m -Xms128m -XX:+HeapDumpOnOutOfMemoryError

# Same as previous property, but allows to not repeat all other settings like -Xmx
#sonar.web.javaAdditionalOpts=

# Binding IP address. For servers with more than one IP address, this property specifies which
# address will be used for listening on the specified ports.
# By default, ports will be used on all IP addresses associated with the server.
sonar.web.host=0.0.0.0

# Web context. When set, it must start with forward slash (for example /sonarqube).
# The default value is root context (empty value).
#sonar.web.context=
# TCP port for incoming HTTP connections. Default value is 9000.
sonar.web.port=9000
前三项是设定Sonar使用的数据库JDBC信息,需要预先建立一个MySQL数据库sonar,创建sonar用户,给它对sonar数据库的所有访问权限(创建过程不再赘述)
sonar.web.host和sonar.web.port是Sonar服务器为外部访问时使用的IP地址和端口号。
将sonar服务器加为CentOS 7自启动服务,在/etc/systemd/system下添加sonar.service
[Unit]
Description=sonar service
After=network.target

[Service]
Type=forking
LimitNOFILE=65536   #set file descriptor num
ExecStart=/usr/local/sonarqube-6.7.1/bin/linux-x86-64/sonar.sh start
ExecStop=/usr/local/sonarqube-6.7.1/bin/linux-x86-64/sonar.sh stop
ExecReload=/usr/local/sonarqube-6.7.1/bin/linux-x86-64/sonar.sh restart
User=sonar
Restart=on-abort

[Install]
WantedBy=multi-user.target
其中LimitNOFILE=65536这一行是避免启动Sonar集成的Elasticsearch时因为文件描述符不够而导致启动失败。
启动sonar服务
systemctl daemon-reload
systemctl enable sonar.service
systemctl start sonar.service
访问http://192.168.56.103:9000,检验sonar服务器是否启动成功。
第一次访问Sonar服务器时使用admin/admin用户登录时,会需要生成一个访问token,这个token可以用于对maven项目执行mvn sonar:sonar命令时使用,也可以用于Jenkins的SonarQube插件使用,下面会提到。
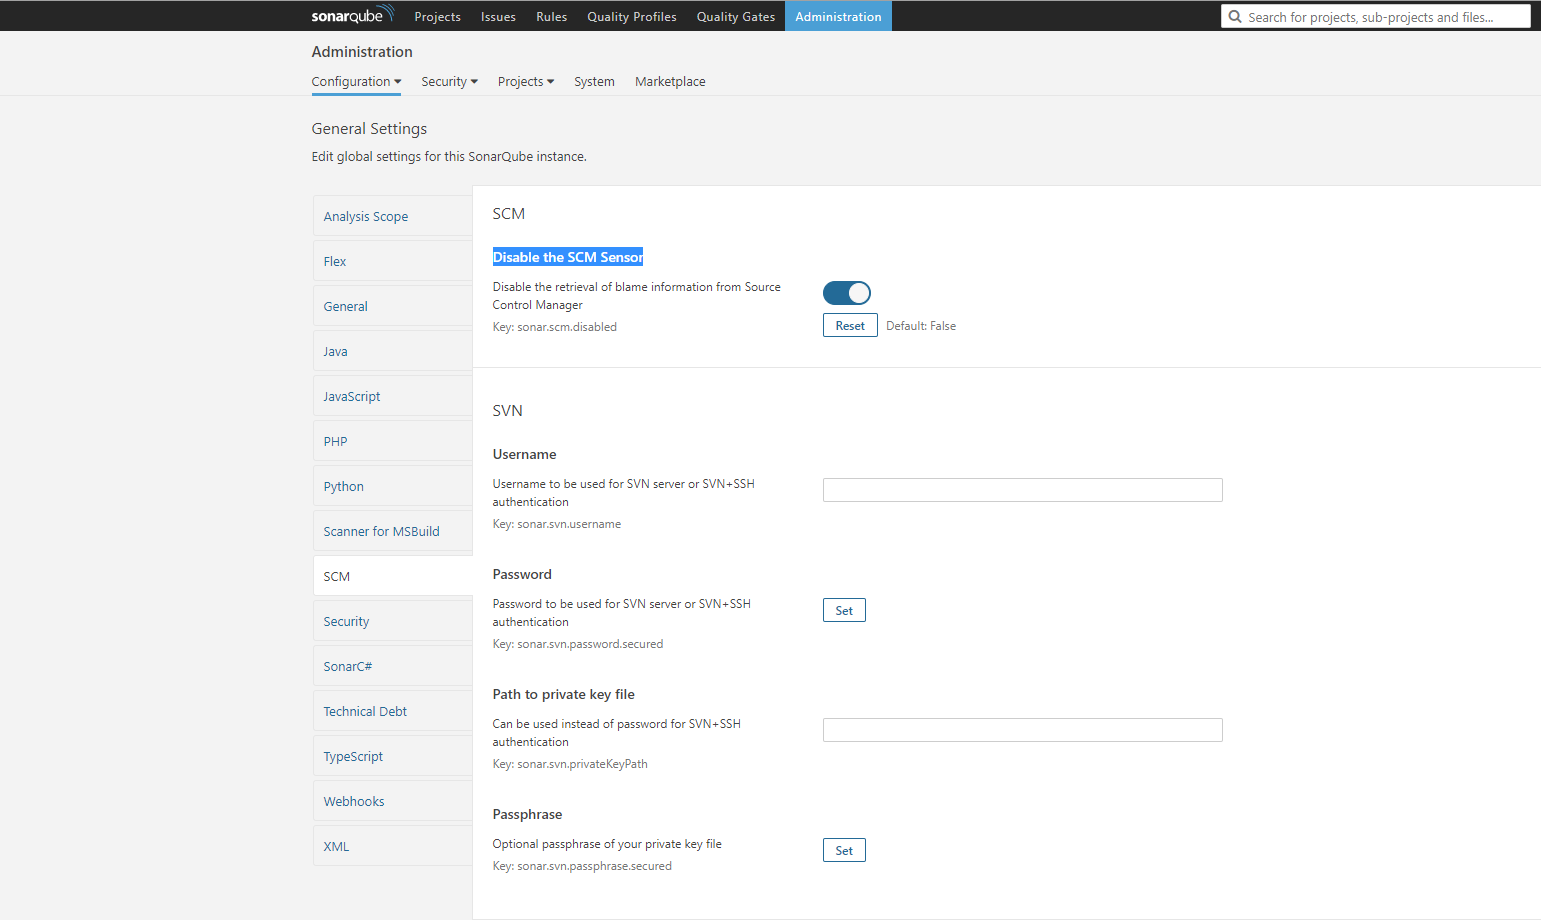
在Sonar管理员页面中,需要禁用SCM Sensor,否则在执行Sonar Scanner完成后,SonarQube Server还会去访问SVN项目,再次要求输入用户名和密码,导致扫描任务失败,设定界面如下
3)安装Jenkins在服务器192.168.56.103上,端口8080(安装步骤不再赘述),在[Manage Jenkins]-[Global Tool Configuration]中配置JDK和Maven后,再在Jenkins上安装SonarQube插件,如下图所示
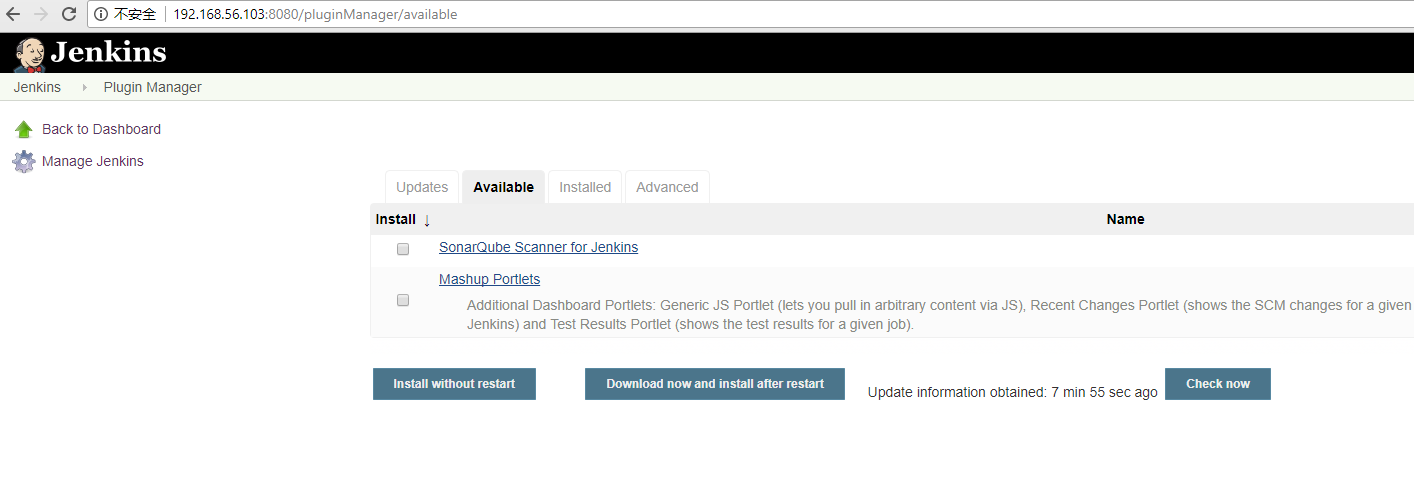
选择SonarQube Scanner For Jenkins插件,点击[Download now and install after restart],下载完成后重启Jenkins,打开[Manage Jenkins]-[Configure System]和[Manage Jenkins]-[Global Tool Configuration],可以看到新增了Sonar Qube的选项。
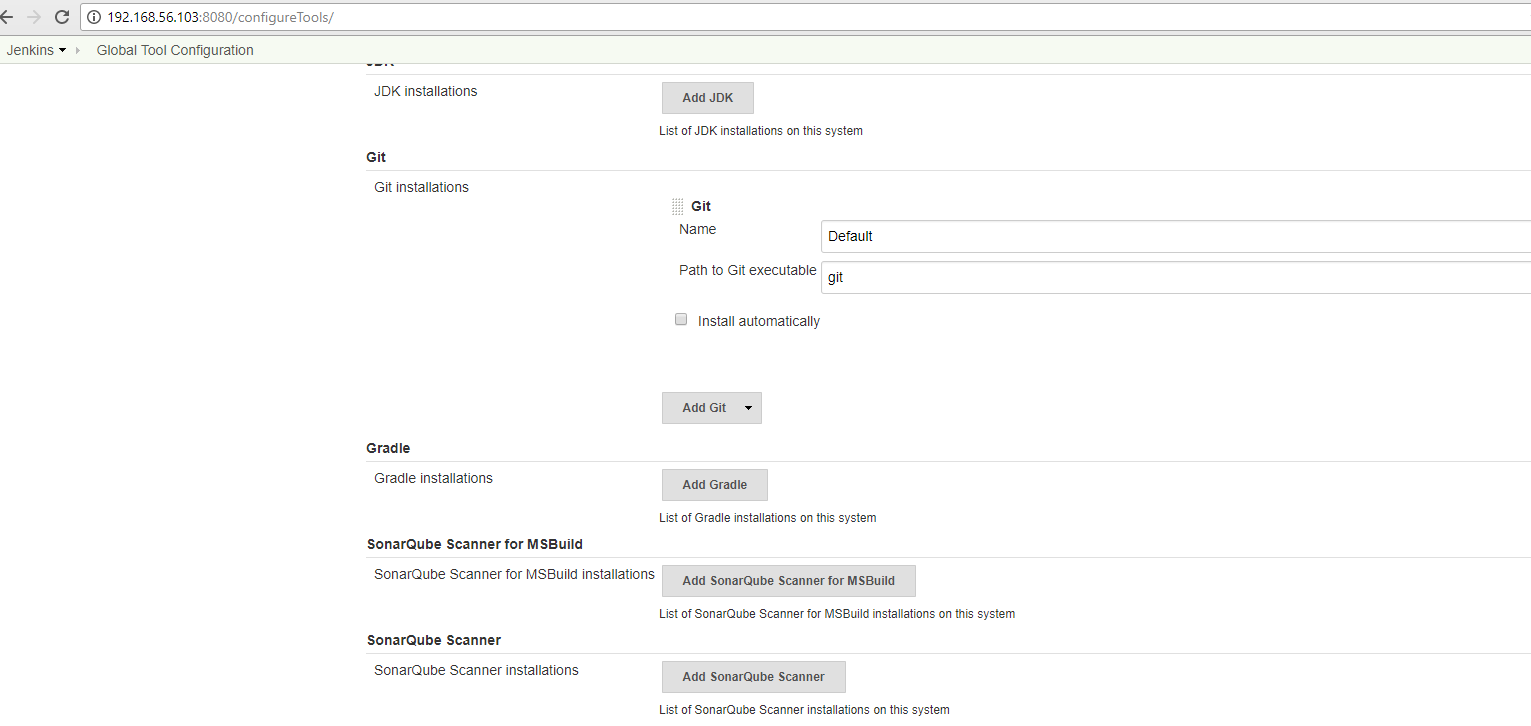
我们先在[Manage Jenkins]-[Global Tool Configuration]中配置SonarQube Scanner

这里的SonarQube Scanner路径就是1)中指定的scanner路径
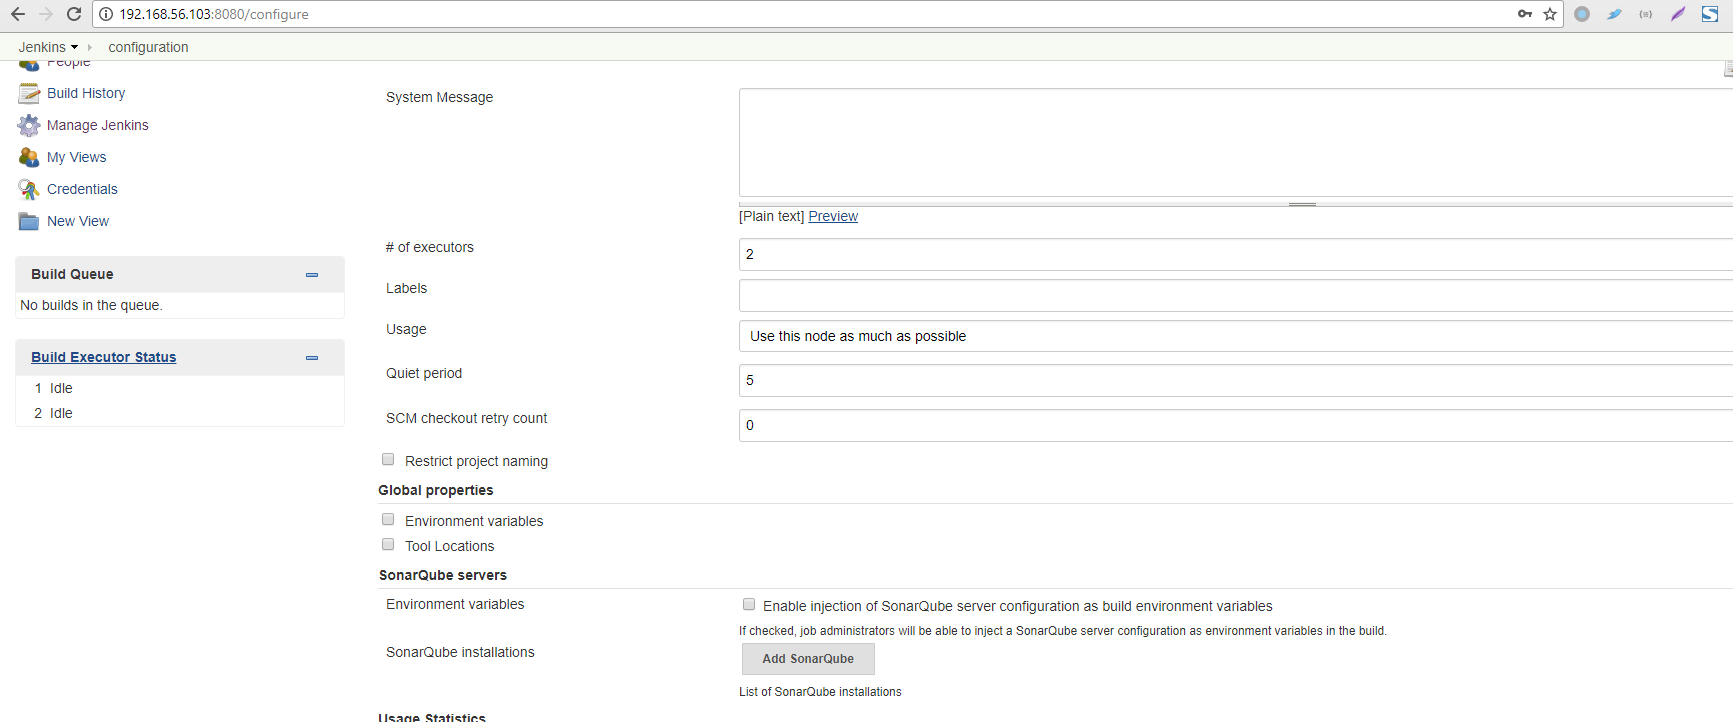
再在[Manage Jenkins]-[Configure System]中指定SonarQube Server
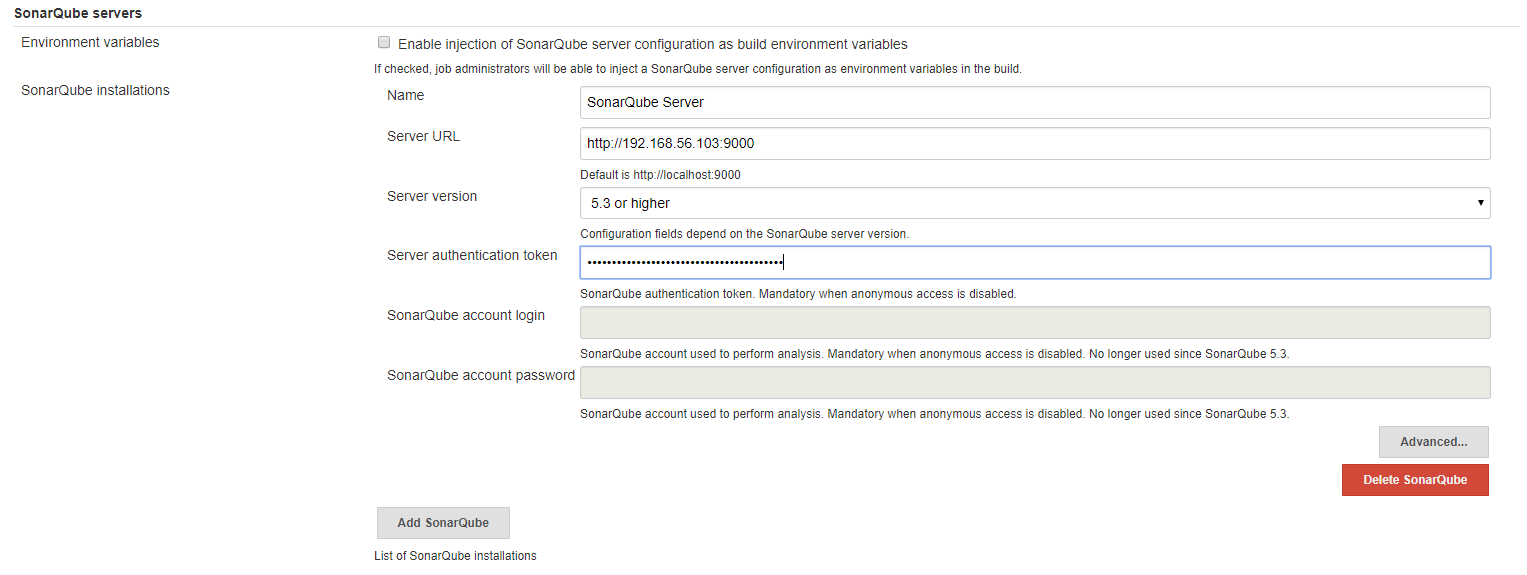
[Server authentication token]行对应的token请输入第一次启动sonar server时生成的token
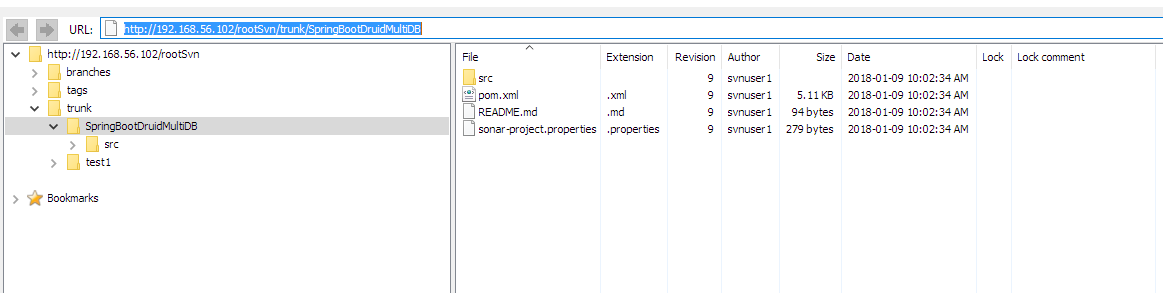
4)创建一个Pipeline Job用于执行Sonar扫描操作,这里我们使用多数据源集成一文中的SpringBootDruidMultiDB项目,在这个项目根目录下创建sonar.properties文件,用于Sonar扫描
sonar.projectKey=SpringBootDruidMultiDB
sonar.projectName=SpringBootDruidMultiDB
sonar.projectVersion=0.1.0
sonar.sources=src
sonar.language=java
sonar.sourceEncoding=UTF-8
sonar.java.binaries=target/classes
sonar.java.source=1.8
sonar.java.target=1.8
将其上传到前面博客里搭建的SVN上,地址为http://192.168.56.102/rootSvn
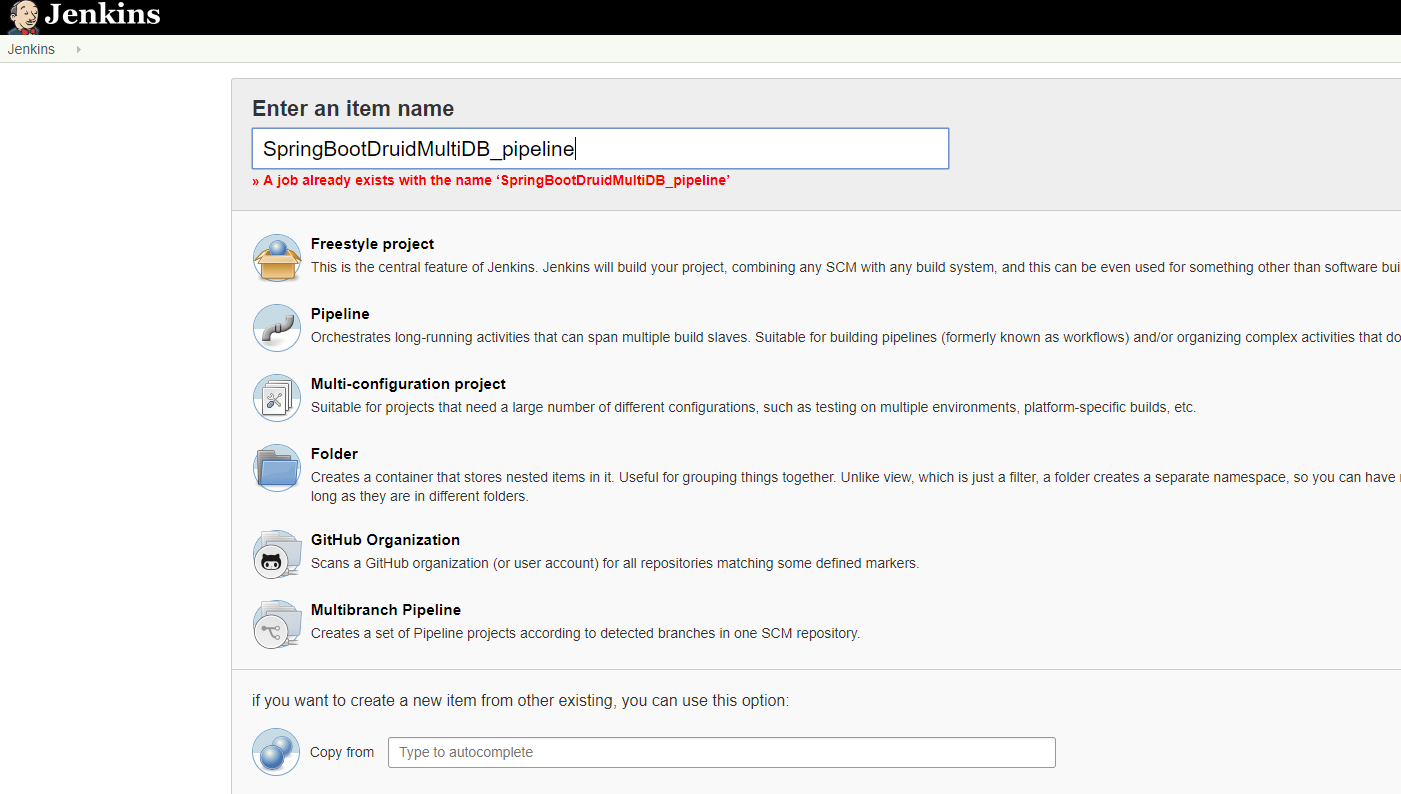
在Jenkins中创建一个Pipeline Job,命名为SpringBootDruidMultiDB_pipeline
在SpringBootDruidMultiDB_pipeline的编辑页面,我们在Pipeline部分的下拉框中选择[Pipeline Script]
在Script编辑框下面点击[Pipeline Syntax]链接,根据提示编写我们的Script
在Pipeline Syntax界面中如下选择

在Credentials行需要点击[Add]按钮,添加SVN访问的用户名和密码。
最后点击页面最下方的[Generate Pipeline Script]按钮,生成从SVN拉取代码任务的Script
checkout([
	$class: 'SubversionSCM',
	additionalCredentials: [],
	excludedCommitMessages: '',
	excludedRegions: '',
	excludedRevprop: '',
	excludedUsers: '',
	filterChangelog: false,
	ignoreDirPropChanges: false,
	includedRegions: '',
	locations: [[credentialsId: '25558b5e-7e96-4df0-a6e9-146e7f75dc5c',
	depthOption: 'infinity',
	ignoreExternalsOption: true,
	local: '.',
	remote: 'http: //192.168.56.102/rootSvn/trunk/SpringBootDruidMultiDB']],
	quietOperation: true,
	workspaceUpdater: [$class: 'UpdateUpdater']])
我们将其作为SpringBootDruidMultiDB_pipeline的第一个任务,放入node节点中,再加入编译任务和执行sonar扫描任务的script
node {
    checkout([
	$class: 'SubversionSCM',
	additionalCredentials: [],
	excludedCommitMessages: '',
	excludedRegions: '',
	excludedRevprop: '',
	excludedUsers: '',
	filterChangelog: false,
	ignoreDirPropChanges: false,
	includedRegions: '',
	locations: [[credentialsId: '25558b5e-7e96-4df0-a6e9-146e7f75dc5c',
	depthOption: 'infinity',
	ignoreExternalsOption: true,
	local: '.',
	remote: 'http://192.168.56.102/rootSvn/trunk/SpringBootDruidMultiDB']],
	quietOperation: true,
	workspaceUpdater: [$class: 'UpdateUpdater']])

    def mvnHome = tool "M3"
     stage('Build') {
        sh "${mvnHome}/bin/mvn -Dmaven.test.skip=true clean package"
    }

   stage('SonarQube analysis'){
    def scannerHome = tool 'SonarQube Scanner'
    withSonarQubeEnv('SonarQube Server')
    {
        sh "${scannerHome}/bin/sonar-scanner"
    }
   }
}
第二个任务是执行mvn clean package命令,其中M3是Maven Tools安装路径的别名
第三个任务是编译完成后进行SonarQube Scanner扫描,其中SonarQube Server是SonarQube服务器配置的别名,SonarQube Scanner是SonarQube Scanner CLI配置的别名,在上面的图中已标明。
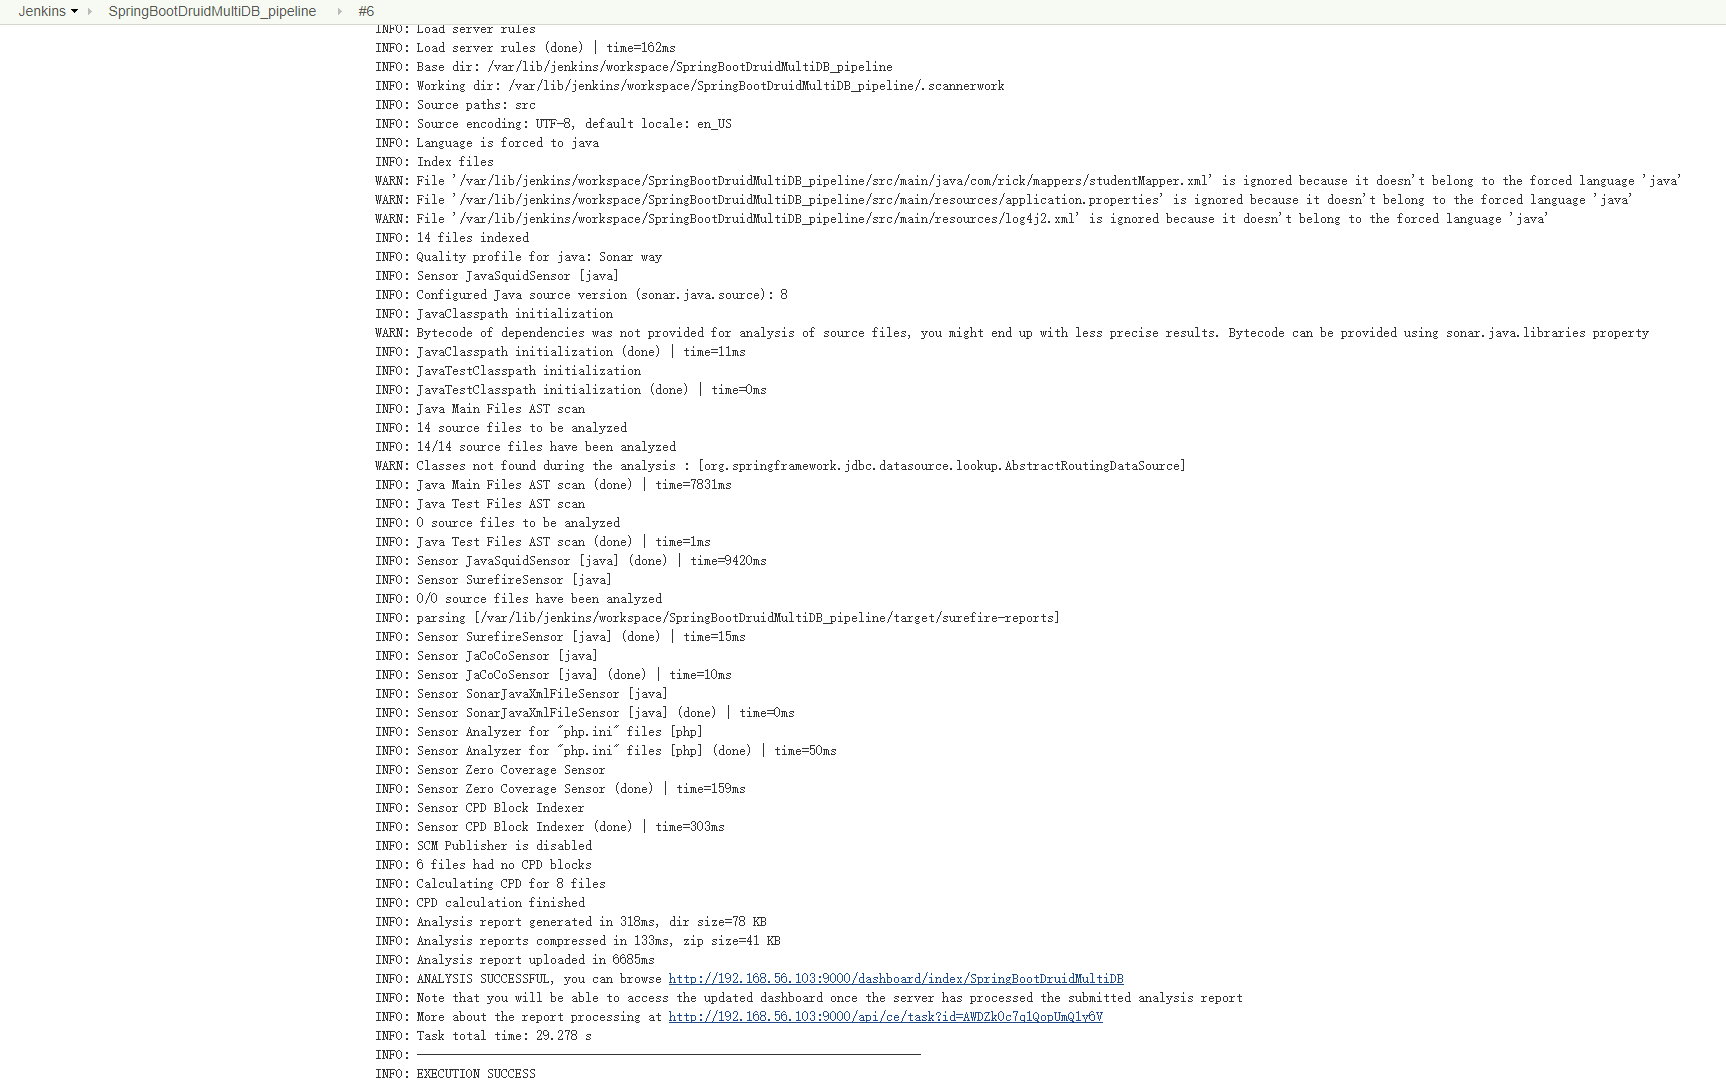
最后执行Pipeline Job,执行结果如下图所示
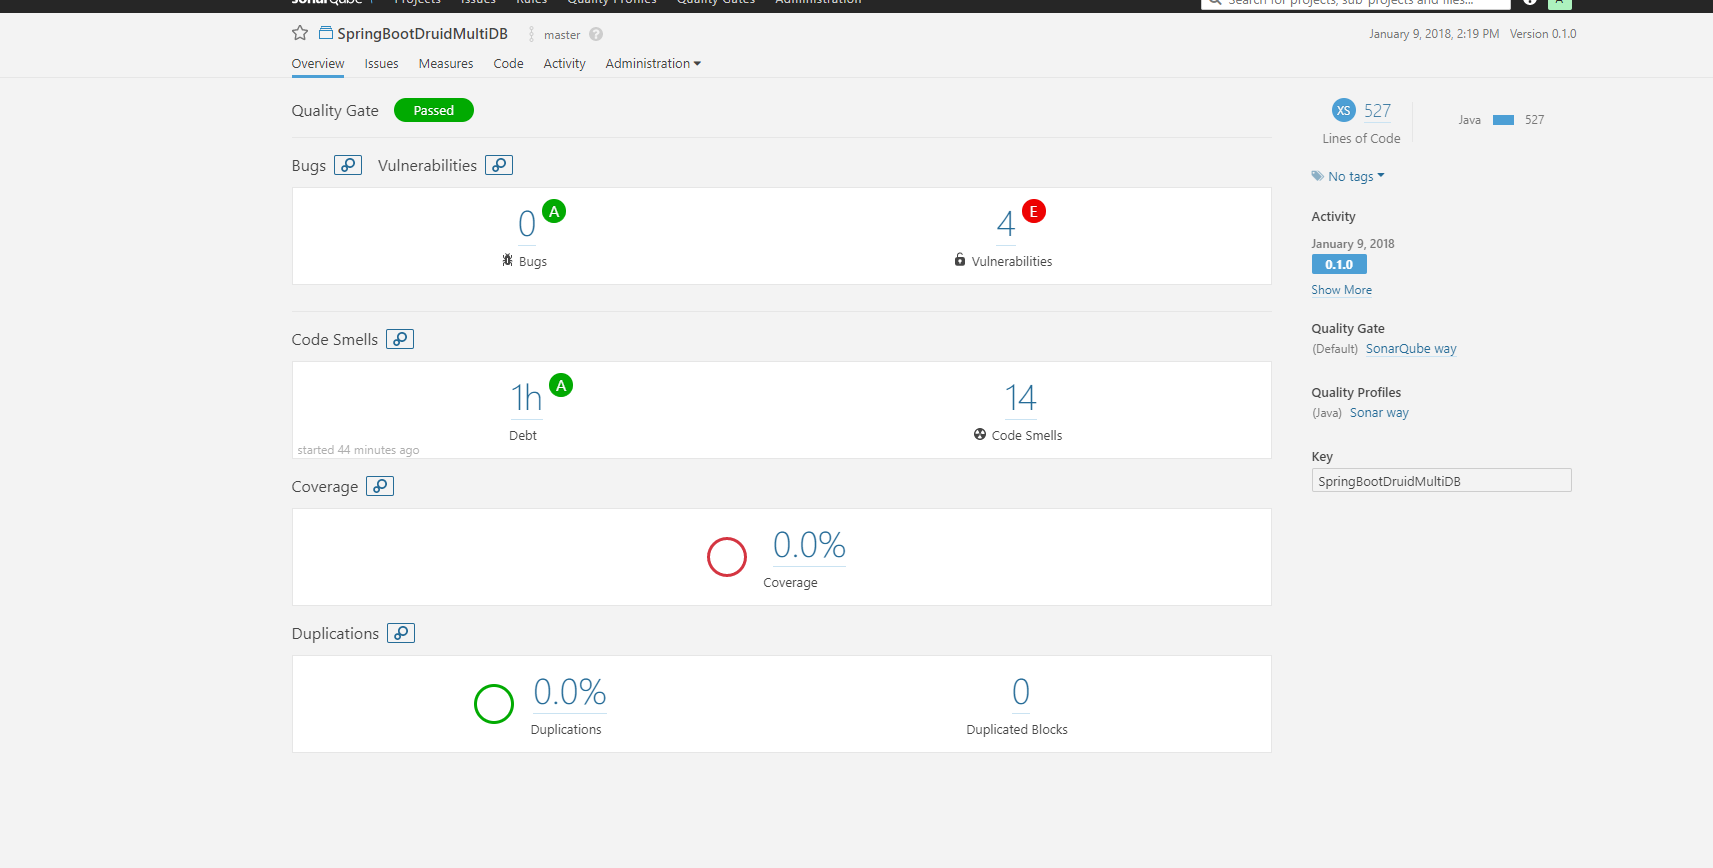
点开SonarQube结果链接
http://192.168.56.103:9000/dashboard/index/SpringBootDruidMultiDB
可以看到Sonar项目扫描结果
此外,在Eclipse环境下使用SonarLint也可以进行代码Sonar扫描,但是它与SonarQube Server使用的Sonar规则有差异,最后的扫描结果有差异,在使用的时候需要注意。