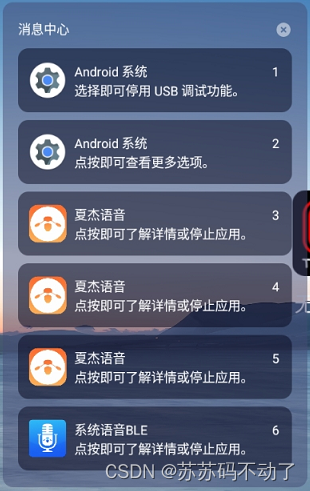
写在前面:RecyclerView 很常用,对于有上下滑动需求,自动添加更多内容的需求来说,很好用。最后可以实现如下的类似效果,动态添加Item,且可上下滑动:
下面结合addView的方式介绍RecyclerView 怎么用。
注:文末会贴上一个简单的demo APP 的github链接,读者可以在此基础上理解、二次使用。不是上图的哪种效果,不过图片中的哪种效果就是从demo APP结合通知服务改出来的消息中心。
第一步:addView的布局文件中引入 RecyclerView
            <androidx.recyclerview.widget.RecyclerView
                android:id="@+id/notification_center"
                android:layout_width="wrap_content"
                android:layout_height="wrap_content"
                android:layout_gravity="center"
                android:layout_marginTop="10dp"
                android:layout_marginBottom="10dp"
                tools:ignore="MissingConstraints"
                tools:layout_editor_absoluteX="1dp"
                tools:layout_editor_absoluteY="1dp" />
第二步:将需要的View添加到屏幕上
下面用伪代码说明:
    private void initLayoutParams() {


        lp = new WindowManager.LayoutParams();
        lp.format = PixelFormat.RGBA_8888;
        //弹出来之后,还能点其它地方
        lp.flags = WindowManager.LayoutParams.FLAG_LOCAL_FOCUS_MODE | WindowManager.LayoutParams.FLAG_NOT_TOUCH_MODAL;
        if (Build.VERSION.SDK_INT >= Build.VERSION_CODES.O) {


            lp.type = WindowManager.LayoutParams.TYPE_APPLICATION_OVERLAY;
        } else {


            lp.type = WindowManager.LayoutParams.TYPE_SYSTEM_ALERT;
        }
        lp.width = WindowManager.LayoutParams.WRAP_CONTENT;
        lp.height = WindowManager.LayoutParams.WRAP_CONTENT;
        lp.gravity = Gravity.LEFT;
        lp.x = 20;
    }

    private void initView() {


        Log.d(TAG,String.valueOf(mycontext));
        inflater = (LayoutInflater) mycontext.getSystemService(Context.LAYOUT_INFLATER_SERVICE);
        //读取顶层布局文件
        notification = inflater.inflate(R.layout.notification, null);

        STATIC_INSTANCE_UTILS.mavts.addView(notification,lp);
    }
第三步:给RecyclerView 搭配对应的RecyclerView.Adapter
RecyclerView.Adapter持有至少一个RecyclerView.ViewHolder。这里说人话就是RecyclerView 不知道自己内部的每一项具体是怎么样的,需要我们用的人通过绑定RecyclerView.Adapter,再通过RecyclerView.Adapter里面的RecyclerView.ViewHolder告诉它,它就知道了,哦原来用户想往我肚子里面添加哪些东西。
一般的写法如下:
package com.color.notification;

import android.content.Context;
import android.content.pm.ApplicationInfo;
import android.content.pm.PackageManager;
import android.graphics.drawable.Drawable;
import android.view.LayoutInflater;
import android.view.View;
import android.view.ViewGroup;
import android.widget.ImageView;
import android.widget.TextView;

import androidx.recyclerview.widget.RecyclerView;

import java.util.List;

/*
① 创建一个继承RecyclerView.Adapter<VH>的Adapter类
② 创建一个继承RecyclerView.ViewHolder的静态内部类
③ 在Adapter中实现3个方法:
   onCreateViewHolder()
   onBindViewHolder()
   getItemCount()
*/
public class RecycleAdapter extends RecyclerView.Adapter<RecycleAdapter.MyViewHolder>{


    private Context mycontext;
    private List<String> list;
    private View view;

    private PackageManager packageManager;

    private ApplicationInfo applicationInfo;

    Drawable drawable;
    //构造方法,传入数据,即把展示的数据源传进来,并且复制给一个全局变量,以后的操作都在该数据源上进行
    public RecycleAdapter(Context context, List<String> list) throws PackageManager.NameNotFoundException {


        mycontext = context;
        this.list = list;

        packageManager = mycontext.getPackageManager();
        applicationInfo = packageManager.getApplicationInfo("com.mphotool.whiteboard", 0);
        drawable = applicationInfo.loadIcon(packageManager);
    }
    //由于RecycleAdapter继承自RecyclerView.Adapter,则必须重写onCreateViewHolder(),onBindViewHolder(),getItemCount()
    //onCreateViewHolder()方法用于创建ViewHolder实例,我们在这个方法将item_demo.xml布局加载进来
    //然后创建一个ViewHolder实例,并把加载出来的布局传入到构造函数,最后将实例返回
    @Override
    public MyViewHolder onCreateViewHolder(ViewGroup parent, int viewType) {


        //创建ViewHolder,返回每一项的布局
        view = LayoutInflater.from(mycontext).inflate(R.layout.item_demo,parent,false);
        MyViewHolder myViewHolder = new MyViewHolder(view);
        return myViewHolder;
    }
    //onBindViewHolder()方法用于对RecyclerView子项数据进行赋值,会在每个子项被滚动到屏幕内的时候执行
    //这里我们通过position参数的得到当前项的实例,然后将数据设置到ViewHolder的TextView即可
    @Override
    public void onBindViewHolder(MyViewHolder holder, int position) {


        //将数据和控件绑定
        holder.title.setText(packageManager.getApplicationLabel(applicationInfo));
        holder.time.setText("2023/12/20");
        holder.content.setText("通知中心内容跟测试,看看可能的效果。");
        holder.imageView.setImageDrawable(drawable);
    }
    //getItemCount()告诉RecyclerView一共有多少个子项,直接返回数据源的长度。
    @Override
    public int getItemCount() {


        //返回Item总条数
        return list.size();
    }

    //内部类,绑定控件
    class MyViewHolder extends RecyclerView.ViewHolder{


        TextView title, time, content;

        ImageView imageView;
        public MyViewHolder(View itemView) {

    //这个view参数就是recyclerview子项的最外层布局
            super(itemView);
            //可以通过findViewById方法获取布局中的TextView
            title = (TextView) itemView.findViewById(R.id.title);

            time = (TextView) itemView.findViewById(R.id.time);

            content = (TextView) itemView.findViewById(R.id.content);

            imageView = (ImageView) itemView.findViewById(R.id.Icon);
        }
    }
}
需要重写的方法:onCreateViewHolder告诉RecyclerView.Adapter,持有什么Holder;onBindViewHolder 每次添加新内容的时候,会执行;getItemCount 获取整个RecyclerView中有多少Item,就是添加了多少行或者列。最后调用setAdapter方法绑定RecyclerView和Adapter,见第四步最后的代码。
MyViewHolder 中引入需要添加进RecyclerView的Item的布局,R.layout.item_demo的例子如下:
<?xml version="1.0" encoding="utf-8"?>
<LinearLayout xmlns:android="http://schemas.android.com/apk/res/android"
    xmlns:tools="http://schemas.android.com/tools"
    android:orientation="horizontal"
    android:layout_width="400dp"
    android:layout_height="50dp"
    android:layout_marginTop="5dp"
    android:layout_marginBottom="5dp"
    android:background="@drawable/shapetop"
    android:focusable="true">

    <ImageView
        android:id="@+id/Icon"
        android:layout_width="60dp"
        android:layout_height="wrap_content"
        android:src="@drawable/ic_launcher_background">

    </ImageView>

    <LinearLayout
        android:orientation="vertical"
        android:layout_width="match_parent"
        android:layout_height="match_parent">

        <LinearLayout
            android:orientation="horizontal"
            android:layout_width="match_parent"
            android:layout_height="wrap_content">
            <TextView
                android:id="@+id/title"
                android:text="白板"
                android:layout_width="200dp"
                android:layout_height="wrap_content">

            </TextView>

            <TextView
                android:id="@+id/time"
                android:gravity="right"
                android:text="2023/12/20"
                android:layout_width="match_parent"
                android:layout_height="wrap_content"
                android:layout_marginRight="20dp">

            </TextView>


        </LinearLayout>

        <TextView
            android:id="@+id/content"
            android:text="这是一个测试的效果"
            android:layout_width="match_parent"
            android:layout_height="wrap_content">

        </TextView>

    </LinearLayout>

</LinearLayout>
上面是一个RecyclerView.Adapter 持有一个RecyclerView.ViewHolder的情况,Adapter 其实可以一对多,作者凭借自己的需求来按需添加。下面贴出结合T泛型之后的进阶代码:
package com.color.notification.models;

import android.content.Context;
import android.content.pm.ApplicationInfo;
import android.content.pm.PackageManager;
import android.graphics.drawable.Drawable;
import android.util.Log;
import android.view.LayoutInflater;
import android.view.View;
import android.view.ViewGroup;
import android.widget.ImageView;
import android.widget.TextView;

import androidx.annotation.NonNull;
import androidx.recyclerview.widget.RecyclerView;

import com.color.osd.R;
import com.color.systemui.interfaces.Instance;

import java.util.ArrayList;
import java.util.List;

public class Notification_Center_Adapter<T extends RecyclerView.ViewHolder> extends RecyclerView.Adapter<T> implements Instance {


    private Context mycontext;

    private View notification_center;

    private View notification_center_title;

//    private View notification_quick_settings;
//
//    private PackageManager packageManager;
//
//    private ApplicationInfo applicationInfo;
//
//    private Drawable drawable;

    private List<Notification_Item> list = new ArrayList<>();

    private int number = 0;

    public Center_ViewHolder center_viewHolder;

    public Center_Title_ViewHolder center_title_viewHolder;

    public Notification_Center_Adapter() {


    }

    public void setContext(Context context, List list) throws PackageManager.NameNotFoundException {


        mycontext = context;
        this.list = list;

//        packageManager = mycontext.getPackageManager();
//        applicationInfo = packageManager.getApplicationInfo("com.mphotool.whiteboard", 0);
//        drawable = applicationInfo.loadIcon(packageManager);
    }

    @NonNull
    @Override
    public T onCreateViewHolder(@NonNull ViewGroup parent, int viewType) {


        Log.d("onCreateViewHolder", " " + String.valueOf(number));
        if (number == 0) {


            number++;
            notification_center_title = LayoutInflater.from(mycontext).inflate(R.layout.notification_center_title, parent, false);
            center_title_viewHolder = new Center_Title_ViewHolder(notification_center_title);
            return (T) center_title_viewHolder;
        } else if (number > 0) {


            number++;
            notification_center = LayoutInflater.from(mycontext).inflate(R.layout.notification_center, parent, false);
            center_viewHolder = new Center_ViewHolder(notification_center);
            return (T) center_viewHolder;
        }

        return null;
    }

    @Override
    public void onBindViewHolder(@NonNull T holder, int position) {


        if (holder.getClass() == Center_ViewHolder.class) {


            bindItemViewHolder((Center_ViewHolder) holder, position);
        } else if (holder.getClass() == Center_Title_ViewHolder.class) {


            // 处理 Quick_Settings_ViewHolder 的逻辑
            // 例如:quick_settings_viewHolder.appName.setText(...)
        }

    }

    @Override
    public int getItemCount() {


        return list.size();
    }

    class Center_ViewHolder extends RecyclerView.ViewHolder {


        TextView appName, time, content;

        ImageView Icon;

        public Center_ViewHolder(View view) {


            super(view);
            //可以通过findViewById方法获取布局中的TextView
            appName = (TextView) view.findViewById(R.id.appName);

            time = (TextView) view.findViewById(R.id.time);

            content = (TextView) view.findViewById(R.id.content);

            Icon = (ImageView) view.findViewById(R.id.Icon);
        }
    }

    class Center_Title_ViewHolder extends RecyclerView.ViewHolder {


        public Center_Title_ViewHolder(View view) {


            super(view);
        }
    }


    private void bindItemViewHolder(Center_ViewHolder holder, int position) {


        if (list.size() != 0) {


            holder.appName.setText(list.get(position).appName);
            holder.time.setText(list.get(position).time);
            holder.content.setText(list.get(position).content);
            holder.Icon.setImageDrawable(list.get(position).Icon);
        }
    }
}
注:上述代码均不完整,类似伪代码,重要的是思路,读者可以截取关键部分使用。
第四步:给RecyclerView添加 “布局管理者”
这一步贴出代码:
    private RecyclerView recyclerView;
    private Notification_Center_Adapter notification_center_adapter = new Notification_Center_Adapter();

. . . . . .
. . . . . .
. . . . . .
. . . . . .

        mycontext = getApplicationContext();
        packageManager = mycontext.getPackageManager();

        //添加View到桌面,包括两个部分:快捷设置和消息中心
        mynotification.setContext(mycontext);
        setInstance(mynotification);
        recyclerView = STATIC_INSTANCE_UTILS.myNotification.notification.findViewById(R.id.notification_center);

        //初始化RecycleViewAdapter
        try {


            notification_center_adapter.setContext(mycontext, list);
            setInstance(notification_center_adapter);
        } catch (PackageManager.NameNotFoundException e) {


            throw new RuntimeException(e);

        LinearLayoutManager manager = new LinearLayoutManager(mycontext);

        manager.setOrientation(LinearLayoutManager.VERTICAL);

        recyclerView.setLayoutManager(manager);
        recyclerView.setAdapter(notification_center_adapter);
上面代码的意思是:用顺序布局管理RecyclerView ,方向为竖。简单来说就是你往RecyclerView 添加的Item是往下增加的。完成这几步,就可以基本使用RecyclerView了。
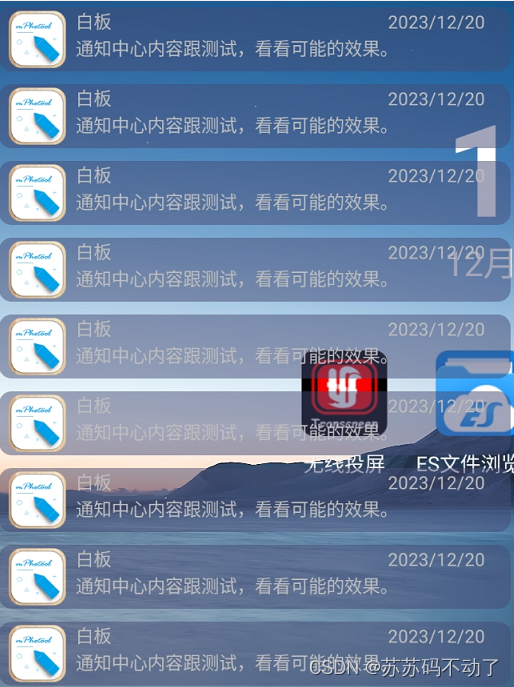
demo APP Github链接:https://github.com/xuhao120833/Notification/tree/master
demo效果如下:读取的是特定APP图片,读者用的时候记得更换。
写在后面:RecyclerView 有很多经典的用例,如刷新闻、刷视频、瀑布流等,掌握了基本用法,任何复杂的东西都是简单事物的重复和叠加。