轮廓绘制通过下面6个步骤得出轮廓
- 读取图像 Cv2.ImRead();
- 将图像转换为灰度图像 Cv2.CvtColor();
- 对图像进行模糊处理 滤波Cv2.Blur();
- 边缘检测Canny();
- 查找轮廓Cv2.FindContours();
- 绘制轮廓Cv2.DrawContours();
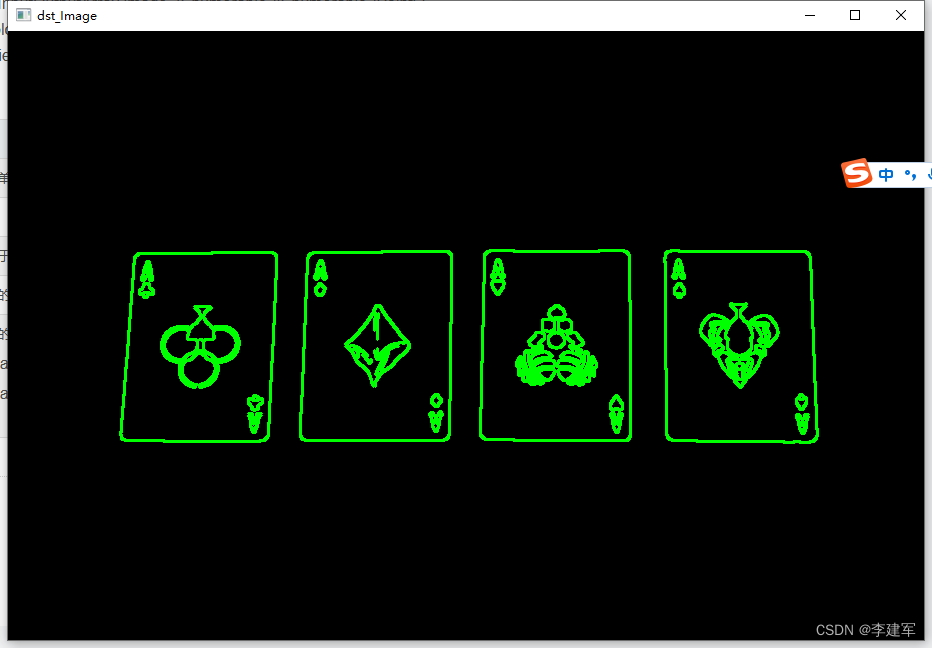
图例(自娱自乐一下上个扑克牌玩一下)

 // 1、读取图像
 Mat image = Cv2.ImRead("0.jpg", ImreadModes.Color);

 // 2、 将图像转换为灰度图像
 Mat src_gray = new Mat();
 Cv2.CvtColor(image, src_gray, ColorConversionCodes.BGR2GRAY);

 // 3、 滤波
 Cv2.Blur(src_gray, src_gray, new OpenCvSharp.Size(3, 3));
 // 4、Canny边缘检测
 Mat canny_Image = new Mat();
 // 输入、输出、最小阀值、最大阀值
 Cv2.Canny(src_gray, canny_Image, 100, 200);

 //5、查找轮廓
 // 寻找轮廓
 OpenCvSharp.Point[][] contours;
 HierarchyIndex[] hierarchy;

 Cv2.FindContours(canny_Image, out contours, out hierarchy, RetrievalModes.Tree, ContourApproximationModes.ApproxNone, new OpenCvSharp.Point(0, 0));
 // 将结果画出并返回结果
 Mat dst_Image = Mat.Zeros(canny_Image.Size(), image.Type());
 for (int i = 0; i < contours.Length; i++)
 {
     // 轮廓的颜色为绿色
     Scalar color = new Scalar(0, 255, 0);
     Cv2.DrawContours(dst_Image, contours, i, color, 2, LineTypes.Link8, hierarchy);

 }
 Cv2.ImShow("dst_Image", dst_Image); // 显示图像
 Cv2.WaitKey(0);
一、读取图像 Cv2.ImRead();不介绍了
二、将图像转换为灰度图像 Cv2.CvtColor();不介绍了
三、滤波 Cv2.Blur()
用于对图像进行模糊处理。
Cv2.Blur(src, dst, ksize, anchor,borderType,borderValue)
| 参数 | 解释 |
|---|---|
| src | 输入图像,可以是单通道或多通道图像。 |
| dst | 输出图像,与输入图像具有相同的尺寸和深度。 |
| ksize | 模糊核的大小。它是一个2D的Size结构,指定了水平和垂直方向上的核大小。它的宽度和高度必须是正奇数,例如(3,3),(5,5)等。 |
| anchor | 模糊核的锚点位置,默认为(-1,-1),表示核的中心点。 |
| borderType | 界模式,默认为BorderType.Default,表示使用默认边界模式 |
| borderValue | 边界值,当边界模式为BorderType.Constant时使用,默认为Scalar(0)。 |
new OpenCvSharp.Size(3, 3)效果

四、边缘检测cv2.Canny()
Canny边缘检测算法的原理是:首先对图像进行高斯滤波,然后通过Sobel算子计算图像的梯度,再通过非极大值抑制来提取局部最大值作为边缘点,最后通过双阈值检测来连接边缘点。
cv2.Canny(image,edges,threshold1,threshold2,apertureSize,L2gradient)
| 参数 | 解释 |
|---|---|
| image | 输入图像,可以是单通道灰度图像或者是3通道彩色图像。 |
| edges | 输出的边缘图像,是一个单通道二值图像。 |
| threshold1 | 第一个阈值,用于边缘强度的低阈值过滤。 |
| threshold2 | 第二个阈值,用于边缘强度的高阈值过滤。 |
| apertureSize | Sobel算子的孔径大小,默认为3。 |
| L2gradient | 一个布尔值,指定计算梯度幅值时是否使用L2范数,默认为false。 |
Cv2.Blur(src_gray, src_gray, new OpenCvSharp.Size(3, 3)) 效果

五、查找轮廓 Cv2.FindContours()
用于检测图像中的轮廓,即找到图像中所有的连续的点的集合。该函数需要输入二值化图像,并且图像中的背景色为黑色,前景色为白色。函数会返回一个包含所有轮廓的列表,每个轮廓都是一个由点组成的数组。
Cv2.FindContours(image, mode, method[, contours[, hierarchy[, offset]]])
FindContours(InputArray image, out Point[][] contours, out HierarchyIndex[] hierarchy, RetrievalModes mode, ContourApproximationModes method, Point? offset = null)

注意事项:
- 输入图像必须是二值图像,即只包含黑白两种像素值。
- 轮廓检测只能应用于二值图像,因此在应用函数之前,通常需要先进行图像阈值化或其他图像处理操作。
六、绘制轮廓Cv2.DrawContours()
在图像上绘制检测到的轮廓,通过指定的颜色和线宽度来显示图像中的边界。
public static void DrawContours(InputOutputArray image, IEnumerable<IEnumerable<Point>> contours, int contourIdx, Scalar color, int thickness = 1, LineTypes lineType = LineTypes.Link8, IEnumerable<HierarchyIndex>? hierarchy = null, int maxLevel = int.MaxValue, Point? offset = null)