继续跟着b站@老陈打码 一起学习threejs
gltf文件下载 https://pan.baidu.com/s/15PHhoj3qmNiDhiAu9S7b0A
提取码: 6666
1.搭建项目
使用vue脚手架搭建项目
vue create app 选择vue3
npm add gsap three 下载threejs相关依赖
npm run serve 运行项目
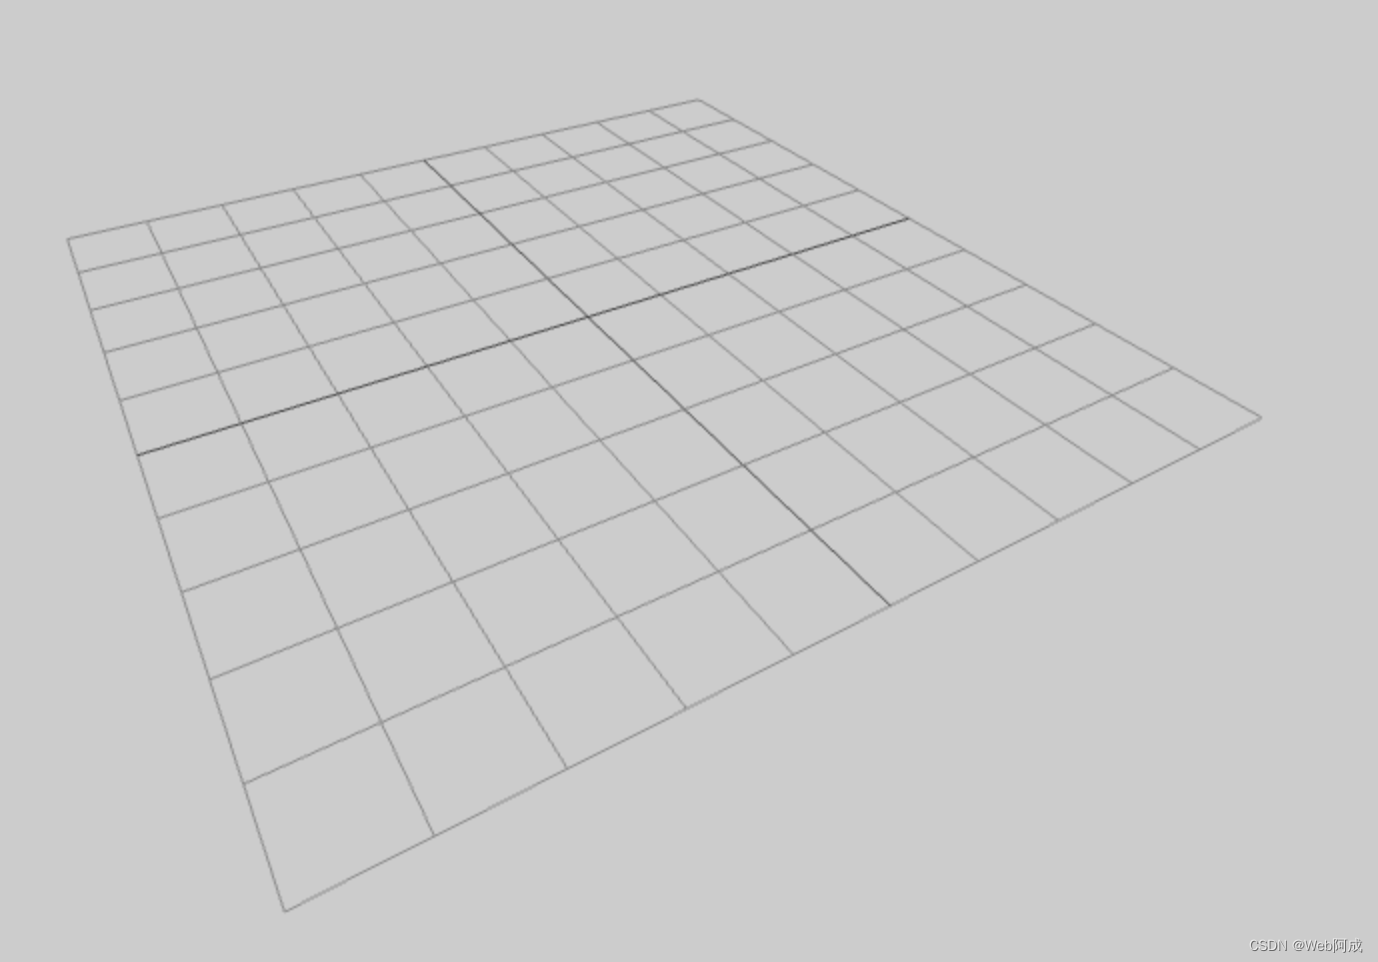
2. 引入three 构建基本图层
我们引入控制器,创建场景相机、开启抗锯齿、渲染对象、引入控制器、创建网格地面。走一遍threejs渲染的流程。
在vue中使用threejs搭建项目 在生命周期中初始化。
<template>
  <div class="home">
    <div class="canvas-container" ref="canvasDom"></div>
  </div>
</template>

import { ref, onMounted } from "vue";
import * as THREE from "three";
import { OrbitControls } from "three/examples/jsm/controls/OrbitControls.js";

let controls;
const canvasDom = ref();
// 创建场景
const scene = new THREE.Scene();
// 创建相机
const camera = new THREE.PerspectiveCamera(
  75,
  window.innerWidth / window.innerHeight,
  0.1,
  1000
);
camera.position.set(0, 2, 6);
// 创建渲染器
const renderer = new THREE.WebGLRenderer({
  // 开启抗锯齿
  antialias: true,
});
// 设置渲染器的大小为窗口的内宽度,也就是内容区的宽度
renderer.setSize(window.innerWidth, window.innerHeight);
// 将渲染器的dom元素(renderer.domElement)添加到我们的HTML文档中。
// 这就是渲染器用来显示场景给我们看的<canvas>元素
document.body.appendChild(renderer.domElement);

// 渲染对象
const render = () => {
  renderer.render(scene, camera);
  // 控制器更新
  controls && controls.update();
  // 通过循环调用render()函数,使动画循环执行
  requestAnimationFrame(render);
};

onMounted(() => {
  canvasDom.value.appendChild(renderer.domElement);
  // 初始化渲染器
  renderer.setClearColor("#000");
  // 设置背景
  scene.background = new THREE.Color("#ccc");
  scene.environment = new THREE.Color("#ccc");
  render();

  // 添加网格地面
  const gridHelper = new THREE.GridHelper(10, 10);
  gridHelper.opacity = 0.2;
  // 设置透明度
  gridHelper.material.transparent = true;
  scene.add(gridHelper);

  // 添加控制器
  controls = new OrbitControls(camera, renderer.domElement);
  controls.update();
});

* {
  margin: 0;
  padding: 0;
}
3.加载引入模型
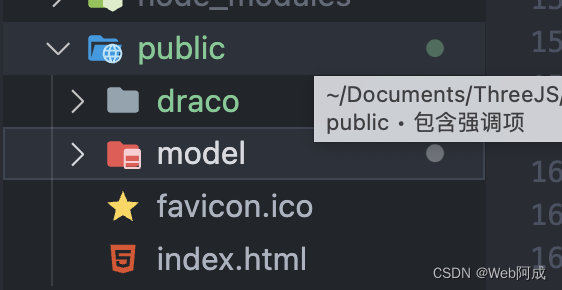
由于我们的模型文件是压缩过的,所以我们需要threejs的解压工具draco先解压以后才能正常使用。draco工具需要我们将文件添加至public方便操作。
愿文件地址: node_modules/three/examples/jsm/libs/draco 将draco文件夹复制到public文件下
import { GLTFLoader } from "three/examples/jsm/loaders/GLTFLoader.js";
import { DRACOLoader } from "three/examples/jsm/loaders/DRACOLoader.js";


onMounted(() => {
  canvasDom.value.appendChild(renderer.domElement);
  // 初始化渲染器
  renderer.setClearColor("#000");
  // 设置背景
  scene.background = new THREE.Color("#ccc");
  scene.environment = new THREE.Color("#ccc");
  render();

  // 添加网格地面
  const gridHelper = new THREE.GridHelper(10, 10);
  gridHelper.opacity = 0.2;
  // 设置透明度
  gridHelper.material.transparent = true;
  scene.add(gridHelper);
  // 添加控制器
  controls = new OrbitControls(camera, renderer.domElement);
  controls.update();

  // 添加汽车模型
  const loader = new GLTFLoader();
  // 解压缩实例化
  const dracoLoader = new DRACOLoader();
  dracoLoader.setDecoderPath("./draco/gltf/");
  loader.setDRACOLoader(dracoLoader);

  // 加载模型
  loader.load("./model/bmw01.glb", (gltf) => {
    const bwm = gltf.scene;
    scene.add(bwm);
  });
});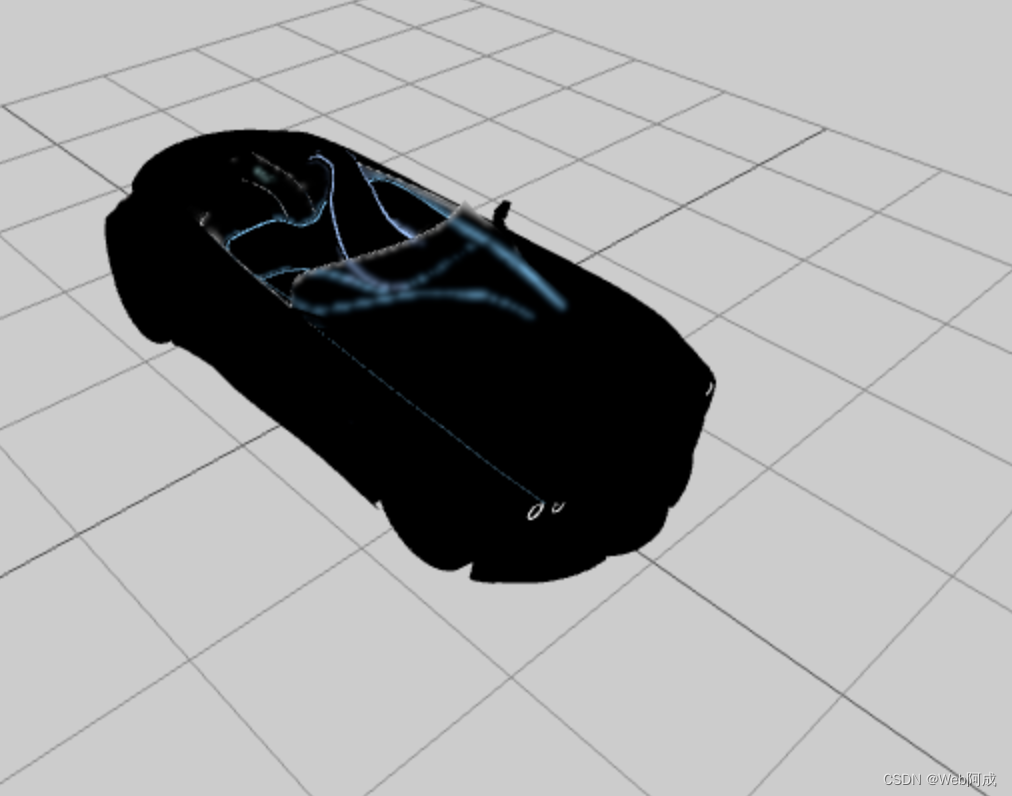
4.引入光源
引入的模型为物理材质的,色彩依赖灯光。我们需要添加灯光才能看到本来的样子。
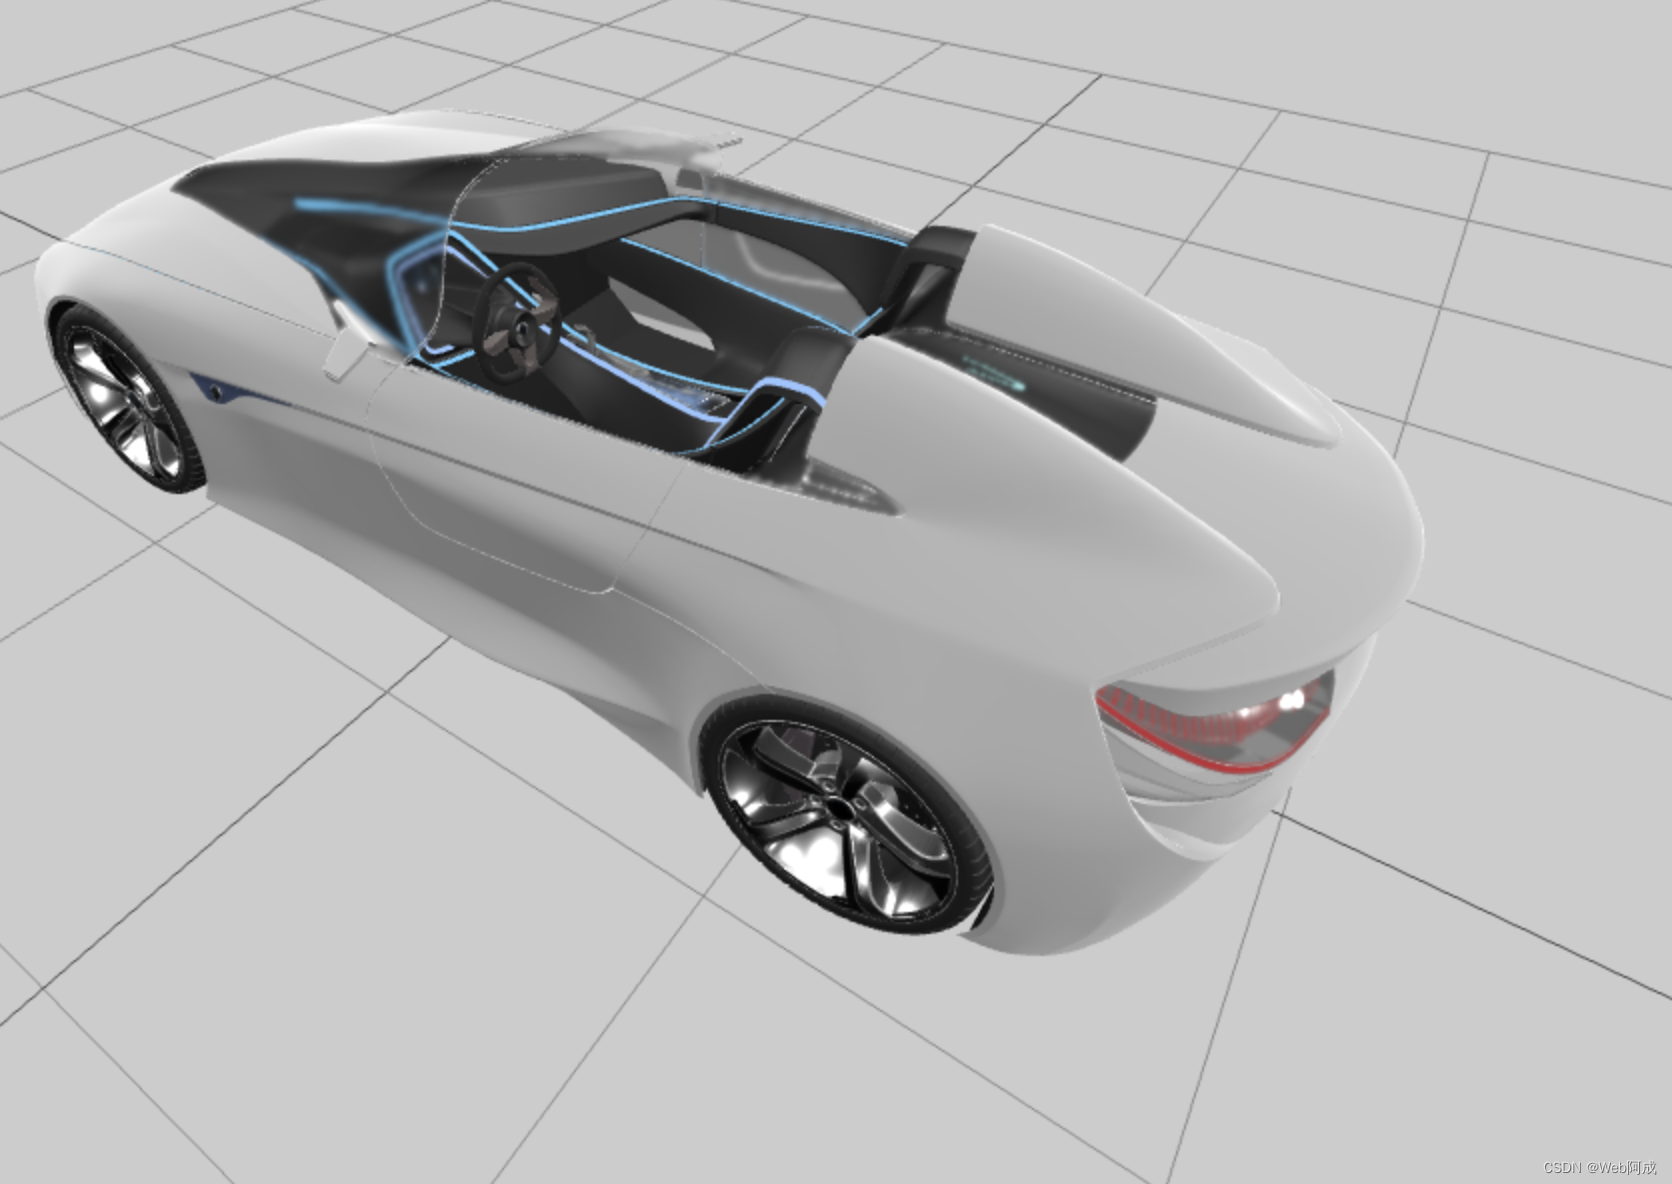
我们从小车各个方向打上灯光。
onMounted(() => {
  canvasDom.value.appendChild(renderer.domElement);
  // 初始化渲染器
  renderer.setClearColor("#000");
  // 设置背景
  scene.background = new THREE.Color("#ccc");
  scene.environment = new THREE.Color("#ccc");
  render();

  // 添加网格地面
  const gridHelper = new THREE.GridHelper(10, 10);
  gridHelper.opacity = 0.2;
  // 设置透明度
  gridHelper.material.transparent = true;
  scene.add(gridHelper);
  // 添加控制器
  controls = new OrbitControls(camera, renderer.domElement);
  controls.update();

  // 添加汽车模型
  const loader = new GLTFLoader();
  // 解压缩实例化
  const dracoLoader = new DRACOLoader();
  dracoLoader.setDecoderPath("./draco/gltf/");
  loader.setDRACOLoader(dracoLoader);

  // 加载模型
  loader.load("./model/bmw01.glb", (gltf) => {
    const bwm = gltf.scene;
    scene.add(bwm);
  });
    // 添加光源
    const light1 = new THREE.DirectionalLight("#fff", 1);
  light1.position.set(0, 0, 10);
  scene.add(light1);

  // 添加光源
  const light2 = new THREE.DirectionalLight("#fff", 1);
  light2.position.set(0, 0, -10);
  scene.add(light2);

  // 添加光源
  const light3 = new THREE.DirectionalLight("#fff", 1);
  light3.position.set(10, 0, 0);
  scene.add(light3);

  // 添加光源
  const light4 = new THREE.DirectionalLight("#fff", 1);
  light4.position.set(-10, 0, 0);
  scene.add(light4);

  // 添加光源
  const light5 = new THREE.DirectionalLight("#fff", 1);
  light5.position.set(0, 10, 0);
  scene.add(light5);

  // 添加光源
  const light6 = new THREE.DirectionalLight("#fff", 1);
  light6.position.set(5, 10, 0);
  scene.add(light6);

  // 添加光源
  const light7 = new THREE.DirectionalLight("#fff", 1);
  light7.position.set(0, 10, 5);
  scene.add(light7);

  // 添加光源
  const light8 = new THREE.DirectionalLight("#fff", 1);
  light8.position.set(-5, 10, 0);
  scene.add(light8);

  // 添加光源
  const light9 = new THREE.DirectionalLight("#fff", 1);
  light9.position.set(0, 10, -5);
  scene.add(light9);
});
5. 设置小车各个模块属性的实现(颜色、材质)
小车模型是由很多模块组成,我们可以在加载模型文件的回调函数中使用traverse方法查看小车的组件。
  // 加载模型
  loader.load("./model/bmw01.glb", (gltf) => {
    const bwm = gltf.scene;
    bwm.traverse((item) => {
      if (item.isMesh) {
        console.log(item.name);
      }
    });
    scene.add(bwm);
  });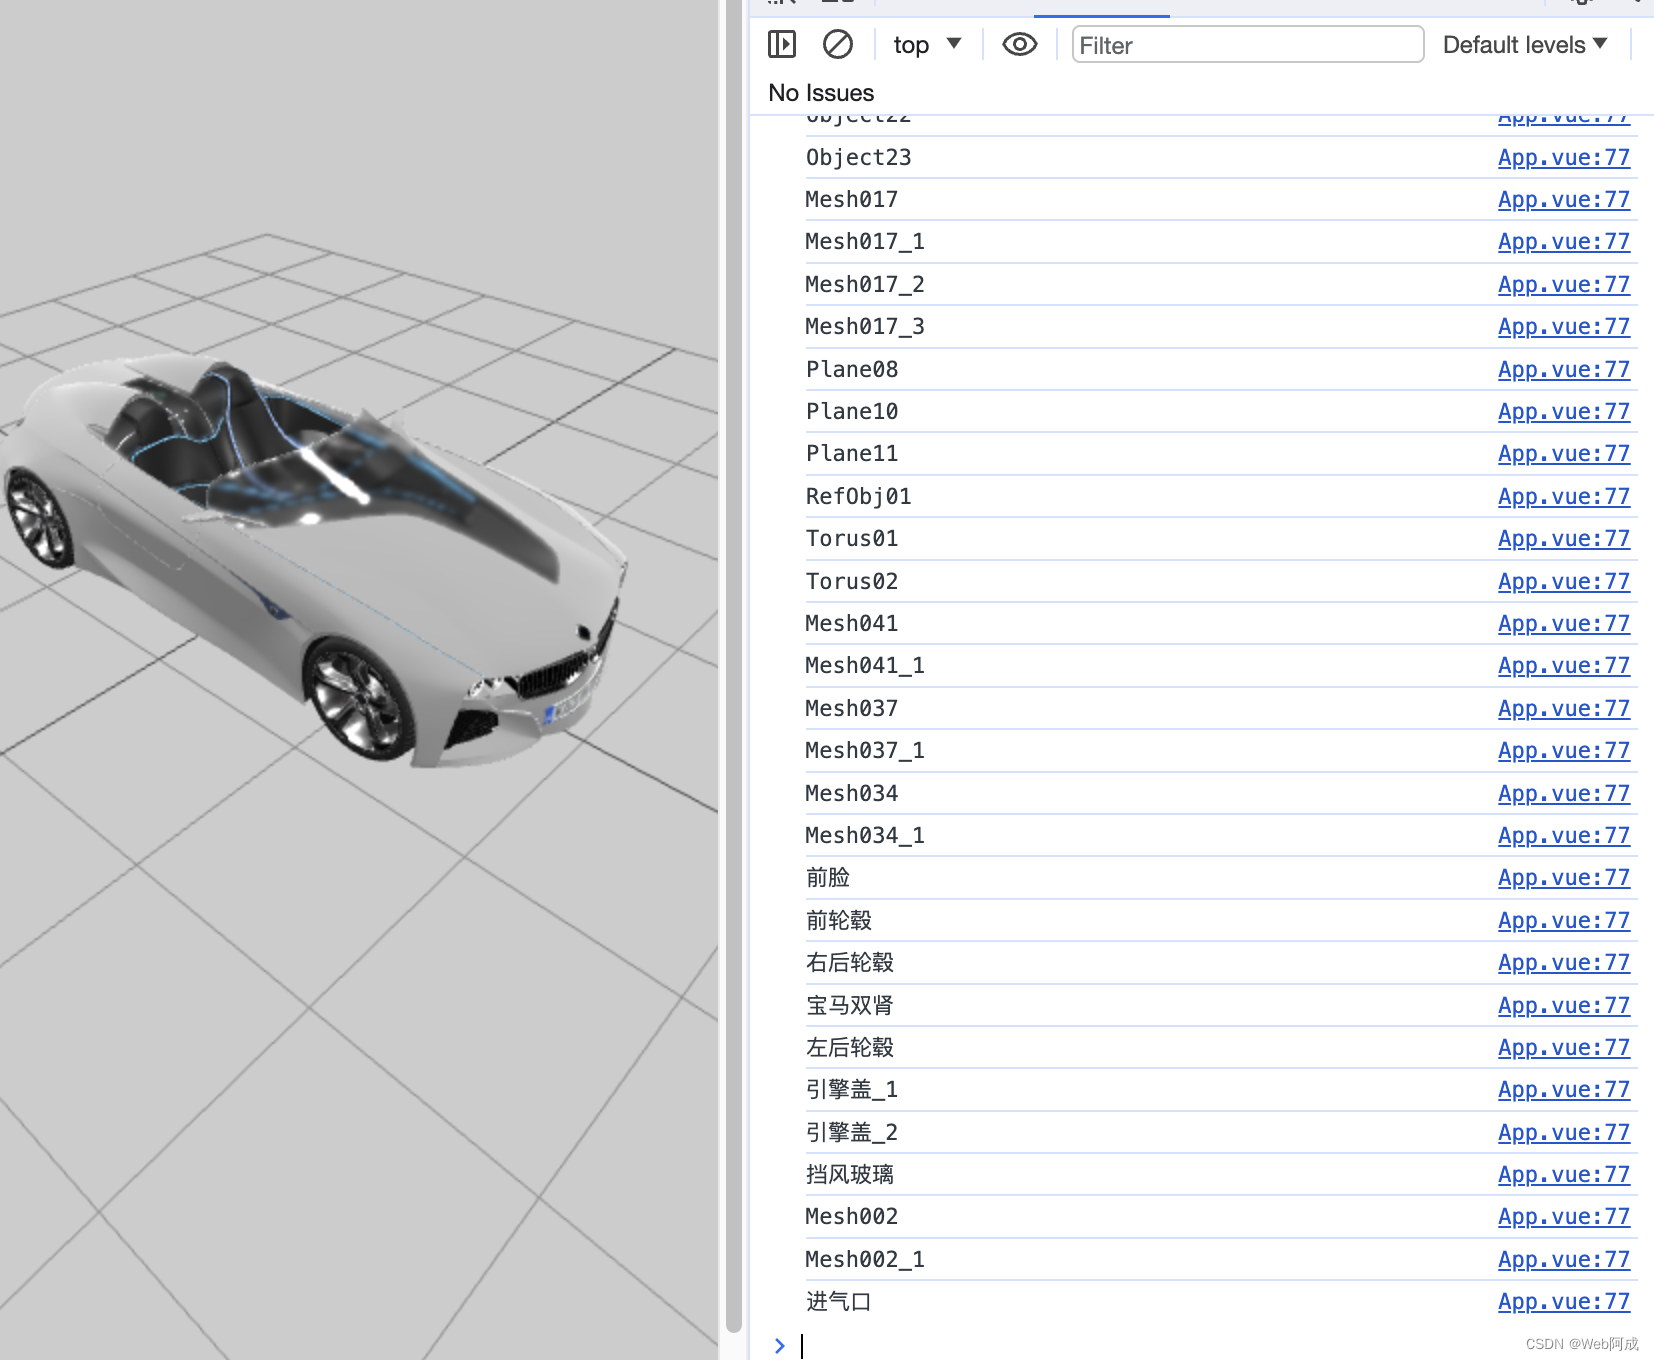
有了组件的名字,我们可以分别设置组件的材质,才达到不同的效果。
这里我们分别对车的车身、前脸、玻璃、引擎盖等组件进行对应的设置。比如说金属度、粗糙度、清漆属性、透明度等。
我们这里通过材质的设置得到一个红色的小车。
// 轮毂,车身,前车灯,车头,玻璃
let wheels = [];
let carBody, frontCar, hoodCar, glassCar;
// 创建材质(车身)
const bodyMaterial = new THREE.MeshPhysicalMaterial({
  color: "#ff0000",
  // 金属度
  metalness: 0,
  // 粗糙度
  roughness: 0.5,
  // 清漆层级
  clearCoat: 100,
  // 清漆粗糙度
  clearCoatRoughness: 0,
});
// 创建材质(前脸)
const frontMaterial = new THREE.MeshPhysicalMaterial({
  color: "#ff0000",
  // 金属度
  metalness: 1,
  // 粗糙度
  roughness: 0.5,
  // 清漆层级
  clearCoat: 1,
  // 清漆粗糙度
  clearCoatRoughness: 0,
});
// 创建材质(引擎盖)
const hoodMaterial = new THREE.MeshPhysicalMaterial({
  color: "#ff0000",
  // 金属度
  metalness: 1,
  // 粗糙度
  roughness: 0.5,
  // 清漆层级
  clearCoat: 1,
  // 清漆粗糙度
  clearCoatRoughness: 0,
});
// 创建材质(轮毂)
const wheelsMaterial = new THREE.MeshPhysicalMaterial({
  color: "#ff0000",
  // 金属度
  metalness: 1,
  // 粗糙度
  roughness: 0.1,
  // 清漆粗糙度
  clearCoatRoughness: 0.1,
});
// 创建材质(玻璃)
const glassMaterial = new THREE.MeshPhysicalMaterial({
  color: "#ffffff",
  // 金属度
  metalness: 0,
  // 粗糙度
  roughness: 0,
  // 透明
  transmission: true,
  // 透明度
  transparent: true,
});

  loader.load("./model/bmw01.glb", (gltf) => {
    const bwm = gltf.scene;
    bwm.traverse((item) => {
      if (item.isMesh) {
        console.log(item.name);
      }
      // 判断是不是轮毂
      if (item.isMesh && item.name.includes("轮毂")) {
        wheels.push(item);
        item.material = wheelsMaterial;
      }
      // 判断是不是车身
      if (item.isMesh && item.name.includes("Mesh002")) {
        carBody = item;
        carBody.material = bodyMaterial;
      }
      // 判断是不是前脸
      if (item.isMesh && item.name.includes("前脸")) {
        frontCar = item;
        frontCar.material = frontMaterial;
      }
      // 判断是不是引擎盖
      if (item.isMesh && item.name.includes("引擎盖_1")) {
        hoodCar = item;
        hoodCar.material = hoodMaterial;
      }
      // 判断是不是挡风玻璃
      if (item.isMesh && item.name.includes("挡风玻璃")) {
        glassCar = item;
        glassCar.material = glassMaterial;
      }
    });
    scene.add(bwm);
  });
6. 小车颜色选配的实现
我们如何实现小车颜色的自定义选配呢?我们可以使用函数的方式 动态的利用材质设置小车的参数,来实现动态改变小车颜色的功能。
<template>
  <div class="home">
    <div class="canvas-container" ref="canvasDom"></div>
    <div class="home-content">
      <div class="home-content-title">
        <h1>汽车展示与选配</h1>
      </div>
      <h2>请选择车身颜色</h2>
      <div class="select">
        <div
          class="select-item"
          v-for="(item, index) in colors"
          :key="index"
          @click="selectColor(index)"
        >
          <div
            class="select-item-color"
            :style="{ backgroundColor: item }"
          ></div>
        </div>
      </div>
    </div>
  </div>
</template>

// 颜色
let colors = ["red", "blue", "black", "gray", "orange", "pink"];

const selectColor = (index) => {
  // 车身颜色
  bodyMaterial.color = new THREE.Color(colors[index]);
  // 前脸颜色
  frontMaterial.color = new THREE.Color(colors[index]);
  // 引擎盖颜色
  hoodMaterial.color = new THREE.Color(colors[index]);
  // 轮毂颜色
  wheelsMaterial.color = new THREE.Color(colors[index]);
  // 玻璃颜色
  // glassMaterial.color = new THREE.Color(colors[index]);
};

.home-content {
  position: fixed;
  top: 0;
  right: 20px;
}
.select-item-color {
  width: 40px;
  height: 40px;
  border: 1px solid #ccc;
  margin: 10px;
  display: inline-block;
  cursor: pointer;
  border-radius: 10px;
}
.select {
  display: flex;
}
全部代码
<template>
  <div class="home">
    <div class="canvas-container" ref="canvasDom"></div>
    <div class="home-content">
      <div class="home-content-title">
        <h1>汽车展示与选配</h1>
      </div>
      <h2>请选择车身颜色</h2>
      <div class="select">
        <div
          class="select-item"
          v-for="(item, index) in colors"
          :key="index"
          @click="selectColor(index)"
        >
          <div
            class="select-item-color"
            :style="{ backgroundColor: item }"
          ></div>
        </div>
      </div>
    </div>
  </div>
</template>

<script setup>
import { ref, onMounted } from "vue";
import * as THREE from "three";
import { OrbitControls } from "three/examples/jsm/controls/OrbitControls.js";
import { GLTFLoader } from "three/examples/jsm/loaders/GLTFLoader.js";
import { DRACOLoader } from "three/examples/jsm/loaders/DRACOLoader.js";
let controls;
//
const canvasDom = ref();
// 创建场景
const scene = new THREE.Scene();
// 创建相机
const camera = new THREE.PerspectiveCamera(
  75,
  window.innerWidth / window.innerHeight,
  0.1,
  1000
);
camera.position.set(0, 2, 6);
// 创建渲染器
const renderer = new THREE.WebGLRenderer({
  // 开启抗锯齿
  antialias: true,
});
// 设置渲染器的大小为窗口的内宽度,也就是内容区的宽度
renderer.setSize(window.innerWidth, window.innerHeight);
// 将渲染器的dom元素(renderer.domElement)添加到我们的HTML文档中。
// 这就是渲染器用来显示场景给我们看的<canvas>元素
document.body.appendChild(renderer.domElement);

// 渲染对象
const render = () => {
  renderer.render(scene, camera);
  // 控制器更新
  controls && controls.update();
  // 通过循环调用render()函数,使动画循环执行
  requestAnimationFrame(render);
};

// 轮毂,车身,前车灯,车头,玻璃
let wheels = [];
let carBody, frontCar, hoodCar, glassCar;
// 创建材质(车身)
const bodyMaterial = new THREE.MeshPhysicalMaterial({
  color: "#ff0000",
  // 金属度
  metalness: 0,
  // 粗糙度
  roughness: 0.5,
  // 清漆层级
  clearCoat: 100,
  // 清漆粗糙度
  clearCoatRoughness: 0,
});
// 创建材质(前脸)
const frontMaterial = new THREE.MeshPhysicalMaterial({
  color: "#ff0000",
  // 金属度
  metalness: 1,
  // 粗糙度
  roughness: 0.5,
  // 清漆层级
  clearCoat: 1,
  // 清漆粗糙度
  clearCoatRoughness: 0,
});
// 创建材质(引擎盖)
const hoodMaterial = new THREE.MeshPhysicalMaterial({
  color: "#ff0000",
  // 金属度
  metalness: 1,
  // 粗糙度
  roughness: 0.5,
  // 清漆层级
  clearCoat: 1,
  // 清漆粗糙度
  clearCoatRoughness: 0,
});
// 创建材质(轮毂)
const wheelsMaterial = new THREE.MeshPhysicalMaterial({
  color: "#ff0000",
  // 金属度
  metalness: 1,
  // 粗糙度
  roughness: 0.1,
  // 清漆粗糙度
  clearCoatRoughness: 0.1,
});
// 创建材质(玻璃)
const glassMaterial = new THREE.MeshPhysicalMaterial({
  color: "#ffffff",
  // 金属度
  metalness: 0,
  // 粗糙度
  roughness: 0,
  // 透明
  transmission: true,
  // 透明度
  transparent: true,
});

// 颜色
let colors = ["red", "blue", "black", "gray", "orange", "pink"];

const selectColor = (index) => {
  // 车身颜色
  bodyMaterial.color = new THREE.Color(colors[index]);
  // 前脸颜色
  frontMaterial.color = new THREE.Color(colors[index]);
  // 引擎盖颜色
  hoodMaterial.color = new THREE.Color(colors[index]);
  // 轮毂颜色
  wheelsMaterial.color = new THREE.Color(colors[index]);
  // 玻璃颜色
  // glassMaterial.color = new THREE.Color(colors[index]);
};
onMounted(() => {
  canvasDom.value.appendChild(renderer.domElement);
  // 初始化渲染器
  renderer.setClearColor("#000");
  // 设置背景
  scene.background = new THREE.Color("#ccc");
  scene.environment = new THREE.Color("#ccc");
  render();

  // 添加网格地面
  const gridHelper = new THREE.GridHelper(10, 10);
  gridHelper.opacity = 0.2;
  // 设置透明度
  gridHelper.material.transparent = true;
  scene.add(gridHelper);
  // 添加控制器
  controls = new OrbitControls(camera, renderer.domElement);
  controls.update();

  // 添加汽车模型
  const loader = new GLTFLoader();
  // 解压缩实例化
  const dracoLoader = new DRACOLoader();
  dracoLoader.setDecoderPath("./draco/gltf/");
  loader.setDRACOLoader(dracoLoader);

  // 加载模型
  loader.load("./model/bmw01.glb", (gltf) => {
    const bwm = gltf.scene;
    bwm.traverse((item) => {
      if (item.isMesh) {
        console.log(item.name);
      }
      // 判断是不是轮毂
      if (item.isMesh && item.name.includes("轮毂")) {
        wheels.push(item);
        item.material = wheelsMaterial;
      }
      // 判断是不是车身
      if (item.isMesh && item.name.includes("Mesh002")) {
        carBody = item;
        carBody.material = bodyMaterial;
      }
      // 判断是不是前脸
      if (item.isMesh && item.name.includes("前脸")) {
        frontCar = item;
        frontCar.material = frontMaterial;
      }
      // 判断是不是引擎盖
      if (item.isMesh && item.name.includes("引擎盖_1")) {
        hoodCar = item;
        hoodCar.material = hoodMaterial;
      }
      // 判断是不是挡风玻璃
      if (item.isMesh && item.name.includes("挡风玻璃")) {
        glassCar = item;
        glassCar.material = glassMaterial;
      }
    });
    scene.add(bwm);
  });
  // 添加光源
  const light1 = new THREE.DirectionalLight("#fff", 1);
  light1.position.set(0, 0, 10);
  scene.add(light1);

  // 添加光源
  const light2 = new THREE.DirectionalLight("#fff", 1);
  light2.position.set(0, 0, -10);
  scene.add(light2);

  // 添加光源
  const light3 = new THREE.DirectionalLight("#fff", 1);
  light3.position.set(10, 0, 0);
  scene.add(light3);

  // 添加光源
  const light4 = new THREE.DirectionalLight("#fff", 1);
  light4.position.set(-10, 0, 0);
  scene.add(light4);

  // 添加光源
  const light5 = new THREE.DirectionalLight("#fff", 1);
  light5.position.set(0, 10, 0);
  scene.add(light5);

  // 添加光源
  const light6 = new THREE.DirectionalLight("#fff", 1);
  light6.position.set(5, 10, 0);
  scene.add(light6);

  // 添加光源
  const light7 = new THREE.DirectionalLight("#fff", 1);
  light7.position.set(0, 10, 5);
  scene.add(light7);

  // 添加光源
  const light8 = new THREE.DirectionalLight("#fff", 1);
  light8.position.set(-5, 10, 0);
  scene.add(light8);

  // 添加光源
  const light9 = new THREE.DirectionalLight("#fff", 1);
  light9.position.set(0, 10, -5);
  scene.add(light9);
});
</script>

<style>
* {
  margin: 0;
  padding: 0;
}

.home-content {
  position: fixed;
  top: 0;
  right: 20px;
}
.select-item-color {
  width: 40px;
  height: 40px;
  border: 1px solid #ccc;
  margin: 10px;
  display: inline-block;
  cursor: pointer;
  border-radius: 10px;
}
.select {
  display: flex;
}
</style>