一、通知
1.用到的类和方法
(1) Context类
| getSystemService() | 接收一个字符串参数用于确定获取系统的哪个服务,这里我们传入Context.NOTIFICATION_SERVICE,获取NotificationManager |
(2) NotificationManager类
| createNotificationChannel() | 创建通知渠道 |
| notify() | 让通知显示出来,第一个参数是id,第二个参数是Notification对象 |
(3) NotificationChannel类
| NotificationChannel() | 构建通知渠道,第一个参数,渠道ID,第二个参数,渠道名称,第三个参数,通知的重要等级,等级从高到低有IMPORTANCE_HIGH、IMPORTANCE_DEFAULT、IMPORTANCE_LOW、IMPORTANCE_MIN这几种。 |
(4) NotificationCompat类
| NotificationCompat.builder() | 创建Notification对象,第一个参数是context,第二个参数是渠道ID。 |
(5) Notification
| setContentTitle() | 指定通知的标题内容 |
| setContentText() | 指定通知的正文内容 |
| setSmallIcon() | 设置通知的小图标 |
| setLargeIcon() | 设置通知的大图标 |
| setWhen() | 设置创建的时间 |
| setContentIntent() | 通过PendingIntent构建一个延迟执行的”意图“,参数为PendingIntent对象 |
| setAutoCancel() | 方法传入true,就表示点击这个通知时,通知会自动取消 |
| setStyle() | 接收一个NotificationCompat.Style参数,这个参数时用来构建具体的富文本信息的,如长文字、图片等。 |
.setStyle(NotificationCompat.BigTextStyle().bigText(".........................")

.setStyle(NotificationCompat.BigPictureStyle().bigPicture(BigmapFactory.decodeResource(resources,R.drawable.big_image)))
(6) PendingIntent
| getActivity() | 获得PendingIntent对象,第一个参数是Context,第二个参数用不到,传入0,第三个参数是一个Intent对象,第四个参数是确定PendingIntent的行为,行为有FLAG_ONE_SHOT,FLAG_NO_CREATE,FLAG_CANCEL_CURRENT和FLAG_UPDATE_CURRENT四种可选。 |
2.创建通知
步骤
(1)创建通知渠道
获取NotificationManager的实例,,由于NotificationManager类和createNotificationChannel()方法都是Android 8.0系统新增的API,因此在使用的时候要进行版本判断,接下来使用NotificationChannel类构建通知渠道,并调用NotificationManager类的createNotificationChannel()方法完成创建。
val manager=getSystemService(Context.NOTIFICATION_SERVICE) as NotificationManager
        if(Build.VERSION.SDK_INT>=Build.VERSION_CODES.O){
            val channel=NotificationChannel("normal","Normal",NotificationManager.IMPORTANCE_DEFAULT)
            manager.createNotificationChannel(channel)
        }
(2)设置通知点击事件,构建Notification对象并显示通知。
val sendNotion:Button=findViewById(R.id.sendNotion)
        sendNotion.setOnClickListener {
            val intent= Intent(this,otherActivity::class.java)
            val pi=PendingIntent.getActivity(this,0,intent,0)
            val notification= NotificationCompat.Builder(this,"normal")
                .setContentTitle("This is content title")
                .setContentText("This is content text")
                .setSmallIcon(R.drawable.small)
                .setLargeIcon(BitmapFactory.decodeResource(getResources(),R.drawable.big))
                .setWhen(System.currentTimeMillis())
                .setContentIntent(pi)
                .setAutoCancel(true)
                .build()
            manager.notify(1,notification)
        }
二、调用摄像头和相册
1.用到的方法
| Uri.fromFile() | 将File对象转换成Uri对象,参数为File对象 |
| FileProvider.getUriForFile() | 将File对象转换成一个封装过的Uri对象,第一个参数是 Context 对象,第二个参数是任意唯一的字符串,第三个参数是File对象。 |
| BitmapFactory.decodeStream() | 将输入流传入,把图片加载成Bitmap |
| imageView.setImageBitmap(): | 显示图片 |
| File(pathname:String) | 通过路径名创建一个新的File实例 |
| File(parent:File,child:String) | 从父抽象路径和子路径名字符串创建新的File实例 |
| File(parent:String,child:String) | 从父路径名字符串和子路径名字符串创建新的File实例 |
| exists() | 路径是否存在 |
| delete() | 删除文件或者路径 |
| createNewFile() | 创建新文件 |
| getPath() | 得到File的路径 |
2.步骤
(1)在布局文件中,添加Button和ImageView
<Button
        android:id="@+id/takePhotoBtn"
        android:layout_width="match_parent"
        android:layout_height="wrap_content"
        android:text="take Photo"/>
    <ImageView
        android:id="@+id/imageView"
        android:layout_width="wrap_content"
        android:layout_height="wrap_content"
        android:layout_gravity="center_horizontal"/>
(2)设置变量
    private val takePhoto=1
    lateinit var imageUri: Uri
    lateinit var outputImage:File
(3)创建File对象
将图片命名为output_image.jpg并存放在手机SD卡的应用关联缓存目录下
outputImage = File(externalCacheDir, "output_image.jpg")
            if (outputImage.exists()) {//如果路径存在,就先删除
                outputImage.delete()
            }
            outputImage.createNewFile()//创建一个新的File
(4)把File转换成Uri
从Android7.0系统开始,直接使用本地路径的Uri被认为是不安全,会抛出一个FileUriExposedException异常,而FileProvide则是一种特殊的ContentProvider,它使用了和ContentProvider类似的机制来对数据进行保护,可以选择性地将封装过的Uri共享给外部,从而提高了应用的安全性。
imageUri = if (Build.VERSION.SDK_INT >= Build.VERSION_CODES.N) {
                FileProvider.getUriForFile(this, "com.example.cameraman's.fileprovider", outputImage);
            } else {
                Uri.fromFile(outputImage);
            }
(5)启动相机程序
// 启动相机程序
           val intent= Intent("android.media.action.IMAGE_CAPTURE")
            intent.putExtra(MediaStore.EXTRA_OUTPUT,imageUri)
            requestDataLauncher.launch(intent)
(6)在onActivityResult()函数中,在相机程序拍到的图片显示出来
override fun onActivityResult(requestCode: Int, resultCode: Int, data: Intent?) {
        super.onActivityResult(requestCode, resultCode, data)
        val imageView: ImageView = findViewById(R.id.imageView)
        when (requestCode) {
            takePhoto -> {
                if (resultCode == RESULT_OK) {
                    // 将拍摄的照片显示出来
                    val bitmap =
                        BitmapFactory.decodeStream(contentResolver.openInputStream(imageUri))
                    imageView.setImageBitmap(rotateIfRequired(bitmap))
                }
            }
        }
    }
(7)解决调用相机程序去拍照有可能会在一些手机上发生照片旋转的情况
private fun rotateIfRequired(bitmap: Bitmap): Bitmap {
            val exif = ExifInterface(outputImage.path)
            val orientation = exif.getAttributeInt(ExifInterface.TAG_ORIENTATION, ExifInterface.ORIENTATION_NORMAL)
            return when (orientation) {
                ExifInterface.ORIENTATION_ROTATE_90 -> rotateBitmap(bitmap, 90)
                ExifInterface.ORIENTATION_ROTATE_180 -> rotateBitmap(bitmap, 180)
                ExifInterface.ORIENTATION_ROTATE_270 -> rotateBitmap(bitmap, 270)
                else -> bitmap
            }
        }

        private fun rotateBitmap(bitmap: Bitmap, degree: Int): Bitmap {
            val matrix = Matrix()
            matrix.postRotate(degree.toFloat())
            val rotatedBitmap = Bitmap.createBitmap(bitmap, 0, 0, bitmap.width, bitmap.height, matrix, true)
            bitmap.recycle()
            return rotatedBitmap
        }
(8)在AndroidManifeest.xml对ContentProvider进行注册
android:authorities属性的值必须和刚才FileProvider.getUriForFile()方法中的第二个参数一致,另外,这里还在<provider>标签的内部使用<meta-data>指定Uri的共享路径,并引入一个@xml/file_paths资源。
<provider
            android:name="androidx.core.content.FileProvider"
            android:authorities="com.example.cameraman's.fileprovider"
            android:exported="false"
            android:grantUriPermissions="true">
            <meta-data
                android:name="android.support.FILE_PROVIDER_PATHS"
                android:resource="@xml/file_paths" />
        </provider>
(9)右击res目录->New->Directory,创建一个xml目录,接着右击xml目录->New->File,创建一个file_paths.xml文件
<?xml version="1.0" encoding="utf-8"?>
<paths xmlns:android="http://schemas.android.com/apk/res/android">
    <external-path name="my_images" path="/" />
</paths>
三、从相册中选择图片
步骤
(1)在布局文件中加入Button:fromAlbumBtn
<Button
        android:id="@+id/fromAlbumBtn"
        android:layout_width="match_parent"
        android:layout_height="wrap_content"
        android:text="From Album"/>
(2)初始化fromAlbum
val fromAlbum = 2(3)在按键fromAlbumBtn的点击事件中,打开文件选择器,显示图片
val fromAlbumBtn: Button = findViewById(R.id.fromAlbumBtn)
        fromAlbumBtn.setOnClickListener {
            val intent1=Intent(Intent.ACTION_OPEN_DOCUMENT)
            intent1.addCategory(Intent.CATEGORY_OPENABLE)
            intent1.type="image/*"
            requestDataLauncher1.launch(intent1)
        }
(4)在onActivityResult()函数中,将选择的图片显示出来
override fun onActivityResult(requestCode: Int, resultCode: Int, data: Intent?) {
        super.onActivityResult(requestCode, resultCode, data)
        val imageView: ImageView = findViewById(R.id.imageView)
        when (requestCode) {
            ...
            fromAlbum -> {
                if (resultCode == RESULT_OK && data != null) {
                    data.data?.let { uri ->
                        //将选择的图片显示
                        val bitmap = getBitmapFromUri(uri)
                        imageView.setImageBitmap(bitmap)
                    }
                }
            }
        }
    }
(5)将Uri转换成Bitmap
private fun getBitmapFromUri(uri: Uri) =
        contentResolver.openFileDescriptor(uri, "r")?.use{
            BitmapFactory.decodeFileDescriptor(it.fileDescriptor)
        }
四、播放多媒体文件
1、播放音频
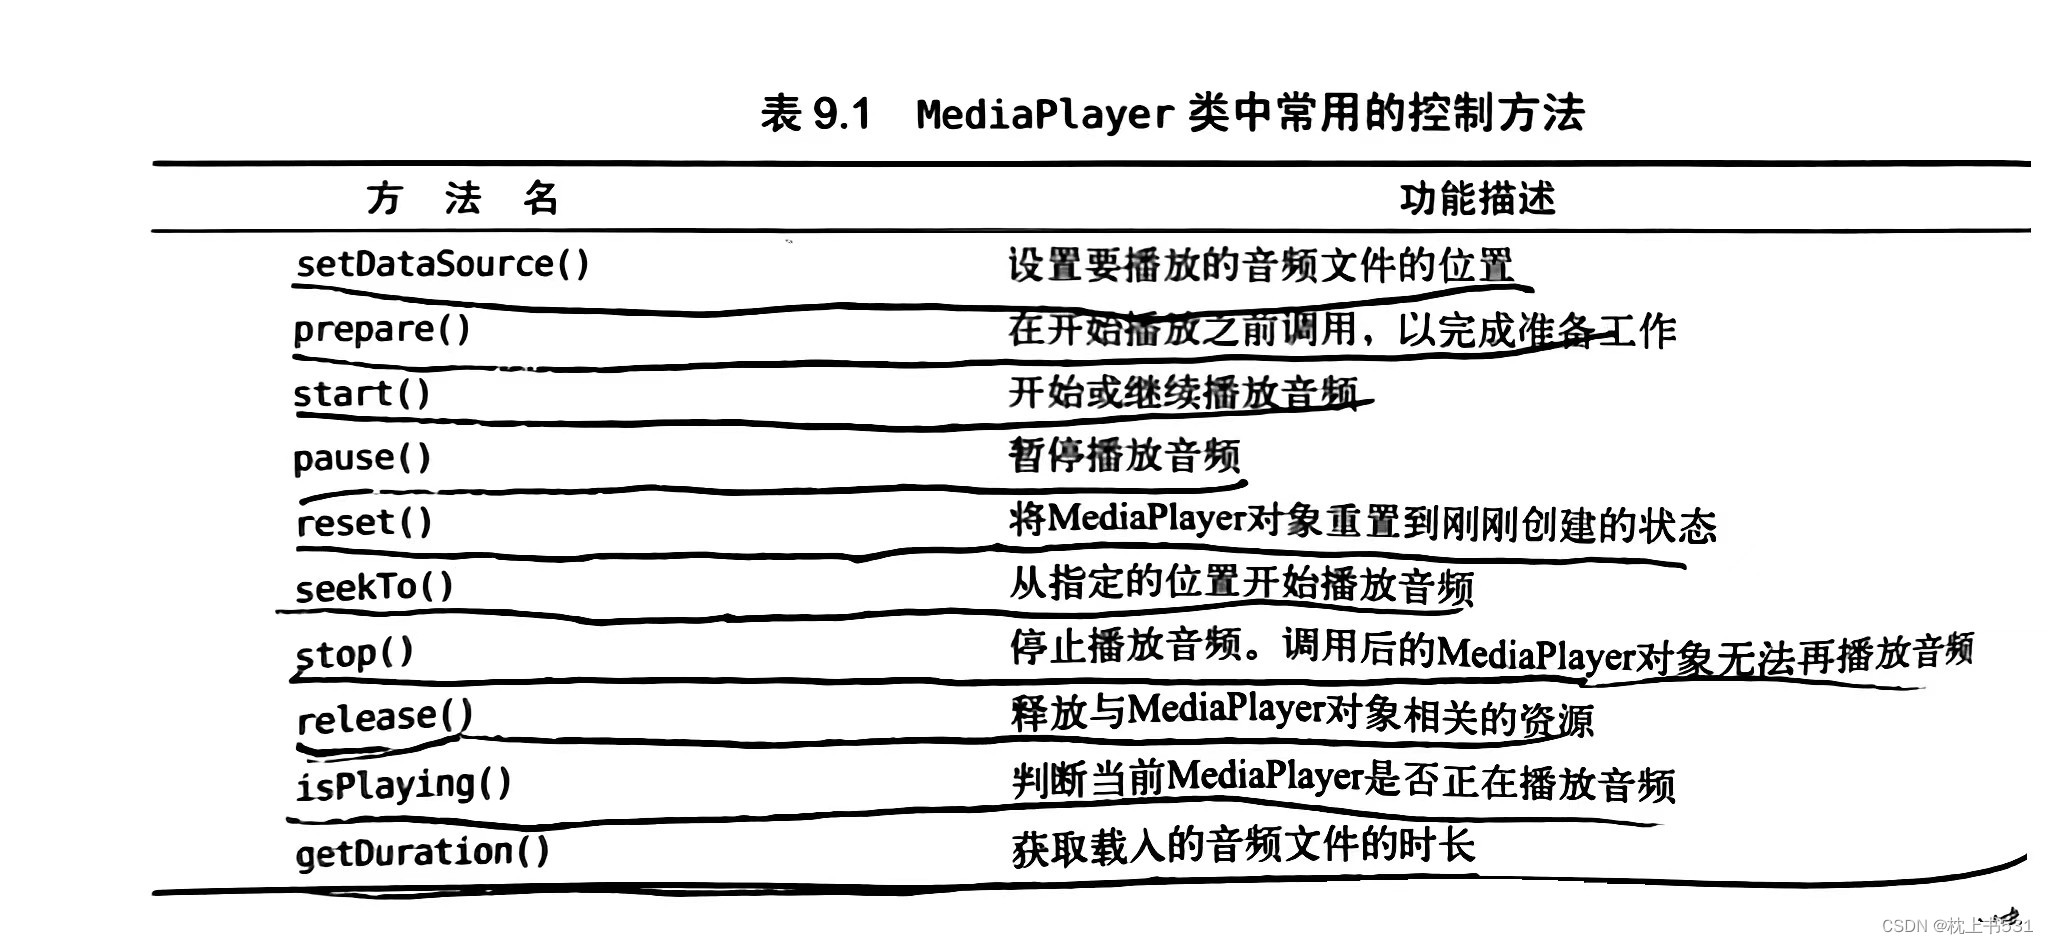
步骤
(1)创建一个MediaPlayer的实例
private val mediaPlayer=MediaPlayer()(2)为MediaPlayer对象进行初始化操作
通过getAssets()方法得到一个AssetManager的实例,AssetManager可用于读取assets目录下的任何资源,接着调用openFd()方法将音频文件句柄打开,后来调用setDataSource()方法设置要播放的音频文件的位置和prepare()方法完成准备工作。
private fun initMediaPlayer() {
        val assetManager=assets
        val fd=assetManager.openFd("music.mp3")
        mediaPlayer.setDataSource(fd.fileDescriptor,fd.startOffset,fd.length)
        mediaPlayer.prepare()
    }
(3)设置三个按键的点击事件
        val play:Button=findViewById(R.id.play)
        val pause:Button=findViewById(R.id.pause)
        val stop:Button=findViewById(R.id.stop)
        play.setOnClickListener {
            if(!mediaPlayer.isPlaying)
                mediaPlayer.start()
        }
        pause.setOnClickListener {
            if(mediaPlayer.isPlaying){
                mediaPlayer.pause()
            }
        }
        stop.setOnClickListener {
            if(mediaPlayer.isPlaying){
                mediaPlayer.reset()
                initMediaPlayer()
            }
        }
(4)最后在onDestroy()方法中,我们需要调用stop()方法和release()方法将MediaPlayer相关的资源释放掉。
override fun onDestroy() {
        super.onDestroy()
        mediaPlayer.stop()
        mediaPlayer.release()
    }
2、播放视频

步骤
(1)在布局文件中放置三个按钮,分别控制视频的播放,暂停,和重新播放,在按钮下面放置视频VideoView。
<LinearLayout
        android:layout_width="match_parent"
        android:layout_height="wrap_content"
        android:orientation="horizontal">
        <Button
            android:id="@+id/play"
            android:layout_width="0dp"
            android:layout_height="wrap_content"
            android:layout_weight="1"
            android:text="play"/>
        <Button
            android:id="@+id/pause"
            android:layout_width="0dp"
            android:layout_height="wrap_content"
            android:layout_weight="1"
            android:text="pause"/>
        <Button
            android:id="@+id/replay"
            android:layout_width="0dp"
            android:layout_height="wrap_content"
            android:layout_weight="1"
            android:text="replay"/>
    </LinearLayout>

    <VideoView
        android:id="@+id/videoView"
        android:layout_width="match_parent"
        android:layout_height="wrap_content"
        android:text="videoView"/>
(2)点击res->New->Directory,然后输入raw,把视频资源放在这。
(3)初始化VideoView
val uri=Uri.parse("android.resource://$packageName/${R.raw.video}")
        videoView.setVideoURI(uri)
(4)设置三个按键的点击事件
 play.setOnClickListener {
            if(!videoView.isPlaying)
                videoView.start()
        }
        pause.setOnClickListener {
            if(videoView.isPlaying){
                videoView.pause()
            }
        }
        replay.setOnClickListener {
            if(videoView.isPlaying){
                videoView.resume()
            }
        }
(5)在onDestroy()方法中,需要调用suspend()方法,将VideoView所占用的资源释放掉。
override fun onDestroy() {
        super.onDestroy()
        videoView.suspend()
    }