Android UI组件
前言
今天我们来简单介绍一下Android的UI组件以及四种常见的UI组件的使用。
目录

1.Android UI介绍
Android 应用中的所有用户界面元素都是使用 View 或者 ViewGroup 对象来构成,通过使用 View 或者 ViewGroup 定义对象的层次结构后即可在里面绘制UI。
2.四种常用UI组件
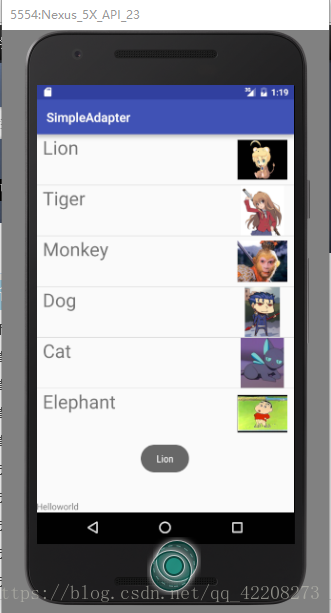
2.1 SimpleAdapter
SimpleAdapter从名字看是简单的适配器,但是使用起来并不是很简单,而且能够实现的功能也不是简单的几种,功能相当强大。ListView的大部分应用场景都可以用SimpleAdapter来实现。
新建一个Listview,宽度占屏,高度由内容定。
<ListView
        android:layout_width="match_parent"
        android:layout_height="wrap_content"
        android:id="@+id/listView" />
定义完ListView后实现内容均在Activity内实现。
public class MainActivity extends AppCompatActivity {

    String [] animalname=new String[]{"Lion","Tiger","Monkey","Dog","Cat","Elephant"};
    //创建Listname
    int [] images = new int[] {R.drawable.lion,R.drawable.tiger,R.drawable.monkey,R.drawable.dog,R.drawable.cat,R.drawable.elephant};
    //选择Listimage
    @Override
    protected void onCreate(Bundle savedInstanceState) {
        super.onCreate(savedInstanceState);
        setContentView(R.layout.activity_main);
        //创建List合集,元素是Map
        List<Map<String,Object>> listItems=new ArrayList<Map<String,Object>>();
        for(int i=0;i<animalname.length;i++)
        {
            Map<String,Object> listItem=new HashMap<String,Object>();
            listItem.put("name",animalname[i]);
            listItem.put("image",images[i]);
            listItems.add(listItem);
        }
        //创建SimpleAdapter
        SimpleAdapter sim=new SimpleAdapter(this,listItems,R.layout.simple_item,
            new String[] {"name","image"},
            new int[]{R.id.name ,R.id.header});
            ListView l=(ListView)findViewById(R.id.listView);
            l.setAdapter(sim);
            l.setOnItemClickListener(new AdapterView.OnItemClickListener(){
            public void onItemClick(AdapterView parent, View view,int position,long id){
                Toast.makeText(MainActivity.this,animalname[position],Toast.LENGTH_LONG).show();
            }
        });
    }

}
设置完Activity后要在layout文件夹写一个item来配置simple的控件。
<LinearLayout xmlns:android="http://schemas.android.com/apk/res/android"
    android:layout_width="match_parent"
    android:layout_height="match_parent"
    android:orientation="horizontal">
       //先设置文本
       <TextView
           android:layout_width="wrap_content"
           android:layout_height="wrap_content"
           android:id="@+id/name"
           android:textSize="30dp"
           android:paddingLeft="10dp"/>

    <LinearLayout
        android:layout_width="match_parent"
        android:layout_height="wrap_content"
        android:gravity="right">
        //后设置图片
        <ImageView
            android:id="@+id/header"
            android:layout_width="80dp"
            android:layout_height="80dp"
            android:layout_marginRight="10dp" />
    </LinearLayout>
</LinearLayout>
代码结果截图
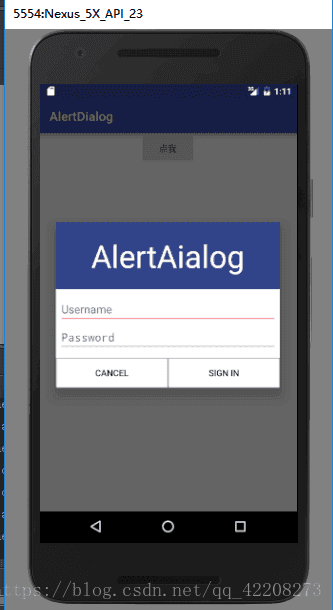
2.2 AlertDialog
AlertDialog功能非常强大,可以实现各种对话框。
实现步骤:
① 创建AlertDialog.Builder对象。
② 调用AlertDialog.Builder的setTitle()方法设置标题。
③ 调用AlertDialog.Builder的SetIcon()方法设置图标。
④ 调用AlertDialog.Builder的相关设置方法设置对话框内容。
⑤ 调用AlertDialog.Builder的set来添加按钮。
⑥ 调用AlertDialog.Builder的create()方法创建对象后show()出该对话框。
设置Activity
public class MainActivity extends AppCompatActivity {

    @Override
    protected void onCreate(Bundle savedInstanceState) {
        super.onCreate(savedInstanceState);
        setContentView(R.layout.activity_main);
        Button bn=(Button)findViewById(R.id.clickme);

        LayoutInflater inflater=MainActivity.this.getLayoutInflater();
        View v= inflater.inflate(R.layout.alerdialog,null,false);
        Context context=MainActivity.this;
        AlertDialog.Builder builder=new AlertDialog.Builder(context);
        //创建AlterDialog对象
        builder.setView(v);
        //输入文本
        builder.setCancelable(false);
        final AlertDialog alertDialog=builder.create();
        //创建对象
        bn.setOnClickListener(new View.OnClickListener() {
            @Override
            public void onClick(View view) {
                alertDialog.show();
            }
        });

        v.findViewById(R.id.cancle).setOnClickListener(new View.OnClickListener() {
            @Override
            public void onClick(View view) {
                Toast.makeText(MainActivity.this,"cancle",Toast.LENGTH_LONG).show();
                alertDialog.dismiss();
            }
        });
        v.findViewById(R.id.signin).setOnClickListener(new View.OnClickListener() {
            @Override
            public void onClick(View view) {
                Toast.makeText(MainActivity.this,"Sign in",Toast.LENGTH_LONG).show();
                alertDialog.dismiss();
            }
        });
    }
}
Activity.xml
<Button
        android:layout_width="wrap_content"
        android:layout_height="wrap_content"
        android:text="点我"
        android:id="@+id/clickme"
        android:layout_gravity="center_horizontal" />
AlterDialog.xml
<LinearLayout
    xmlns:android="http://schemas.android.com/apk/res/android" android:layout_width="match_parent"
    android:layout_height="match_parent"
    android:orientation="vertical">
    <LinearLayout
        android:layout_width="match_parent"
        android:layout_height="wrap_content">
    <TextView
        android:layout_width="match_parent"
        android:layout_height="wrap_content"
        android:text="AlertAialog"
        android:textSize="50dp"
        android:textColor="#fff"
        android:gravity="center"
        android:background="#334488"
        android:paddingTop="20dp"
        android:paddingBottom="20dp"/>
</LinearLayout>
    <LinearLayout
        android:layout_width="match_parent"
        android:layout_height="wrap_content"
        android:orientation="vertical"
        android:layout_marginTop="10dp">
    <EditText

        android:layout_width="match_parent"
        android:layout_height="wrap_content"
        android:hint="Username"
        android:layout_marginLeft="5dp"
        android:layout_marginRight="5dp"/>
    <EditText
        android:layout_width="match_parent"
        android:layout_height="wrap_content"
        android:hint="Password"
        android:inputType="textPassword"
        android:layout_marginLeft="5dp"
        android:layout_marginRight="5dp"/>
    </LinearLayout>
        <LinearLayout
            android:layout_width="match_parent"
            android:layout_height="wrap_content"
            android:orientation="horizontal"
            android:layout_marginTop="10dp">

            <Button
                android:id="@+id/cancle"
                android:layout_width="match_parent"
                android:layout_height="wrap_content"
                android:layout_weight="1"
                android:background="@drawable/shapdrawable"
                android:gravity="center"
                android:text="Cancel"
                android:textColor="#000" />
        <Button
            android:id="@+id/signin"
            android:layout_width="match_parent"
            android:layout_height="wrap_content"
            android:text="Sign in"
            android:background="@drawable/shapdrawable"
            android:textColor="#000"
            android:gravity="center"
            android:layout_weight="1"/>
        </LinearLayout>

</LinearLayout>
代码结果截图
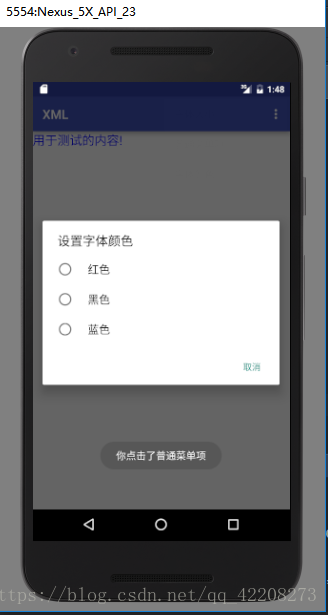
2.3 XML menu
Android 提供了两种创建菜单的方式,一种是直接在java文件里写,另一种是在Android开发中使用较广的XML资源文件定义。笔者是使用不会使代码更臃肿的XML方法来定义。
<TextView
        android:id="@+id/textid"
        android:layout_width="wrap_content"
        android:layout_height="wrap_content"
        android:text="用于测试的内容!" />
public class MainActivity extends AppCompatActivity {
private final int size=110;
private final int common=111;
private final int color=112;
private TextView textId;
@Override
protected void onCreate(Bundle savedInstanceState) {
super.onCreate(savedInstanceState);
setContentView(R.layout.activity_main);
textId=(TextView)findViewById(R.id.textid);
}
@Override
public boolean onCreateOptionsMenu(Menu menu) {
menu.add(1,size,1,"字体大小");
menu.add(1,common,2,"普通菜单项");
menu.add(1,color,3,"字体颜色");
return super.onCreateOptionsMenu(menu);
}
@Override
public boolean onOptionsItemSelected(MenuItem item) {
int id=item.getItemId();
switch (id){
case size:
final AlertDialog.Builder builder=new AlertDialog.Builder(this);
builder.setTitle("设置字体大小");
builder.setSingleChoiceItems(new String[]{"10号字体","16号字体","20号字体"},-1,new DialogInterface.OnClickListener(){
@Override
public void onClick(DialogInterface dialogInterface, int i) {
switch (i){
case 0:textId.setTextSize(10);
dialogInterface.dismiss();
break;
case 1:textId.setTextSize(16);
dialogInterface.dismiss();
break;
case 2:textId.setTextSize(20);
dialogInterface.dismiss();
break;
}
}
});
builder.setNegativeButton("取消",null);
builder.show();
break;
case common:
Toast.makeText(this,"你点击了普通菜单项", Toast.LENGTH_LONG).show();
break;
case color:
final AlertDialog.Builder builder2=new AlertDialog.Builder(this);
builder2.setTitle("设置字体颜色");
builder2.setSingleChoiceItems(new String[]{"红色","黑色","蓝色"},-1,new DialogInterface.OnClickListener(){
@Override
public void onClick(DialogInterface dialogInterface, int i) {
switch (i){
case 0:textId.setTextColor(Color.RED);
dialogInterface.dismiss();
break;
case 1:textId.setTextColor(Color.BLACK);
dialogInterface.dismiss();
break;
case 2:textId.setTextColor(Color.BLUE);
dialogInterface.dismiss();
break;
}
}
});
builder2.setNegativeButton("取消",null);
builder2.show();
break;
}
return super.onOptionsItemSelected(item);
}
}
代码结果截图
3.总结
在应用中加载布局资源时,Android 会将布局的每个节点初始化为运行时对象,供您定义其他行为、查询对象状态或修改布局。
作者:黄毅
原文链接:点击这里