在Android上构建人脸检测程序
目录
1、导入mlKit依赖包
dependencies {


  // ...
  // Use this dependency to bundle the model with your app
  implementation 'com.google.mlkit:face-detection:16.1.5'
}
依赖地址:mlkit
2、配置人脸检测器并且获取人脸检测器
// 1、配置人脸检测器
FaceDetectorOptions faceDetectorOptions = new FaceDetectorOptions.Builder()
        .setPerformanceMode(PERFORMANCE_MODE_FAST)
        .build();
//2、获取人脸检测器
FaceDetector detector = FaceDetection.getClient(faceDetectorOptions);
人脸检测器Api有如下,这里使用了最简单的作为样例:

3、加载图片资源
// 3、从资源中加载图片
bitmap = BitmapFactory.decodeResource(getResources(), R.drawable.test3);
imgView.setImageBitmap(bitmap);
InputImage image = InputImage.fromBitmap(bitmap, 0);
这里使用Bitmap,将图片进行转化,然后制作成InputImage流。
4、调用人脸检测器
// 4、处理图片
  detector.process(image)
          .addOnSuccessListener(new OnSuccessListener<List<Face>>() {


              @Override
              public void onSuccess(List<Face> faces) {


                  Log.e("TAG", "onSuccess: " + 1);
                  imgView.setImageBitmap(drawWithRectangle(faces));
              }
          })
          .addOnFailureListener(new OnFailureListener() {


              @Override
              public void onFailure(@NonNull Exception e) {


                  Notice();
              }
          });
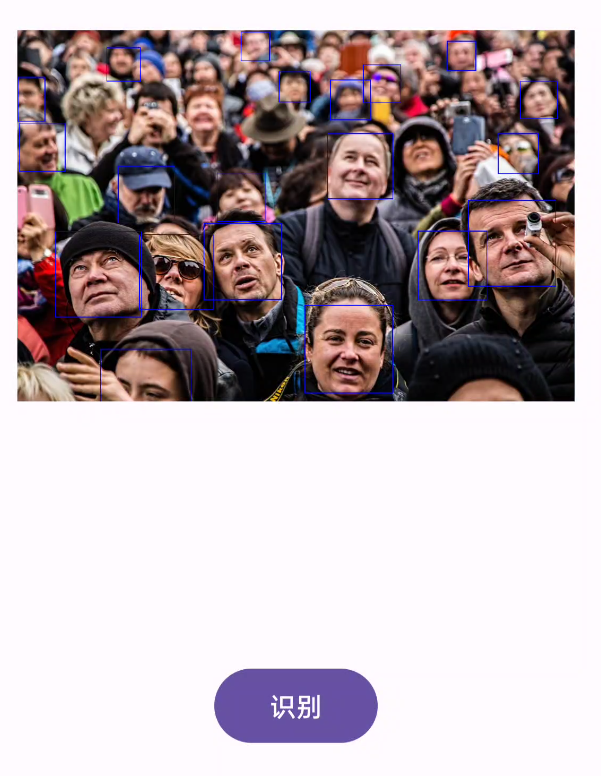
5、绘制矩形边框
private void Notice() {


    Toast.makeText(this, "识别失败", Toast.LENGTH_SHORT);
}

/**
 *
 * 为人脸绘制边框
 *
 * @param faces 采集的人脸
 * @return {@link Bitmap}
 */
private Bitmap drawWithRectangle(List<Face> faces) {


    //复制一个新的Bitmap
    Bitmap copiedBitmap = bitmap.copy(bitmap.getConfig(), true);;

    for (Face face : faces) {


        //获取边界状态
        Rect bounds = face.getBoundingBox();
        // 初始化Paint
        Paint paint = new Paint();
        // 设置矩形颜色
        paint.setColor(Color.BLUE);
        // 设置绘制样式为轮廓绘制
        paint.setStyle(Paint.Style.STROKE);
        // 设置为你需要的宽度
        paint.setStrokeWidth(10);

        Canvas canvas = new Canvas(copiedBitmap);
        canvas.drawRect(bounds, paint);
    }
    return copiedBitmap;
}
6、完整代码
import static com.google.mlkit.vision.face.FaceDetectorOptions.PERFORMANCE_MODE_FAST;

import android.graphics.Bitmap;
import android.graphics.BitmapFactory;
import android.graphics.Canvas;
import android.graphics.Color;
import android.graphics.Paint;
import android.graphics.Rect;
import android.os.Bundle;
import android.util.Log;
import android.view.View;
import android.widget.Button;
import android.widget.ImageView;
import android.widget.Toast;

import androidx.annotation.NonNull;
import androidx.appcompat.app.AppCompatActivity;

import com.google.android.gms.tasks.OnFailureListener;
import com.google.android.gms.tasks.OnSuccessListener;
import com.google.mlkit.vision.common.InputImage;
import com.google.mlkit.vision.face.Face;
import com.google.mlkit.vision.face.FaceDetection;
import com.google.mlkit.vision.face.FaceDetector;
import com.google.mlkit.vision.face.FaceDetectorOptions;

import java.util.List;

public class MainActivity extends AppCompatActivity {


    private ImageView imgView;
    private Bitmap bitmap;

    @Override
    protected void onCreate(Bundle savedInstanceState) {


        super.onCreate(savedInstanceState);
        setContentView(R.layout.activity_main);

        imgView = findViewById(R.id.imageView);
        Button button = findViewById(R.id.button);

        button.setOnClickListener(new View.OnClickListener() {


            @Override
            public void onClick(View view) {


                // 1、配置人脸检测器
                FaceDetectorOptions faceDetectorOptions = new FaceDetectorOptions.Builder()
                        .setPerformanceMode(PERFORMANCE_MODE_FAST)
                        .build();
                //2、获取人脸检测器
                FaceDetector detector = FaceDetection.getClient(faceDetectorOptions);

                // 3、从资源中加载图片
                bitmap = BitmapFactory.decodeResource(getResources(), R.drawable.test3);
                imgView.setImageBitmap(bitmap);
                InputImage image = InputImage.fromBitmap(bitmap, 0);

                // 4、处理图片
                detector.process(image)
                        .addOnSuccessListener(new OnSuccessListener<List<Face>>() {


                            @Override
                            public void onSuccess(List<Face> faces) {


                                Log.e("TAG", "onSuccess: " + 1);
                                imgView.setImageBitmap(drawWithRectangle(faces));
                            }
                        })
                        .addOnFailureListener(new OnFailureListener() {


                            @Override
                            public void onFailure(@NonNull Exception e) {


                                Notice();
                            }
                        });
            }
        });

    }

    private void Notice() {


        Toast.makeText(this, "识别失败", Toast.LENGTH_SHORT);
    }

    /**
     *
     * 为人脸绘制边框
     *
     * @param faces 采集的人脸
     * @return {@link Bitmap}
     */
    private Bitmap drawWithRectangle(List<Face> faces) {


        //复制一个新的Bitmap
        Bitmap copiedBitmap = bitmap.copy(bitmap.getConfig(), true);;

        for (Face face : faces) {


            //获取边界状态
            Rect bounds = face.getBoundingBox();
            // 初始化Paint
            Paint paint = new Paint();
            // 设置矩形颜色
            paint.setColor(Color.BLUE);
            // 设置绘制样式为轮廓绘制
            paint.setStyle(Paint.Style.STROKE);
            // 设置为你需要的宽度
            paint.setStrokeWidth(10);

            Canvas canvas = new Canvas(copiedBitmap);
            canvas.drawRect(bounds, paint);
        }
        return copiedBitmap;
    }

}
在相机中识别也是同样的方法,只不过换成相机的视频流。
7、效果展示