目录
一、需求
因为不知道具体会有多少个点,那就直接以海量点安排,海量点也是有限制的,建议在 30000 点内。
文档:标注和标注图层-海量点-海量点标记-示例中心-JS API 2.0 示例 | 高德地图API

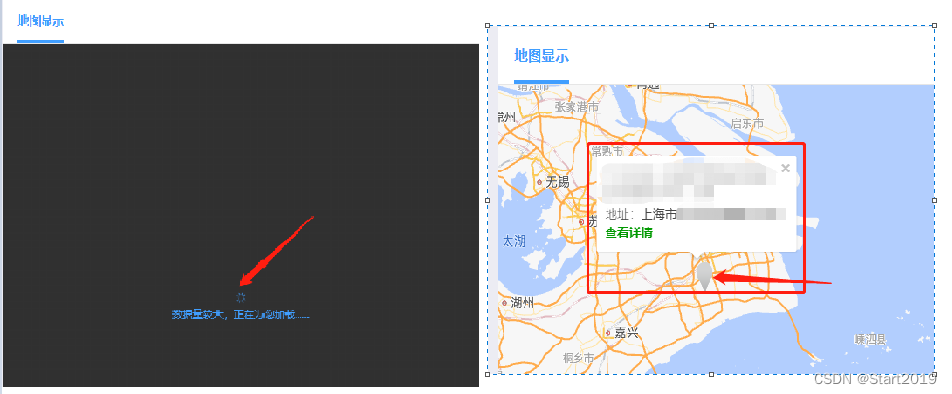
需求:后台给多个经纬度,都要在地图上显示成标注点,且根据 online 的值,online=0 时标注点为灰色点,online=1为红色点。点击标注点有内容弹框,弹框中绑定点击事件,点击 “查看详情” 可以进行跳转。实现如下图:
二、引入高德地图
2.1、将高德地图引入到项目中
先参者上面这篇博客,注册应用的过程就不在这里重复了,第一步是把自己的地图在页面上显示出来,其他的慢慢来。
<template>
  <div id="container"></div>
</template>
<script>
import AMapLoader from "@amap/amap-jsapi-loader";
export default {
  data() {
    return {
        map:null
    };
  },
  mounted() {
    AMapLoader.load({
      key: "", // 申请好的Web端开发者Key,首次调用 load 时必填
      version: "2.0", // 指定要加载的 JSAPI 的版本,缺省时默认为 1.4.15
      plugins: [], // 需要使用的的插件列表,如比例尺'AMap.Scale'等
    }).then((AMap) => {
      map = new AMap.Map("container");
    }).catch((e) => {
      console.log(e);
    });
  },
};
</script>
<style>
#container { width: 800px; height: 400px; }
</style>
2.2、查看官网快速上手,熟悉高德地图的主要API
快速上手-入门-教程-地图 JS API v2.0 | 高德地图API高德开放平台官网https://lbs.amap.com/api/jsapi-v2/guide/abc/quickstart
2.3、海量点标注要用到的API文档
1. 在 2.1 中写出地图的基础上,设置一些假数据模拟海量点,参考以下文档,实现海量点标记。
标注和标注图层-海量点-海量点标记-示例中心-JS API 2.0 示例 | 高德地图API高德开放平台官网https://lbs.amap.com/demo/jsapi-v2/example/mass-markers/labelmarker-mass 2. 在海量点标记上给点添加信息窗口给多个点添加信息窗体-信息窗体-示例中心-JS API 2.0 示例 | 高德地图API高德开放平台官网https://lbs.amap.com/demo/jsapi-v2/example/infowindow/add-infowindows-to-multiple-markers
3. 查看 API 手册,细化自己要使用到的功能覆盖物-参考手册-地图 JS API | 高德地图API高德开放平台官网https://lbs.amap.com/api/javascript-api/reference/overlay
2.4、全部代码
<template>
  <div id="container" v-loading="loading" element-loading-text="数据量较大,正在为您加载......"
    element-loading-spinner="el-icon-loading"
    element-loading-background="rgba(0, 0, 0, 0.8)"></div>
</template>

<script>
import AMapLoader from '@amap/amap-jsapi-loader';
export default {
  data(){
    return{
      loading: true,
      map:null,
      infoWindow: null, //信息窗口
      positionData: []
    }
  },
  methods:{
    initMap(){
      var _this = this;
      // https://webapi.amap.com/theme/v1.3/markers/n/mark_b.png
        AMapLoader.load({
            key: "您的Key值",             // 申请好的Web端开发者Key,首次调用 load 时必填
            version:"2.0",      // 指定要加载的 JSAPI 的版本,缺省时默认为 1.4.15
            plugins:['AMap.LineSearch'],       // 需要使用的的插件列表,如比例尺'AMap.Scale'等
        }).then((AMap)=>{
            _this.map = new AMap.Map("container",{  //设置地图容器id
                viewMode:"3D",    //是否为3D地图模式
                zoom:5.8,           //初始化地图级别
                expandZoomRange: true, //支持可以扩展最大缩放级别
                center:['116.441504', '40.031386'], //初始化地图中心点位置
                // pitch: 30, //俯仰角度 2D地图下无效,自V1.4.0开始支持
                mapStyle: 'amap://styles/normal' //地图样式,彩色
            });
            _this.map.on('complete',()=>{
              _this.$axios.post("接口获取经纬度,处理数据",{}).then(res=>{
                if(res.state == 200 && res.data.length){
                  //处理后台返回要用到的数据
                    _this.positionData = res.data.map(item=>({
                      "deviceMarkId": item.deviceMarkId, "sn": item.sn, "address": item.address,
                      "onlineImg": item.online? "online.png":"offline.png",
                      "positionArr": [item.longitude,item.latitude]
                    }));
                    _this.mapPoint();

                } else {
                  _this.loading = false;
                }
              });
            })
            //放大/缩小的工具条----地图右下角的 + 和 - 按钮
            _this.map.plugin(["AMap.ToolBar"], function() {
              _this.map.addControl(new AMap.ToolBar());
            });
            if(location.href.indexOf('&guide=1')!==-1){
              _this.map.setStatus({scrollWheel:false})
            }
        }).catch(e=>{
            console.log(e);
        })
    },
    mapPoint(){
      var _this = this;
      /* 1.创建 LabelMarker,
      2.创建 LabelsLayer,将已创建的 LabelMarker 添加到 LabelsLayer 上
      3. 将 LabelsLayer 添加到地图实例 */
      var labelsLayer = new AMap.LabelsLayer({
          zooms: [3, 20],
          zIndex: 1000,
          // 该层内标注是否避让
          collision: true,
          // 设置 allowCollision:true,可以让标注避让用户的标注
          allowCollision: true,
      });
      //将 LabelsLayer 添加到地图实例
      _this.map.add(labelsLayer);


      _this.infoWindow = new AMap.InfoWindow({offset: new AMap.Pixel(0, -4)});//信息窗口
      var position = JSON.parse(JSON.stringify(_this.positionData));
      for(var i = 0; i < position.length; i++){
        var labelMarker = new AMap.LabelMarker({
            position: position[i].positionArr
        });

        //标注信息
        var normalMarker = new AMap.Marker({
          position: position[i].positionArr,
          map: _this.map,
          icon: require("@/assets/imgs/icons/"+ position[i].onlineImg)
        });
        normalMarker.content = '<p><b>序号1:</b>'+position[i].deviceMarkId+'</p>'+
                              '<p><b>序号2:</b>'+position[i].sn+'</p>'+
                              '<p><b>地址:</b>'+position[i].address+'</p>'+
                              '<strong style="color:#090;cursor:pointer;" onclick="handleDetail(\''+position[i].deviceMarkId+'\')">查看详情</strong>'
        normalMarker.on('click', _this.markerClick);
        normalMarker.setExtData({deviceMarkId: position[i].deviceMarkId}); //给标注添加信息,点击时可以获取
      }
      // 一次性将海量点添加到图层
      labelsLayer.add(labelMarker);
      this.loading = false; //地图加载完成
    },
    markerClick(e) {
      //这个只是标注的点击事件
        // this.map.setZoomAndCenter(8,e.target.getPosition()); //点击标点放大地图-缺点,不管放大/缩小多少倍,点击标点都会被缩放到8倍
        this.infoWindow.setContent(e.target.content);
        this.infoWindow.open(this.map, e.target.getPosition());
    }
  },
  created(){
    //标注文字上的点击事件
    window.handleDetail = (deviceMarkId)=>{
        this.$router.push({path:"/device/nowMonitor", query:{deviceMarkId}})
      }
  },
  mounted(){
    //DOM初始化完成进行地图初始化
    this.initMap();
  },
  destroyed(){
    // 销毁地图,并清空地图容器.该方法执行后,地图对象被注销,内存释放,地图容器被清空。
    this.map.destroy( );
  }
}
</script>

<style lang="scss" scoped>
#container{ padding:0px; margin: 0px; width: 100%; height: calc(100vh - 180px); }
</style>