React组件打包发布npm(create-react-app+ts+cesium)持续更新~
最新一个新需求,做个组件发布到npm上,此项目用的是React18,使用create-react-app脚手架生成的react框架,该项目包括ts、cesium等。
之前的项目是纯js的,需要先改造一下。
搭建react框架
脚手架生成react框架
终端输入命令:
npx create-react-app my-app --template typescript
暴露配置文件
因为项目中有很多webpack配置需要改动,所以直接将配置文件暴露出来。
终端输入命令:
npm run eject
注:改动react框架中内容可能会造成无法eject,可先暴露文件然后再进行其他
配置别名
在config文件夹下查找webpack.config.js文件,搜索alias(resolve对象下的alias)
修改代码如下:
alias: {


        // Support React Native Web
        // https://www.smashingmagazine.com/2016/08/a-glimpse-into-the-future-with-react-native-for-web/
        'react-native': 'react-native-web',
        // Allows for better profiling with ReactDevTools
        ...(isEnvProductionProfile && {


          'react-dom$': 'react-dom/profiling',
          'scheduler/tracing': 'scheduler/tracing-profiling',
        }),
        ...(modules.webpackAliases || {

    }),
        // 自定义的别名
        '@': path.resolve('src'),
},
因为该项目使用ts则需找到,tsconfig.json文件
修改代码如下:
{


  "compilerOptions": {


    "target": "es5",// 转化成的目标语言
    "lib": [
      "dom",
      "dom.iterable",
      "esnext",
      "es2015"
    ],
    "allowJs": true,
    "skipLibCheck": true,
    "esModuleInterop": true,
    "allowSyntheticDefaultImports": true,
    "strict": true,
    "forceConsistentCasingInFileNames": true,
    "noFallthroughCasesInSwitch": true,
    "module": "esnext",
    "moduleResolution": "node",
    "resolveJsonModule": true,
    "isolatedModules": true,
    "noEmit": false,
    "jsx": "react-jsx",
    // 别名
    "paths": {


      "@/*": [
        "./src/*"
      ],
    },
  },
  "include": [
    "src",
  ],
  "exclude": ["node_modules", "build",]
}
运行项目
终端输入命令:
yarn start
此时项目运行成功!
改造项目
这一节如果不需要,可以进行下一步,此章节仅记录项目改造中遇到的问题。
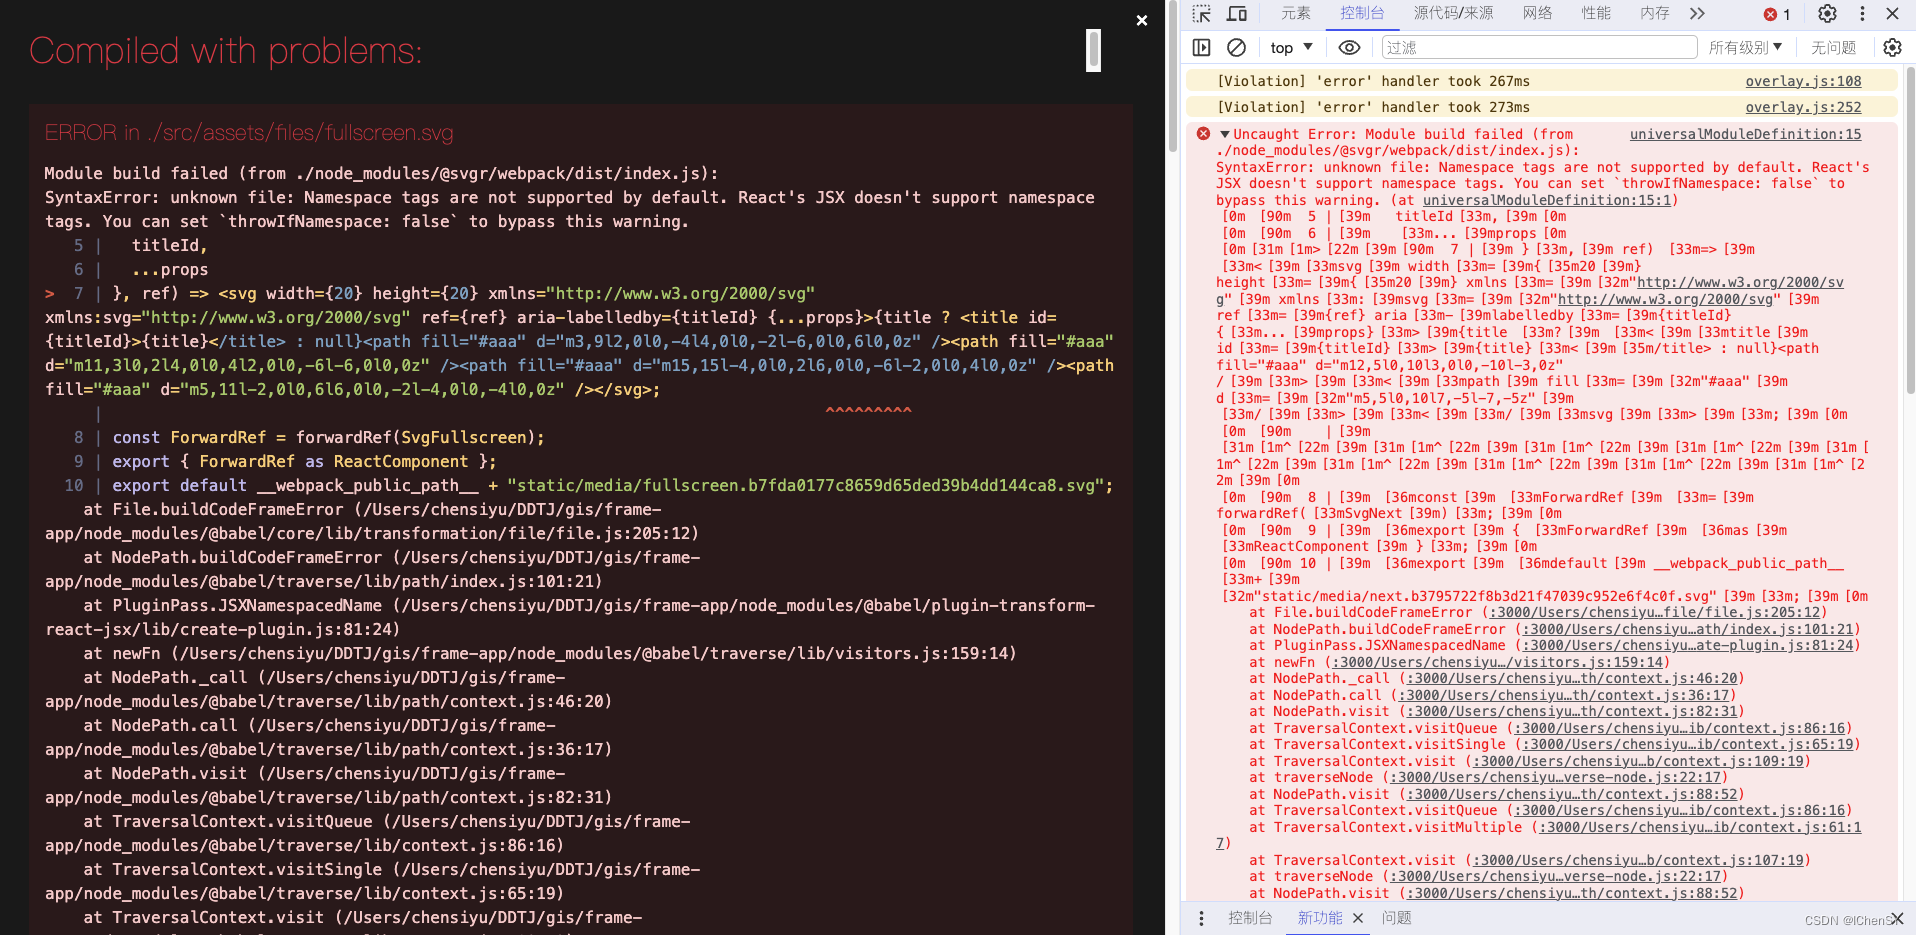
svg报错
控制台报错内容如下:
Uncaught Error: Module build failed (from ./node_modules/@svgr/webpack/dist/index.js):
SyntaxError: unknown file: Namespace tags are not supported by default. React's JSX doesn't support namespace tags. You can set `throwIfNamespace: false` to bypass this warning. (at universalModuleDefinition:15:1)
Module build failed (from ./node_modules/@svgr/webpack/dist/index.js):
SyntaxError: unknown file: Namespace tags are not supported by default. React's JSX doesn't support namespace tags. You can set `throwIfNamespace: false` to bypass this warning.
   5 |   titleId,
   6 |   ...props
>  7 | }, ref) => <svg width={

    20} height={

    20} xmlns="http://www.w3.org/2000/svg" xmlns:svg="http://www.w3.org/2000/svg" ref={

    ref} aria-labelledby={

    titleId} {

    ...props}>{

    title ? <title id={

    titleId}>{

    title}</title> : null}<path fill="#aaa" d="m3,9l2,0l0,-4l4,0l0,-2l-6,0l0,6l0,0z" /><path fill="#aaa" d="m11,3l0,2l4,0l0,4l2,0l0,-6l-6,0l0,0z" /><path fill="#aaa" d="m15,15l-4,0l0,2l6,0l0,-6l-2,0l0,4l0,0z" /><path fill="#aaa" d="m5,11l-2,0l0,6l6,0l0,-2l-4,0l0,-4l0,0z" /></svg>;
     |                                                                           ^^^^^^^^^
   8 | const ForwardRef = forwardRef(SvgFullscreen);
   9 | export {

     ForwardRef as ReactComponent };
  10 | export default __webpack_public_path__ + "static/media/fullscreen.b7fda0177c8659d65ded39b4dd144ca8.svg";
如图:
解决方法:
修改webpack配置,在根目录下找到config文件夹>找到webpack.config.js文件。
webpack.config.js文件中找到module对象,找到rules数组。
修改规则如下图:
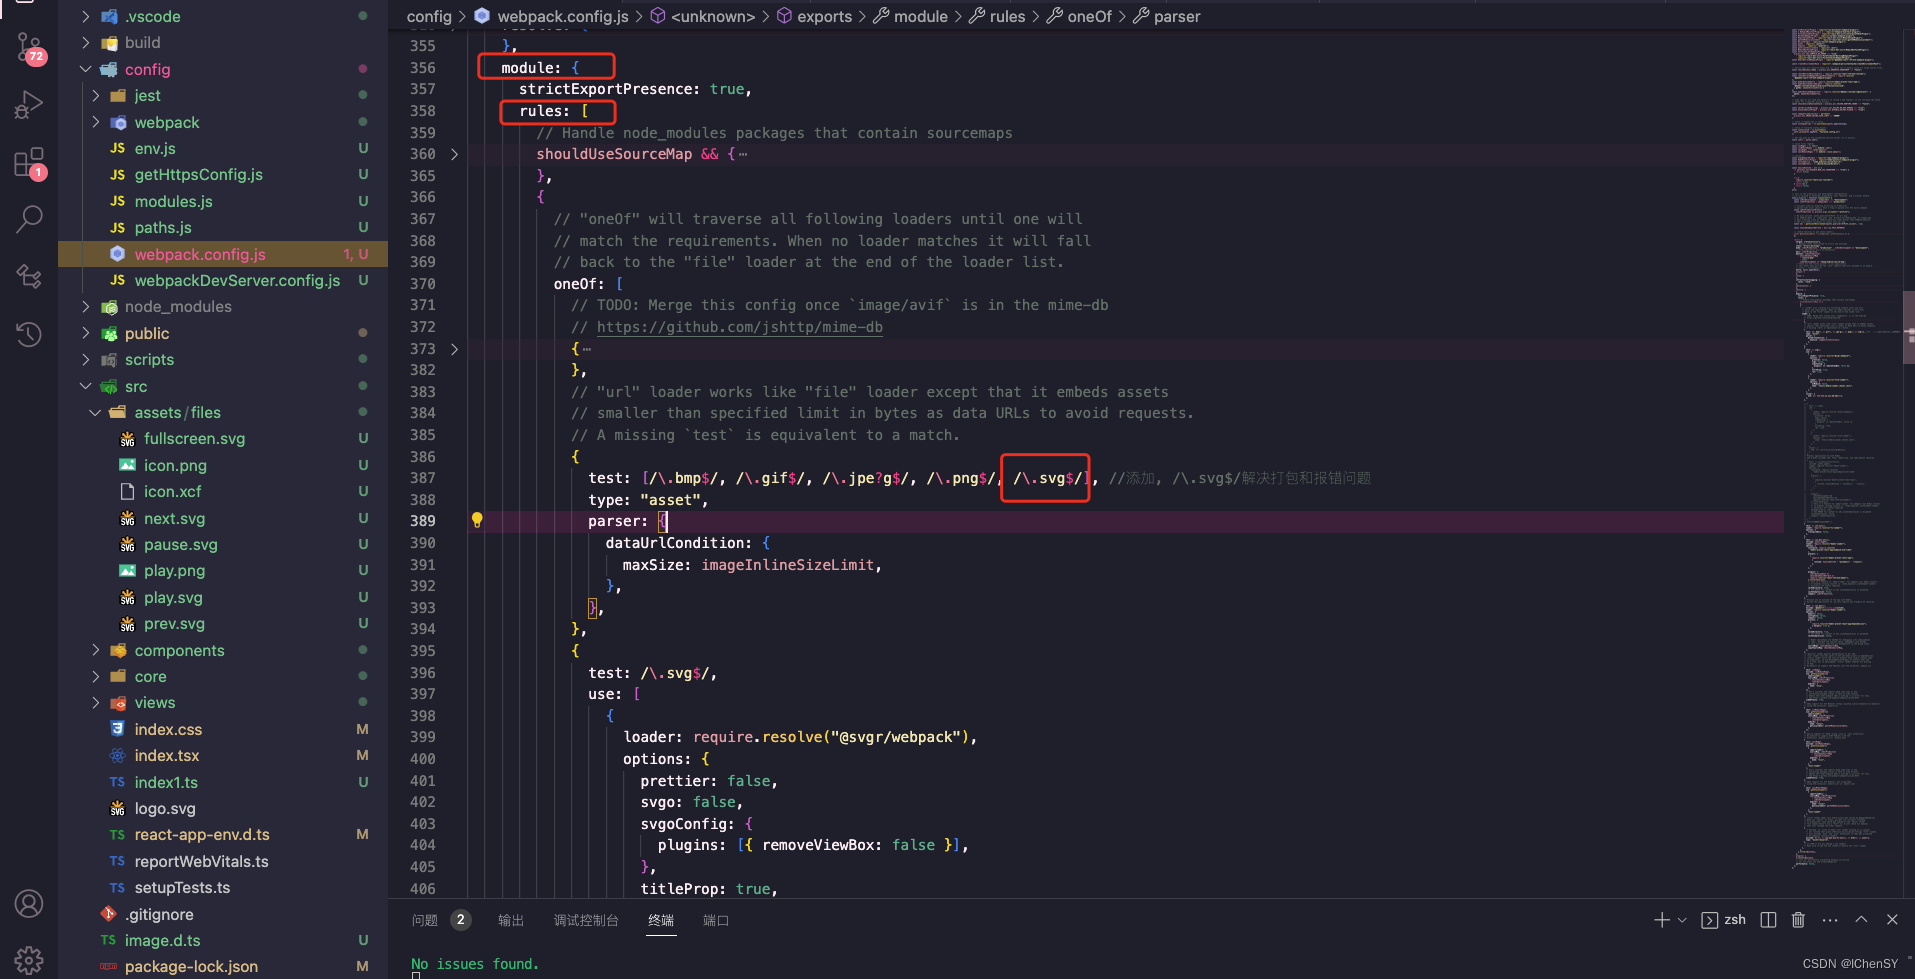
代码如下:
{


              test: [/\.bmp$/, /\.gif$/, /\.jpe?g$/, /\.png$/, /\.svg$/], //添加, /\.svg$/解决打包和报错问题
              type: "asset",
              parser: {


                dataUrlCondition: {


                  maxSize: imageInlineSizeLimit,
                },
              },
            },
修改该配置也会解决,打包后在其他项目引用找不到svg路径的问题。
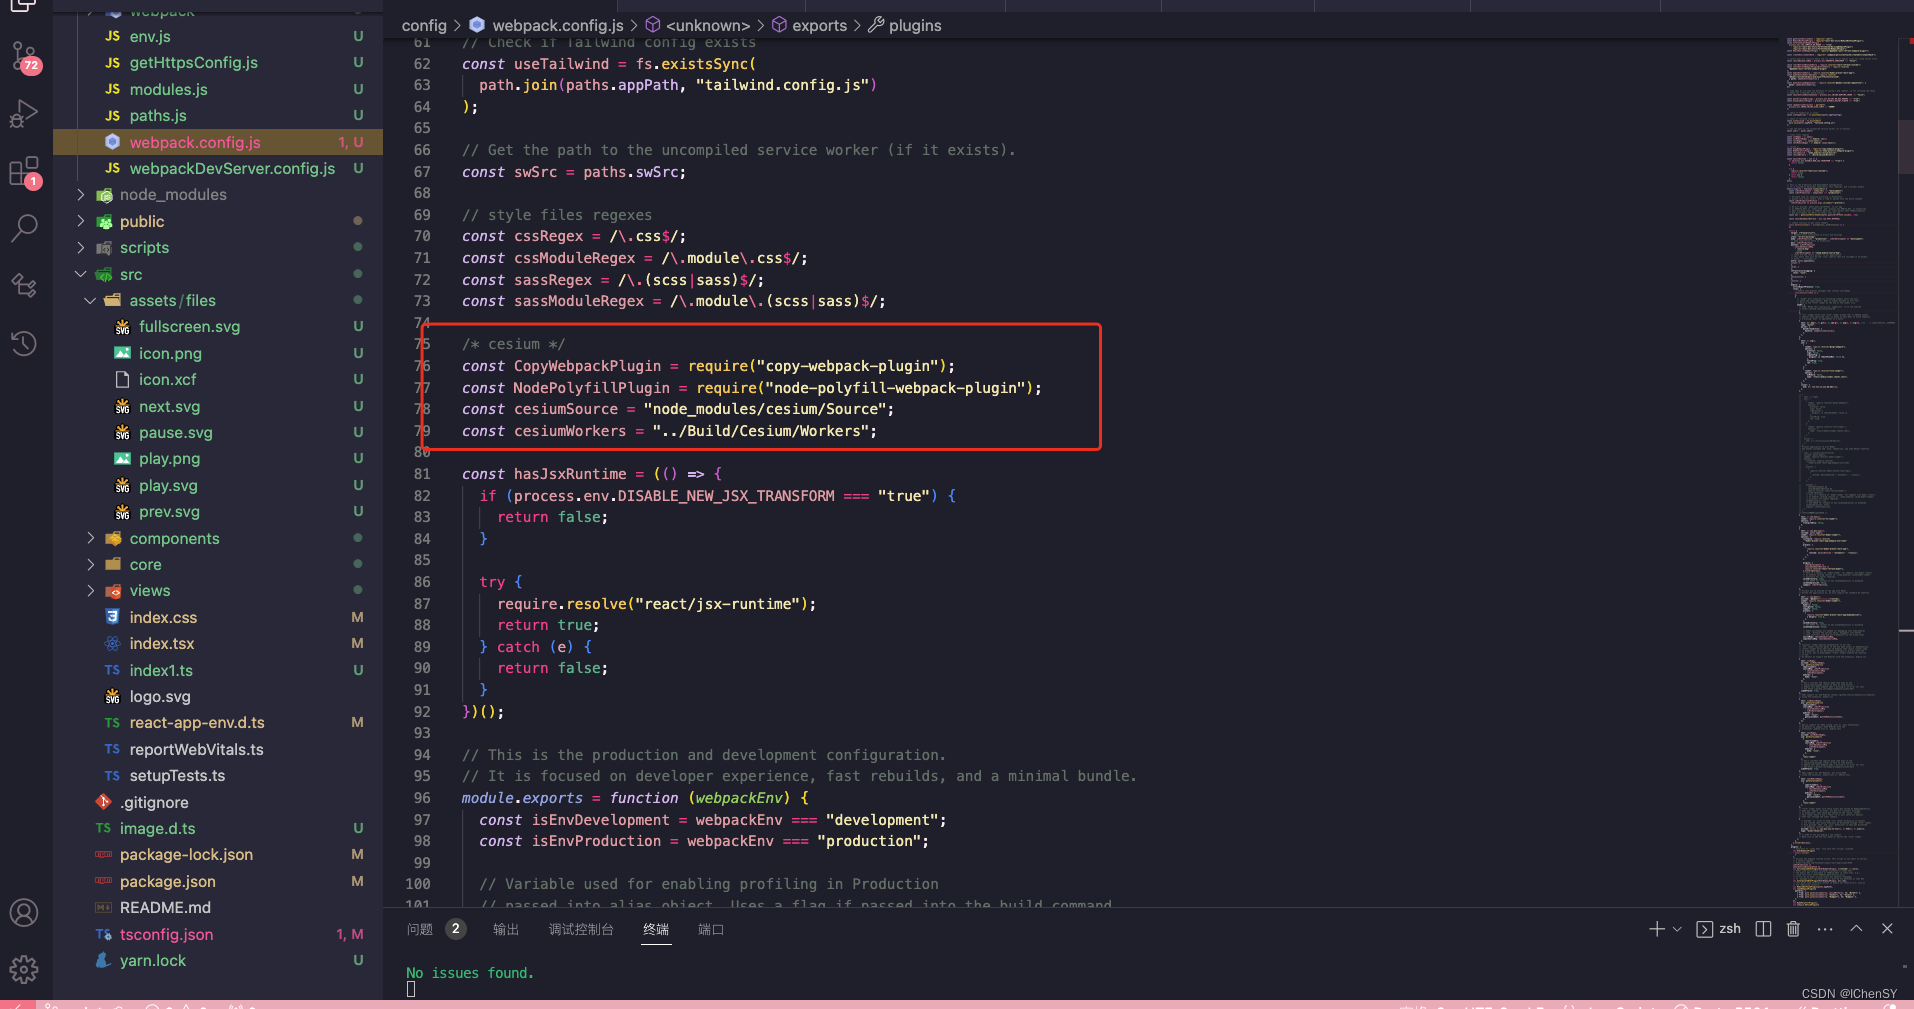
cesium相关配置
本项目使用cesium的版本为1.110.0。
需要下载插件:
- cesium
- copy-webpack-plugin
- node-polyfill-webpack-plugin
版本如下:
"cesium": "^1.110.0",
"copy-webpack-plugin": "^11.0.0",
"node-polyfill-webpack-plugin": "^2.0.1",
下载命令如下:
yarn add cesium -D
yarn add copy-webpack-plugin -D
yarn add node-polyfill-webpack-plugin -D
在根目录下找到config文件夹>找到webpack.config.js文件
webpack.config.js文件添加如下代码:
/* cesium */
const CopyWebpackPlugin = require("copy-webpack-plugin");
const NodePolyfillPlugin = require("node-polyfill-webpack-plugin");
const cesiumSource = "node_modules/cesium/Source";
const cesiumWorkers = "../Build/Cesium/Workers";

//下面代码需要添加到plugins数组中
new CopyWebpackPlugin({


	patterns: [
		{

     from: path.join(cesiumSource, cesiumWorkers), to: "Workers" },
        {

     from: path.join(cesiumSource, "Assets"), to: "Assets" },
        {

     from: path.join(cesiumSource, "Widgets"), to: "Widgets" },
	],
}),
new NodePolyfillPlugin(),
new webpack.DefinePlugin({


	// env.stringified,
	CESIUM_BASE_URL: JSON.stringify(""),
}),
配置如图:

实例化cesium代码:
let viewer = new Cesium.Viewer(mapContainer, {


      animation: false, //是否创建动画小器件,左下角仪表
      baseLayerPicker: false, //是否显示图层选择器
      fullscreenButton: false, //是否显示全屏按钮
      geocoder: false, //是否显示geocoder小器件,右上角查询按钮
      homeButton: false, //是否显示Home按钮
      infoBox: false, //是否显示信息框
      sceneModePicker: false, //是否显示3D/2D选择器,与scene3DOnly不能同时为true
      selectionIndicator: false, //是否显示选取指示器组件
      timeline: false, //是否显示时间轴
      navigationHelpButton: false, //是否显示右上角的帮助按钮
      scene3DOnly: false, //如果设置为true,则所有几何图形以3D模式绘制以节约GPU资源
      // terrainProvider: Cesium.createWorldTerrain(),
      orderIndependentTranslucency: false,
      contextOptions: {


        //cesium状态下允许canvas转图片convertToImage
        webgl: {


          alpha: true,
          depth: false,
          stencil: true,
          antialias: true,
          premultipliedAlpha: true,
          preserveDrawingBuffer: true,
          failIfMajorPerformanceCaveat: true,
        },
        allowTextureFilterAnisotropic: true,
      },
      // baseLayer: ,
});

viewer.imageryLayers.addImageryProvider(
      new Cesium.UrlTemplateImageryProvider({


        url: "地址xxxxxxxxxx",
        maximumLevel: 18,
      })
);
viewer.scene.sun.show = false;
viewer.scene.moon.show = false;
viewer.scene.skyBox.show = true;
viewer.scene.backgroundColor = new Cesium.Color(0.0, 0.0, 0.0, 0.0);
codemirror配置
版本如下:
"@codemirror/lang-javascript": "^6.2.1",
"@types/codemirror": "^5.60.12",
"codemirror": "5.38.0",
版本不同实例化方法不同,需要引入样式主题才能生效。
代码如下:
import CodeMirror from "codemirror";
import {

     javascript } from "@codemirror/lang-javascript";
import "codemirror/lib/codemirror.css";
import "codemirror/theme/monokai.css"; //主题样式文件
import "codemirror/mode/javascript/javascript"; //javascript模式
import "codemirror/addon/hint/show-hint.css";
import "codemirror/addon/hint/show-hint";

// var codemirror = new EditorView({


//   extensions: [basicSetup, javascript()],
//   parent: container.dom!,
// });
var codemirror = CodeMirror(container.dom, {


    value: "",
    lineNumbers: true,
    lineWrapping: true,
    matchBrackets: true,
    indentWithTabs: true,
    tabSize: 4,
    indentUnit: 4,
    mode: "javascript",
  });
codemirror.setOption("theme", "monokai");
codemirror.on("change", function () {


    if (codemirror.state.focused === false) return;
    clearTimeout(delay);
    delay = setTimeout(function () {


      if (errorLine) {


        codemirror.removeLineClass(errorLine, "CodeMirror-errorLine");
        errorLine = null;
      }

      if (currentScript !== null) {


        currentScript.source = codemirror.getValue();

        editor.signals.scriptChanged.dispatch();
      } else if (currentEffect !== null) {


        var error;
        var currentSource = currentEffect.source;

        editor.timeline.reset();

        try {


          currentEffect.source = codemirror.getValue();
          editor.compileEffect(currentEffect);
        } catch (e) {


          error = e.name + " : " + e.message; // e.stack, e.columnNumber, e.lineNumber

          if (/Chrome/i.test(navigator.userAgent)) {


            var result = /<anonymous>:([0-9]+):([0-9+])/g.exec(e.stack);
            if (result !== null) errorLine = parseInt(result[1]) - 3;
          } else if (/Firefox/i.test(navigator.userAgent)) {


            var result = /Function:([0-9]+):([0-9+])/g.exec(e.stack);
            if (result !== null) errorLine = parseInt(result[1]) - 1;
          }

          if (errorLine !== null) {


            codemirror.addLineClass(
              errorLine,
              "errorLine",
              "CodeMirror-errorLine"
            );
          }
        }

        editor.timeline.update(editor.player.currentTime);

        if (error !== undefined) {


          errorDiv.setDisplay("");
          errorText.setValue("⌦ " + error);

          currentEffect.source = currentSource;
        } else {


          errorDiv.setDisplay("none");
        }
      }
    }, 1000);
});
react里引用src文件外内容
因为create-react-app脚手架生成的框架,禁止了从src目录外引用,需要修改webpack配置。
webpack.config.js文件修改代码如下:
找到resolve对象-plugins数组
plugins: [
        // Prevents users from importing files from outside of src/ (or node_modules/).
        // This often causes confusion because we only process files within src/ with babel.
        // To fix this, we prevent you from importing files out of src/ -- if you'd like to,
        // please link the files into your node_modules/ and let module-resolution kick in.
        // Make sure your source files are compiled, as they will not be processed in any way.
        new ModuleScopePlugin(paths.appRoot, [
          paths.appPackageJson,
          reactRefreshRuntimeEntry,
          reactRefreshWebpackPluginRuntimeEntry,
          babelRuntimeEntry,
          babelRuntimeEntryHelpers,
          babelRuntimeRegenerator,
        ]),
],
找到config下的paths.js文件
在paths.js文件中填入上述导入的路径
代码如下:
module.exports = {


  dotenv: resolveApp('.env'),
  appPath: resolveApp('.'),
  appBuild: resolveApp(buildPath),
  appPublic: resolveApp('public'),
  appHtml: resolveApp('public/index.html'),
  appIndexJs: resolveModule(resolveApp, 'src/index'),
  buildEntry: resolveModule(resolveApp, 'src/gis'),
  appPackageJson: resolveApp('package.json'),
  appSrc: resolveApp('src'),
  appTsConfig: resolveApp('tsconfig.json'),
  appJsConfig: resolveApp('jsconfig.json'),
  yarnLockFile: resolveApp('yarn.lock'),
  testsSetup: resolveModule(resolveApp, 'src/setupTests'),
  proxySetup: resolveApp('src/setupProxy.js'),
  appNodeModules: resolveApp('node_modules'),
  appWebpackCache: resolveApp('node_modules/.cache'),
  appTsBuildInfoFile: resolveApp('node_modules/.cache/tsconfig.tsbuildinfo'),
  swSrc: resolveModule(resolveApp, 'src/service-worker'),
  publicUrlOrPath,
  appRoot: resolveApp(''),
};
打包
打包出入口配置
因为改项目最后出口为js,所以修改打包的js文件名称及其路径。
webpack.config.js文件,找到output对象
修改代码如下:
output: {


      // The build folder.
      path: paths.appBuild,
      // Add /* filename */ comments to generated require()s in the output.
      pathinfo: isEnvDevelopment,
      // There will be one main bundle, and one file per asynchronous chunk.
      // In development, it does not produce real files.
      // filename: isEnvProduction
      //   ? 'static/js/[name].[contenthash:8].js'
      //   : isEnvDevelopment && 'static/js/bundle.js',
      filename: "index.js",//出口js文件路径及其名称
      library: {


        name: "library", //库输出变量名
        type: "umd", //库类型
        export: "Gis", //导出变量名
        auxiliaryComment: "test component",
      },
      // There are also additional JS chunk files if you use code splitting.
      chunkFilename: isEnvProduction
        ? "static/js/[name].[contenthash:8].chunk.js"
        : isEnvDevelopment && "static/js/[name].chunk.js",
      assetModuleFilename: "static/media/[name].[hash][ext]",
      // webpack uses `publicPath` to determine where the app is being served from.
      // It requires a trailing slash, or the file assets will get an incorrect path.
      // We inferred the "public path" (such as / or /my-project) from homepage.
      publicPath: paths.publicUrlOrPath,
      // Point sourcemap entries to original disk location (format as URL on Windows)
      devtoolModuleFilenameTemplate: isEnvProduction
        ? (info) =>
          path
            .relative(paths.appSrc, info.absoluteResourcePath)
            .replace(/\\/g, "/")
        : isEnvDevelopment &&
        ((info) =>
          path.resolve(info.absoluteResourcePath).replace(/\\/g, "/")),
    },
打包按照项目结构输出ts的声明文件
create-react-app脚手架中生成的webpack中编译ts用的是babel-loader而不是ts-loader,所以需要添加ts-loader依赖。
ts-loader版本如下:
"ts-loader": "^9.5.0"
修改webpack.config.js:
//改代码为修改之前的代码
{


              test: /\.(js|mjs|jsx|ts|tsx)$/,
              include: paths.appSrc,
              loader: require.resolve('babel-loader'),
              options: {


                customize: require.resolve(
                  'babel-preset-react-app/webpack-overrides'
                ),
                presets: [
                  [
                    require.resolve('babel-preset-react-app'),
                    {


                      runtime: hasJsxRuntime ? 'automatic' : 'classic',
                    },
                  ],
                ],

                plugins: [
                  isEnvDevelopment &&
                  shouldUseReactRefresh &&
                  require.resolve('react-refresh/babel'),
                ].filter(Boolean),
                // This is a feature of `babel-loader` for webpack (not Babel itself).
                // It enables caching results in ./node_modules/.cache/babel-loader/
                // directory for faster rebuilds.
                cacheDirectory: true,
                // See #6846 for context on why cacheCompression is disabled
                cacheCompression: false,
                compact: isEnvProduction,
              },
            },

//修改之后的代码如下
{


              test: /\.(ts|tsx)$/,
              loader: require.resolve("ts-loader"),
              options: {


                transpileOnly: false,
              },
            },
            {


              test: /\.(js|mjs|jsx)$/,
              include: paths.appSrc,
              loader: require.resolve("babel-loader"),
              options: {


                customize: require.resolve(
                  "babel-preset-react-app/webpack-overrides"
                ),
                presets: [
                  [
                    require.resolve("babel-preset-react-app"),
                    {


                      runtime: hasJsxRuntime ? "automatic" : "classic",
                    },
                  ],
                ],

                plugins: [
                  isEnvDevelopment &&
                  shouldUseReactRefresh &&
                  require.resolve("react-refresh/babel"),
                ].filter(Boolean),
                // This is a feature of `babel-loader` for webpack (not Babel itself).
                // It enables caching results in ./node_modules/.cache/babel-loader/
                // directory for faster rebuilds.
                cacheDirectory: true,
                // See #6846 for context on why cacheCompression is disabled
                cacheCompression: false,
                compact: isEnvProduction,
              },
            },
其实思路就是,将编译的ts规则与其他的拆开写,ts用ts-loader。
打包引入另一个项目测试
我们需要将该组件导出,因为打包的出口是src目录下的index,所以将index.tsx修改名称,并添加一个导出组件的引用
添加index.ts文件:
import Gis from "./views/gis/Gis";
export {

     Gis };
运行打包命令:
yarn build
这里插一句题外话,start和build都不需要加run即可运行。
将打包后的文件拷贝到另一个空项目中,在空项目中引入该插件。
代码如下:
import React from 'react';
import './App.css';
import Gis from "../build/index.js"
function App() {


  return (
    <div className="App">
      <Gis />
    </div>
  );
}

export default App;
此时运行成功即可。
未完待续~~
如果有报错根据相关报错去解决问题即可。
npm发布流程
登录npm
终端输入命令:
npm login
依次输入你的用户名、密码、邮箱
有的还会输入邮箱的验证码
有的会报错如下图:

报错信息如下:
code F403
npm ERR!
npm ERR!403 403 Forbidden - PU https://registry.npmirror. con/-/user/org. couchdb.user:csiyu - [FORBIDDEN] Public registration is not allowetnpm ERR!403 In most cases, you or one of your dependencies are requestingnpmERr!403 a package version that is forbidden by your security policy, ornpm ERR! 403 on a server you do not have access to.
npmERR! A complete log of this run can be found in:npmERR!/Users/chensiyu/.npm/_ logs/2023-10 27T07 10 40 630Z-debug -0.log
报错原因是因为npm的镜像源,将镜像源切换即可
终端输入命令:
npm config set registry https://registry.npmjs.org/
再次登录即可。
发布
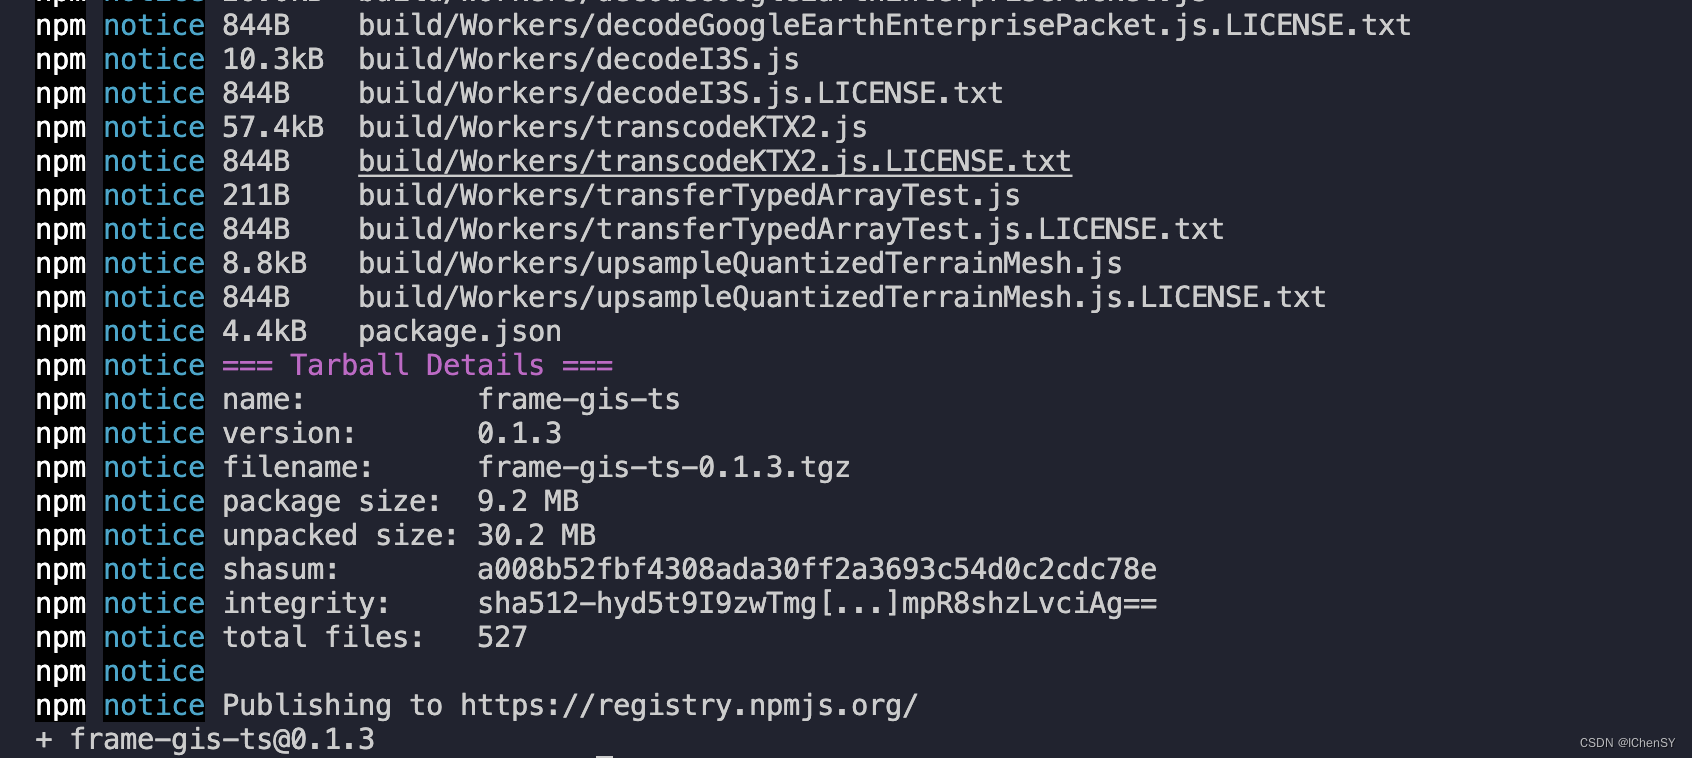
终端输入命令:
npm publish
如果遇到报错如下:
npm ERR! code E403
npm ERR! 403 403 Forbidden - PUT https://registry.npmjs.org/test-xxx - You do not have permission to publish “test-xxx”. Are you logged in as the correct user?
npm ERR! 403 In most cases, you or one of your dependencies are requesting
npm ERR! 403 a package version that is forbidden by your security policy, or
npm ERR! 403 on a server you do not have access to.
则是因为包名与npm上的冲突了,修改包名重新发布即可。
发布成功如下图: