1.memcpy函数
1.1函数介绍
在C语言中,memcpy函数用于将一段内存中的数据复制到另一段内存中。它接受三个参数:目标内存的指针、源内存的指针以及要复制的字节数。这个函数非常有用,特别是在需要复制大块内存数据时,如数组、结构体等。
同样是复制,那与strcpy有什么不同呢?
memcpy函数适用于复制任意类型的内存数据,而strcpy函数专门用于复制字符串。memcpy函数提供了更灵活的复制方式和长度控制,而strcpy函数更方便地处理以null字符结尾的字符串。在使用时,需要根据具体的需求来选择合适的函数。
void * memcpy ( void * destination, const void * source, size_t num );1.2函数使用
1.2.1代码
下面是一个简单的示例,演示了如何使用memcpy函数来复制一个整型数组:
#include <stdio.h>
#include <string.h>
int main() {
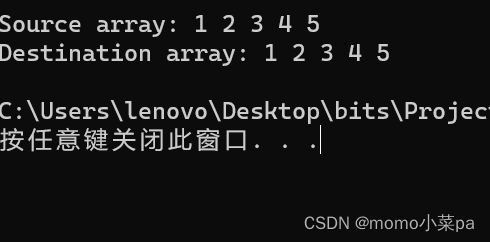
int source[] = {1, 2, 3, 4, 5};
int destination[5];
memcpy(destination, source, sizeof(source));
printf("Source array: ");
for (int i = 0; i < sizeof(source)/sizeof(source[0]); i++) {
printf("%d ", source[i]);
}
printf("\n");
printf("Destination array: ");
for (int i = 0; i < sizeof(destination)/sizeof(destination[0]); i++) {
printf("%d ", destination[i]);
}
printf("\n");
return 0;
}1.2.1运行结果
1.3模拟实现memcpy
1.3.1实现思路
1.函数memcpy从source的位置开始向后复制num个字节的数据到destination的内存位置。
2.这个函数在遇到 '\0' 的时候并不会停下来。
3.memcpy函数是按字节级别进行复制,它将源内存区域的数据按照字节的粒度直接复制到目标内存区域。4.如果source和destination有任何的重叠,复制的结果都是未定义的。
1.3.2代码
void* my_memcpy(void* dst, const void* src, size_t count)
{
	void* ret = dst;
	assert(dst);
	assert(src);
	/*
	* copy from lower addresses to higher addresses
	*/
	while (count--) {
		*(char*)dst = *(char*)src;
		dst = (char*)dst + 1;
		src = (char*)src + 1;
	}
	return(ret);
}

int main()
{
	int arr1[5] = { 0 };
	int arr2[] = { 1,2,3,4,5 };
	//把arr2中的前5个整数的数据,拷贝放在arr1中
	my_memcpy(arr1, arr2, 20);
	for (int i = 0; i < 5; i++)
	{
		printf(" %d ", arr1[i]);
	}
	return 0;
}
1.3.3运行结果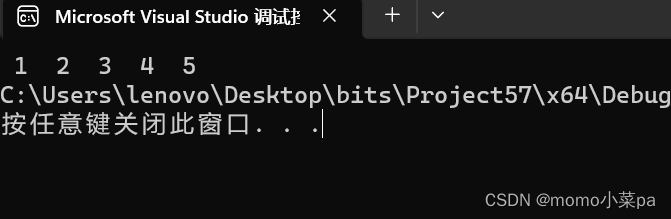
2.memmove函数
2.1函数介绍
在C语言中,memmove函数用于将一段内存中的数据移动到另一段内存中。与memcpy函数不同的是,memmove函数可以处理源内存区域和目标内存区域有重叠的情况。它接受三个参数:目标内存的指针、源内存的指针以及要移动的字节数。这个函数非常有用,特别是在需要在内存中重新排列数据或处理重叠内存区域时。
void * memmove ( void * destination, const void * source, size_t num );2.2函数使用
2.2.1代码
#include <stdio.h>
#include <string.h>
int main()
{
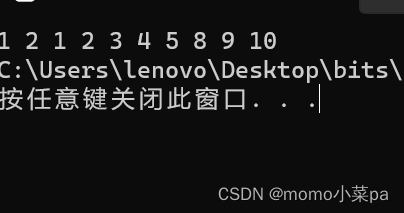
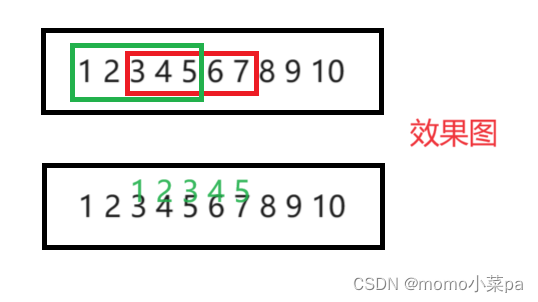
int arr[10] = { 1,2,3,4,5,6,7,8,9,10 };
memcpy(arr + 2, arr, 20);
for (int i = 0; i < 10; i++)
{
printf("%d ", arr[i]);
}
return 0;
}2.2.2运行结果
2.3模拟实现mememove
2.3.1实现思路
1. 首先,检查源内存区域和目标内存区域是否有重叠。如果有重叠,则需要从后往前复制数据,以避免数据被覆盖。如果没有重叠,则可以从前往后复制数据。
2. 根据重叠情况,确定数据复制的起始位置和方向。如果有重叠,起始位置应该是源内存区域的末尾;如果没有重叠,起始位置应该是源内存区域的开头。
3. 根据重叠情况,确定数据复制的终止位置和方向。如果有重叠,终止位置应该是源内存区域的开头;如果没有重叠,终止位置应该是源内存区域的末尾。
4. 根据起始位置、终止位置和方向,使用循环逐个复制数据。可以使用指针来访问内存区域中的每个字节,并将其复制到目标内存区域中。
5. 最后,返回目标内存区域的指针,表示复制完成
2.3.2代码
#include <stdio.h>
#include<assert.h>
void* my_memmove(void* dest, const void* src, size_t sz)
{
assert(dest && src);
void* ret = dest;
if (dest < src)
{
//前->后
int i = 0;
for (i = 0; i < sz; i++)
{
*(char*)dest = *(char*)src;
dest = (char*)dest + 1;
src = (char*)src + 1;
}
}
else
{
//后->前
while (sz--)
{
*((char*)dest+sz) = *((char*)src + sz);
}
}
return ret;
}
int main()
{
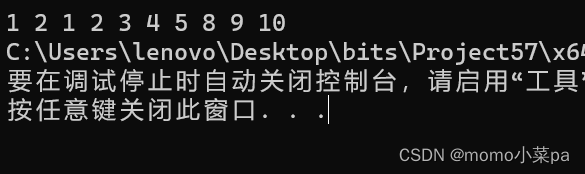
int arr[] = { 1,2,3,4,5,6,7,8,9,10 };
my_memmove(arr+2, arr, 20);
int i = 0;
for (i = 0; i < 10; i++)
{
printf("%d ", arr[i]);
}
return 0;
}2.2.3运行结果