一、引言
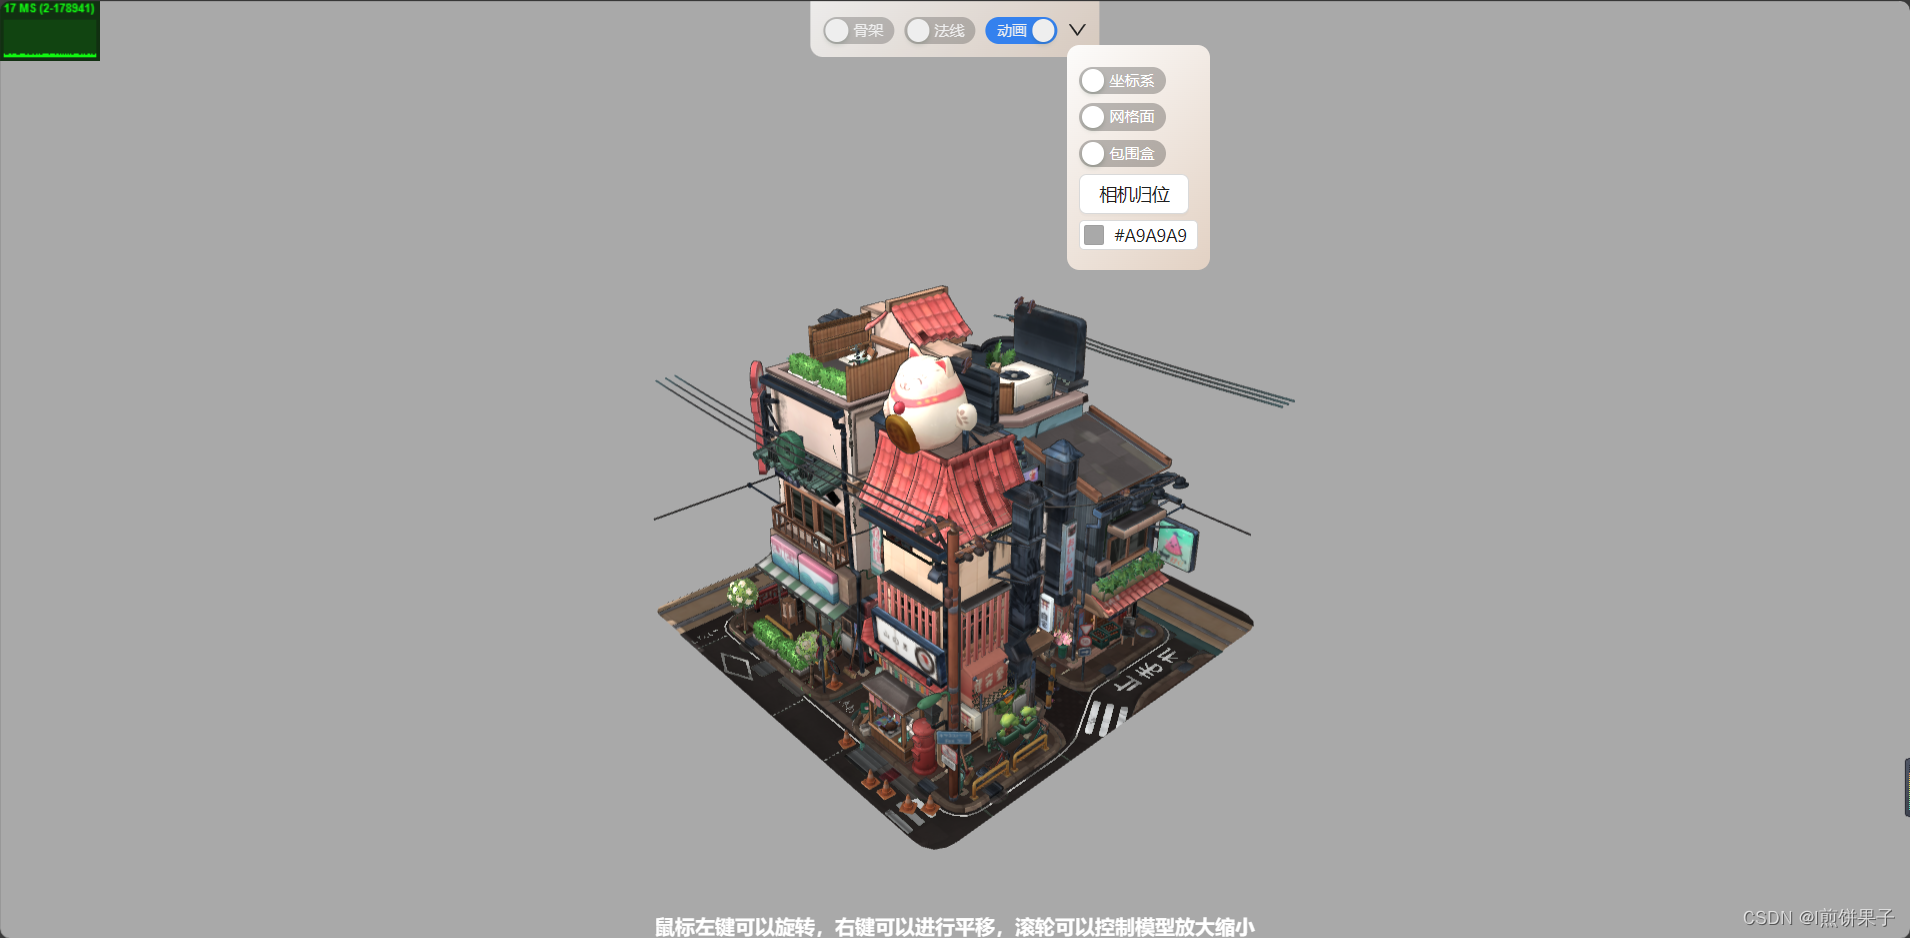
最近基于Three.JS,使用class封装了一个GLB模型展示,支持TypeScript、支持不同框架使用,具有多种功能。 (下图展示一些基础的功能,可以自行扩展,比如光源等)
二、主要代码
本模块依赖: three、 @types/three, 请先下载这两个npm包
yarn add three @types/three 或 npm i three @types/three 使用了class进行封装,将主要的操作代码从组件中抽离出来,便于不同框架之间的使用
// /components/ShowModel/GLBModel.ts

import { OrbitControls } from "three/examples/jsm/controls/OrbitControls";
import { GLTF, GLTFLoader } from "three/examples/jsm/loaders/GLTFLoader";
import * as THREE from "three";
import Stats from "three/examples/jsm/libs/stats.module.js";
import { RoomEnvironment } from "three/examples/jsm/environments/RoomEnvironment.js";
import { DRACOLoader } from "three/examples/jsm/loaders/DRACOLoader.js";
import { onErr, setting } from "./type";

/**GLB模型展示 */
class GLBModel {
    /**当前canvas挂载的node节点 */
    node: HTMLElement
    /**判断模型是否加载完成(代表那些原本undefined的变量已经可以使用了)*/
    load = false
    /**一些模式的开关和设置,外部只读,修改无效。会把配置保存在本地存储,记录数据  */
    setting!: setting
    /**渲染器 */
    private renderer!: THREE.WebGLRenderer
    /**摄像机 */
    private camera!: THREE.PerspectiveCamera
    /**场景 */
    private scene!: THREE.Scene;
    /**操控摄像机的控制器 */
    private controls!: OrbitControls;
    /**性能统计信息的工具 */
    private stats!: Stats
    /**clock对象,用于跟踪时间的流逝,并在动画循环中提供统一的时间更新 */
    private clock!: THREE.Clock
    /**辅助观察的帮助器,包括 三维坐标、网格平面、包围盒框框 */
    private helpers?: ReturnType<typeof initHelper>['helper']
    /**包围盒有关的数据,包括放大倍数、放大后的中心坐标、放大后的模型大小 */
    private box?: ReturnType<typeof getBoxAndScale>['box']
    /**动画混合器 */
    private mixer?: THREE.AnimationMixer
    /**当前模型实例 */
    private gltf?: GLTF
    /**模型的动画列表 */
    private actionList: THREE.AnimationAction[] = []
    /**模型的原始材质Map,可以用于还原 */
    private originalMesh = new Map<THREE.Mesh, THREE.Mesh["material"]>()
    /**当内部的setting变量发生改变时,会触发这个函数,可以用于框架的响应式 */
    private settingChangeCallback?: (setting: setting) => void


    /**GLB模型展示 - 构造函数
     * @param node 要挂载canvas画布的节点。注意需要设置好node的宽高
     * @param settingChangeCallback 当内部的setting变量发生改变时,会触发这个函数,可以用于框架的响应式
     */
    constructor(node: HTMLElement, settingChangeCallback?: (setting: setting) => void) {
        this.node = node
        this.settingChangeCallback = settingChangeCallback
        Object.assign(this, initBaseDevice(node), initOtherDevice(node))//这个操作是,把函数的返回值赋值到this上, 省的我一个个去 this.xxx = xxx
        this.resizeListen()
        this.settingFn.getSettingFromLocal()//给setting属性赋值
    }
    /**加载glb模型,同时进行基础设置
     * @param url 要加载的url
     * @param onload 加载成功的回调函数
     * @param onProgress 进度更新时触发的函数,可以用来配置进度条
     * @param onErr 加载失败的回调
     */
    loadGlb(url: string, onload: (data: GLTF) => void, onProgress: (e: ProgressEvent) => void, onErr?: onErr) {
        /**dracoLoader模型压缩器 */
        const dracoLoader = new DRACOLoader();
        dracoLoader.setDecoderPath('https://threejs.org/examples/jsm/libs/draco/gltf/');//这段代码在部署时会不会报错?
        /**glb模型加载器 */
        const loader = new GLTFLoader();
        loader.setDRACOLoader(dracoLoader); //设置压缩器
        loader.load(
            url,
            (gltf) => {
                this.gltf = gltf
                const model = gltf.scene;
                this.box = getBoxAndScale(model, this.camera, this.controls, this.scene).box
                this.helpers = initHelper(150, this.box.centerWithScale, model).helper;
                this.mixer = new THREE.AnimationMixer(model); //设置新的动画混合器
                this.actionList = getAnimations(gltf, this.mixer); //获取动画列表
                this.animate()
                this.originalMesh = getOriginalMesh(model)//保存原始材质
                onload(gltf)
                this.load = true
                this.settingFn.setFromLocal()
            },
            onProgress,
            (e) => {
                onErr && onErr(e);
                console.error("加载glb模型出错啦", e);
            });
    };
    /**卸载时需要做的事。 */
    destory() {
        try {
            this.resizeDestory();//清除DOM监听
            window.cancelAnimationFrame(this.animateKey || 0);//清除canvas动画
            while (this.node.firstChild) this.node.firstChild.remove(); //删除DOM下所有子元素
        } catch (error) {
            console.error('执行清除函数失败,请检查问题。可能是由于this指向的问题,请保证此函数的调用者是实例本身。', error);
            //注意调用时,必须保证调用者是实例本身,否则此处请改为箭头函数
        }
    }
    /**开启/关闭骨架模式
     * @param open 开启还是关闭
     * @param onErr 失败的回调
     */
    changeWireframe(open: boolean, onErr?: onErr) {
        try {
            this.judgeLoad()
            this.gltf!.scene.traverse(function (child) {
                if (child instanceof THREE.Mesh) {
                    child.material.wireframe = open; //查看骨架模式
                }
            });
            this.settingFn.setSetting('wireframe', open)
        } catch (error) {
            console.error('开启/关闭骨架模式失败', error)
            onErr && onErr(error)
        }
    }
    /**开启/关闭法线模式 */
    changeNormal(open: boolean, onErr?: onErr) {
        try {
            this.judgeLoad()
            this.gltf!.scene.traverse((object) => {
                if (object instanceof THREE.Mesh) {
                    if (open) {
                        object.material = new THREE.MeshNormalMaterial({
                            transparent: true, // 是否开启使用透明度
                            wireframe: this.setting.wireframe, //骨架模式
                            opacity: 0.8, // 透明度
                            depthWrite: false, // 关闭深度写入 透视效果
                        });
                    } else {
                        const origin = this.originalMesh.get(object); //原始材质
                        object.material = origin;
                        this.changeWireframe(this.setting.wireframe);
                    }
                }
            });
            this.settingFn.setSetting('normal', open)
        } catch (error) {
            console.error('开启/关闭法线模式失败', error)
            onErr && onErr(error)
        }
    }
    /**开启/关闭动画
     * @param open 是否开启
     * @param onErr 失败回调,参数是失败提示
     */
    changeAnimation(open: boolean, onErr?: onErr) {
        try {
            if (open && !this.actionList.length) {
                console.log("该模型暂无动画哦");
                onErr && onErr("该模型暂无动画哦")
                return;
            }
            this.actionList.forEach((k) => {
                open ? k.play() : k.stop();
            });
            this.settingFn.setSetting('animation', open)
        } catch (error) {
            console.error('开启/关闭动画失败', error)
            onErr && onErr(error)
        }
    };
    /**开启/关闭坐标系 */
    changeAxesHelper(open: boolean, onErr?: onErr) {
        try {
            this.judgeLoad()
            open ? this.scene.add(this.helpers!.axesHelper) : this.scene.remove(this.helpers!.axesHelper)
            this.settingFn.setSetting('axesHelper', open)
        } catch (error) {
            console.error('开启/关闭坐标系失败', error);
            onErr && onErr(error)
        }
    }
    /**开启/关闭网格 */
    changeGridHelper(open: boolean, onErr?: onErr) {
        try {
            this.judgeLoad()
            open ? this.scene.add(this.helpers!.gridHelper) : this.scene.remove(this.helpers!.gridHelper)
            this.settingFn.setSetting('gridHelper', open)
        } catch (error) {
            console.error('开启/关闭网格失败', error);
            onErr && onErr(error)
        }
    }
    /**开启/关闭包围盒 */
    changeBoundingBoxHelper(open: boolean, onErr?: onErr) {
        try {
            this.judgeLoad()
            open ? this.scene.add(this.helpers!.boundingBoxHelper) : this.scene.remove(this.helpers!.boundingBoxHelper)
            this.settingFn.setSetting('boundingBoxHelper', open)
        } catch (error) {
            console.error('开启/关闭包围盒 失败', error);
            onErr && onErr(error)
        }
    }
    /**切换背景颜色,参数是十六进制颜色字符串 */
    changeBgcolor(hex: string, onErr?: onErr) {
        try {
            this.judgeLoad()
            this.scene.background = new THREE.Color(hex); //场景背景色
            this.settingFn.setSetting('bgcolor', hex)
        } catch (error) {
            console.error('开启/关闭包围盒 失败', error);
            onErr && onErr(error)
        }
    }
    /**相机归回原位 */
    cameraOriginalPosition(onErr?: onErr) {
        try {
            this.judgeLoad()
            const { camera, controls, box } = this
            camera.position.copy(box!.sizeWithScale); //设置摄像机的初始位置,乘上缩放倍数
            controls.target.copy(box!.centerWithScale); //设置摄像机旋转和放大等操作的目标点
        } catch (error) {
            console.error('相机归回原位 失败', error);
            onErr && onErr(error)
        }
    };

    /**有关于setting的一些函数 */
    private settingFn = {
        /**设置模块配置 */
        setSetting: <T extends keyof setting>(key: T, value: setting[T]) => {
            this.setting[key] = value
            localStorage.setItem('glbModelSetting', JSON.stringify(this.setting))//存到本地存储
            this.settingChangeCallback && this.settingChangeCallback(this.setting)
        },
        /**从本地存储读出设置,保存在实例中 */
        getSettingFromLocal: () => {
            const setting = JSON.parse(localStorage.getItem('glbModelSetting') || 'null') as setting | null
            if (setting) {
                this.setting = setting
            } else {
                this.setting = {
                    wireframe: false,
                    normal: false,
                    animation: false,
                    axesHelper: false,
                    gridHelper: false,
                    boundingBoxHelper: false,
                    bgcolor: "#000000"
                }
            }
        },
        /**根据setting,配置对应的模式 - 在加载模型后使用 */
        setFromLocal: () => {
            const setting = this.setting
            //设置这些设置的函数,都是 change + Xxxxx 形式的命名,所以下面直接遍历调用
            for (const key in setting) {
                if (Object.prototype.hasOwnProperty.call(setting, key)) {
                    const fnName = 'change' + key.slice(0, 1).toUpperCase() + key.slice(1)
                    try {
                        (this as any)[fnName]((setting as any)[key])
                    } catch (error) {
                        console.log('调用', fnName, '失败', error);
                    }
                }
            }
        }
    }
    /**判断是否加载完成,没完成的话会抛出错误,可以被catch捕获 */
    private judgeLoad = () => {
        if (!this.load) {
            throw '模型还未加载完成'
        }
    }
    /**窗口监听事件的卸载函数,在卸载时需要清除 */
    private resizeDestory!: () => void
    /**绑定窗口大小监听事件 */
    private resizeListen() {
        const { node, camera, renderer, scene } = this
        //下面这个监听,可能有性能问题吧,看左上角自带的性能指标,拖动时起伏很大,如果加节流的话,又会因为没有及时更新而大小不同
        /**创建 ResizeObserver 实例 */
        let observer: ResizeObserver | null = new ResizeObserver(entries => {
            for (let entry of entries) {
                const width = entry.contentRect.width;
                const height = entry.contentRect.height;
                camera.aspect = width / height; //设置新比例
                camera.updateProjectionMatrix(); //更新相机的投影矩阵
                renderer.setSize(width, height);
                renderer.render(scene, camera) //渲染
            }
        });
        observer.observe(node); // 开始观察目标元素
        this.resizeDestory = () => {
            observer!.unobserve(node);  // 停止观察目标元素
            observer!.disconnect();// 停止观察所有元素
            observer = null //垃圾回收
        }
    }
    /**当前canvas的动画key,在卸载时需要清除 */
    private animateKey: number = 0
    /**canvas动画,在这里更新数据并实时render渲染 */
    private animate = () => {
        this.animateKey = window.requestAnimationFrame(this.animate);
        const delta = this.clock.getDelta(); // 获取每帧的时间间隔,从而可以根据时间进行动画更新,使动画在不同的设备和性能下保持一致
        this.mixer!.update(delta); //更新动画
        this.controls.update(); //操作器更新
        this.stats.update(); //更新性能计算器
        this.renderer.render(this.scene, this.camera) //渲染
    }
}
export default GLBModel
/**初始化基础设备 */
const initBaseDevice = (node: HTMLElement) => {
    /**节点宽度 */
    const width = node.clientWidth;
    /**节点高度 */
    const height = node.clientHeight;

    /**渲染器 */
    const renderer = new THREE.WebGLRenderer({ antialias: true, alpha: true }); //antialias启用抗锯齿功能
    renderer.setPixelRatio(window.devicePixelRatio); //设置渲染器的设备像素比例的方法,在不同设备展示一样的东西
    renderer.setSize(width, height); //设置宽高
    node.appendChild(renderer.domElement); //挂载渲染器DOM

    /**摄像机 */
    const camera = new THREE.PerspectiveCamera(50, width / height, 0.1, 10000);

    /**创建场景 */
    const scene = new THREE.Scene();
    scene.background = new THREE.Color(0x000000); //场景背景色
    scene.environment = new THREE.PMREMGenerator(renderer).fromScene(new RoomEnvironment(renderer), 0.04).texture; //将场景的当前光照信息计算为环境贴图。第二个参数 0.04 指定了纹理的精度,数值越小表示精度越高,但计算时间也越长。

    /**操控摄像机的控制器 */
    const controls = new OrbitControls(camera, renderer.domElement);
    controls.update(); //更新控制器的状态。在动画函数中也需要执行
    controls.enablePan = true; //是否启用控制器的右键平移功能。
    controls.enableDamping = true; //是否启用惯性功能

    return {
        /**渲染器 */
        renderer,
        /**摄像机 */
        camera,
        /**场景 */
        scene,
        /**操控摄像机的控制器 */
        controls,
    };
};
/**初始化其它设备,如性能展示器、clock时钟 */
const initOtherDevice = (node: HTMLElement) => {
    /**用于在 WebGL 渲染中显示性能统计信息的工具 */
    const stats = new Stats();
    stats.dom.style.position = "absolute";
    node.appendChild(stats.dom); //挂载性能展示DOM

    /**clock对象,用于跟踪时间的流逝,并在动画循环中提供统一的时间更新 */
    const clock = new THREE.Clock();

    return {
        /**用于在 WebGL 渲染中显示性能统计信息的工具 */
        stats,
        /**clock对象,用于跟踪时间的流逝,并在动画循环中提供统一的时间更新 */
        clock,
    };
};
/**初始化三维坐标系、网格帮助器、包围盒帮助器 */
const initHelper = (size: number, center: THREE.Vector3, model: THREE.Group<THREE.Object3DEventMap>) => {
    /**AxesHelper:辅助观察的坐标系 */
    const axesHelper = new THREE.AxesHelper(size);
    axesHelper.position.copy(center); //三维坐标系的位置

    /**网格帮助器 */
    const gridHelper = new THREE.GridHelper(size, size);
    gridHelper.position.copy(center); //网格的位置

    /**新包围盒辅助展示 */
    const boundingBoxHelper = new THREE.BoxHelper(model); //创建一个BoxHelper对象,传入模型的网格对象作为参数
    boundingBoxHelper.material.color.set(0xff0000); //将包围盒的材质设置为红色

    return {
        /**辅助观察的帮助器 */
        helper: {
            /**辅助观察的坐标系 */
            axesHelper,
            /**网格帮助器 */
            gridHelper,
            /**包围盒轮廓,可以添加到场景中 */
            boundingBoxHelper,
        },
    };
};
/**获得模型包围盒的数据,并计算模型位置、缩放倍数,设置相机位置等,最后把模型添加到场景。 */
const getBoxAndScale = (model: THREE.Group<THREE.Object3DEventMap>, camera: THREE.PerspectiveCamera, controls: OrbitControls, scene: THREE.Scene) => {
    /**获取模型包围盒 */
    const boundingBox = new THREE.Box3().expandByObject(model);
    /**获取包围盒的size */
    const size = boundingBox.getSize(new THREE.Vector3()); //设置size
    /**中心坐标*/
    const center = boundingBox.getCenter(new THREE.Vector3()); // 计算包围盒中心坐标,并将中心坐标保存在center向量中
    /**设置的缩放倍数,根据实际情况进行调整 */
    const scale = 10 / Math.max(size.x, size.y, size.z); // 分母是期望的模型大小
    // const scale = 1;
    /**中心点的三维向量 * 放大值 */
    const centerWithScale = center.clone().multiplyScalar(scale);
    /**盒子的三维向量 * 放大值 */
    const sizeWithScale = size.clone().multiplyScalar(scale);

    // console.log("boundingBox", boundingBox);
    // console.log("size", size);
    // console.log("center", center);
    // console.log("scale", scale);
    // console.log("centerWithScale", centerWithScale);
    // console.log("sizeWithScale", sizeWithScale);

    model.scale.set(scale, scale, scale); //设置模型缩放倍率
    camera.position.copy(sizeWithScale); //设置摄像机的初始位置,乘上缩放倍数
    controls.target.copy(centerWithScale); //设置摄像机旋转和放大等操作的目标点
    scene.add(model); //把模型添加进去

    return {
        /**包围盒有关的信息 */
        box: {
            /**缩放倍率 */
            scale,
            /**放大后的中心点的三维向量 */
            centerWithScale,
            /**放大后的盒子的三维向量 */
            sizeWithScale,
        },
    };
};
/**获取模型上的全部动画,返回动画实例列表,后续操控实例列表即可 */
const getAnimations = (gltf: GLTF, mixer: THREE.AnimationMixer) => {
    const actionList: THREE.AnimationAction[] = [];
    // 遍历模型的动画数组,为个动画创建剪辑并添加到混合器中
    for (let i = 0; i < gltf.animations.length; i++) {
        const animation = gltf.animations[i];
        const action = mixer.clipAction(animation); //创建
        actionList.push(action);
        action.setLoop(THREE.LoopRepeat, Infinity); // 设置动画播放相关参数:循环模式、重复次数
        action.clampWhenFinished = true; // 动画在播放完成后会停留在最后一帧,不再继续播放  (但是上面设置了循环播放,所以不影响)
        // action.play(); // 播放动画
    }
    return actionList;
};
/**获取模型身上的原始材质,返回map */
const getOriginalMesh = (model: THREE.Group<THREE.Object3DEventMap>) => {
    const map = new Map<THREE.Mesh, THREE.Mesh["material"]>();
    //设置模型原始材质
    model.traverse((object) => {
        if (object instanceof THREE.Mesh) {
            map.set(object, object.material);
        }
    });
    return map;
};
其中 type.ts 本文件所需的部分内容如下: (完整内容在 三-1-(3) 里)
// /components/ShowModel/type.ts

//...

/**展示3D模型的组件Props */
export interface showModelProps {
  /**要展示的模型的URL */
  url: string;
  /**组件最外层的style。在这里面指定宽高等。不指定宽高,将会适配父元素宽高 */
  style?: CSSProperties;
  /**工具栏的扩展render。参数是内部数据  */
  toolBarRender?: (instance: GLBModel) => ReactNode;
}

/**各个工具的开关和设置等,外部只读 */
export interface setting {
  /**是否开启了骨架模式 */
  wireframe: boolean,
  /**是否开启了法线模式 */
  normal: boolean,
  /**是否开启了动画 */
  animation: boolean
  /**是否开启了坐标系 */
  axesHelper: boolean
  /**是否开启了网格 */
  gridHelper: boolean
  /**是否开启了包围盒 */
  boundingBoxHelper: boolean
  /**背景色,十六进制字符串 */
  bgcolor: string
}

/**失败的回调函数 */
export type onErr = (e: any) => void
三、示例 - 在React中使用
本文以react示例,演示如何封装组件
1. 封装组件
基于antd组件库,所以请先下载依赖(不想使用antd的话,可以把下文有关的组件替换成自己的)
npm i antd @ant-design/icons 或 yarn add antd @ant-design/icons(1)index.tsx
最主要的操作,其实就是下面这两步,做完就显示模型出来了,其它就是可视化的配置了。
const modelShow = new GLBModel(node) //创建实例
modelShow.loadGlb(url, ....... ); //加载模型
// /components/ShowModel/index.tsx

import cssStyle from "./index.module.css";
import { useState, useRef, useEffect } from "react";
import { Button, ColorPicker, Dropdown, Progress, Space, Switch } from "antd";
import { showTip } from "../../utils";
import GLBModel from "./GLBModel";
import { setting, showModelProps } from "./type";
import { DownOutlined } from "@ant-design/icons";

/**展示3D模型 */
export default function ShowModel({ url, style = {}, toolBarRender }: showModelProps) {
  /**用来承载three画布的容器 */
  const threeDivRef = useRef<HTMLDivElement>(null);
  const [progress, setProgress] = useState(0); //进度条,大于100时隐藏,小于0时代表加载失败
  const [instance, setInstance] = useState<GLBModel>(); //模型实例。
  const [setting, setSetting] = useState<setting>({
    wireframe: false,
    normal: false,
    animation: false,
    axesHelper: false,
    gridHelper: false,
    boundingBoxHelper: false,
    bgcolor: "#000000",
  }); //工具栏配置

  /**初始化模型并挂载 */
  const init = (node: HTMLDivElement) => {
    const modelShow = new GLBModel(node, (_setting) => setSetting({ ..._setting }));
    setInstance(modelShow);
    setProgress(0); //开始进度条
    modelShow.loadGlb(
      url,
      function (gltf) {
        setProgress(101); //隐藏进度条
      },
      function (e) {
        // 加载进度的处理逻辑,这里实际上是AJAX请求,如果是本地文件的话就不会有加载进度条
        if (e.lengthComputable) {
          const percentComplete = (e.loaded / e.total) * 100;
          if (percentComplete <= 100) {
            setProgress(parseInt(percentComplete.toFixed(2)));
          } else {
            //有时候会有超出100的情况
            setProgress(100);
          }
        }
      },
      function (e) {
        setProgress(-1); //错误进度条
        showTip("加载失败,请F12查看报错", "error", 5);
      }
    );
    return () => {
      modelShow.destory();
    };
  };
  /**自定义下拉框渲染 */
  const dropdownRender = () => {
    if (!instance) return <></>;
    const items = [
      <Switch
        onChange={(open) => instance.changeAxesHelper(open)}
        checkedChildren="坐标系"
        unCheckedChildren="坐标系"
        checked={setting.axesHelper}
      />,
      <Switch
        onChange={(open) => instance.changeGridHelper(open)}
        checkedChildren="网格面"
        unCheckedChildren="网格面"
        checked={setting.gridHelper}
      />,
      <Switch
        onChange={(open) => instance.changeBoundingBoxHelper(open)}
        checkedChildren="包围盒"
        unCheckedChildren="包围盒"
        checked={setting.boundingBoxHelper}
      />,
      <Button onClick={() => instance.cameraOriginalPosition()}>相机归位</Button>,
      <ColorPicker showText onChange={(_, hex) => instance.changeBgcolor(hex)} size="small" value={setting.bgcolor} />,
    ];
    return (
      <div style={

   { ...bgStyle, padding: "10px", borderRadius: "10px" }}>
        {items.map((k, i) => {
          return (
            <div key={i} style={

   { margin: "5px 0" }}>
              {k}
            </div>
          );
        })}
        {toolBarRender && toolBarRender(instance)}
      </div>
    );
  };

  useEffect(() => {
    if (!url) {
      showTip("请传递模型URL!", "error", 5);
      setProgress(-1);
      return;
    }
    //在react18的开发环境下,useEffect会执行两次,所以需要在return中消除副作用
    const dom = threeDivRef.current;
    if (dom) {
      setInstance(undefined);
      const destory = init(dom);
      return destory;
    }
  }, [url]);
  return (
    <div className={`${cssStyle.showModel}`} style={style}>
      {instance && progress > 100 && (
        <Space className="toolList" style={bgStyle}>
          <Switch onChange={(open) => instance.changeWireframe(open)} checkedChildren="骨架" unCheckedChildren="骨架" checked={setting.wireframe} />
          <Switch onChange={(open) => instance.changeNormal(open)} checkedChildren="法线" unCheckedChildren="法线" checked={setting.normal} />
          <Switch
            onChange={(open) => instance.changeAnimation(open, (e) => showTip(e, "error"))}
            checkedChildren="动画"
            unCheckedChildren="动画"
            checked={setting.animation}
          />
          <Dropdown dropdownRender={dropdownRender}>
            <DownOutlined className="cursor-pointer" />
          </Dropdown>
        </Space>
      )}
      <div className="canvasContain" ref={threeDivRef}></div>
      <div className="progress">
        <Progress
          type="dashboard"
          status={progress < 0 ? "exception" : "active"}
          percent={progress}
          style={

   { opacity: progress > 100 ? "0" : "1" }}
          strokeColor={

   { "0%": "#87d068", "50%": "#ffe58f", "100%": "#ffccc7" }}
        />
      </div>
      <div className="tip">
        鼠标左键可以旋转,右键可以进行平移,滚轮可以控制模型放大缩小
      </div>
    </div>
  );
}

const bgStyle = { backgroundImage: "linear-gradient(135deg, #fdfcfb 0%, #e2d1c3 100%)" };
(2)index.module.css
less版:
 /* /components/ShowModel/index.module.less  */

.showModel {
     width: 100%;
     height: 100%;
     position: relative;
     background-color: #000;


     :global {

         //工具栏
         .toolList {
             position: absolute;
             top: 0;
             right: 50%;
             transform: translate(50%);
             z-index: 99;
             display: flex;
             padding: 10px;
             border-bottom-right-radius: 10px;
             border-bottom-left-radius: 10px;
             opacity: 0.8;
             align-items: center;
         }

         //antd 圆环进度条中间文字的颜色
         .ant-progress-text {
             color: white !important;
         }

         //画布的容器
         .canvasContain {
             display: flex;
             align-items: center;
             justify-content: center;
             width: 100%;
             height: 100%;
             position: relative;
         }

         //进度条
         .progress {
             position: absolute;
             top: 50%;
             left: 50%;
             transform: translate(-50%, -50%);
             z-index: 9999;
             color: white;

             .ant-progress {
                 transition: all 1s;
             }
         }

         //提示
         .tip {
             position: absolute;
             bottom: 0;
             left: 50%;
             transform: translate(-50%);
             font-weight: 900;
             white-space: nowrap;
             color: white;
         }

     }

 }
css版
 /* /components/ShowModel/index.module.css */

.showModel {
  width: 100%;
  height: 100%;
  position: relative;
  background-color: #000;
}
.showModel :global .toolList {
  position: absolute;
  top: 0;
  right: 50%;
  transform: translate(50%);
  z-index: 99;
  display: flex;
  padding: 10px;
  border-bottom-right-radius: 10px;
  border-bottom-left-radius: 10px;
  opacity: 0.8;
  align-items: center;
}
.showModel :global .ant-progress-text {
  color: white !important;
}
.showModel :global .canvasContain {
  display: flex;
  align-items: center;
  justify-content: center;
  width: 100%;
  height: 100%;
  position: relative;
}
.showModel :global .progress {
  position: absolute;
  top: 50%;
  left: 50%;
  transform: translate(-50%, -50%);
  z-index: 9999;
  color: white;
}
.showModel :global .progress .ant-progress {
  transition: all 1s;
}
.showModel :global .tip {
  position: absolute;
  bottom: 0;
  left: 50%;
  transform: translate(-50%);
  font-weight: 900;
  white-space: nowrap;
  color: white;
}
(3)type.ts
 /* /components/ShowModel/type.ts */

import { CSSProperties, ReactNode } from "react";
import GLBModel from "./GLBModel";


/**展示3D模型的组件Props */
export interface showModelProps {
  /**要展示的模型的URL */
  url: string;
  /**组件最外层的style。在这里面指定宽高等。不指定宽高,将会适配父元素宽高 */
  style?: CSSProperties;
  /**工具栏的扩展render。参数是内部数据  */
  toolBarRender?: (instance: GLBModel) => ReactNode;
}


/**各个工具的开关和设置等,外部只读 */
export interface setting {
  /**是否开启了骨架模式 */
  wireframe: boolean,
  /**是否开启了法线模式 */
  normal: boolean,
  /**是否开启了动画 */
  animation: boolean
  /**是否开启了坐标系 */
  axesHelper: boolean
  /**是否开启了网格 */
  gridHelper: boolean
  /**是否开启了包围盒 */
  boundingBoxHelper: boolean
  /**背景色,十六进制字符串 */
  bgcolor: string
}

/**失败的回调函数 */
export type onErr = (e: any) => void
(4)utils
在上面用到了一个弹窗提示函数
/* /utils/index.ts */


/**使用antd做弹窗,展示信息
* @param content 要提示的文字,或者一个ReactNode
* @param type 类型,默认"success"。
* @param duration 显示时间,单位s,默认2s ,0代表不关闭
* @param key 每个message唯一的key, 可以用于destroy。默认为当前时间戳
* @returns 返回弹窗实例,可以进行.then等
*/
export function showTip(content: ReactNode | string, type: NoticeType = 'success', duration: number = 2, key: any = new Date().getTime()) {
    return AntdMessage.open({
        type,
        content,
        duration,
        key,
        style: { zIndex: 99999 }
    })
}
2.测试示例
任意一个想使用的地方中
import ShowModel from "./components/ShowModel";

const App = () => {
  return (
    <div style={

   { width: "100vw", height: "100vh" }}>
      <ShowModel url="https://threejs.org/examples/models/gltf/LittlestTokyo.glb"></ShowModel>
    </div>
  );
};
export default App;
四、结语
虽然说,理论上是可以支持不同框架使用,但是我还没测试过Vue,只测试了Next和react,如果是别的框架的可以尝试试试哦 。基于class封装,就是为了能够和封装组件时解耦,所以理论上是可以支持不同框架使用的
最主要的操作,其实就是下面这两步,做完就显示模型出来了,其它就是可视化的配置了。
         const modelShow = new GLBModel(node)  //创建实例
         modelShow.loadGlb(url, ....... );  //加载模型