目录
(一)手机设置(根据个人手机型号,自行上网查找开发者模式设置)
一、基础知识
(一)通知创建
创建通知渠道至少需要知道渠道的ID、渠道名称以及重要等级这三个参数。
1.渠道ID
可以随意定义,但需要保证全局唯一。
2.渠道名称
给用户看的,表达渠道的用途。
3.通知的重要等级
主要有IMPORTANCE_HIGH、IMPORTANCE_DEFAUILT、IMPORTANCE_LOW、IMPORTANCE_MIN,对应重要程度依次从高到低,不同的重要等级决定通知的不同行为。
(二)通知设置
| 方法名 | 用途 |
| .setContentTitle() | 添加标题 |
| .setContentText() | 添加显示内容 |
| .setStyle(NotificationCompat.BigTextStyle().bigText()) | 添加长内容(点击进去的显示) |
| .setSmallIcon() | 设置简单的小图标 |
| .setLargeIcon() | 设置大图标 |
| .setAutoCancel() | 设置点击之后的通知是否消失(true消失,false不消失) |
| .setContentIntent(pendingIntent) | 载入自己设置的pendingIntent,在通知栏中点击该信息之后的跳转 |
(三)pendingItent和Itent的区别
Intent
可以及时启动执行。
PendingIntent
一种延迟执行的Itent,需要通过getActivit,getBroadcas,getService得到pendingintent的实例。可以显示点击之后再执行。
二、准备工作
(一)手机设置(根据个人手机型号,自行上网查找开发者模式设置)
1.连接
手机数据线进行与电脑连接
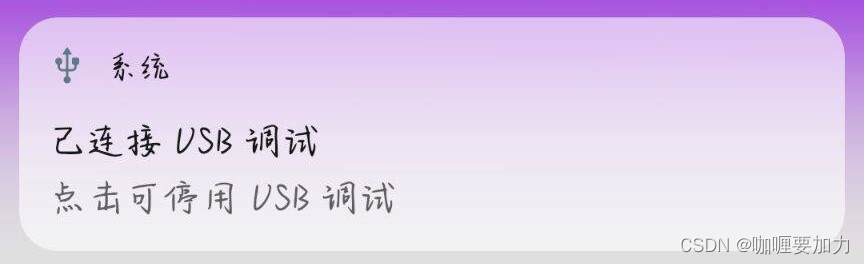
2.更改设置(否则无法手机安装)
系统和更新~开发者选项~调试~usb调试(开启)
有如下显示:
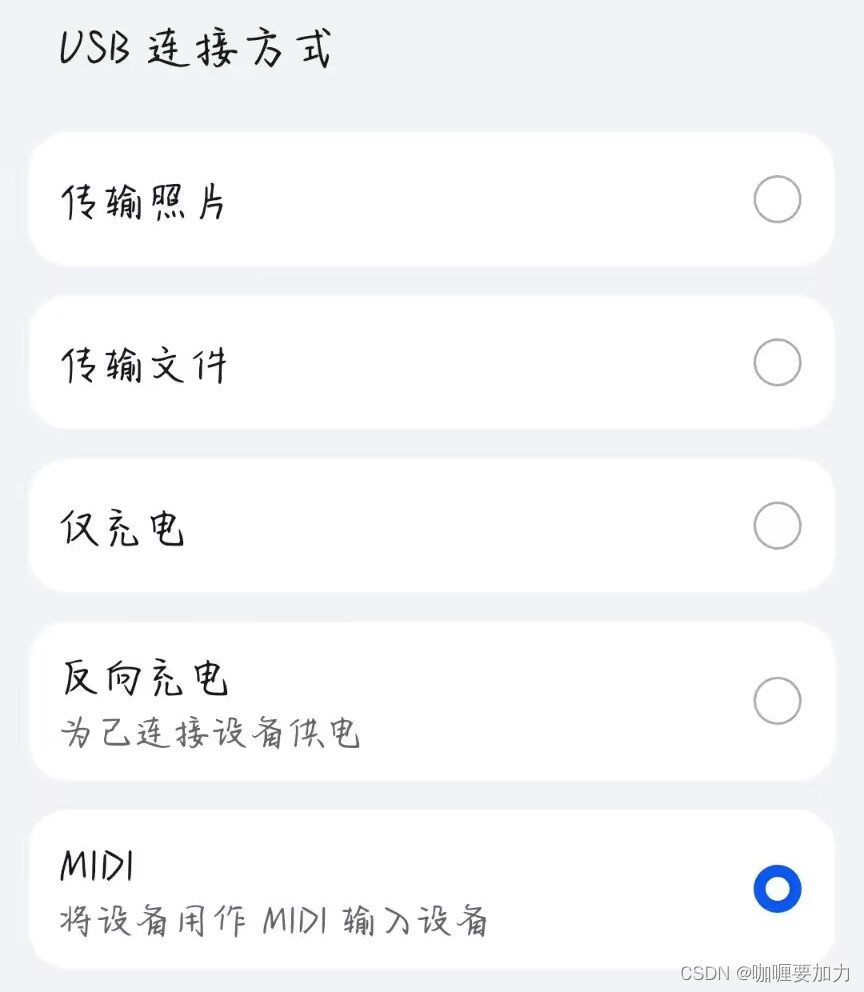
3.更改USB连接方式如下
(二)电脑设置
当以上成功设置后,点击项目下方的 Locat,下拉选择自己的手机,即可连接成功。

三、项目搭建
(一)布局设置
<Button
        android:id="@+id/buttton1"
        android:layout_width="match_parent"
        android:layout_height="wrap_content"
        android:text="notice"
        />
(二)项目准备
1.授权通知
在AndroidManifest.xml中添加下面的权限授予
<uses-permission android:name="android.permission.POST_NOTIFICATIONS" />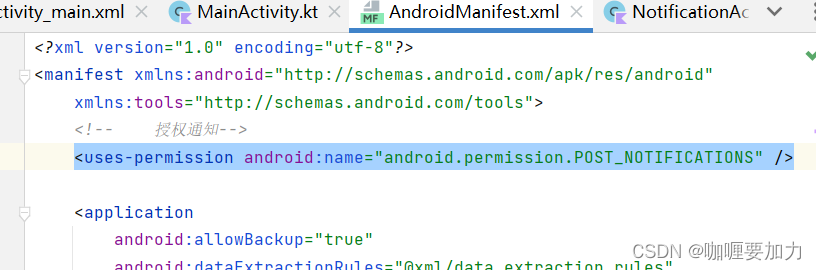
2.建立连接
val sendNotice:Button=findViewById(R.id.buttton1)3.获取当前系统的服务--通知服务
val manager=getSystemService(Context.NOTIFICATION_SERVICE) as NotificationManager4.创建通知
if (Build.VERSION.SDK_INT >= 26){//本项目是26,可写为Build.VERSION_CODES.O来获取
            //8.0引入channel
            //创建通道,第一个ID,第二个名称,第三个重要等级
            val channel = NotificationChannel("normal","warn",NotificationManager.IMPORTANCE_DEFAULT)
            //normal全局为1
            manager.createNotificationChannel(channel)//创建
        }
5.建立监听,实现点击后弹出通知
sendNotice.setOnClickListener {
            val intent = Intent(this,NotificationActivity::class.java)//引用
            val pi = PendingIntent.getActivity(this,0,intent,0)
            val notification = NotificationCompat.Builder(this,"normal")
        //context是上下文指针,channelled与上文id匹配
                .setContentTitle("警告")
                .setContentText("前方的区域以后再来探索吧")
                .setSmallIcon(R.drawable.ic_launcher_foreground)
                .setStyle(NotificationCompat.BigTextStyle().bigText("1 调试自己的手机,配置自己的手机为开发者模式\n" +
                        "\n" +
                        "2 运行安卓,在模拟器运行选择上,选择自己的手机\n" +
                        "\n" +
                        "3 创建3个通知,观察每个通知的详细内容\n"))
                .setAutoCancel(true)//点进通告,通知栏的通告会消失

                .setContentIntent(pi)//载入pi
                .build()
            manager.notify(1,notification)//第一个参数是通知标签
        }
(三)完整代码
AndroidManifest.xml
<?xml version="1.0" encoding="utf-8"?>
<manifest xmlns:android="http://schemas.android.com/apk/res/android"
    xmlns:tools="http://schemas.android.com/tools">
    <!--    授权通知-->
    <uses-permission android:name="android.permission.POST_NOTIFICATIONS" />

    <application
        android:allowBackup="true"
        android:dataExtractionRules="@xml/data_extraction_rules"
        android:fullBackupContent="@xml/backup_rules"
        android:icon="@mipmap/ic_launcher"
        android:label="@string/app_name"
        android:supportsRtl="true"
        android:theme="@style/Theme.124"
        tools:targetApi="31">
        <activity
            android:name=".NotificationActivity"
            android:exported="false" />
        <activity
            android:name=".MainActivity"
            android:exported="true">
            <intent-filter>
                <action android:name="android.intent.action.MAIN" />

                <category android:name="android.intent.category.LAUNCHER" />
            </intent-filter>
        </activity>
    </application>

</manifest>
Activity.xml
<?xml version="1.0" encoding="utf-8"?>
<androidx.coordinatorlayout.widget.CoordinatorLayout xmlns:android="http://schemas.android.com/apk/res/android"
    xmlns:app="http://schemas.android.com/apk/res-auto"
    xmlns:tools="http://schemas.android.com/tools"
    android:layout_width="match_parent"
    android:layout_height="match_parent"
    tools:context=".MainActivity">
    <Button
        android:id="@+id/buttton1"
        android:layout_width="match_parent"
        android:layout_height="wrap_content"
        android:text="notice"
        />

</androidx.coordinatorlayout.widget.CoordinatorLayout>
Activity.kt
package com.example.a124

import android.app.Notification
import android.app.NotificationChannel
import android.app.NotificationManager
import android.app.PendingIntent
import android.content.Context
import android.content.Intent
import android.os.Build
import androidx.appcompat.app.AppCompatActivity
import android.os.Bundle
import android.widget.Button
import androidx.core.app.NotificationCompat

class MainActivity : AppCompatActivity() {
    override fun onCreate(savedInstanceState: Bundle?) {
        super.onCreate(savedInstanceState)
        setContentView(R.layout.activity_main)
        val sendNotice:Button=findViewById(R.id.buttton1)
        val manager=getSystemService(Context.NOTIFICATION_SERVICE) as //获取相应服务
                NotificationManager
        if (Build.VERSION.SDK_INT >= 26){
            //8.0引入channel
            //创建通道
            val channel = NotificationChannel("normal","warn",NotificationManager.IMPORTANCE_DEFAULT)
            //normal全局为1
            manager.createNotificationChannel(channel)//创建
        }
        sendNotice.setOnClickListener {
            val intent = Intent(this,NotificationActivity::class.java)//引用
            val pi = PendingIntent.getActivity(this,0,intent,0)
            val notification = NotificationCompat.Builder(this,"normal")
        //context是上下文指针,channelled与上文id匹配
                .setContentTitle("警告")
                .setContentText("前方的区域以后再来探索吧")
                .setSmallIcon(R.drawable.ic_launcher_foreground)
                .setStyle(NotificationCompat.BigTextStyle().bigText("1 调试自己的手机,配置自己的手机为开发者模式\n" +
                        "\n" +
                        "2 运行安卓,在模拟器运行选择上,选择自己的手机\n" +
                        "\n" +
                        "3 创建3个通知,观察每个通知的详细内容\n"))
                .setAutoCancel(true)//点进通告,通知栏的通告会消失

                .setContentIntent(pi)//载入pi
                .build()
            manager.notify(1,notification)//第一个参数是通知标签
        }

    }
}
NotificationActivity.kt
package com.example.a124

import androidx.appcompat.app.AppCompatActivity
import android.os.Bundle

class NotificationActivity : AppCompatActivity() {
    override fun onCreate(savedInstanceState: Bundle?) {
        super.onCreate(savedInstanceState)
        setContentView(R.layout.activity_notification)
    }
}