Web服务Openlab的搭建
网站需求:
-
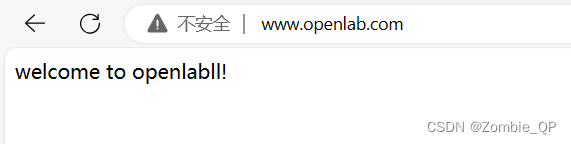
基于域名 www.openlab.com 可以访问网站内容为 welcome to openlab!!!
-
给该公司创建三个子界面分别显示学生信息,教学资料和缴费网站
-
基于 www.openlab.com/student 网站访问学生信息,
-
基于 www.openlab.com/data 网站访问教学资料
-
基于 www.openlab.com/money 网站访问缴费网站。
要求
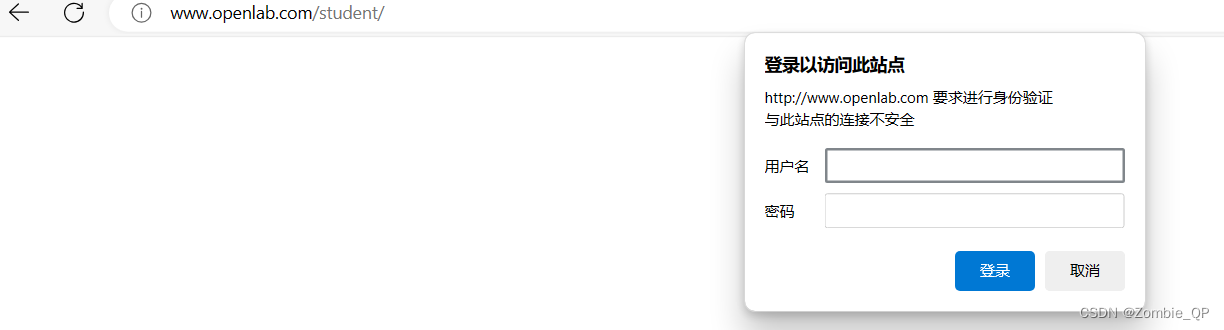
(1)学生信息网站只有 song 和 tian 两个用户可以访问,其他用户不能访问。
(2)访问缴费网站实现数据加密基于 https 访问。
第一步:创建openlab
配置文件:
vim /etc/httpd/conf.d/vhost.conf
cat /httpd/conf.dvhost.conf

<directory /openlab>
allowoverride none
require all granted
</directory>
<virtualhost 192.168.198.134:80>
servername www.openlab.com
documentroot /openlab
配置完成后,需要创建一个openlab文件
mkdir /openlab      #创建文件openlab
echo welcome to openlab!!! > /openlab/index.html   #给网页写入内容
systemctl restart httpd #切记重启HTTPD
输出结果:

根据题目要求需要域名访问,故此还需要在主机hosts配置文件加入ip对应的域名
vim /etc/hosts/ #192.168.198.134 www.openlab.com
第一步就完成啦!
第二步:配置文件(student)
vim /etc/httpd/conf.d/vhost1.conf
cat  /etc/httpd/conf.d/vhost1.conf
<directory /openlab>
allowoverride none
require all granted
</directory>
<directory /openlab/student>
authtype basic
authname "This is a private directory,Please Login: "
authuserfile /etc/httpd/student
require user song tian
</directory>
<virtualhost 192.168.198.134:80>
servername www.openlab.com/student
alias /student /openlab/student
documentroot /openlab/student
</virtualhost>
创建student在openlab下面,并且写入信息
mkdir /openlab/student
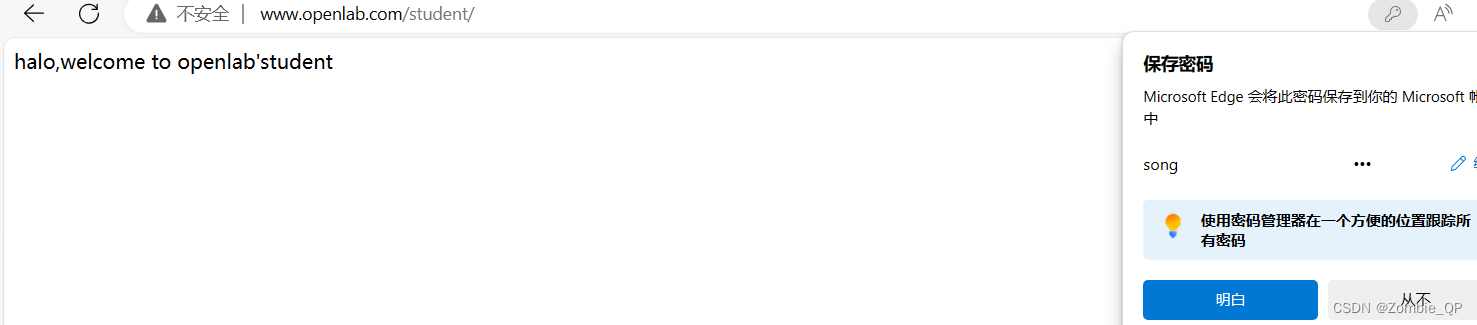
echo "halo,welcome to openlab'student" > /openlab/student/index.html
htpasswd -c /etc/httpd/student song
htpasswd /etc/httpd/student tian
systemctl restart httpd
输出结果:
第三步:配置文件(data)
vim /etc/httpd/conf.d/vhost2.conf
cat /etc/httpd/conf.d/vhost2.conf
<directory /openlab>
allowoverride none
require all granted
</directory>
<virtualhost 192.168.198.134:80>
servername www.openlab.com/data
alias /data /openlab/data
documentroot /openlab/data
</virtualhost>
创建data在openlab里面,及输入信息
mkdir /openlab/data
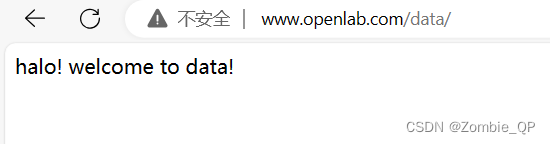
echo "halo! welcome to data!" > /openlab/data/index.html
systemctl restart httpd
运行结果:
第四步:配置文件(money)
vim /etc/httpd/conf.d/vhost3.conf
cat /etc/httpd/conf.d/vhost3.conf
<directory /openlab>
allowoverride none
require all granted
</directory>
<virtualhost 192.168.198.134:443>
servername www.openlab.com/money
documentroot /openlab/money
SSLEngine on
SSLCertificateFile /etc/pki/tls/certs/qp.crt
SSLCertificateKeyFile /etc/pki/tls/private/qp.key
</virtualhost>
创建money在openlab目录下面,并写入网页信息
mkdir /openlab/money
echo "halo,welcome to openlab'money" > /openlab/money/index.html
openssl genrsa > qp.key
openssl req -utf8 -new -key qp.key -x509 -days 100 -out qp.crt
systemctl restart httpd
运行结果: