文章目录
前言
Vue 支持模块化和组件化开发,可以将整个页面进行模块化分割,低耦合高内聚,使得代码可以在各个地方使用。
知识点
- 组件注册
- 组件复用
- 组件通信
- 动态组件
- 实例生命周期
- 生命周期示意图
组件注册
组件分为全局组件和局部组件。
全局注册
Vue.component() 方法注册全局组件。
<!DOCTYPE html>
<html lang="en">
<head>
<meta charset="UTF-8" />
<meta name="viewport" content="width=device-width, initial-scale=1.0" />
<meta http-equiv="X-UA-Compatible" content="ie=edge" />
<title>vue</title>
<script src="vue.min.js"></script>
</head>
<body>
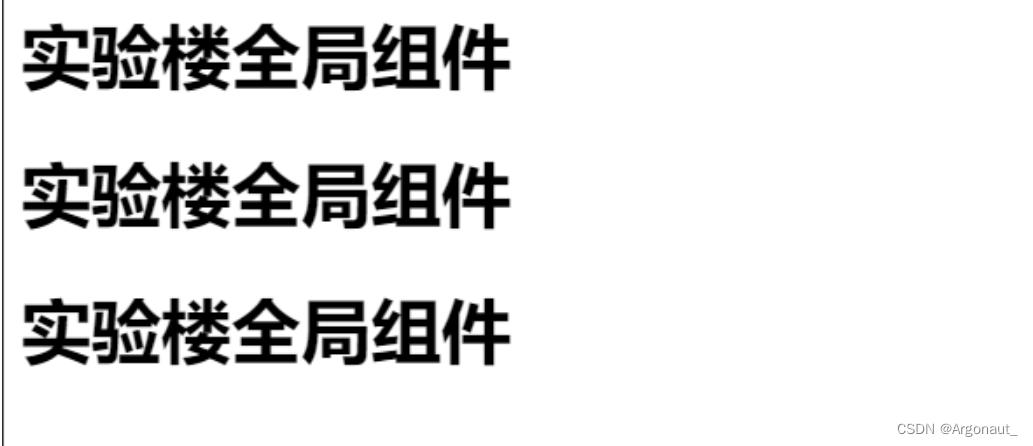
<div id="app">
<syl></syl>
<syl></syl>
<syl></syl>
</div>
<script>
// Vue.component(组件名字,template:{元素标签})
Vue.component("syl", {
template: "<h1>实验楼全局组件</h1>",
});
var app = new Vue({
el: "#app",
});
</script>
</body>
</html>
局部组件
在父级 components 对象中声明,局部组件只有它的父级才能调用。
var header = new Vue({
  el: "#header",
  // 子组件必须声明后使用,不然不能起效
  components: {
    "syl-header": childComponent,
  },
});
局部组件使用:
<!DOCTYPE html>
<html lang="en">
  <head>
    <meta charset="UTF-8" />
    <meta name="viewport" content="width=device-width, initial-scale=1.0" />
    <meta http-equiv="X-UA-Compatible" content="ie=edge" />
    <title>vue</title>
    <script src="vue.min.js"></script>
  </head>

  <body>
    <div id="header">
      <syl-header></syl-header>
    </div>
    <div id="mid">
      <syl-mid></syl-mid>
    </div>
    <script>
      // 头部组件
      var childComponent = {


        template: "<h2>我是实验楼局部组件header,只有我们父级才能调用</h2>",
      };
      // 中间部分组件
      var childComponent2 = {


        template: "<h2>我是实验楼局部组件mid,只有我们父级才能调用</h2>",
      };
      // header vm
      var header = new Vue({


        el: "#header",
        // 子组件必须声明后使用,不然不能起效
        components: {


          "syl-header": childComponent,
        },
      });
      var mid = new Vue({


        el: "#mid",
        // 子组件必须声明后使用,不然不能起效
        components: {


          "syl-mid": childComponent2,
        },
      });
    </script>
  </body>
</html>

组件复用
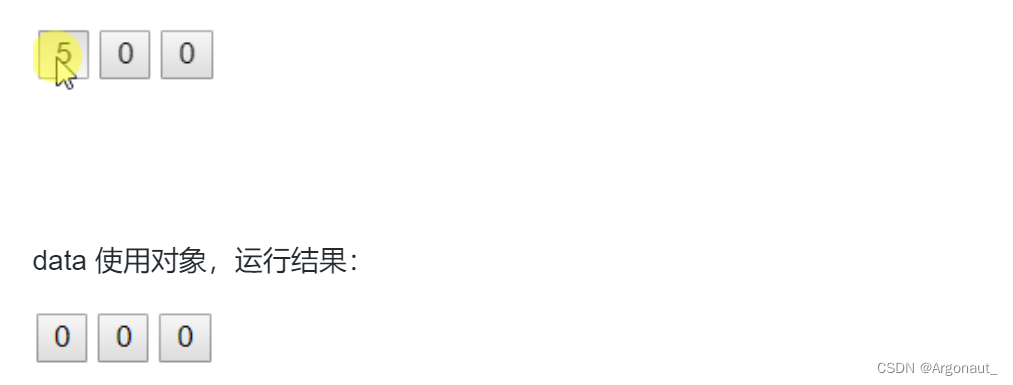
组件的优点就在于能够复用,一次代码编写,整个项目受用。
注意: 复用组件内的 data 必须是一个函数,如果是一个对象(引用类型),组件与组件间会相互影响,组件数据不能独立管理。
<!DOCTYPE html>
<html lang="en">
  <head>
    <meta charset="UTF-8" />
    <meta name="viewport" content="width=device-width, initial-scale=1.0" />
    <meta http-equiv="X-UA-Compatible" content="ie=edge" />
    <title>vue</title>
    <script src="vue.min.js"></script>
  </head>

  <body>
    <div id="app">
      <button-counter></button-counter>
      <button-counter></button-counter>
      <button-counter></button-counter>
    </div>
    <script>
      // 注册一个全局可复用组件
      Vue.component("button-counter", {


        // data 必须是一个函数不然会影响其他组件
        data() {


          return {


            counter: 0,
          };
        },
        template: '<button @click="counter++">{

      {counter}}</button>',
      });
      var app = new Vue({


        el: "#app",
      });
    </script>
  </body>
</html>
组件间通信
组件之间也面临着数据流动,也可以进行通信。下面我们来学习组件间的通信。
父子组件之 props
props 是一个单向的数据流,只允许父组件向子组件传值,值类型可以是一个数值、字符、布尔值、数值、对象,子组件需要显式地用 props 选项声明 “prop”。
注意:HTML 中的特性名是大小写不敏感的,所以浏览器会把所有大写字符解释为小写字符。这意味着当你使用 DOM 中的模板时,camelCase (驼峰命名法) 的 prop 需要使用其等价的 kebab-case (短横线分隔命名) 命名,如下面例子:
<!DOCTYPE html>
<html lang="en">
<head>
<meta charset="UTF-8" />
<meta name="viewport" content="width=device-width, initial-scale=1.0" />
<meta http-equiv="X-UA-Compatible" content="ie=edge" />
<title>vue</title>
<script src="vue.min.js"></script>
</head>
<body>
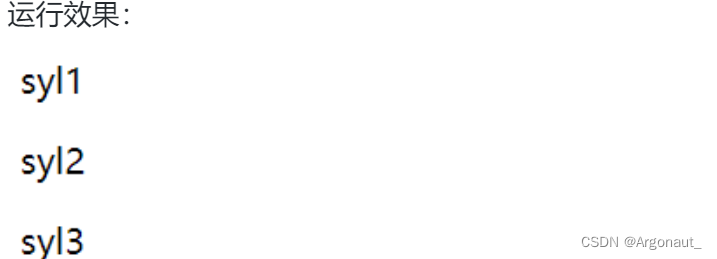
<div id="app">
<title-component post-title="syl1"></title-component>
<title-component post-title="syl2"></title-component>
<title-component post-title="syl3"></title-component>
</div>
<script>
// 注册一个 title 组件,通过传入不同的 title 值,渲染不同的东西
// 组件上 传递的 props 属性名为 kebab-case(短横线分隔命名)的要转换为驼峰命名
Vue.component("title-component", {
props: ["postTitle"], // post-title 转换为驼峰命名
template: "<p>{
{postTitle}}</p>",
});
var app = new Vue({
el: "#app",
});
</script>
</body>
</html>
props 类型检测
到这里,我们只看到了以字符串数组形式列出的 prop:
props: ["postTitle"];
但是,通常你希望每个 prop 都有指定的值类型。这时,你可以以对象形式列出 prop,这些属性的名称和值分别是 prop 各自的名称和类型:
props:{
    title:String,
    id:Number,
    content:String
}
<!DOCTYPE html>
<html lang="en">
  <head>
    <meta charset="UTF-8" />
    <meta name="viewport" content="width=device-width, initial-scale=1.0" />
    <meta http-equiv="X-UA-Compatible" content="ie=edge" />
    <title>vue</title>
    <script src="vue.min.js"></script>
  </head>

  <body>
    <div id="app">
      <child-component
        id="1"
        title="hello syl"
        content="you are welcom"
      ></child-component>
    </div>
    <script>
      // 注册一个子组件
      Vue.component("child-component", {


        // props 对象形式,传递属性值 进行类型检测,在脚手架环境中很有用
        props: {


          id: Number,
          title: String,
          content: String,
        },
        // 使用 es6 模板字符串书写格式更优美
        template: `<div><p>id:{

       {id}}</p><p>title:{

       {title}}</p><p>content:{

       {content}}</p></div>`,
      });
      var app = new Vue({


        el: "#app",
      });
    </script>
  </body>
</html>
子父组件通信之 emit
上面提到 props 实现父向子组件传递数据是单向流的,那么,如何实现子组件向父组件通信呢?这里要使用自定义事件 emit 方法,通过自定义事件来由下到上的数据流动。
语法如下:
this.$emit('自定义事件名',参数)
<!DOCTYPE html>
<html lang="en">
<head>
<meta charset="UTF-8" />
<meta name="viewport" content="width=device-width, initial-scale=1.0" />
<meta http-equiv="X-UA-Compatible" content="ie=edge" />
<title>vue</title>
<script src="vue.min.js"></script>
</head>
<body>
<div id="app">
<child-component v-on:send-msg="getMsg"></child-component>
</div>
<script>
// 定义一个子组件,template 绑定 click 事件
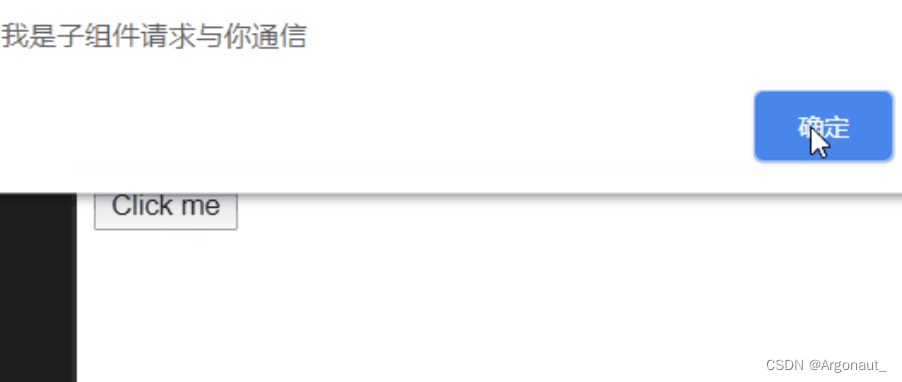
// 当 click 事件触发就使用 emit 自定义一个事件 send-msg,传入参数 “我是子组件请求与你通信”
// $emit('send-msg','我是子组件请求与你通信')
// 子组件标签上绑定自定义事件 send-msg,并绑定上父级的方法 getMsg,即可完成了子父组件通信
// <child-component v-on:send-msg="getMsg"></child-component>
Vue.component("child-component", {
template: `
<button v-on:click="$emit('send-msg','我是子组件请求与你通信')">
Click me
</button>
`,
});
var app = new Vue({
el: "#app",
methods: {
getMsg: function (msg) {
// 弹出子组件传递的信息
alert(msg);
},
},
});
</script>
</body>
</html>
子组件向父组件数据传递套路:
- 第一步:子组件绑定事件。
- 第二步:子组件绑定事件触发,使用 $emit 创建自定义事件并传入需要传值给父组件的数据。
- 第三步:在子组件标签上 用 v-on 绑定自定义事件,在父组件中声明自定义事件处理的方法。
- 第四步:父组件方法,接受自定义事件传的参数,就完成了整个由下到上的数据流。
动态组件
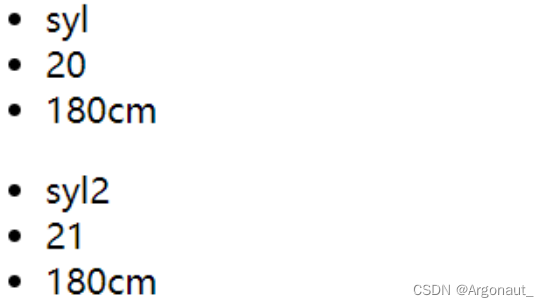
上面例子我们传值都是直接传的固定值,其实动态传值我们也支持,生成动态组件,使用 v-bind 动态绑定 props 值。
<!DOCTYPE html>
<html lang="en">
  <head>
    <meta charset="UTF-8" />
    <meta name="viewport" content="width=device-width, initial-scale=1.0" />
    <meta http-equiv="X-UA-Compatible" content="ie=edge" />
    <title>vue</title>
    <script src="vue.min.js"></script>
  </head>

  <body>
    <div id="app">
      <!-- 使用 v-bind 简写模式 动态绑定 props 值 -->
      <child-component
        :name="name"
        :age="age"
        :height="height"
      ></child-component>
      <child-component
        :name="name+'2'"
        :age="age+1"
        :height="height"
      ></child-component>
    </div>
    <script>
      // 定义一个子组件
      Vue.component("child-component", {


        // 使用属性类型检测
        props: {


          name: String,
          age: Number,
          height: String,
        },
        template: `
            <ul>
                <li>{

       {name}}</li>
                <li>{

       {age}}</li>
                <li>{

       {height}}</li>
            </ul>
            `,
      });
      var app = new Vue({


        el: "#app",
        data() {


          return {


            name: "syl",
            age: 20,
            height: "180cm",
          };
        },
      });
    </script>
  </body>
</html>
生命周期函数
接触了组件后,应该需要了解整个实例的生命周期是怎么样的,有哪些钩子函数,在哪个阶段我们能操作什么,实例在不同的阶段都会抛出不同的钩子函数,方便开发者能够精确的控制整个流程。
<!DOCTYPE html>
<html lang="en">
  <head>
    <meta charset="UTF-8" />
    <meta name="viewport" content="width=device-width, initial-scale=1.0" />
    <meta http-equiv="X-UA-Compatible" content="ie=edge" />
    <title>vue</title>
    <script src="vue.min.js"></script>
  </head>

  <body>
    <div id="app">
      <button @click="handleClick">{

   {name}}</button>
    </div>
    <script>
      var app = new Vue({


        el: "#app",
        data() {


          return {


            name: "syl",
          };
        },
        methods: {


          handleClick: function () {


            this.name = "syl syl";
          },
        },
        beforeCreate() {


          alert(
            "在实例初始化之后,数据观测 (data observer) 和 event/watcher 事件配置之前被调用"
          );
        },
        created() {


          alert(
            "在实例创建完成后被立即调用,挂载阶段还没开始,$el 属性目前不可见"
          );
        },
        beforeMount() {


          alert("在挂载开始之前被调用:相关的 render 函数首次被调用");
        },
        mounted() {


          alert("el 被新创建的 vm.$el 替换,并挂载到实例上去之后调用该钩子");
        },
        beforeUpdate() {


          alert("数据更新时调用");
        },
        updated() {


          alert("组件 DOM 已经更新");
        },
        beforeDestroy() {

      },
        destroyed() {

      },
      });
    </script>
  </body>
</html>
这么多钩子函数我们经常主要用到有:
- 1.created 钩子函数内我们可以进行异步数据请求。
created() {
    fetch('url')
    .then(function(response) {
        console.log(response)
    })
}
- 2.mounted 我们可以直接操作元素 DOM 了,但是并不推荐这样做,不利于性能提升。
<!DOCTYPE html>
<html lang="en">
  <head>
    <meta charset="UTF-8" />
    <meta name="viewport" content="width=device-width, initial-scale=1.0" />
    <meta http-equiv="X-UA-Compatible" content="ie=edge" />
    <title>vue</title>
    <script src="vue.min.js"></script>
  </head>

  <body>
    <div id="app">
      <div id="box" style="width:40px;background: tomato;">点击</div>
    </div>
    <script>
      var app = new Vue({


        el: "#app",
        data() {


          return {

      };
        },
        // div#box 开始并没有绑定事件,挂载后我们直接操作原生 dom
        mounted() {


          var box = document.querySelector("#box");

          box.addEventListener("click", function () {


            alert("我们挂载后 原生点击事件");
          });
        },
      });
    </script>
  </body>
</html>
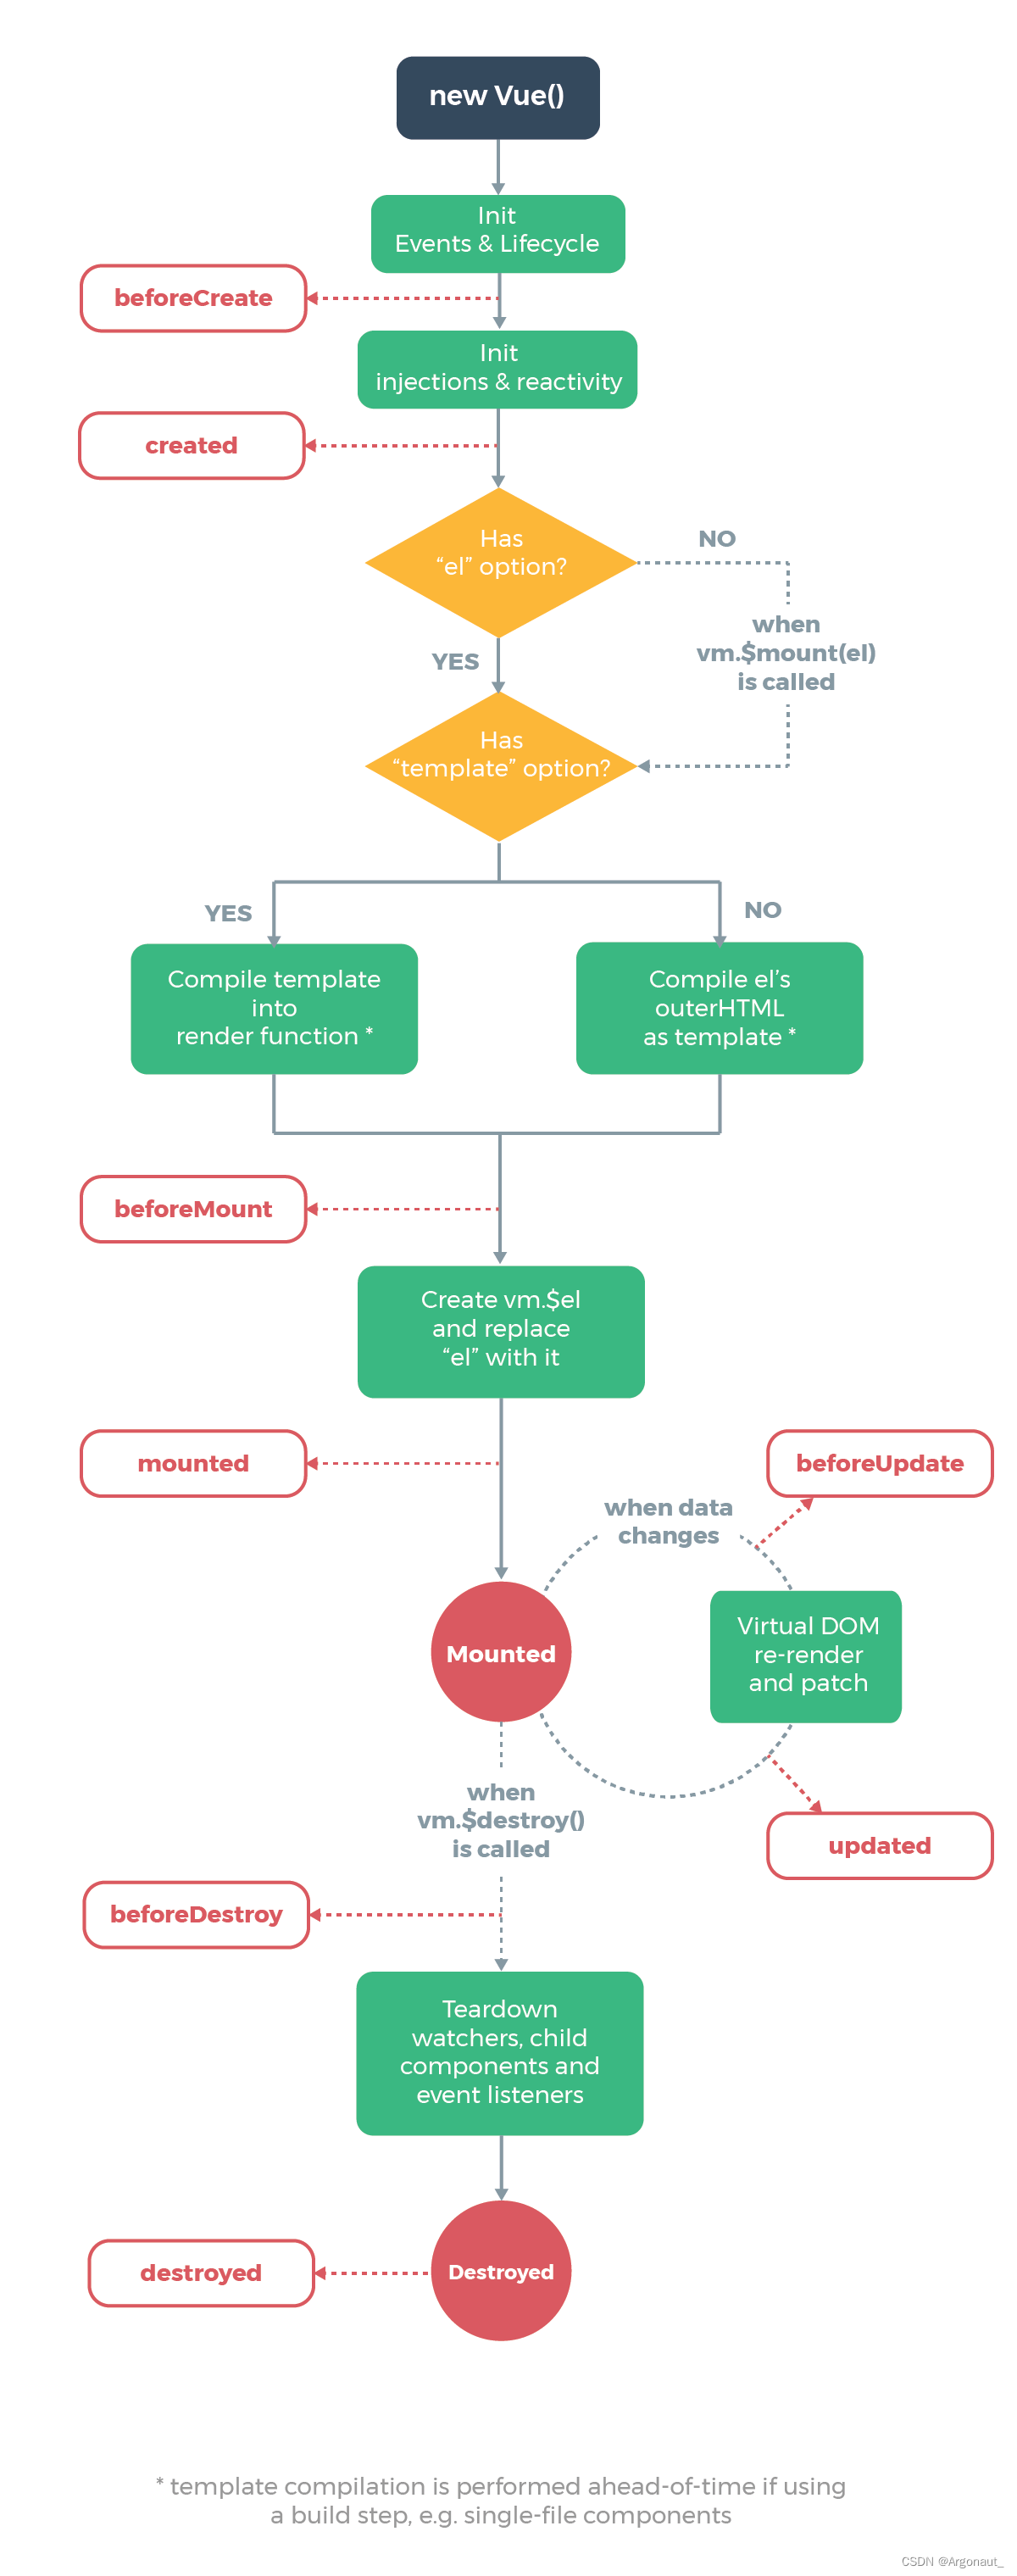
生命周期示意图
一个 Vue 实例从创建到销毁的完善周期,以及相关周期,向外抛出的钩子函数。