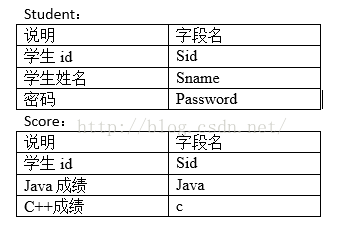
用Myeclipse新建web项目jsp+javabean,具体功能如下:
A. 创建与数据表相对应的javabean
B. 创建一个用户登录页面 ,输入用户名和密码;
C. 创建一个连接数据库、及数据库操作的javabean(DateDao),用来连接数据库、执行数据库操作
D. 登录页面提交时,servlet使用DateDao进行登录验证;登录成功跳转到显示登录用户成绩的页面,登录失败跳转到登录页面;
1、创建Bean
package com.Server;

import java.io.Serializable;

public class Student implements Serializable
{
private int student_id;
private String student_name;
private int student_password;


public Student(String name,int password)
{
	this.student_name=name;
	this.student_password=password;
}


public void setStudent_id(int student_id)
	{
	this.student_id = student_id;
	}
public int getStudent_id()
	{
	return student_id;
	}


public void setStudent_name(String student_name)
	{
	this.student_name = student_name;
	}
public String getStudent_name()
	{
	return student_name;
	}


public void setStudent_password(int student_password)
	{
	this.student_password = student_password;
	}
public int getStudent_password()
	{
	return student_password;
	}


}
2、用户登录界面JSP、显示成绩JSP
<%@ page language="java" contentType="text/html; charset=utf-8"
    pageEncoding="utf-8"%>
<%@ page import="com.Server.Student"%>


<!DOCTYPE html PUBLIC "-//W3C//DTD HTML 4.01 Transitional//EN" "http://www.w3.org/TR/html4/loose.dtd">
<html>
<head>
<meta http-equiv="Content-Type" content="text/html; charset=utf-8">
<title>用户登录页面</title>
</head>


<body>


<form action="check_servlet" method="post">
<center>
<table width="446" height="298" border="1">
  <tr>
    <td colspan="2" align="center">登录页面</td>
</tr>
  <tr>
    <td  width="92" align="center">用户名:</td>
    <td width="232"><input type="text" name="studentname"></td>
  </tr>
  <tr>
    <td align="center">密码:</td>
    <td><input type="password" name="studentpassword"></td>
  </tr>

  <tr>
    <td colspan="2" align="center"><input type="submit" value="登录"></td>
  </tr>
</table>
</center>
</form>


</body>
</html>
<%@page import="java.awt.Window"%>
<%@ page language="java" import="java.util.*" pageEncoding="utf-8"%>
<!DOCTYPE HTML PUBLIC "-//W3C//DTD HTML 4.01 Transitional//EN">
<html>
  <head>

    <title>显示结果页面</title>
<meta http-equiv="Content-Type" content="text/html; charset=utf-8">

  </head>


  <%
  String message = "";
  String Sid = request.getParameter("Sid");
  String getjava = request.getParameter("getjava");
  String c = request.getParameter("c");

  System.out.println(Sid+"score页面");
  String flag = request.getParameter("flag");
  if(flag!=null&&flag.equals("success"))
  {
  	message = "登录成功!";
  }else if(flag!=null&&flag.equals("false"))
  {
  	message = "登录失败!";
  	Sid = "无";
  	getjava = "无";
  	c = "无";
    }
 	 %>


  <body onload="jump()">

  <center>
  <%=message %><br>
  ID:<%=Sid %><br>
  Java成绩:<%=getjava %><br>
  c++成绩:<%=c %><br>
  <a href="student_login.jsp">返回登陆</a>

  </center>

    <script type="text/javascript">

  function jump()
  {
	  if(flag==false)
	 <%

	 %>

   }

  </script>


  </body>
</html>
3、DateDao.java 连接数据库及操作
package com.Server;

import java.sql.Connection;
import java.sql.DriverManager;
import java.sql.PreparedStatement;
import java.sql.ResultSet;
import java.sql.SQLException;
import java.sql.Statement;

public class DateDao
{


	public static Connection con = null;//定义连接
	public static Statement st = null;//定义statement
	public ResultSet result = null;//定义结果集
	public static String driver;//定义驱动
    public static String url;//定义URL
    public static String user;//定义用户名
    public static String password;//定义密码

	//建立与数据库连接的函数
	    public Connection getConn(){
	    	try {

		    	driver="com.mysql.jdbc.Driver";
		    	url="jdbc:mysql://localhost:3306/test2";
		    	user="root";
		    	password="";

					Class.forName(driver);

	            con = DriverManager.getConnection(url,user,password);//获取数据库连接
	            System.out.println("-------连接成功------");
	            }
	    	catch (SQLException e)
	        {
	        	e.printStackTrace();
			}
	    	catch (ClassNotFoundException e)
	    	{
				e.printStackTrace();
			}
	    	return this.con;
	    }


	public DateDao()
	{

		this.con=this.getConn();
		//构造函数,默认加裁配置文件为jdbc.driver
	}


	 // 执行数据库查询并返回查询结果
	 public  ResultSet query(String sql)
	 {
		 this.con=this.getConn();
		 try 	{
				st = con.createStatement();//获取Statement
				result = st.executeQuery(sql);//执行查询,返回结果集
				 } catch (Exception e)
					 {
				e.printStackTrace();
					 }
		return result;
	 }


	 //执行数据库更新
	    public void update(String sql)
	    {
	    	this.con=this.getConn();
		 try 	{
				st = con.createStatement();//获取Statement
				st.executeUpdate(sql);//执行查询,返回结果集
				 } catch (Exception e)
					 {
				e.printStackTrace();
					 }
	    }


	  //关闭数据库连接
	    public void close(){
	        try{
	            if (result != null)result.close();
	            if (st != null)st.close();
	            if (con != null)con.close();
	        }catch(Exception ex){
	            ex.printStackTrace();
	        }
	    }


}
4、Servlet调用DateDao操作数据库
package Servlet;

import java.io.IOException;
import java.sql.ResultSet;
import java.sql.SQLException;

import javax.servlet.ServletException;
import javax.servlet.http.HttpServlet;
import javax.servlet.http.HttpServletRequest;
import javax.servlet.http.HttpServletResponse;

import com.Server.DateDao;
import com.Server.Student;

public class check_servlet extends HttpServlet {
	private static final long serialVersionUID = 1L;


	protected void doGet(HttpServletRequest request, HttpServletResponse response) throws ServletException, IOException
	{
		doPost(request, response);
	}


	protected void doPost(HttpServletRequest request, HttpServletResponse response) throws ServletException, IOException
	{


		DateDao mysql = new DateDao();
		String context = request.getContextPath();


        String username = new String(request.getParameter("studentname").getBytes("iso-8859-1"),"utf-8");
        Integer userpassword = Integer.parseInt(request.getParameter("studentpassword"));


        System.out.println(username);
        System.out.println(userpassword);


        String sql = "select*from student where Sname='"+username+"' and Password='"+userpassword+"'";

        Student student= new Student(username,userpassword);


        	//验证登录
        	ResultSet rs = mysql.query(sql);
            try {
				if (rs.next()){

					//获取该成员ID
					Integer Sid = rs.getInt("Sid");
					System.out.println(Sid);
					mysql.close();//关闭连接

					//通过ID查询该成员成绩

					Integer getjava = 0;
					Integer c = 0;

					String scoresql = "select*from score where Sid ='"+Sid+"'";
					ResultSet rs1 = mysql.query(scoresql);

					if(rs1.next())
						{

						getjava = rs1.getInt("Java");
						System.out.println(getjava);

						c = rs1.getInt("c");
						System.out.println(c);

						mysql.close();//关闭连接
						}
					response.sendRedirect(context+"/student_score.jsp?flag=success&Sid="+Sid+"&getjava="+getjava+"&c="+c);

				}else{

					mysql.close();
					response.sendRedirect(context+"/student_score.jsp?flag=false&Sid=null");

				}
			} catch (SQLException e) {

				e.printStackTrace();
			}


	}

}