文章目录
前言
代码直接复制粘贴使用
一、AlertDialog用法
1.使用步骤
1.创建一个对话框生成器AlertDialog.Builder对象
2.设置AlertDialog.Builder对象的属性,图标,标题,内容等
3.调用create()方法创建一个对话框AlertDialog
4.调用AlertDialog的show()方法显示对话框
5.调用AlertDialog的dismiss()方法关闭对话框
2.AlertDialog.Builder对象的常用属性讲解
1.设置对话框的图标
setIcon(R.mipmap.ic_launcher)
2.设置对话框标题
setTitle("系统警告")
3.设置对话框内容
setMessage("电量过低,一分钟后将自动关机!")
4.设置点击对话框外的区域是否关闭对话框
setCancelable(false)
5.设置对话框按钮功能(系统提供的对话框有三个按钮。不设置则不显示,点击按钮后对话框会自动关闭)
第一个参数为按钮上显示的文字,第二个参数为按钮监听器
setNegativeButton("否", new DialogInterface.OnClickListener() {

    ...})
setNeutralButton("中", new DialogInterface.OnClickListener() {

    ...})
setPositiveButton("是", new DialogInterface.OnClickListener() {

    ...})
6.设置单选列表对话框
第一个参数为数组选项列表,第二个参数为选项监听器
setItems( new String[]{

    "A", "B", "C", "D", "E"}, new DialogInterface.OnClickListener() {

    ...})
7.设置多选列表对话框
第一个参数为数组选项列表,第二个参数为选项的默认选中状态,第三个参数为选项监听器
setMultiChoiceItems(new String[]{

    "A", "B", "C", "D", "E"}, new boolean[]{

    false, false, false, false, false}, new DialogInterface.OnMultiChoiceClickListener() {

    ...})
8.自定义对话框
参数为自定义布局
setView(view)
二、AlertDialog实例代码
提醒消息对话框
设置一个中性按钮即可,点击关闭对话框,还要设置点击对话框以外的区域关闭对话框
   public void alertDialog1() {


        AlertDialog.Builder builder = new AlertDialog.Builder(this);
        builder.setIcon(R.mipmap.ic_launcher)
                .setTitle("系统提示")
                .setMessage("电量过低,请尽快充电!")
                .setCancelable(true)
                .setNeutralButton("好的", new DialogInterface.OnClickListener() {


                    @Override
                    public void onClick(DialogInterface dialog, int which) {


                        Toast.makeText(MainActivity.this, "你点击了好的", Toast.LENGTH_SHORT).show();
                    }
                }).create().show();
    }
提问对话框
设置是和否两个按钮,设置点击对话框以外的区域不关闭对话框
    public void alertDialog2() {


        AlertDialog.Builder builder = new AlertDialog.Builder(this);
        builder.setIcon(R.mipmap.ic_launcher)
                .setTitle("系统提示")
                .setMessage("您确定要退出吗?")
                .setCancelable(false)
                .setNegativeButton("否", new DialogInterface.OnClickListener() {


                    @Override
                    public void onClick(DialogInterface dialog, int which) {


                        Toast.makeText(MainActivity.this, "你点击了否", Toast.LENGTH_SHORT).show();
                    }
                })
                .setPositiveButton("是", new DialogInterface.OnClickListener() {


                    @Override
                    public void onClick(DialogInterface dialog, int which) {


                        Toast.makeText(MainActivity.this, "你点击了是", Toast.LENGTH_SHORT).show();
                    }
                }).create().show();
    }
普通列表对话框
不用设置按钮,点击对应的选项后会自动关闭对话框
防止意外关闭选项框,所以设置以下点击对话框以外的区域不关闭对话框
    public void alertDialog3() {


        AlertDialog.Builder builder = new AlertDialog.Builder(this);
        String[] array = new String[]{

    "A", "B", "C", "D", "E"};
        builder.setIcon(R.mipmap.ic_launcher)
                .setTitle("单选题,请选择正确的答案!")
                .setCancelable(false)
                .setItems(array, new DialogInterface.OnClickListener() {


                    @Override
                    public void onClick(DialogInterface dialog, int which) {


                        Toast.makeText(MainActivity.this, "你选择了" + array[which], Toast.LENGTH_SHORT).show();
                    }
                }).create().show();
    }
多选列表对话框
需要监听选项,添加两个按钮,一个确定按钮,一个中性按钮,同样设置一下点击对话框以外的区域不关闭对话框
    public void alertDialog4() {


        AlertDialog.Builder builder = new AlertDialog.Builder(this);
        final String[] fruits = new String[]{

    "A", "B", "C", "D", "E"};
        boolean[] checkItems = new boolean[]{

    false, false, false, false, false};
        builder.setIcon(R.mipmap.ic_launcher)
                .setTitle("多选题,请选择正确的答案!")
                .setCancelable(false)
                .setMultiChoiceItems(fruits, checkItems, new DialogInterface.OnMultiChoiceClickListener() {


                    @Override
                    public void onClick(DialogInterface dialog, int which, boolean isChecked) {


                        checkItems[which] = isChecked;
                    }
                })
                .setPositiveButton("确定", new DialogInterface.OnClickListener() {


                    @Override
                    public void onClick(DialogInterface dialog, int which) {


                        String res = "";
                        for (int i = 0; i < checkItems.length; i++) {


                            if (checkItems[i])
                                res += fruits[i] + " ";
                        }
                        Toast.makeText(MainActivity.this, "你选择了:" + res, Toast.LENGTH_SHORT).show();
                    }
                })
                .setNeutralButton("关闭", new DialogInterface.OnClickListener() {


                    @Override
                    public void onClick(DialogInterface dialog, int which) {


                        Toast.makeText(MainActivity.this, "你点击了关闭", Toast.LENGTH_SHORT).show();
                    }
                }).create().show();
    }
自定义布局对话框
效果图:
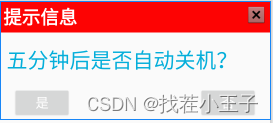
首先创建一个布局文件lyout.xml文件
然后在java代码中添加到AlertDialog中
<?xml version="1.0" encoding="utf-8"?>
<RelativeLayout xmlns:android="http://schemas.android.com/apk/res/android"
    android:layout_width="wrap_content"
    android:layout_height="wrap_content">

    <RelativeLayout
        android:id="@+id/rl1"
        android:layout_width="match_parent"
        android:layout_height="wrap_content"
        android:background="#FD0303"
        android:padding="5dp">

        <TextView
            android:layout_width="match_parent"
            android:layout_height="wrap_content"
            android:layout_centerVertical="true"
            android:text="提示信息"
            android:textColor="#ffffff"
            android:textSize="28dp"
            android:textStyle="bold" />

        <ImageButton
            android:id="@+id/btn_cancle"
            android:layout_width="wrap_content"
            android:layout_height="wrap_content"
            android:layout_alignParentRight="true"
            android:background="@android:drawable/btn_dialog" />

    </RelativeLayout>


    <RelativeLayout
        android:id="@+id/ly_detail"
        android:layout_width="match_parent"
        android:layout_height="wrap_content"
        android:layout_below="@+id/rl1">

        <TextView
            android:layout_width="wrap_content"
            android:layout_height="wrap_content"
            android:layout_marginLeft="10dp"
            android:layout_marginTop="20dp"
            android:text="五分钟后是否自动关机?"
            android:textColor="#04AEDA"
            android:textSize="32dp" />

    </RelativeLayout>

    <RelativeLayout
        android:layout_width="match_parent"
        android:layout_height="wrap_content"
        android:layout_below="@+id/ly_detail"
        android:layout_marginTop="20dp">

        <Button
            android:id="@+id/btn_yes"
            android:layout_width="wrap_content"
            android:layout_height="wrap_content"
            android:layout_alignParentLeft="true"
            android:layout_marginLeft="20dp"
            android:text="是"
            android:textColor="#ffffff"
            android:textSize="20sp" />

        <Button
            android:id="@+id/btn_no"
            android:layout_width="wrap_content"
            android:layout_height="wrap_content"
            android:layout_alignParentRight="true"
            android:layout_marginRight="20dp"
            android:text="否"
            android:textColor="#ffffff"
            android:textSize="20sp" />

    </RelativeLayout>

</RelativeLayout>
    public void alertDialog5() {


        View view = MainActivity.this.getLayoutInflater().inflate(R.layout.layout, null,false);
        AlertDialog.Builder builder = new AlertDialog.Builder(this);
        builder.setCancelable(false)
                .setView(view);
        AlertDialog alert = builder.create();
        alert.show();

        view.findViewById(R.id.btn_cancle).setOnClickListener(new View.OnClickListener() {


            @Override
            public void onClick(View v) {


                Toast.makeText(MainActivity.this, "你点击了右上角的X", Toast.LENGTH_SHORT).show();
                alert.dismiss();
            }
        });
        view.findViewById(R.id.btn_yes).setOnClickListener(new View.OnClickListener() {


            @Override
            public void onClick(View v) {


                Toast.makeText(MainActivity.this, "你点击了是", Toast.LENGTH_SHORT).show();
                alert.dismiss();
            }
        });
        view.findViewById(R.id.btn_no).setOnClickListener(new View.OnClickListener() {


            @Override
            public void onClick(View v) {


                Toast.makeText(MainActivity.this, "你点击了否", Toast.LENGTH_SHORT).show();
                alert.dismiss();
            }
        });
    }
三、ProgressDialog进度条对话框
使用方法
1.创建ProgressDialog对象
2.设置ProgressDialog对象的属性
3.调用ProgressDialog对象的show方法显示对话框
4.调用ProgressDialog对象的dismiss方法关闭对话框
ProgressDialog属性
AlertDialog.Builder对象的属性ProgressDialog都可以用,就不再赘述,重点是ProgressDialog新增的属性
1.setIndeterminate(true)
设置进度条是否显示进度,true为不显示进度,进度条会显示为无限动画,适用于应用安装等待的场景,false为显示进度,根据具体进度值显示
2.setProgressStyle(ProgressDialog.STYLE_HORIZONTAL);
设置进度条样式,STYLE_SPINNER为圆形,STYLE_HORIZONTAL为横线形,没有设置这个属性的时候默认为圆形
这个属性为圆形或者未设置这个属性时,设置setIndeterminate属性是无效的,因为系统提供的圆形进度条无法显示进度
3.setProgress(20);
设置进度条当前进度,总进度值为100
实例代码
代码讲解:
Handler用来更新进度条显示
TimerTask用来模拟应用下载并实时返回下载进度,每秒更新一次进度值,当进度达到100后,将进度条修改为不显示进度值的无限动画模拟应用安装,2秒后安装完成自动关闭对话框
MainActivity.java
public class MainActivity extends AppCompatActivity {


    private ProgressDialog pgDialog;
    private int gres = 0;

    Handler myHandler = new Handler() {


        @Override
        public void handleMessage(Message msg) {


            if (msg.what == 111) {


                pgDialog.setProgress(gres);
            }
            if (msg.what == 222) {


                pgDialog.setTitle("正在安装中");
                pgDialog.setMessage("正在安装中,请稍后...");
                pgDialog.setIndeterminate(true);
            }
        }
    };

    @Override
    protected void onCreate(Bundle savedInstanceState) {


        super.onCreate(savedInstanceState);
        setContentView(R.layout.activity_main2);
        alertDialog7();
    }
    public void alertDialog7() {


        pgDialog = new ProgressDialog(this);
        pgDialog.setIcon(R.mipmap.ic_launcher);
        pgDialog.setTitle("正在下载");
        pgDialog.setMessage("正在下载,请稍后...");
        pgDialog.setCancelable(true);
        pgDialog.setIndeterminate(false);
        pgDialog.setProgressStyle(ProgressDialog.STYLE_HORIZONTAL);
        pgDialog.show();

        //执行事务,每秒钟返回一次事务执行进度
        new Timer().schedule(new TimerTask() {


            @Override
            public void run() {


                gres = gres + 10;
                myHandler.sendEmptyMessage(111);
                if (gres >= 100) {


                    myHandler.sendEmptyMessage(222);
                    try {


                        Thread.sleep(3000);
                    } catch (InterruptedException e) {


                        e.printStackTrace();
                    }
                    pgDialog.dismiss();
                    cancel();
                }
            }
        }, 0, 1000);
    }
}
四、日期时间选择对话框
日期选择对话框
重点:
DatePickerDialog(日期选择对话框)的setOnDateSetListener方法,监听选择的日期
基本用法实例:
创建DatePickerDialog对象时携带参数,参数依次为(上下文,OnDateSetListener()监听器,年,月,日 )
弹出的日期选择框中默认为参数中的年月日
需要注意的是月份一定要+1才是正确的
public void createDialog2(){


	DatePickerDialog dpDialog = new DatePickerDialog(this, new DatePickerDialog.OnDateSetListener() {


		@Override
    	public void onDateSet(DatePicker view, int year, int month, int dayOfMonth) {


    		String result = "你选择的是"+year+"年"+(month+1)+"月"+dayOfMonth+"日";
        	Toast.makeText(getApplicationContext(), result, Toast.LENGTH_SHORT).show();
    	}
	},2012,8,12);
	dpDialog.show();
}
时间选择对话框
重点:
TimePickerDialog(时间选择对话框)的setOnTimeSetListener方法,监听选择的时间
基本用法实例:
创建TimePickerDialog对象时携带参数,参数依次为(上下文,OnTimeSetListener监听器;小时,分钟,是否采用24小时制)
弹出的日期选择框中默认为参数中的小时分钟
    public void createDialog3(){


        TimePickerDialog dpDialog = new TimePickerDialog(this, new TimePickerDialog.OnTimeSetListener() {


            @Override
            public void onTimeSet(TimePicker view, int hourOfDay, int minute) {


                String result = "你选择的是"+hourOfDay+"时"+(minute+1)+"分";
                Toast.makeText(getApplicationContext(), result, Toast.LENGTH_SHORT).show();
            }
        },16,45,true);
        dpDialog.show();
    }
选择日期范围实例代码
public class MainActivity4 extends AppCompatActivity {


    DatePickerDialog dpDialog;
    DatePickerDialog dpDialog2;
    int start_year;
    int start_month;
    int start_day;
    String result = null;

    @Override
    protected void onCreate(Bundle savedInstanceState) {


        super.onCreate(savedInstanceState);
        setContentView(R.layout.activity_main4);
        createDialog4();
    }

    public void createDialog4() {


        Calendar cale = Calendar.getInstance();
        dpDialog = new DatePickerDialog(MainActivity4.this, new DatePickerDialog.OnDateSetListener() {


            @Override
            public void onDateSet(DatePicker view, int year, int month, int dayOfMonth) {


                start_year = year;
                start_month = month + 1;
                start_day = dayOfMonth;

                dpDialog2 = new DatePickerDialog(MainActivity4.this, new DatePickerDialog.OnDateSetListener() {


                    @Override
                    public void onDateSet(DatePicker view, int year, int month, int dayOfMonth) {


                        result = "你选择的日期范围为" + start_year + "年" + start_month + "月" + start_day + "日" + " - " + year + "年" + (month + 1) + "月" + dayOfMonth + "日";
                        Toast.makeText(getApplicationContext(), result, Toast.LENGTH_SHORT).show();
                    }
                }, start_year, start_month, start_day + 7); //设置终止日志选择框默认日期为起始日期+7天
                dpDialog2.setMessage("请选择终止日期");
                dpDialog2.show();
            }
        }, cale.get(Calendar.YEAR), cale.get(Calendar.MONTH), cale.get(Calendar.DAY_OF_MONTH)); //设置起始日期选择框默认日期为今天
        dpDialog.setMessage("请选择起始日期");
        dpDialog.show();
    }

}