1 圆角方案简介
UGUI 中的 Image 实现圆角效果通常有三种方式,Mask、Shader以及自定义顶点数据,相比于前两者,自定义顶点数据的使用方式更加灵活,同时可以减少 DrawCall,但是会增加顶点及三角形数量。最终实现方案可根据实际情况选择,水不深,自己把握
2 实现方案
1 修改顶点数据
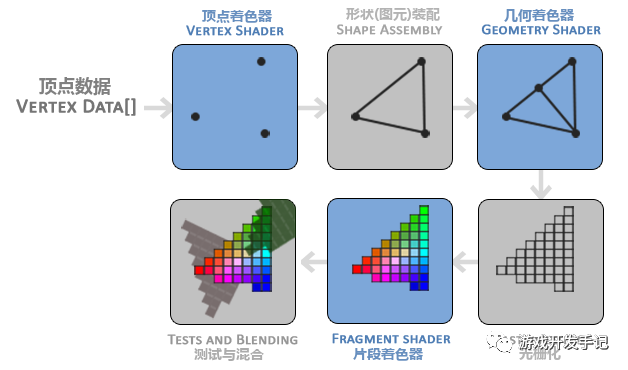
渲染流程这里不再赘述,可以简单回顾下渲染管线的每个阶段:
我们要修改的就是发送给 GPU 的顶点数据, 在 Unity 的 Image 组件中,可以使用 OnPopulateMesh 函数来修改顶点数据
关于 OnPopulateMesh,在之前的 强制新手引导 中也介绍过,这里再重复一遍
API:
protected virtual void OnPopulateMesh(VertexHelper vh);
UI 元素需要生成顶点时的回调函数,通常用于自定义 UI 元素的渲染,可以通过重写该方法来实现自定义的 UI 元素渲染效果
vh 参数是一个 VertexHelper 类型的对象,用于生成网格数据。在该方法中,可以通过调用 VertexHelper 的方法来添加顶点、三角形和颜色等信息,从而生成网格数据
在重写该方法时,需要注意以下几点:
-
在方法中添加顶点、三角形和颜色等信息时,需要按照一定的顺序添加,以确保生成的网格数据正确无误
-
在方法中添加顶点、三角形和颜色等信息时,需要注意坐标系的转换,以确保生成的网格数据与 UI 元素的位置和大小一致
-
在方法中添加顶点、三角形和颜色等信息时,需要注意性能问题,尽量避免生成过多的网格数据,以提高渲染效率
2 填充三角形

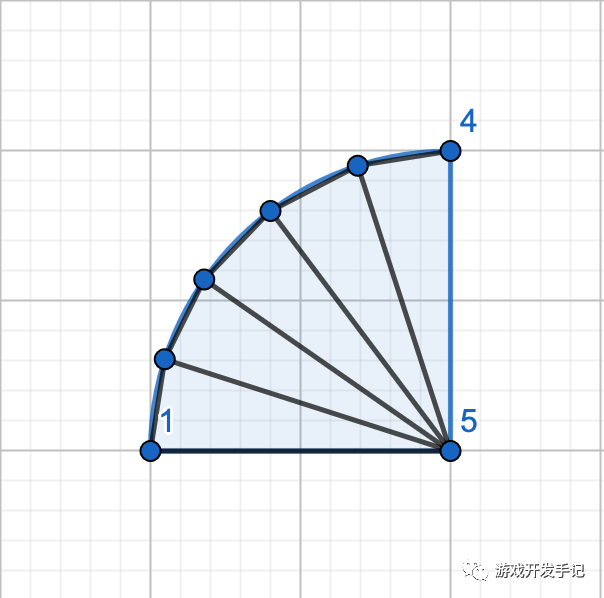
将矩形分割成三个矩形(左边、中间、右边)和四个扇形(四个角)
先将所有顶点都放入 VertexHelper 中:
vh.Clear();

// 0 1 2 3
vh.AddVert(new Vector3(left, top), color32, new Vector2(outerUV.x, outerUV.w));
vh.AddVert(new Vector3(left, top - r), color32, new Vector2(outerUV.x, outerUV.w - uvRadiusY));
vh.AddVert(new Vector3(left, bottom + r), color32, new Vector2(outerUV.x, outerUV.y + uvRadiusY));
vh.AddVert(new Vector3(left, bottom), color32, new Vector2(outerUV.x, outerUV.y));

// 4 5 6 7
vh.AddVert(new Vector3(left + r, top), color32, new Vector2(outerUV.x + uvRadiusX, outerUV.w));
vh.AddVert(new Vector3(left + r, top - r), color32,
    new Vector2(outerUV.x + uvRadiusX, outerUV.w - uvRadiusY));
vh.AddVert(new Vector3(left + r, bottom + r), color32,
    new Vector2(outerUV.x + uvRadiusX, outerUV.y + uvRadiusY));
vh.AddVert(new Vector3(left + r, bottom), color32, new Vector2(outerUV.x + uvRadiusX, outerUV.y));

// 8 9 10 11
vh.AddVert(new Vector3(right - r, top), color32, new Vector2(outerUV.z - uvRadiusX, outerUV.w));
vh.AddVert(new Vector3(right - r, top - r), color32,
    new Vector2(outerUV.z - uvRadiusX, outerUV.w - uvRadiusY));
vh.AddVert(new Vector3(right - r, bottom + r), color32,
    new Vector2(outerUV.z - uvRadiusX, outerUV.y + uvRadiusY));
vh.AddVert(new Vector3(right - r, bottom), color32, new Vector2(outerUV.z - uvRadiusX, outerUV.y));

// 12 13 14 15
vh.AddVert(new Vector3(right, top), color32, new Vector2(outerUV.z, outerUV.w));
vh.AddVert(new Vector3(right, top - r), color32, new Vector2(outerUV.z, outerUV.w - uvRadiusY));
vh.AddVert(new Vector3(right, bottom + r), color32, new Vector2(outerUV.z, outerUV.y + uvRadiusY));
vh.AddVert(new Vector3(right, bottom), color32, new Vector2(outerUV.z, outerUV.y));
组装三个矩形,其对应的六个三角形分别是:(2, 5, 1)、(2, 5, 6)、(7, 8, 4)、(7, 8, 11)、(10, 13, 9)、(10, 13, 14)
// 左边矩形
vh.AddTriangle(2, 5, 1);
vh.AddTriangle(2, 5, 6);
// 中间矩形
vh.AddTriangle(7, 8, 4);
vh.AddTriangle(7, 8, 11);
// 右边矩形
vh.AddTriangle(10, 13, 9);
vh.AddTriangle(10, 13, 14);
组装四个扇形,分别是:(1,5,4)、(2,6,7)、(8,9,13)、(11,10,14),每个扇形需要用若干个三角形来模拟,三角形数量越多,边缘越平滑,但对应的开销越大
List<Vector2> positionList = new List<Vector2>();
List<Vector2> uvList = new List<Vector2>();
List<int> vertexList = new List<int>();

// 右上角圆心
positionList.Add(new Vector2(right - r, top - r));
uvList.Add(new Vector2(outerUV.z - uvRadiusX, outerUV.w - uvRadiusY));
vertexList.Add(9);

// 左上角的圆心
positionList.Add(new Vector2(left + r, top - r));
uvList.Add(new Vector2(outerUV.x + uvRadiusX, outerUV.w - uvRadiusY));
vertexList.Add(5);

// 左下角圆心
positionList.Add(new Vector2(left + r, bottom + r));
uvList.Add(new Vector2(outerUV.x + uvRadiusX, outerUV.y + uvRadiusY));
vertexList.Add(6);

// 右下角圆心
positionList.Add(new Vector2(right - r, bottom + r));
uvList.Add(new Vector2(outerUV.z - uvRadiusX, outerUV.y + uvRadiusY));
vertexList.Add(10);

// 每个三角形角度
float degreeDelta = Mathf.PI / 2 / this.cornerSegments;

// 当前的角度
float degree = 0;
for (int i = 0; i < vertexList.Count; i++)
{
    int currentVertCount = vh.currentVertCount;
    for (int j = 0; j <= this.cornerSegments; j++)
    {
        float cos = Mathf.Cos(degree);
        float sin = Mathf.Sin(degree);
        Vector3 position = new Vector3(positionList[i].x + cos * r, positionList[i].y + sin * r);
        Vector3 uv0 = new Vector2(uvList[i].x + cos * uvRadiusX,
            uvList[i].y + sin * uvRadiusY);
        vh.AddVert(position, color32, uv0);
        degree += degreeDelta;
    }

    degree -= degreeDelta;
    for (int j = 0; j <= this.cornerSegments - 1; j++)
    {
        vh.AddTriangle(vertexList[i], currentVertCount + j + 1, currentVertCount + j);
    }
}
3 扩展 Inspector
由于脚本是直接继承 Image,脚本中定义的 public 变量不会在 Inspector 面板上显示,所以需要自己扩展面板,方便调节参数:
#if UNITY_EDITOR
[CustomEditor(typeof(BorderRadius), true)]
public class BorderRadiusEditor : ImageEditor
{
    SerializedProperty _sprite;
    SerializedProperty _cornerRadius;
    SerializedProperty _cornerSegments;

    protected override void OnEnable()
    {
        base.OnEnable();

        this._sprite = this.serializedObject.FindProperty("m_Sprite");
        this._cornerRadius = this.serializedObject.FindProperty("cornerRadius");
        this._cornerSegments = this.serializedObject.FindProperty("cornerSegments");
    }

    public override void OnInspectorGUI()
    {
        this.serializedObject.Update();

        this.SpriteGUI();
        this.AppearanceControlsGUI();
        this.RaycastControlsGUI();
        bool showNativeSize = this._sprite.objectReferenceValue != null;
        this.m_ShowNativeSize.target = showNativeSize;
        this.MaskableControlsGUI();
        this.NativeSizeButtonGUI();
        EditorGUILayout.PropertyField(this._cornerRadius);
        EditorGUILayout.PropertyField(this._cornerSegments);
        this.serializedObject.ApplyModifiedProperties();
    }
}
#endif
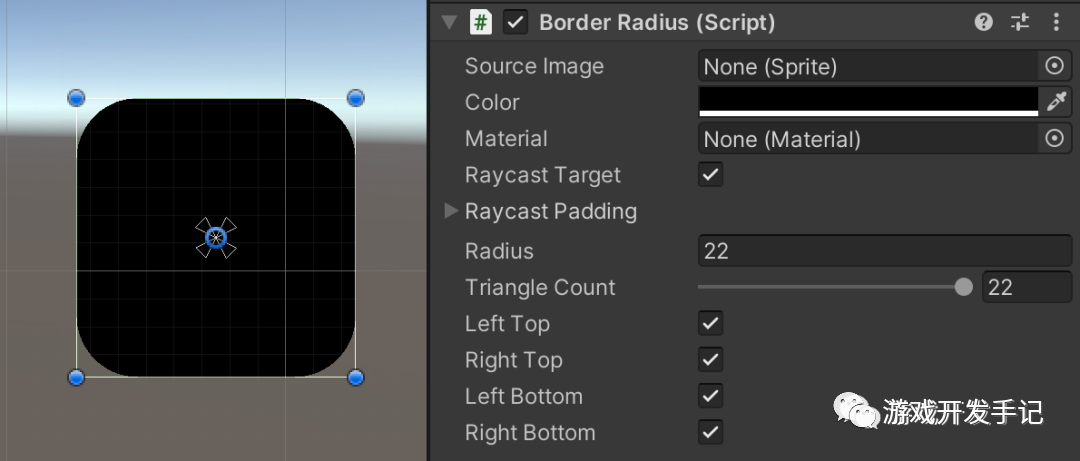
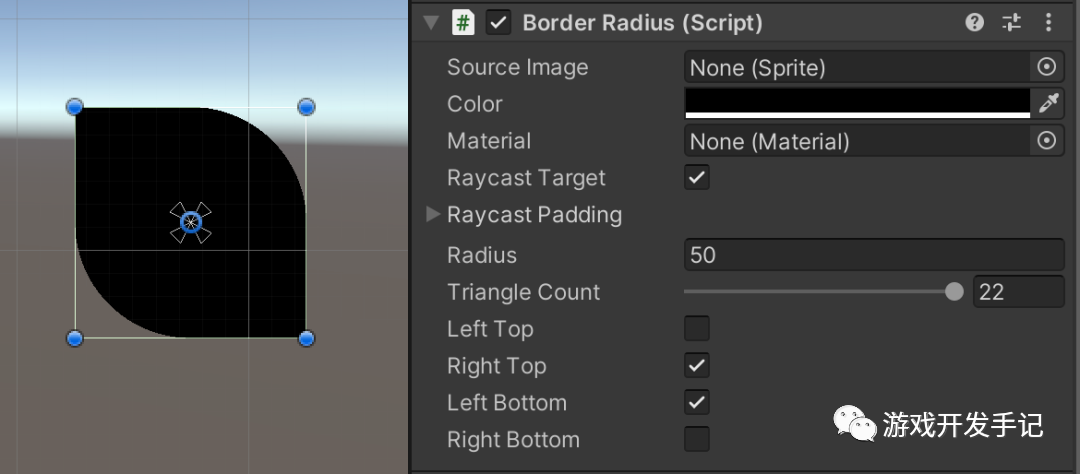
圆角效果:
4 定制圆角
为了视觉体验,多数情况下矩形并非四个角都是圆角,实现该效果只需要在进行圆角的顶点计算时,判断如果是非圆角,则直接填充该扇形对应的矩形:
if (i == 0 && !this.rightTop)
{
    vh.AddTriangle(vertexList[i], 8, 12);
    vh.AddTriangle(vertexList[i], 12, 13);
    continue;
}

if (i == 1 && !this.leftTop)
{
    vh.AddTriangle(vertexList[i], 0, 4);
    vh.AddTriangle(vertexList[i], 0, 1);
    continue;
}

if (i == 2 && !this.leftBottom)
{
    vh.AddTriangle(vertexList[i], 3, 2);
    vh.AddTriangle(vertexList[i], 3, 7);
    continue;
}

if (i == 3 && !this.rightBottom)
{
    vh.AddTriangle(vertexList[i], 15, 14);
    vh.AddTriangle(vertexList[i], 15, 11);
    continue;
}
左上和右上非圆角:
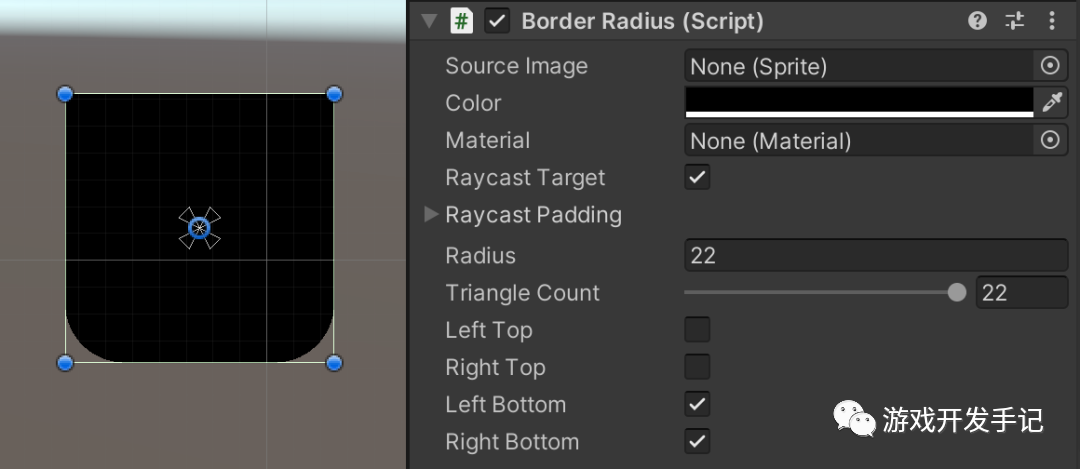
左下和右上非圆角:
「完整代码公众号回复:圆角矩形」
❝
更多源码,请扫码获取
❞