文章目录
一、Vue3介绍
1.性能的提升
- 打包大小减少41%
- 初次渲染快55%, 更新渲染快133%
- 内存减少54%
2.源码的升级
- 使用Proxy代替defineProperty实现响应式
- 重写虚拟DOM的实现和Tree-Shaking
3.拥有TypeScript
- Vue3可以更好的支持TypeScript
4.新的特新
-
Composition API(组合API)
– Setup配置
– ref与reactive
– watch与watchEffect
– provide与inject -
新的内置组件
– Fragment
– Teleport
– Suspense -
其他改变
– 新的生命周期钩子
– data 选项应始终被声明为一个函数
– 移除keyCode支持作为 v-on 的修饰符
5.组合式API和配置项API
-
Options API 存在的问题
– 使用传统OptionsAPI中,新增或者修改一个需求,就需要分别在data,methods,computed里修改 。 -
Composition API的优势
–我们可以更加优雅的组织我们的代码,函数。让相关功能的代码更加有序的组织在一起。
二、Vue3项目创建
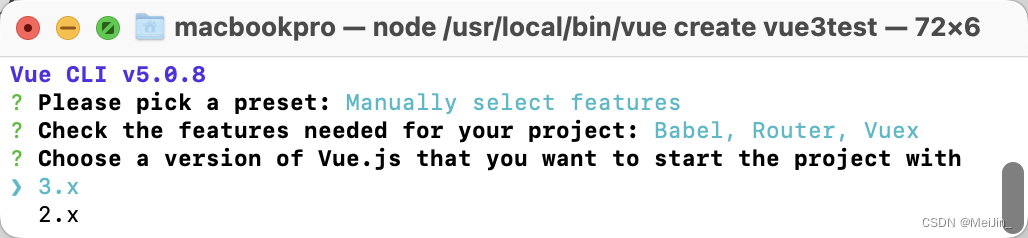
- Vue-cli安装Vue3
vue create 名称		// 选择需要的配置 到版本选择3.X即可
npm run server		// 运行服务器
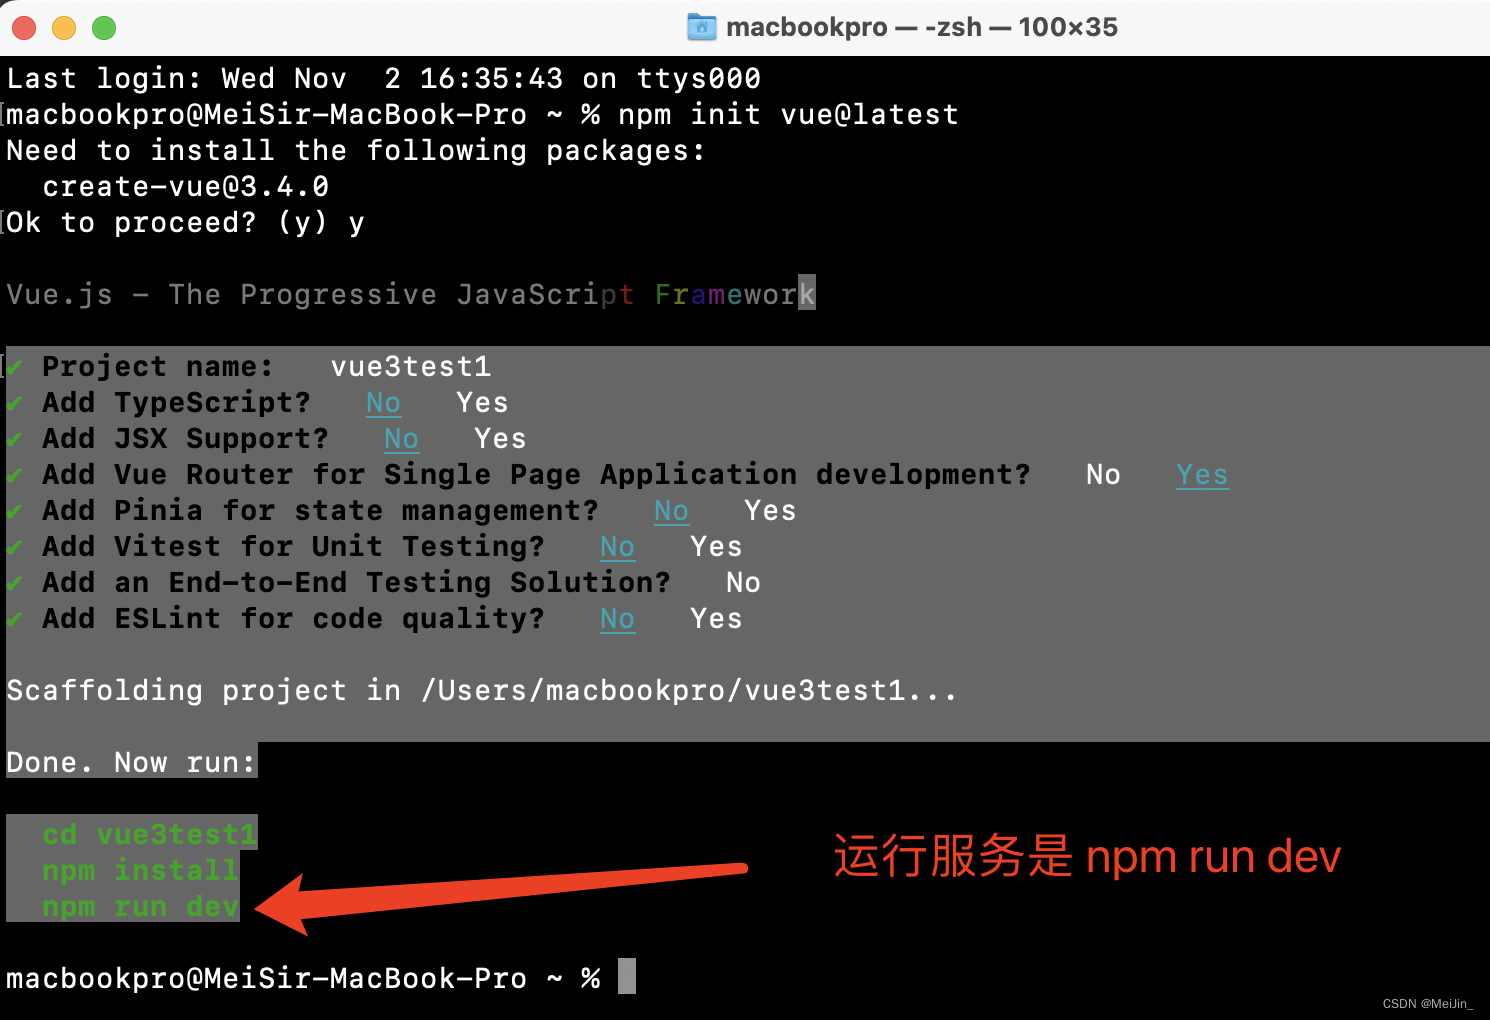
- Vite创建Vue3
npm init vue@latest		// 根据自己的需求选择功能
npm install				// 注意这个方式创建是没有node_modules的
npm run dev				// 运行服务器
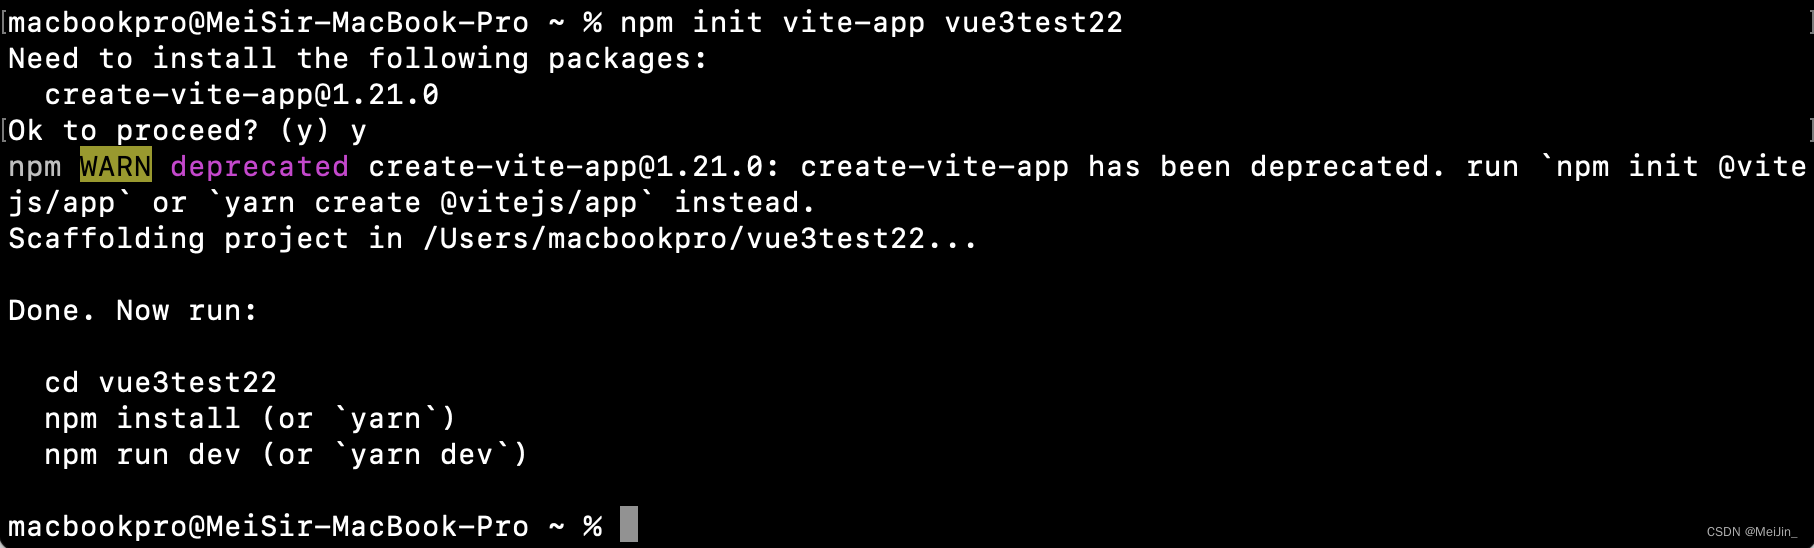
- Vite创建Vue(方式二)
npm init vite-app 项目名称 	// 默认功能是全不选的
npm install 				// 安装 依赖
npm run dev					// 运行服务
三、Setup
Vue3中新增Setup配置项函数 在里面定义函数变量 必须return 才能在模版中使用
<template>
  <div>
    <h1> APP Setup</h1>
    <h3>我是{

    {

    name}}</h3>
    <h3>今年{

    {

    age}}</h3>
    <button @click="leftClick">点我看帅哥</button>
    <button @click="addAge">点我年龄+1</button>
  </div>
  <router-view/>
</template>

<script>
export default{

                       // Vue3中所有的变量 函数编写 都写在Setup函数中
  setup(){


    // console.log(this.name)       // Vue3中没有This
    let name = 'Like'
    let age = 20

    function leftClick() {


      alert('帅哥!!')
    }

    let addAge = () => {


      console.log('开始加啦!')
      age++                       // 发现问题 渲染没有问题 但是没有响应式 页面底层变了 变量没变
      console.log(age)
    }

    return {

                        // 函数 变量 都需要返回
      age, name, leftClick, addAge
    }
  }
}
</script>
四、ref与reactive
使用Ref 和 Reactive需要导入
import {

    ref, reactive} from "vue";
基本数据类型(数组 字符串 布尔)如果想要添加响应式 可以直接使用Ref包裹 通过变量名.Value来修改
对象 数组如果想要添加响应式需要使用Reactive包裹 通过变量.属性来修改
<template>
  <div>
    <h1> APP Setup</h1>
    <h3>我是{

    {

    name.name}}</h3>    <!-- reactive的用法 -->
    <h3>今年{

    {

    age}}</h3>      	  <!-- ref 的用法 -->
    <button @click="leftClick">点我看帅哥</button>
    <button @click="addAge">点我年龄+1</button>
  </div>
  <router-view/>
</template>

<script>

import {

    ref, reactive} from "vue";

export default{


  setup(){


    // console.log(this.name)       // Vue3中没有This
    let name = reactive({

    name:'like', height:180})      // 需要放在一个对象里面
    let age = ref(20)

    function leftClick() {


      name.name = name.name + '?'
      console.log(name)           // 这个时候我们可以看到name是一个Proxy对象 可以通过名称直接拿值
    }

    let addAge = () => {


      console.log('开始加啦!', age)   // 这个时候我们打印age发现是一个RefImpl对象 中有一个Value就是我们的数据值
      age.value = age.value+1                      // 发现问题 渲染没有问题 但是没有响应式 页面底层变了 变量没变
      console.log(age.value)
    }

    return {

                        // 函数 变量 都需要返回
      age, name, leftClick, addAge,
    }
  }
}
</script>

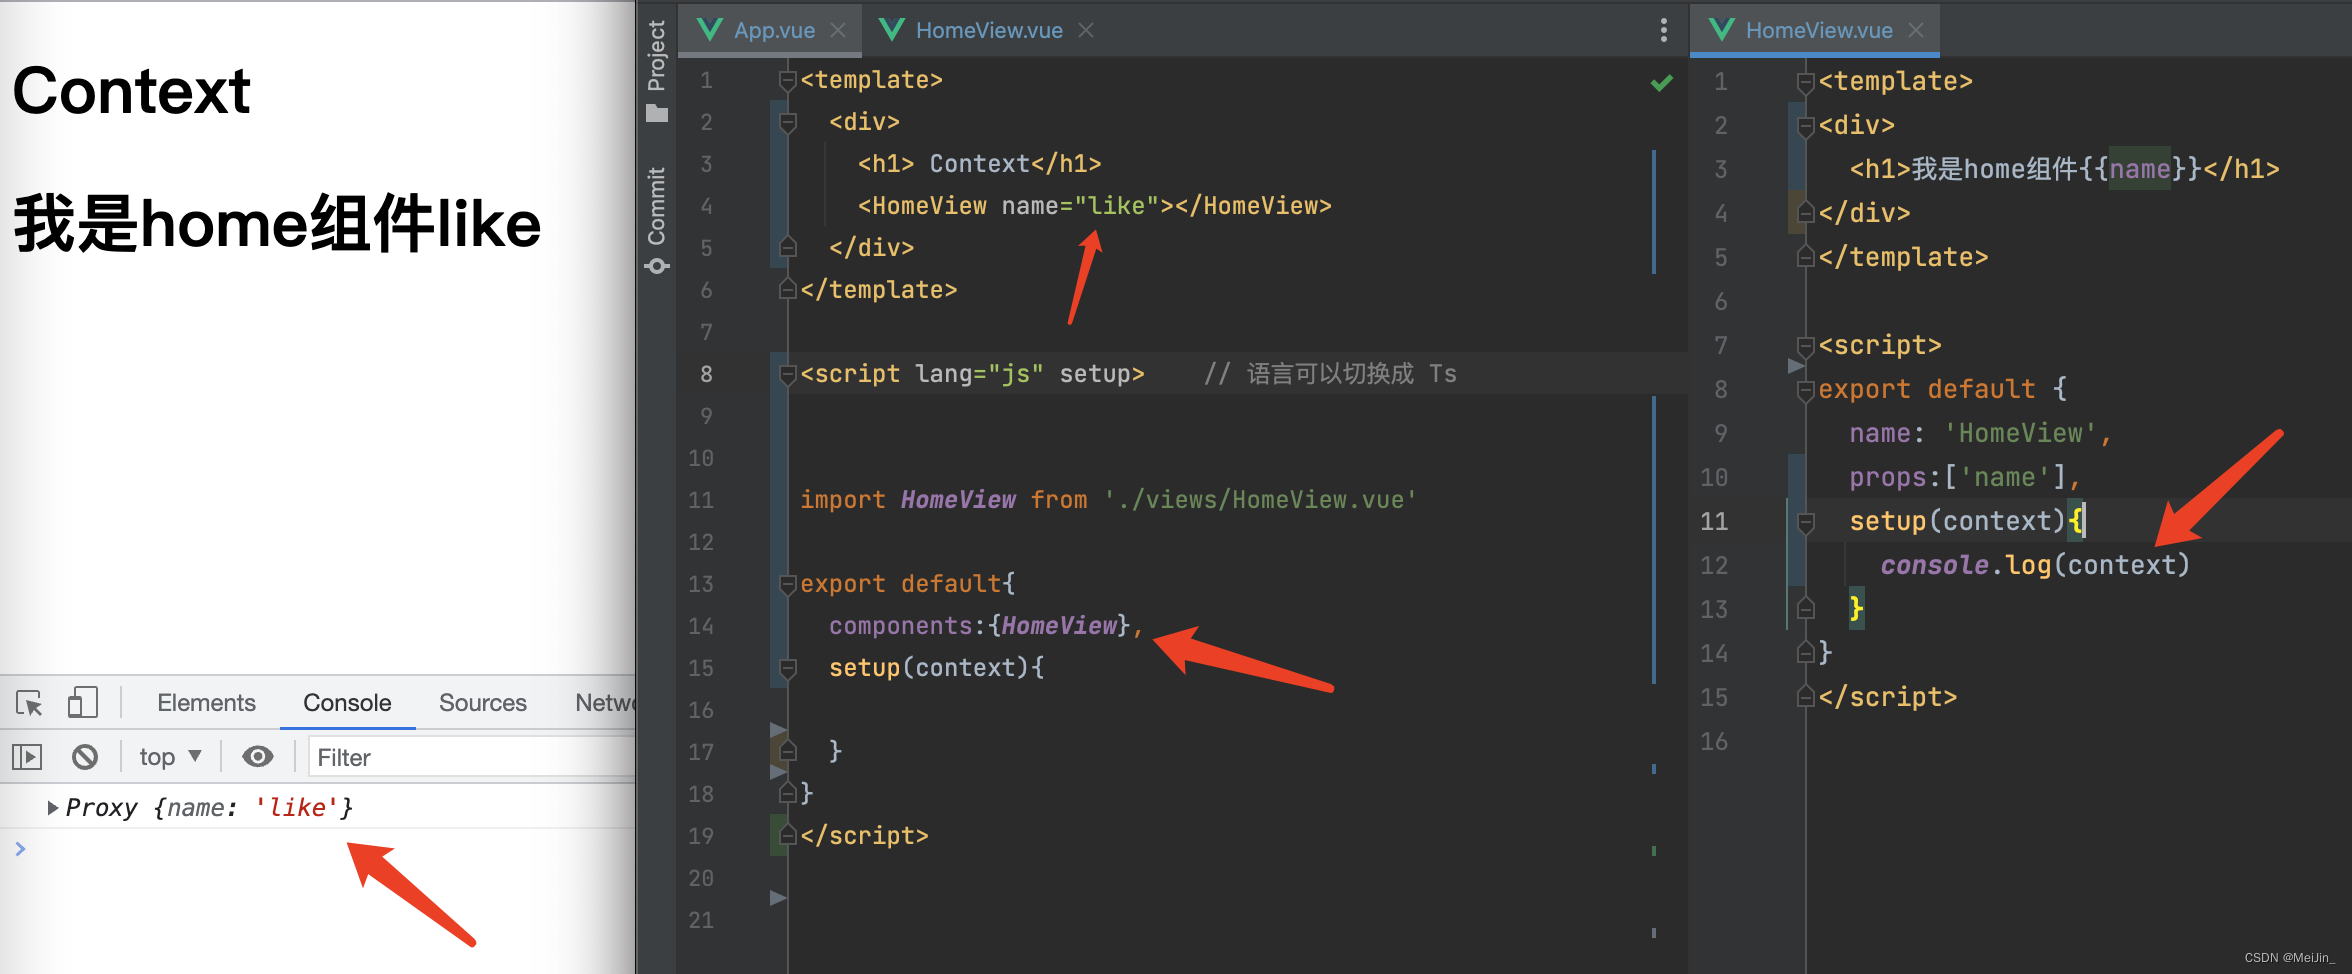
五、setup-context
上下文的作用就是可以接收参数 context 内部函数props接受的自定义属性
组件
	<template>
	<div>
	  <h1>我是home组件{

    {

    name}}</h1>
	</div>
	</template>

	<script>
	export default {


	  name: 'HomeView',
	  props:['name'],
	  setup(context){


	    console.log(context)
	  }
	}
	</script>


App.vue
	<template>
  <div>
    <h1> Context</h1>
    <HomeView name="like"></HomeView>
  </div>
</template>

<script lang="js" setup>    // 语言可以切换成 Ts


import HomeView from './views/HomeView.vue'

export default{


  components:{

    HomeView},
}
</script>
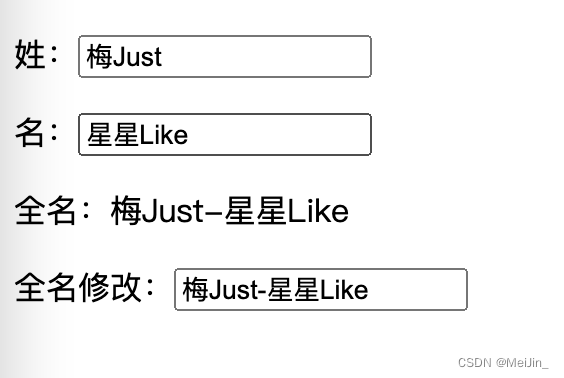
六、计算属性
与Vue2中的computed配置功能一致(案例:当姓名都发生变化的时候 其他也跟着变换)
<template>
  <p>姓:<input type="text" v-model="person.firstName"></p>
  <p>名:<input type="text" v-model="person.lastName"></p>
  <p>全名:{

    {

     person.fullName }}</p>
  <p>全名修改:<input type="text" v-model="person.fullName"></p>

</template>

<script>

import {

    ref, reactive} from 'vue'
import {

    computed} from 'vue'

export default {


  name: 'App',
  setup() {


    const person = reactive({


      firstName: '梅',
      lastName: '星星'
    })

    // let fullName = computed(() => {


      // return person.firstName + '-' + person.lastName
    })
    // 或者,传入箭头函数
    // person.fullName=computed(() => {


      // return person.firstName + '-' + person.lastName
    })
    // 修改,传入配置项目
    person.fullName = computed({


      get() {


        return person.firstName + '-' + person.lastName
      },
      set(value) {


        const nameArr = value.split('-')
        person.firstName = nameArr[0]
        person.lastName = nameArr[1]
      }
    })
    return {

    person}
  },
}
</script>
七、监听属性
<template>
  <h2>年龄是:{

    {

     age }}</h2>
  <button @click="age++">点我年龄增加</button>
  <hr>
  <h2>姓名是:{

    {

     person.name }}</h2>
  <button @click="person.name+='?'">点我姓名变化</button>
  <hr>
  <h2>sum是:{

    {

     sum }},msg是:{

    {

     msg }}</h2>
  <button @click="sum++">点我sum变化</button>
  |
  <button @click="msg+='?'">点我msg变化</button>

</template>

<script>

import {

    ref, reactive} from 'vue'
import {

    watch} from 'vue'

export default {


  name: 'App',
  setup() {


    const age = ref(19)
    const person = reactive({


      name: 'Like',
      age: 20
    })
    //1 监听普通
    watch(age, (newValue, oldValue) => {


      console.log('sum变化了', newValue, oldValue)
    })
    // 2 监听对象
    watch(() => person.name, (newValue, oldValue) => {


      console.log('person.name变化了', newValue, oldValue)
    })
    // 3 监听多个
    const sum = ref(100)
    const msg = ref('很好')

    watch([sum, msg], (newValue, oldValue) => {


      console.log('sum或msg变化了', newValue, oldValue)
    })
    return {

    person, age, sum, msg}
  },
}
</script>

八、Vue3生命周期
Vue3.0中可以继续使用Vue2.x中的生命周期钩子,但有有两个被更名:
- beforeDestroy改名为 beforeUnmount
- destroyed改名为 unmounted
Vue3.0也提供了 Composition API 形式的生命周期钩子,与Vue2.x中钩子对应关系如下:
- beforeCreate====>setup()
- created========>setup()
- beforeMount ====>onBeforeMount
- mounted========>onMounted
- beforeUpdate====>onBeforeUpdate
- updated ========>onUpdated
- beforeUnmount ==>onBeforeUnmount
- unmounted =====>onUnmounted

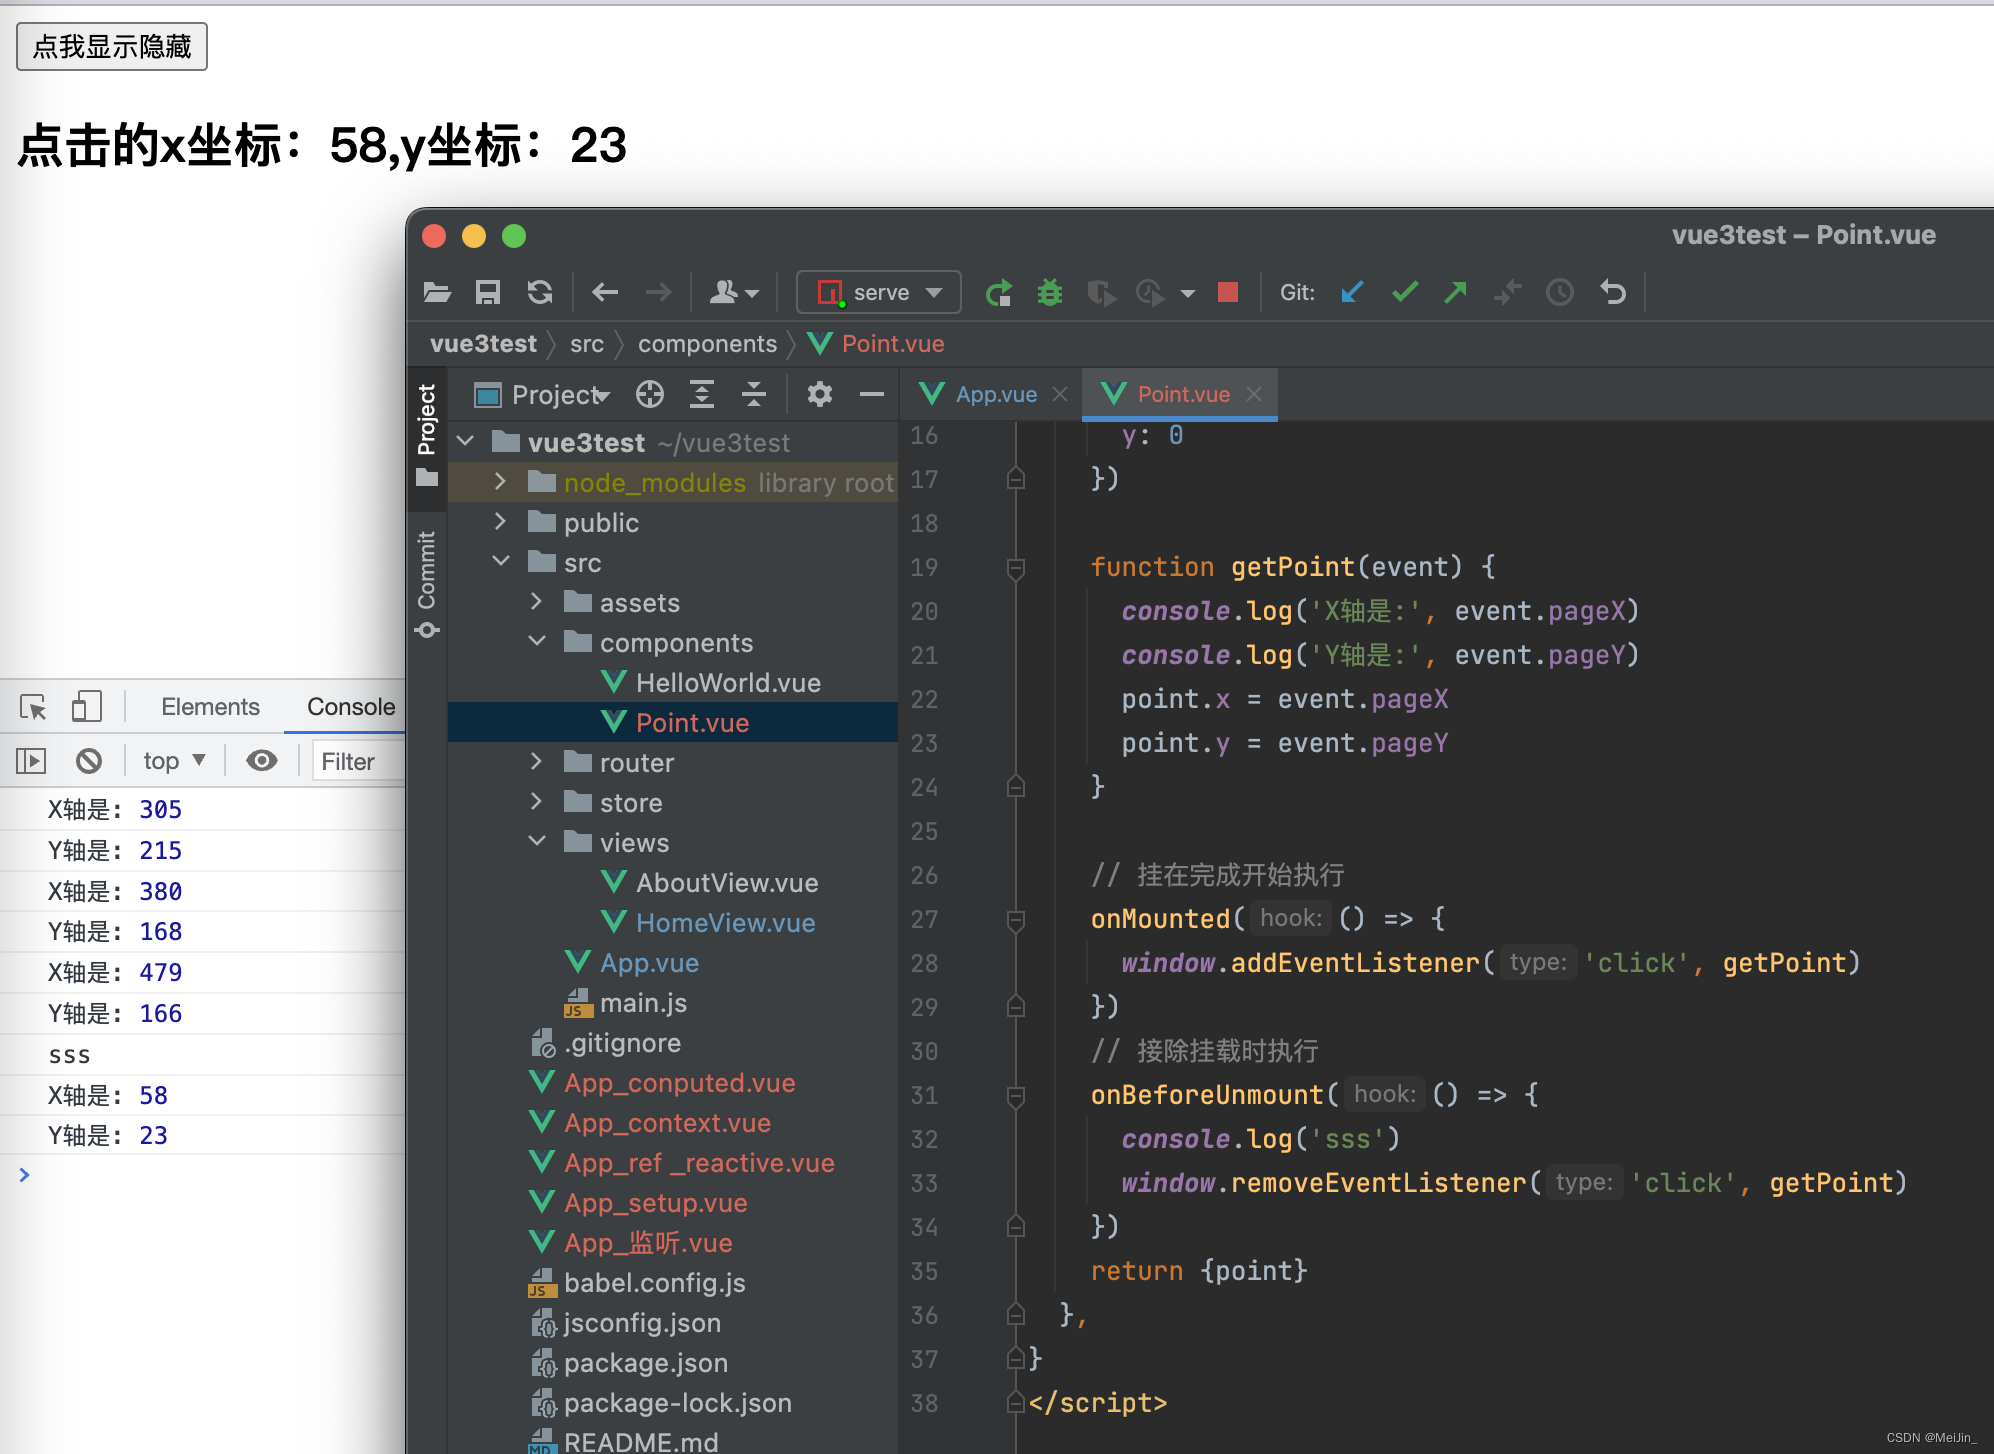
九、自定义hook函数
什么是hook?
本质是一个函数,把setup函数中使用的Composition API进行了封装,类似于vue2.x中的mixin,自定义hook的优势: 复用代码, 让setup中的逻辑更清楚易懂。
打点功能示例
<template>
  <h2>点击的x坐标:{

    {

     point.x }},y坐标:{

    {

     point.y }}</h2>
</template>

<script>
import {

    reactive} from 'vue'
import {

    onMounted, onBeforeUnmount} from 'vue'

export default {


  name: 'Point',
  setup() {


    const point = reactive({


      x: 0,
      y: 0
    })

    function getPoint(event) {


      console.log('X轴是:', event.pageX)
      console.log('Y轴是:', event.pageY)
      point.x = event.pageX
      point.y = event.pageY
    }

    // 挂在完成开始执行
    onMounted(() => {


      window.addEventListener('click', getPoint)
    })
    // 接除挂载时执行
    onBeforeUnmount(() => {


      console.log('sss')
      window.removeEventListener('click', getPoint)
    })
    return {

    point}
  },
}
</script>
<template>
  <div>
    <button @click="isShow=!isShow">点我显示隐藏</button>
    <Point v-if="isShow"></Point>
  </div>
</template>

<script>
import {

    ref, reactive} from 'vue'
import Point from "./components/Point.vue";
import Demo from './components/HelloWorld.vue'

export default {


  name: 'App',
  components: {

    Demo, Point},
  setup() {


    const isShow = ref(true)
    return {

    isShow}
  },
}
</script>
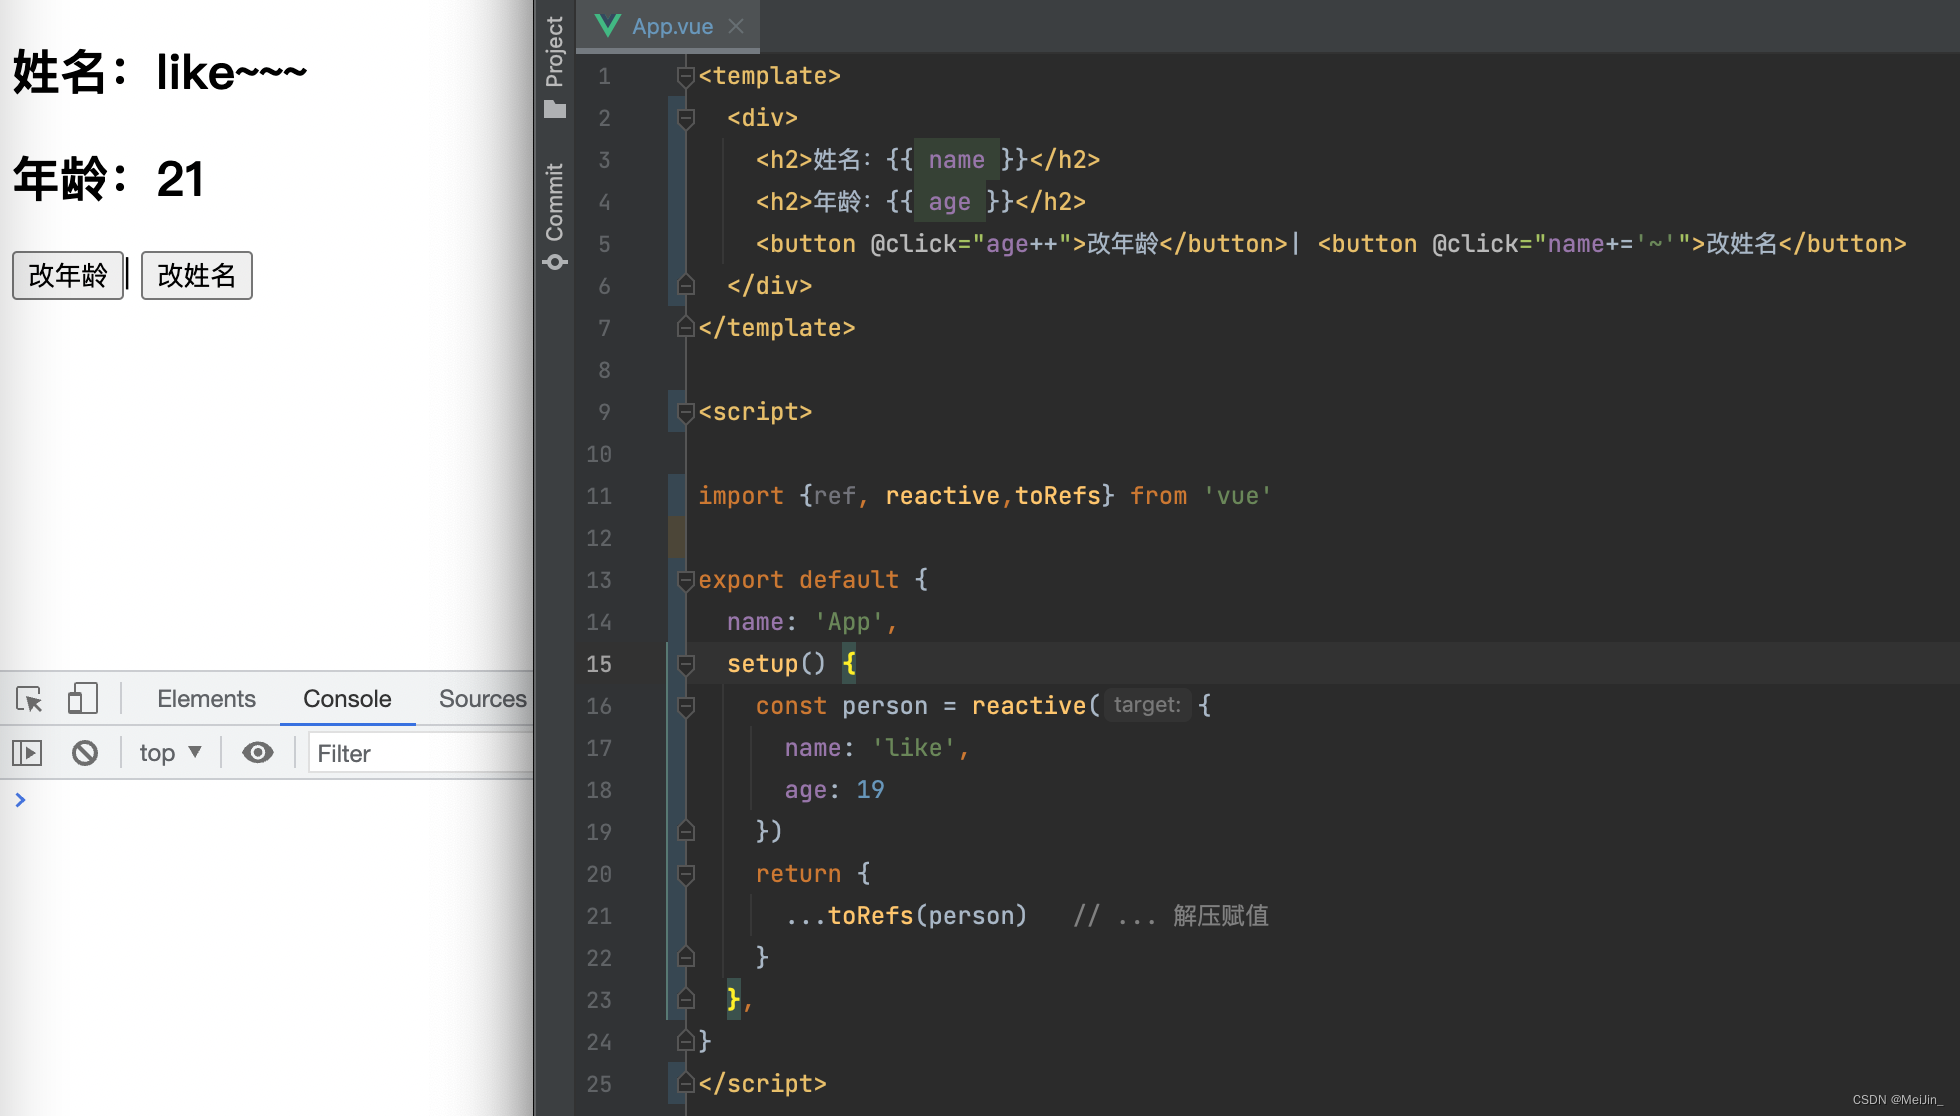
十、toRef
- toRef的作用:创建一个 ref 对象,其value值指向另一个对象中的某个属性。
- 语法:const name =
toRef(person,'name') - 应用: 要将响应式对象中的某个属性单独提供给外部使用时。
- 扩展:
toRefs与toRef功能一致,但可以批量创建多个ref 对象,语法:toRefs(person)
<template>
  <div>
    <h2>姓名:{

    {

     name }}</h2>
    <h2>年龄:{

    {

     age }}</h2>
    <button @click="age++">改年龄</button>| <button @click="name+='~'">改姓名</button>
  </div>
</template>

<script>

import {

    ref, reactive,toRefs} from 'vue'

export default {


  name: 'App',
  setup() {


    const person = reactive({


      name: 'like',
      age: 19
    })
    return {


      ...toRefs(person)   // ... 解压赋值
    }
  },
}
</script>
技术小白记录学习过程,有错误或不解的地方请指出,如果这篇文章对你有所帮助请
点点赞收藏+关注谢谢支持 !!!